


In this post, I will demonstrate different methods to enable memory integrity on Windows 11. By turning on the core isolation’s memory integrity feature in Windows 11, you can help prevent malicious code from accessing high-security processes in the event of an attack.
One of the key components that shields your device from harmful attacks is core isolation. Core isolation provides added protection against malware and other attacks by isolating computer processes from your operating system and device.
Memory integrity is a feature of core isolation in Windows security. This feature should be turned on because it helps protect your data and privacy by preventing unauthorized access to your device. It is sometimes referred to as hypervisor-protected code integrity (HVCI) or hypervisor-enforced code integrity.
What is Memory Integrity?
Memory integrity is a virtualization-based security (VBS) feature available in Windows. Memory integrity is a critical component that protects and hardens Windows by running kernel mode code integrity within the isolated virtual environment of VBS.
Starting with Windows 11 22H2, users will see a warning in Windows Security if memory integrity is turned off. The warning indicator also appears on the Windows Security icon in the Windows Taskbar and in the Windows Notification Center. The user can dismiss the warning from within Windows Security.
Features of Memory Integrity
The following is a list of the key features that core isolation’s memory integrity provides.
- Prevents attacks from inserting malicious code into high-security processes.
- Restricts kernel memory allocations that could be used to compromise the system.
- Protects modification of the Control Flow Guard (CFG) bitmap for kernel mode drivers.
- Protects the kernel mode code integrity process that ensures that other trusted kernel processes have a valid certificate.
Ways to Enable Memory Integrity on Windows 11
Memory integrity is on by default in Windows 11 and can be turned on using the following methods:
- Windows Security Settings
- PowerShell
- Intune Settings catalog
- Intune Security baseline
- Group Policy
- Configuration Manager (SCCM)
- Windows Registry
- Local Group Policy Editor
- Microsoft Windows DeviceGuard Unattend
Method 1: Turn on Memory Integrity in Windows Security
The memory integrity is found in Windows Security > Device Security > Core Isolation. Let’s see the steps to manually turn on the core isolation’s memory integrity feature on Windows 11 from Windows security.
Select the Start button and type “Core isolation” in the search. Select the Core Isolation system settings from the search results to open the Windows security app.

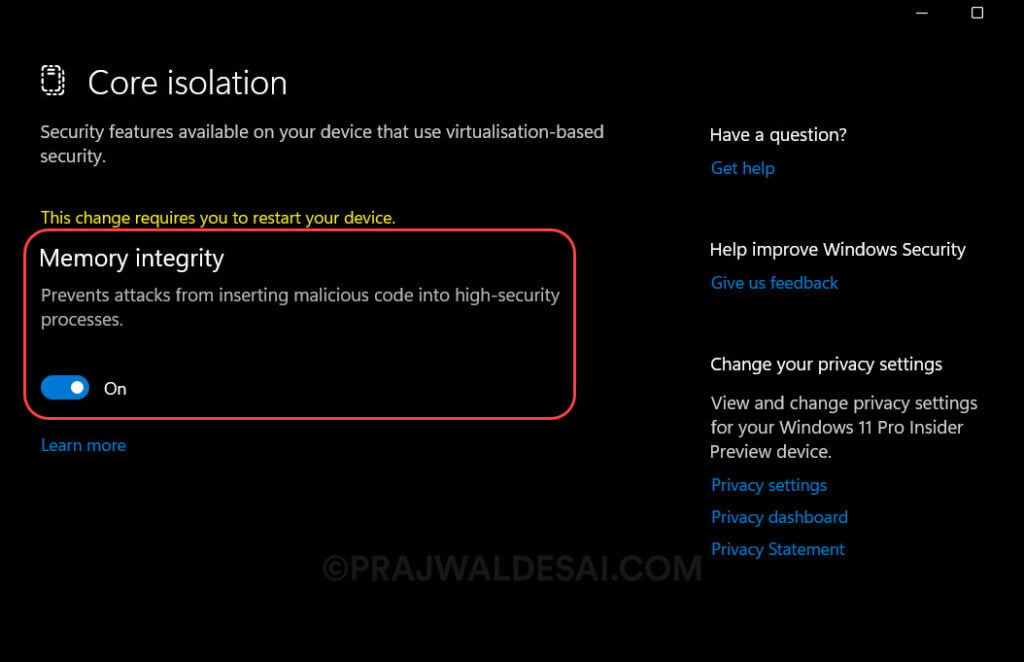
On the core isolation page, turn on memory integrity. Once you complete these steps, restart the computer to apply the settings to protect your computer from malicious code injected into high-security processes.
Note: Turning core isolation memory integrity on or off requires a reboot each time.
Method 2: Enable Memory Integrity using Intune policy
You can turn on the core isolation’s memory integrity feature on Windows 11 devices from the Intune admin center. Enabling this feature in Intune requires using the Code Integrity node in the VirtualizationBasedTechnology CSP. Alternatively, you can configure these settings by using the settings catalog policy.
Perform the following steps to create a new policy in the Microsoft Intune admin center to enable memory integrity on Windows devices
First, sign in to the Microsoft Intune Admin center. Select Devices > Windows > Configuration Profiles > Create New Policy.
On the Create a profile window, configure the following settings and select Create.
- Platform: Windows 10 and later
- Profile Type: Settings Catalog

In the Basics tab, enter the following details:
- Name: Enter a descriptive name for the profile, which you can easily identify later. For example, a good profile name is Enable Memory Integrity on Windows devices.
- Description: Enter a brief description of the profile. This setting is optional but recommended. For example, you can enter the following description for the profile: “Protects your data and privacy by preventing unauthorized access to your device.“
Click Next.

In the Configuration Settings section, under Settings Catalog, click Add Settings.
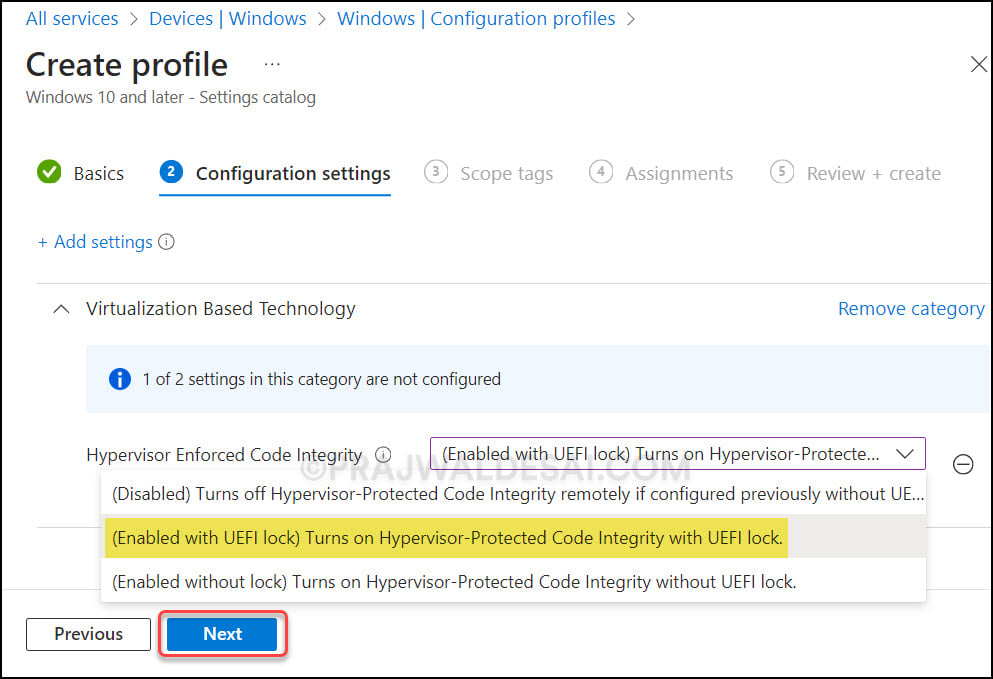
On the Settings picker window, type “Hypervisor Enforced Code Integrity” in the search box and click Search. From the search results, click on the Virtualization Based Technology category and select the setting Hypervisor Enforced Code Integrity. Close the Settings Picker panel.

The hypervisor enforced code integrity offers three options to choose from:
- (Disabled) Turns off Hypervisor-Protected Code Integrity remotely if configured previously without UEFI Lock.
- (Enabled with UEFI lock) Turns on Hypervisor-Protected Code Integrity with UEFI lock.
- (Enabled without lock) Turns on Hypervisor-Protected Code Integrity without UEFI lock.
From the above options, select (Enabled with UEFI lock) Turns on Hypervisor-Protected Code Integrity with UEFI lock. This will turn on memory integrity within the core isolation.
Click Next.
In Intune, Scope tags determine which objects admins can see. In the Scope tags section, you specify scope tags. Specifying scope tags is optional, and you may skip this step. Click Next.
In the Assignments window, specify the groups to which you want to apply this policy. We recommend deploying the profile to a few test groups first, then expanding to more groups if testing is successful. Select Next.

On the Review + Create page, review all the settings that you have defined to activate the memory integrity via Intune and select Create.

After you perform the above steps, a notification appears: “Policy created successfully.” This confirms that the policy has been created and is being applied to the groups we chose. In Intune, the new profile we created to turn on memory integrity appears in the list of configuration profiles.
You must wait for the policy to apply to the targeted groups, and once the devices check in with the Intune service, they will receive your profile settings. You can also force sync Intune policies using different methods, including PowerShell on your Windows devices. To monitor the deployment, select the policy and review the Device and user check-in status.
Method 3: Enable memory integrity using Local Group Policy Editor
On Windows 11, you can utilize the local group policy editor to enable memory integrity. You’ll need to be an administrator on your Windows 11 PC to make these changes.
The Local Group Policy Editor is available only on Windows Pro and Enterprise editions. Windows 10 Home Edition users don’t have access to the GP Editor on their computer. Learn how to upgrade Windows 11 Home edition to Windows 11 Pro.
If you’re running Windows 10 /11 Pro or Enterprise, the easiest way to enable the memory integrity feature is to use the Local Group Policy Editor with these steps:
- Run the command gpedit.msc to open the Local Group Policy Editor.
- Navigate to Computer Configuration > Administrative Templates > System > Device Guard.
- Double-click the Turn on Virtualization Based Security policy setting.
- Select Enabled and under Virtualization Based Protection of Code Integrity, click the drop-down and select Enabled with UEFI lock.
Click Apply and OK to save the changes. When you restart your computer, memory integrity should be enabled in Windows Security.

Method 4: Turn on Memory Integrity using Registry
The Windows Registry is one of the methods that you can use to turn on the core isolation’s memory integrity feature. If you are going to use this method, make sure you back up the registry keys to a file and save it on your PC.
- Launch the registry editor by running the shortcut command regedit.exe.
- Browse the following path: HKEY_LOCAL_MACHINE\SYSTEM\CurrentControlSet\Control\DeviceGuard\Scenarios\HypervisorEnforcedCodeIntegrity
- Double-click the Enabled key and change its value from 0 to 1.
- Click the OK button.
Restart your computer and open the Windows Security app. Under Core Isolation, you’ll notice that memory integrity has been enabled.

Method 5: Enable or Disable Memory Integrity via PowerShell
Using PowerShell, you can enable or disable Memory Integrity in Windows 11.
Run PowerShell as an administrator. Use the below command to Enable the Memory Integrity feature.
Set-ItemProperty -Path "HKLM:\SYSTEM\CurrentControlSet\Control\DeviceGuard\Scenarios\HypervisorEnforcedCodeIntegrity" -Name Enabled -Value 1Use the below command to disable the Memory Integrity feature.
Set-ItemProperty -Path "HKLM:\SYSTEM\CurrentControlSet\Control\DeviceGuard\Scenarios\HypervisorEnforcedCodeIntegrity" -Name Enabled -Value 0Method 6: Turn on Virtualization Based Security using GPO
In this method, I will show you how to turn on memory integrity using group policy. When your organization does not use Microsoft Intune and computers are joined to an active directory domain, the GPO method is preferred.
To create a new GPO, you can either log in to a domain controller or a member server installed with GPMC. You can also install the GPMC on Windows 11 and configure the group policies.
Use the following steps to create a group policy to enable memory integrity on Windows devices:
- Launch Server Manager from the Start menu and select Tools > Group Policy Management Console.
- In the Group Policy Management console, expand the domain, right-click Group Policy Objects or an OU, and select New.
- Enter the name for the group policy, such as “Enable memory integrity,” and click OK.

Right-click the GPO that you just created and select Edit. In the Group Policy Management Editor, navigate to Computer Configuration > Administrative Templates > System > Device Guard. Right-click the Turn on Virtualization Based Security policy setting and select Edit.

Select Enabled. Under Virtualization Based Protection of Code Integrity, click the drop-down and select Enabled with UEFI lock. Click Apply and OK.

After the group policy object is configured, you need to link the GPO to an OU if you haven’t already. You can also link it to the domain, but doing so will make the GPO applicable to every computer in the domain, so it is not advised. The best approach is to choose a test OU, connect your GPO, and test the policy settings.
It’s time to update the group policy on the client computers and check to see if the access to memory integrity is enabled in Windows security. You can use multiple ways to perform the group policy update on remote computers. On a test client machine, you can manually perform the group policy update by running the gpupdate /force command.
After the group policy has been refreshed, launch the Windows Security app. Now select Device Security > Core Isolation Details. You’ll see that the memory integrity feature has been enabled.
Method 7: Enable Core Isolation and Memory Integrity using SCCM
If your Windows 11 and 10 devices are managed by SCCM, you can deploy Device Guard and Device Guard-enabled apps in your environment.
Configuration Manager assists with the following scenarios:
- Determine which clients meet the prerequisites to support Device Guard
- Enable Device Guard settings
- Deploy Device Guard policy
- Deploy Device Guard-enabled apps
Device guard configurations can be applied in SCCM in two ways:
- Write a script and deploy it via a package or application
- Use the Configuration Manager task sequence.
Microsoft advises incorporating the configuration steps into your Windows 10/11 deployment task sequence to enable Device Guard by default.
Method 8: Turn on Memory Integrity using Intune Security Baseline
Using an Intune security baseline policy, you can activate the memory integrity for Windows 11 devices. In the Intune admin center, go to Endpoint Security > Security Baselines. Select Security Baseline for Windows 10 and later.

Create a new policy and enter the profile name and description. Click Next.

In the Configuration Settings tab, scroll down and look for Virtualization Based Technology. Click the drop-down next to Hypervisor Enforced Code Integrity and select (Enabled with UEFI lock) Turns on Hypervisor-Protected Code Integrity with UEFI lock.
Complete the profile creation and assign the profile to the Entra ID device group. This will activate the memory integrity within the core isolation for Windows 11 devices.

Method 9: Turn on VBS with Microsoft Windows DeviceGuard Unattend XML
The Microsoft-Windows-DeviceGuard-Unattend component specifies settings for initializing and enforcing virtualization-based security, which helps protect system memory and kernel mode apps and drivers from possible tampering.
For instance, you can enable virtualization-based security by using the unattend XML provided below.
<?xml version="1.0" encoding="UTF-8"?>
<unattend xmlns="urn:schemas-microsoft-com:unattend">
   <settings pass="offlineServicing">
      <component language="neutral" xmlns:xsi="http://www.w3.org/2001/XMLSchema-instance" xmlns:wcm="http://schemas.microsoft.com/WMIConfig/2002/State" versionScope="nonSxS" publicKeyToken="31bf3856ad364e35" processorArchitecture="amd64" name="Microsoft-Windows-DeviceGuard-Unattend">
         <EnableVirtualizationBasedSecurity>1</EnableVirtualizationBasedSecurity>
         <HypervisorEnforcedCodeIntegrity>1</HypervisorEnforcedCodeIntegrity>
         <LsaCfgFlags>1</LsaCfgFlags>
      </component>
   </settings>
   <cpi:offlineImage xmlns:cpi="urn:schemas-microsoft-com:cpi" cpi:source="wim:c:/install2/sources/install.wim#Windows 10 Enterprise"/>
</unattend>Verify Memory Integrity Status using PowerShell
To verify memory integrity in Windows 11 using PowerShell, you can check the status of the “Memory integrity” feature, which is part of the Windows Defender Device Security settings.
Run PowerShell as an administrator. Enter the following command to check the status of Memory Integrity. This command retrieves the registry value for Virtualization-Based Security (VBS), which is required for Memory Integrity. If the output value is 1, it signifies that VBS is enabled; if the value is 0, it signifies that VBS is disabled.
Get-ItemProperty -Path "HKLM:\SYSTEM\CurrentControlSet\Control\DeviceGuard" -Name EnableVirtualizationBasedSecurityTo specifically check the Memory Integrity feature, use the below command. If the value is 1, Memory Integrity is turned on. If the value is 0, Memory Integrity is turned off.
Get-ItemProperty -Path "HKLM:\SYSTEM\CurrentControlSet\Control\DeviceGuard\Scenarios\HypervisorEnforcedCodeIntegrity" -Name Enabled