


In this article, I will show you how to enable or turn on cloud protection in Microsoft Defender antivirus using multiple methods like Intune (Endpoint Manager), Group Policy, PowerShell, WMI, etc.
Microsoft Defender Antivirus cloud protection helps protect against malware on your endpoints and across your network. Microsoft Defender Antivirus provides near-instant, automated protection against new and emerging threats.
Cloud protection works together with Microsoft Defender Antivirus to deliver accurate, real-time, and intelligent protection. Microsoft recommends keeping cloud protection turned on because certain security features and capabilities in Microsoft Defender for Endpoint only work when cloud protection is enabled.


The Cloud Protection Service enables the collection of information about detected malware on managed systems and the actions taken. This information is collected and sent to Microsoft.
Read: Attack Surface Reduction Rules in Microsoft Intune
There are several ways you can go about turning on cloud protection in Microsoft Defender Antivirus on endpoints. We will discuss all of these methods in this article. If you are new to the Cloud Protection topic, I recommend reading the article on Cloud protection and Microsoft Defender Antivirus.
Methods to Enable Cloud Protection
You can turn Microsoft Defender Antivirus cloud protection on or off by using one of several methods:
- Microsoft Intune
- Configuration Manager
- Group Policy
- PowerShell cmdlets
- WMI
1. Turn On Cloud Protection using Intune
Using Intune, you can turn on cloud protection with following steps:
- Sign in to the Microsoft Endpoint Manager admin center (https://endpoint.microsoft.com)
- On the Home pane, select Device configuration > Profiles.
- To create a new Microsoft Intune Device profile, click Create Profile.

Select the Platform as Windows 10 and later and Profile Type as Templates. Templates are useful when you don’t want to build policies manually. Under Template name, select Device restrictions and click Create button.

On the Basics tab of Device restrictions page, enter the Name, Description for the profile. For example, you can enter the profile name as “Enable Cloud Protection” and click Next to continue.

On the Configuration settings windows, expand Microsoft Defender Antivirus. On the Cloud-delivered protection switch, select Enable. Enabling this option will send telemetry to the Microsoft Active Protection Service for detection of suspicious activity.

In the Prompt users before sample submission dropdown, select Send all samples automatically. Click Next to continue.
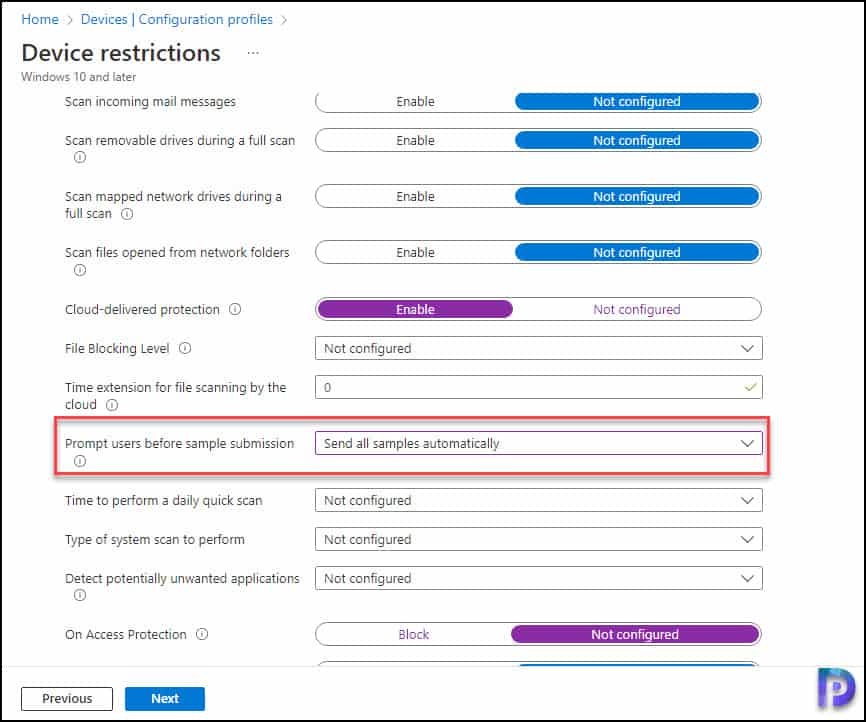
On the Assignments tab, you can deploy or assign this profile to your Windows devices. Review the settings on the Review+Create tab and complete the device profile creation. Once the devices sync with Intune policies, the cloud protection will be automatically turned on.
Recommended Article: Onboard Windows Endpoints in Microsoft Defender via MEM
2. Turn on Cloud Protection using Endpoint Manager Antimalware Policy
You can create a new antimalware policy in Microsoft Endpoint Manager to enable the cloud protection in Microsoft Defender Antivirus on computers.
- Sign in to the Microsoft Endpoint Manager admin center (https://endpoint.microsoft.com)
- Select Endpoint Security > Antivirus.
- To create a new Antimalware policy, click Create Policy.
On the Create a profile window, select the Platform as Windows 10, Windows 11, and Windows server. Select the Profile as Microsoft Defender Antivirus. Click Create.

On the Basics tab, enter the name of the profile to Enable the Cloud Protection in Microsoft Defender Antivirus. You may add a brief description for the policy. Click Next.

There are many settings available for Microsoft Defender Antivirus. Click the drop-down for Cloud Block Level setting and choose one of these:
- High: Applies a strong level of detection.
- High plus: Uses the High level and applies more protection measures (may affect client performance).
- Zero tolerance: Blocks all unknown executables.
Select a desired option for Cloud Block Level and click Next.

On the Assignments tab, you can deploy or assign the Defender Antimalware profile to your Windows devices. Review the settings on the Review+Create tab and complete the device profile creation. Once the devices sync with Intune policies, the cloud protection will be automatically turned on.
Recommended Article: Fix Windows Defender Credential Guard Issues
3. Use Group Policy to Turn on Cloud Protection
If you aren’t using any MDM solution such as Intune, you can use the group policy to turn on the cloud protection. The GPO to enable the cloud protection can be enabled at the domain level, or you can start with a pilot batch of computers and then expand to larger groups of devices.
On the Windows Server, launch the Server Manager and click Tools and launch the Group Policy Management Console. Right-click Group Policy Objects and create a new GPO. Specify the GPO name as Configure Cloud Protection or something similar. Right click Configure Cloud Protection GPO and select Edit.

In the Group Policy Management Editor, go to Computer configuration > Administrative templates. Expand the tree to Windows components > Microsoft Defender Antivirus > MAPS. If you’re wondering why the MAPS settings are being configured, they are equivalent to cloud-delivered security.
Double-click Join Microsoft MAPS policy.

Ensure the option is turned on and set to Basic MAPS or Advanced MAPS. Select OK.
You can choose to send basic or additional information about detected software:
- Basic MAPS: Basic membership will send basic information to Microsoft about malware and potentially unwanted software that has been detected on your device. Information includes where the software came from (like URLs and partial paths), the actions taken to resolve the threat, and whether the actions were successful.
- Advanced MAPS: In addition to basic information, advanced membership will send detailed information about malware and potentially unwanted software, including the full path to the software, and detailed information about how the software has affected your device.
Click Apply and OK to save the changes made to the policy.

Double-click Send file samples when further analysis is required. Ensure that the first option is set to Enabled. For sample submissions, you can select Send all Samples or Send Safe Samples. Click Apply and OK to save the changes made to the policy.

Let’s close the group policy editor and go to the Group Policy Management console. You need to link the GPO: Configure Cloud Protection to an OU. The GPO can also be linked to the domain, but that is not advised.
Recommended: Modify Group Policy Refresh Interval for Windows computers
Once you have linked the GPO, you can test the policy by logging in to few computers and update the group policy. Microsoft Defender Antivirus should now have the Cloud Protection feature enabled.
This completes the steps to configure Cloud Protection using the Group Policy for Microsoft Defender Antivirus.
4. Use PowerShell cmdlets to turn on cloud protection
You can use PowerShell to perform various functions in Windows Defender. Turning on the Cloud Protection in Microsoft Defender Antivirus can be easily done with PowerShell. In fact, with just 2 PowerShell commands, you can enable the Cloud Protection.
- In the Windows search bar, type PowerShell.
- Select Windows PowerShell from the results to open the interface.
- Enter the PowerShell command and any parameters.
Run the below PowerShell command to turn on the Cloud Protection.
Set-MpPreference -MAPSReporting Advanced
Run the below PowerShell command to configure the sample submissions to Microsoft.
Set-MpPreference -SubmitSamplesConsent SendAllSamples
Useful Article: Enable Windows Defender GUI on Windows Server
5. Manually Turn on Cloud Protection on Clients with the Windows Security app
Perform the following steps to enable the cloud protection and automatic sample submission from the Windows Security app.
1. Open the Windows Security app by selecting the shield icon in the task bar, or by searching the start menu for Windows Security.

2. Select the Virus & threat protection tile (or the shield icon on the left menu bar), and then, under Virus & threat protection settings, select Manage settings.

3. Turn on the Cloud-delivered Protection and Automatic sample submission.


Hi Mr Desai
Could you also give a write up on disabling Windows firewall profiles (all 3) using GPO
Looking forward to your awesome KB on the same
Br,
Syed