


Windows 11 is officially released by Microsoft, and I will show you different ways to upgrade to Windows 11. Check out each Windows 11 upgrade method to determine the best option for you.
As an example, we will upgrade a Windows 10 PC to Windows 11. You can also test the Windows 11 upgrade on a virtual machine. However, don’t forget to enable TPM on a VM before you upgrade to Windows 11.
Windows 11, version 22H2 is the latest update released by Microsoft. Windows 11 2022 update is now available via Windows Update for eligible devices. New Windows upgrades are typically distributed through Windows Update. On a computer running Windows 10, the Windows 11 upgrade should appear via Windows Updates.

According to Microsoft, “If you are upgrading from Windows 10, you will be notified through Windows Update that the upgrade is ready for your PC.” If you see the Windows 11 upgrade appearing in Windows Updates, you may decide to upgrade to Windows 11. If you don’t like Windows 11, you can always uninstall it and roll back to Windows 10.
Microsoft offers different ways to upgrade your Windows 10 PC to Windows 11, and I will be covering all the possible Windows 11 upgrade methods in this article.
Different Methods to Upgrade to Windows 11
There are several methods that you can use to upgrade Windows 10 devices to Windows 11.
- Use the SCCM in-place upgrade task sequence to upgrade to Windows 11.
- You can manually upgrade to Windows 11 using the Installation Assistant.
- Upgrade from Windows 10 to Windows 11 using ISO Installation Media.
- You can manually upgrade to Windows 11 using Windows Update.
- Upgrade to Windows 11 (22H2, 21H2) using Intune feature update deployment policy
Also Read: How to create Windows 11 22H2 device collection in SCCM
System Requirements for Windows 11
To install Windows 11 or to upgrade to Windows 11, Microsoft has documented the minimum system requirements for installing Windows 11 on a PC. The requirements for Windows 11 (21H2, 22H2) will also remain the same.
Your system must meet those minimum system requirements to upgrade to Windows 11. If you cannot check those specs manually, the Windows 11 PC Health Check app will make your task easier. The following section will include a brief description of the new Windows 11 PC health check app. Here are the minimum requirements for Windows 11 that your PC or laptop should have.
| Processor | 1 gigahertz (GHz) or faster with 2 or more cores on a compatible 64-bit processor or System on a Chip (SoC) |
| RAM | 4 GB |
| Storage | 64 GB or More |
| System firmware | UEFI, Secure Boot capable |
| TPM | TPM version 2.0 |
| Graphics card | DirectX 12 or later with WDDM 2.0 driver |
| Display | HD display that is greater than 9” diagonally, 8 bits per color channel |
| Internet | Microsoft account and internet connectivity |
Download Windows 11 ISO File
Using Windows 11 ISO file, you can upgrade Windows 10 PC to Windows 11. I will cover more about this in method 2. This Windows 11 ISO (disk image) option is for users that want to create a bootable installation media (USB flash drive, DVD) or create a virtual machine (.ISO file) to install Windows 11.
This download is a multi-edition ISO which uses your product key to unlock the correct edition.
You can download the 64-bit Windows 11 ISO from the following sources.
- Sign in to the Volume Licensing Service Center to download Windows 11 Enterprise editions.
- Sign in to your subscription on the Visual Studio Subscriptions portal and download the Windows 11 ISO.
- Visit the Windows Insider site to download Insider Preview builds.
- Download the Windows 11 ISO file for free from Microsoft download page.
I will cover the steps to download the Windows 11 ISO from the Microsoft downloads page. This method should be used when you don’t have access to the Visual Studio Subscriptions portal or MSDN.
Recommended: Download Windows 11 22H2 Administrative Templates
Go to Windows 11 Downloads page, look for Download Windows 11 Disk Image (ISO). Click the drop-down and select Windows 11 product. Click Download.

The Windows 11 is available in several languages. Select the Product language and click Confirm.

Click the 64-bit download button to download Windows 11 ISO file. The download link is available only for 24 hours and then the link expires.
Note – This download is a multi-edition ISO which uses your product key to unlock the correct edition. After you install Windows 11, you must activate it using a product key.

Create Windows 11 Bootable Installation Media
When you have downloaded Windows 11 ISO media, you can create a bootable installation media (USB flash drive, DVD) to install or upgrade Windows 11.
There are numerous tools available online that can burn Windows 11 ISO file to a USD flash drive. I will be using an old tool – Windows 7 USB/DVD download tool.
The Windows USB/DVD Download tool allows you to create a copy of your Windows 11 ISO file on a USB flash drive or a DVD. Before you install this tool, install the .NET Framework 2.0 first. That’s because this tool requires .NET Framework 2.0 to work.
The steps to install Windows USB/DVD Download tool are simple. Assuming you have installed the tool, run the setup and on the welcome screen click Next.
Connect the USB flash to drive your computer. In the first step, you must choose the ISO file. Click Browse button and select the Windows 11 ISO file. Click Next.

In the next step, choose the media type which is either USB device or DVD. Select USB device.

The tool should automatically select the connected USB device. If you have multiple USB devices connected to the computer, click the drop-down and select the correct one. Click Begin Copying.

A final confirmation which requires your consent to erase all the contents from USB device. Select Erase USB device.

The tool copies the contents of the Windows 11 ISO file to the USB device that you specified. Wait for the message “Boot USB device created successfully“. Unplug the USB device, and you can now use this USB device to image a PC with Windows 11.

Download and Install Windows 11 PC Health Check App
Before performing a Windows 11 upgrade, you must download and run the Windows 11 PC health check app.
The PC Health Check app was intended to help people check if their current Windows 10 PC could upgrade to Windows 11.
Microsoft had released the PC health check app, but it was not totally ready. Hence, a new version of PC health check app has been released for Windows 11.
Download the latest version of PC health check app from Microsoft site. Follow the below steps to install the Health check app on Windows 10 PC.
Run the WindowsPCHealthCheckSetup.msi installer. On the Windows PC health check setup window, select I accept the terms in the license agreement. Click Install.

The Windows PC health check application is now installed. Click Finish.

You should now see a PC health check screen. If your device is already running Windows 10, you can run the PC Health Check app to assess compatibility.
To determine if your Windows 10 PC can be upgraded to Windows 11, click Check Now.

This PC meets Windows 11 requirements – If you see this message, congratulations, your computer is eligible for Windows 11 upgrade.
In case your system doesn’t qualify for Windows 11 upgrade, you can click See all results and find what system requirement is blocking you from upgrading to Windows 11.

Method 1 – Upgrade to Windows 11 using Windows 11 Installation Assistant
According to Microsoft, the Windows 11 upgrade assistant is the best option for installing Windows 11 on the device you’re currently using. First, download the Windows 11 installation assistant on your computer. Your computer should be connected to the internet to download the Windows 11 update.

Right click Windows11InstallationAssistant installer and select Run as administrator.

I have purposely added this screen to show you know that a Windows 11 PC health app is required by Windows 11 installation assistant tool. If you have already installed the health check app, you shouldn’t see this screen.

If you haven’t installed the health check app, install it and click Refresh. Now you should see Install Windows 11 screen. Click Accept and Install.

The Windows 11 installation assistant tool now starts to download files required for Windows 11 upgrade. Leave your computer idle and let the download complete.

In the next step, we see the Windows 11 upgrade installation begins.

Usually, the Windows Upgrades will require a computer restart. To install Windows 11, click Restart Now.

The Windows 11 Installation Assistant will reboot your device to complete the install. Click Close.

Site back and relax because your Windows 10 PC will now be upgraded to Windows 11.

A couple of system restarts are expected during Windows 11 upgrade.

And finally, we have successfully upgraded our Windows 10 PC to Windows 11 using the Windows 11 installation assistant tool.

Method 2 – Upgrade to Windows 11 using ISO Installation Media
Using this method, you can upgrade to Windows 11 using the ISO file that Microsoft provides. You can download the ISO file from other sources as listed at the beginning of the post.
When you have the Windows 11 ISO media, you can choose to upgrade to Windows 11 using 2 methods.
- Copy the Win 11 ISO media to Windows 10 PC and manually begin the Windows 11 upgrade.
- Create a bootable installation media (USB flash drive, DVD) and use it to upgrade to Windows 11.
The first method is easy because all you need to do is copy the Windows 11 ISO to the computer, mount it, and begin the upgrade. The second method needs an installation medium that can be booted, like a DVD or USB flash drive. Using the bootable media, you begin the Windows 11 upgrade.
If you want to install Windows 11 directly from the ISO file without using a DVD or USB flash drive, you can do so by mounting the ISO file. This will perform an upgrade of your current operating system to Windows 11.
Right click Windows 11 ISO media and select Mount.

From the virtual drive, run the Windows 11 setup.exe as administrator.

Now you see Install Windows 11 window. The setup will download updates online, drivers and optional features. Your computer should be connected to Internet for smooth Windows 11 upgrade.
Click Next.

The latest updates required to upgrade to Windows 11 are downloaded. The Windows 11 setup restarts now.

On the Applicable notices and license terms window, click Accept.

On the Getting Updates window, wait for the setup to check for latest Windows 11 updates.

On the Ready to Install window, click Install.

The Windows 11 Upgrade is now in progress. During the Windows 11 upgrade, your computer will restart several times.

The upgrade to Windows 11 is complete. Our Windows 10 computer has successfully been upgraded to Windows 11.

Method 3 – Windows 11 Upgrade SCCM (Configuration Manager)
In this method, we will perform Windows 11 Upgrade using SCCM task sequence. You must import the Windows 11 upgrade package into SCCM and use the in-place upgrade task sequence to upgrade to Windows 11. If you are already deploying operating systems and managing software updates via Configuration Manager, you can opt for this method.
If you are looking for a bare-metal deployment of Windows 11, refer to the guide on how to deploy Windows 11 using SCCM. If you are managing your devices using Intune, you can use the Windows 11 feature update deployment for the Windows 11 upgrade.
You can also upgrade Windows 11 21H2 to Windows 11 22H2 using Configuration Manager. Upgrade methods via SCCM include servicing plans, windows servicing and ADR.
Note: You must use ConfigMgr 2107 or above to upgrade computers to Windows 11. Configuration Manager 2107 supports Windows 11 as client.
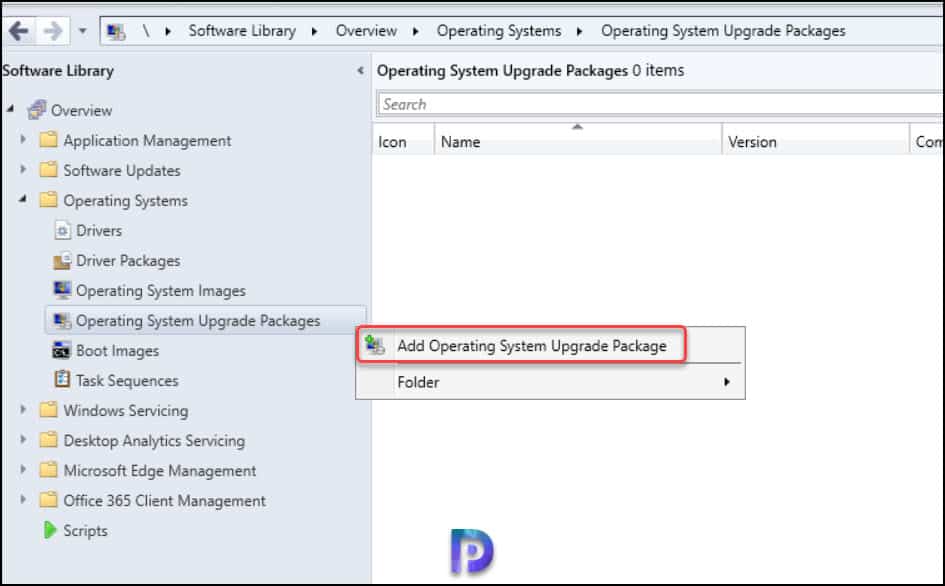
Add Windows 11 Operating System Upgrade Package
Here are the steps to add or import Windows 11 upgrade package into SCCM.
- Launch the SCCM console.
- Navigate to Software Library > Operating Systems > Operating System Upgrade Packages.
- Right click Operating System Upgrade Packages and click Add Operating System Upgrade Package.
On the Data Source page, click Browse and specify the folder path that contains Windows 11 setup files.
Select the option: By checking this box, you agree that when applying this operating system to the device, the applicable Windows license was purchased through volume licensing. Or that you are authorized to bind your company and agree to the Microsoft license terms on its behalf.
Check the box – Extract a specific image index from install.wim file of selected upgrade package. Select the image index appropriately and click Next.

On the General window, specify the upgrade package name as Windows 11 upgrade. You may add more details in the comment box and click Next.

Click Next on Summary window.

On the Completion window, click Close. We have successfully imported Windows 11 upgrade package in SCCM.

Create Windows 11 In-place upgrade SCCM Task Sequence
Let’s create an SCCM in-place upgrade task sequence to upgrade to Windows 11.
- Launch the Configuration Manager console.
- Go to Software Library\Overview\Operating Systems\Task Sequences.
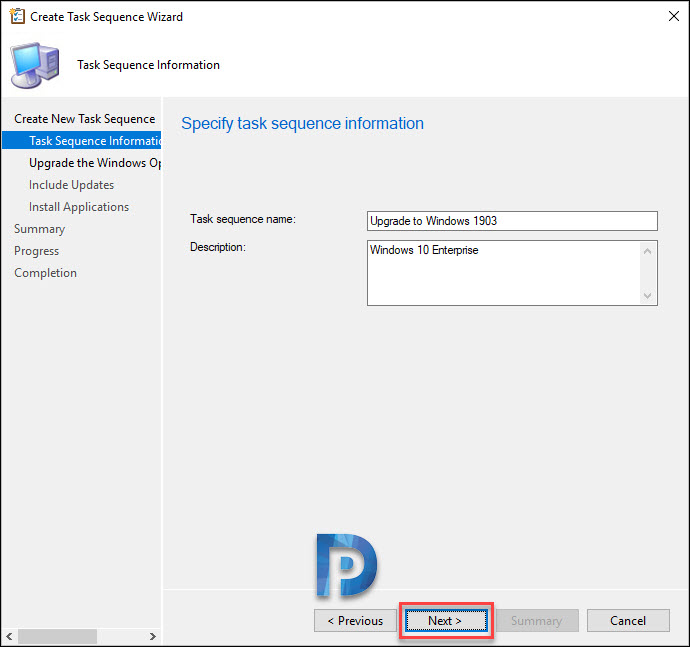
- Right click Task Sequences and select Create Task Sequence.

On the Create a new task sequence page, select Upgrade an operating system from an upgrade package. Click Next.

Specify the task sequence name such as in-place upgrade of Windows 10 to Windows 11 or something meaningful. Add an optional description. Click Next.

Now you see Upgrade Windows operating system window. You must select an upgrade package, click Browse and select Windows 11 upgrade package. The edition index is automatically populated. Click Next.

Select Do not install any software updates. Click Next.

If you have any applications that you need to install along with this upgrade, you can do so. Otherwise, click Next.

Review the settings on Summary window and click Next.

Finally, on the Completion window, click Close. This completes the steps for creating a Windows 11 in-place upgrade task sequence.

Distribute the Windows 11 Task Sequence Content to Distribution Points
After you have created the Windows 11 task sequence, you must distribute the TS content to distribution points.
Go to Software Library\Overview\Operating Systems\Task Sequences. Right-click the Windows 11 in-place upgrade task sequence and click Distribute Content.

On the General window of distribute content wizard, click Next.

On the content window, click Next.

Specify the content destination which involves adding the distribution points. Click Add button and select the distribution points to which you want to distribute the task sequence content.
Click Next.

On Summary window click Next and close the Distribute Content Wizard.

You can go to Monitoring\Overview\Distribution Status\Content Status and confirm if the Windows 11 upgrade task sequence content has been distributed to DP’s.
Deploy Windows 11 In-Place Upgrade Task Sequence
Let’s deploy the Windows 11 in-place upgrade task sequence to SCCM device collection. I have got a Windows 10 device collection that includes Windows 10 21H1 devices.
In the ConfigMgr console, go to Software Library\Overview\Operating Systems\Task Sequences. Right click Windows 11 upgrade task sequence and click Deploy.

Click Browse and select the device collection for Windows 11 upgrade. Click Next.

Specify the settings to control how the Windows 11 upgrade is deployed. Select the Purpose as Available. Click Next.

You can schedule the deployment for Windows 11 upgrade. For example, you can schedule the date and time when the deployment will become available and when the deployment will expire.
Scheduling a deployment is optional, if you don’t schedule a deployment, the upgrade will be made available to devices without much delay. Click Next.

Specify the user experience settings and click Next.

Nothing to configure on Alerts page, click Next.

Select the deployment options. The recommended and default deployment option is download content locally when needed by the running task sequence. Click Next.

Click Next on Summary window and on Completion window, click Close.

Upgrade Windows 10 to Windows 11 using Task Sequence
I will show you how to upgrade Windows 10 to Windows 11 using the SCCM upgrade task sequence. Log in to the client computer and launch the software center.
In the Software Center, click the Operating Systems tab and select the Windows 11 in-place upgrade task sequence. You will be asked to confirm if you want to upgrade the operating system on this computer. Select Install.

The task sequence progresses now and the Windows 11 upgrade files will be downloaded to computer.

The Windows 11 upgrade is now in progress. It’s nice to see the task sequence displays the Windows 11 upgrade progress percentage.

When the in-place task sequence is running, you can monitor the deployment by reviewing the smsts.log file. During the Windows 11 upgrade, the smsts.log file is located in C:\Windows\CCM\Logs\SMSTSLog folder on the client machine.

The task sequence restarts the computer to complete the upgrade.

The Windows 11 upgrade using SCCM is successful. You can verify the upgrade by reviewing the smsts.log file located in C:\Windows\CCM\Logs folder.

From the Configuration Manager console, you can monitor the task sequence progress. Right-click the Windows 11 in-place upgrade task sequence and select Deployments tab. Right-click the deployment and select Show Status Messages.
The below table shows the status messages of Windows 11 upgrade task sequence in order.
| Message ID | Component | Description |
| 11171 | Task Sequence Manager | The task sequence manager successfully completed execution of the task sequence. |
| 11143 | Task Sequence Engine | The task sequence execution engine successfully completed a task sequence. |
| 11122 | Task Sequence Engine | The task sequence execution engine skipped the group (Run Actions on Failure) because the condition was evaluated to be false. |
| 11122 | Task Sequence Engine | The task sequence execution engine skipped the group (Rollback) because the condition was evaluated to be false. |
| 11127 | Task Sequence Engine | The task sequence execution engine successfully completed the group (Post-Processing). |
| 11127 | Task Sequence Engine | The task sequence execution engine successfully completed the group (Apply customizations and personalizations). |
| 11124 | Task Sequence Engine | The task sequence execution engine started the group (Apply customizations and personalizations). |
| 11127 | Task Sequence Engine | The task sequence execution engine successfully completed the group (Set Windows default apps and associations). |
| 11124 | Task Sequence Engine | The task sequence execution engine started the group (Set Windows default apps and associations). |
| 11127 | Task Sequence Engine | The task sequence execution engine successfully completed the group (Install/enable third-party security). |
| 11124 | Task Sequence Engine | The task sequence execution engine started the group (Install/enable third-party security). |
| 11127 | Task Sequence Engine | The task sequence execution engine successfully completed the group (Apply setup-based drivers). |
| 11124 | Task Sequence Engine | The task sequence execution engine started the group (Apply setup-based drivers). |
| 11124 | Task Sequence Engine | The task sequence execution engine started the group (Post-Processing). |
| 11127 | Task Sequence Engine | The task sequence execution engine successfully completed the group (Upgrade the Operating System). |
| 11140 | Task Sequence Engine | The task sequence execution engine started execution of a task sequence. |
| 11142 | Task Sequence Engine | The task sequence execution engine performed a system reboot initiated by the action (Restart Computer) in the group (Upgrade the Operating System). |
| 11134 | Task Sequence Engine | The task sequence execution engine successfully completed the action (Restart Computer) in the group (Upgrade the Operating System) with exit code 0 Action output: ========================= [ smsboot.exe ] ========================= Running module version 5.0.9058.1000 from location ‘C:\Windows\CCM\smsboot.exe’ Command line: ‘”smsboot.exe” /target:HD’ SMSTSRebootDelay=10 SMSTSRebootMessage=Microsoft Windows operating system is being upgraded. The computer must reboot to continue. SMSTSRebootRequested=HD. |
| 11134 | Task Sequence Engine | The task sequence execution engine successfully completed the action (Upgrade Operating System) in the group (Upgrade the Operating System) with exit code 0 Action output: … (), HRESULT=80070422 (X:\bt\1204713\repo\src\client\OsDeployment\UpgradeWindows\upgradewindows.cpp,1640) Not enabling smstsmgr service. The next time a task sequences starts in the full OS, it will switch the smstsmgr service to Auto while the task sequence is running Waiting for the CCM client. Waiting for CcmExec service to be fully operational Failed to start the remote control service. 0x80070422. Succeeded loading resource DLL ‘C:\Windows\CCM\1033\TSRES.DLL’ CcmExec service is up and fullyoperational dwEnabled > 0, HRESULT=80004005 (X:\bt\1022896\repo\src\Framework\Core\CCMCore\util.cpp,4610) LSGetInternetMode LSGetInternetMode: In Intranet LSGetHomeMPFromWMI Current Assigned Management Point is corpsccm.prajwal.local with Version 9058 and Capabilities: <Capabilities SchemaVersion=”1.0″><Property Name=”SSL” Version=”1″/><Property Name=”SSLState” Value=”63″/></Capabilities> Successfully connected to Management Point corpsccm.prajwal.local:80 [ScanOnly]: Exiting with code 0x00000000. |
| 11140 | Task Sequence Engine | The task sequence execution engine started execution of a task sequence. |
| 11142 | Task Sequence Engine | The task sequence execution engine performed a system reboot initiated by the action (Upgrade Operating System) in the group (Upgrade the Operating System). |
| 11134 | Task Sequence Engine | The task sequence execution engine successfully completed the action (Upgrade Operating System) in the group (Upgrade the Operating System) with exit code 0 Action output: … tup progress registry key value SetupProgress exists Waited 2 sec to read successfully initial setup progress registry key value SetupProgress Windows upgrade progress: 0% Windows upgrade progress: 12% Windows upgrade progress: 20% Windows upgrade progress: 31% Windows upgrade progress: 40% Windows upgrade progress: 50% Windows upgrade progress: 64% Windows upgrade progress: 70% Windows upgrade progress: 83% Windows upgrade progress: 96% Windows upgrade progress: 96% Waiting for Windows Upgrade Setup process to return … Process completed with exit code 0 ExecuteWithTimeout returned Windows Setup process hexadecimal exit code 0x00000000 (decimal 0) Wait for event returned 0 Windows setup completed with exit code hexadecimal 0x00000000 (decimal 0) Saving exit code of Windows upgrade – hexadecimal 0x00000000 (decimal 0) – to Task sequence environment variable ‘_SMSTSOSUpgradeActionReturnCode’, as decimal string Windows Setup completed successfully! Exiting with code 0x00000000. |
| 11124 | Task Sequence Engine | The task sequence execution engine started the group (Upgrade the Operating System). |
| 11127 | Task Sequence Engine | The task sequence execution engine successfully completed the group (Prepare for Upgrade). |
| 11127 | Task Sequence Engine | The task sequence execution engine successfully completed the group (Remove/suspend third-party security). |
| 11124 | Task Sequence Engine | The task sequence execution engine started the group (Remove/suspend third-party security). |
| 11127 | Task Sequence Engine | The task sequence execution engine successfully completed the group (Remove incompatible drivers). |
| 11124 | Task Sequence Engine | The task sequence execution engine started the group (Remove incompatible drivers). |
| 11127 | Task Sequence Engine | The task sequence execution engine successfully completed the group (Remove incompatible applications). |
| 11124 | Task Sequence Engine | The task sequence execution engine started the group (Remove incompatible applications). |
| 11127 | Task Sequence Engine | The task sequence execution engine successfully completed the group (Network/Wired Connection Checks). |
| 11124 | Task Sequence Engine | The task sequence execution engine started the group (Network/Wired Connection Checks). |
| 11127 | Task Sequence Engine | The task sequence execution engine successfully completed the group (Battery Checks). |
| 11124 | Task Sequence Engine | The task sequence execution engine started the group (Battery Checks). |
| 11134 | Task Sequence Engine | The task sequence execution engine successfully completed the action (Check Readiness for Upgrade) in the group (Prepare for Upgrade) with exit code 0 Action output: … [ osdprestartcheck.exe ] ========================= Running module version 5.0.9058.1000 from location ‘C:\Windows\CCM\OSDPrestartCheck.exe’ Command line: ‘”OSDPrestartCheck.exe”‘ Checking if at least 2048 MB of computer memory is available Memoryrequirement validation successful (User Required: 2048 MB, Found: 8192 MB) _TS_CRMEMORY=1 Checking if computer processor speed is at least 1024 MHz Processor speed requirement validation successful. (User Required: 1024 MHz, Found: 3600 MHz) _TS_CRSPEED=1 Checking if at least 25600 MB free disk space is available Free disk space on drive C:\ 130752 MB. Volume C:\ has the needed disk space. Free disk space user requirement validation successful. Found drive ‘C:\’ with the required free disk space (25600 MB) _TS_CRDISK=1 Checking if OS type is CLIENT OS type requirement validation successful. (User Required: ‘CLIENT’, Found: ‘CLIENT’) _TS_CROSTYPE=1 4 selected readiness verifications have succeeded. All selected verifications have succeeded!. |
| 11124 | Task Sequence Engine | The task sequence execution engine started the group (Prepare for Upgrade). |
| 11140 | Task Sequence Engine | The task sequence execution engine started execution of a task sequence. |
Windows 11 Upgrade (21H2, 22H2) using Intune
You can use Windows 11 feature update deployment to upgrade Windows 10 devices to Windows 11 using Intune or Microsoft Endpoint Manager Center. You can also upgrade to Windows 11 22H2 using the Intune feature update deployment policy.
The Intune feature update policy in Intune makes it easier to upgrade devices running Windows 10 to Windows 11. After you create a Windows 11 upgrade policy in Intune, you can target the policy to Windows 10 devices and upgrade them to Windows 11.
Note that the devices should meet the Windows 11 minimum requirements for Windows 11 upgrade. Devices that don’t meet the requirements for Windows 11 won’t receive the update and remain at their current Windows 10 version. You can refer to the following guide to upgrade Windows 10 to Windows 11 using Intune.

Can this in-place upgrade to Windows 11 deployed as Required?
what are people doing about drivers ? sticking with the original win 10 drivers or including them as part of the task sequence or seperate update after the win 11 in-place upgrade?
Why not just right click the upgrade in Windows Servicing and hit “deploy”? What’s the advantage of creating a task sequence using full media?
Yes, that method also works. I have covered this method for Windows 11 22H2 upgrade.
I’m new to this but in my testing I’ve see my device reboot a few times and occasionally get stuck asking for a PIN to get passed MBAM managed BitLocker. I enter the PIN and it proceeds but ideally I would disable the protectors temporarily. Any suggestions on how to handle this? Could the disable and enable commands be added as steps in the task sequence?
Some of my machines update to Windows 11 without notice, but i didn’t approved Windows 11 upgrades.
I have an automatic update deployment rule with: CRitical upates, Definition updates, future pack, update roll-ups updates and upgrades.
How i prevent that my computers with Windows 10 2021 don’t get Windows 11 with this rule?
I have upgrades selected because some windows 10s computers are in older versions.
What about feature package? How can I upgrade with feature package on W10.
Thanks for article.
Hello Kemal,
When you upgrade a Windows system all packagse that you have installed previsously need to be reinstall as the Windows folder is create to a new one and the previous is name Windows.old.