


In this article, I will show you how to install SCCM client agent on Windows 11 computer using multiple methods. There are different ConfigMgr agent deployment methods for Windows 11.
To deploy SCCM client agent to Windows 11 computers, you can use any of the these methods.
After you install Windows 11, you must install the ConfigMgr client agent to manage the computers. With SCCM 2107 and above, you can install client agent on Windows 11, and it’s fully compatible.

If you are deploying Windows 11 using SCCM task sequence, the ConfigMgr agent is automatically installed on Windows 11. Here is a guide to deploy Windows 11 using SCCM.
There are multiple ways to deploy Configuration Manager client agents to our Windows 11 endpoints. Only when you install the client agent, you can manage the Windows 11 computers using SCCM.
Method 1 – Manually Install ConfigMgr Agent on Windows 11
Manually installing SCCM client agent is recommended when other installation methods aren’t working. Or you should use this method when you want to quickly install the agent on Windows 11 using the client agent setup files.
Sometimes you may encounter issues while installing SCCM client agent via client push installation method. The client agent may not install on a Windows machine, and you really want to find out why.
Although SCCM log files will log the errors however you may want to attempt manual install of SCCM agent and test.
To manually install SCCM client on Windows 11, you will need the client agent install files. The source files to ccmsetup.exe are available either on your primary server or CAS.
You must first copy the client agent install files manually from primary server to destination computer which will be Windows 11 computer in this case.
If you have installed Configuration Manager on C: drive, the ccmsetup.exe is located under C:\Program Files\Microsoft Configuration Manager\Client folder. Copy the entire client folder to destination computer and run the ccmsetup.exe file.
Here are the steps to manually install SCCM client agent on a Windows 11 computer.
- Login to the Windows 11 computer with an account that has admin privileges.
- Click Start and run the command prompt as administrator.
- Change the folder path to SCCM client agent install files.
- Run the command – ccmsetup.exe /install to manually install the agent.

The CCMSetup.exe command downloads needed files to install the client from a management point or a source location.
- The Windows Installer package client.msi that installs the client software
- Client prerequisites
- Updates and fixes for the Configuration Manager client
Method 2 – Using Client Push Method to Install SCCM Client Agent on Windows 11
Client push method is one of the easiest and recommend method to install SCCM client agent to your Windows 11 machines.
There are three main ways to use client push installation wizard :-
- When you configure client push installation for a site, client installation automatically runs on computers that the site discovers. This method is scoped to the site’s configured boundaries when those boundaries are configured as a boundary group.
- You can start the client push installation by running the Client Push Installation Wizard for a specific collection or resource within a collection.
- Use the Client Push Installation Wizard to install the Configuration Manager client, which you can use to query the result. The installation will succeed only if one of the items returned by the query is the Resource ID attribute of the System Resource class.
I will show you a simple example of client push which will install SCCM client agent on Windows 11 computer. Client push installation method works for Windows operating systems only.
Configure Client Push Installation Account
Before you initiate client push, ensure you have configured the client push install account. This account must have local administrator rights on the target computer to install the client.
If you don’t specify a client push installation account, Configuration Manager tries to use the site system computer account.
To configure client push install account, Administration\Overview\Site Configuration\Sites. On the top ribbon, click Client Installation Settings and select Client Push Installation.
On the client push installation properties window, select the accounts tab. Specify the accounts that can install the Configuration Manager client.
The accounts must be a member of local administrator group on the destination computer. You can specify multiple accounts. Click OK and close the properties box.

Note – To use client push from a secondary site, specify the account at the secondary site that initiates the client push.
Initiate Client Push Installation on Windows 11 Computers
We will now look at the steps to perform client push installation to install SCCM client agent on Windows 11 computer.
You can perform client push install either on a single Windows 11 device or on an entire device collection. You can also create a device collection for Windows 11 in SCCM and push the client agents.
In the Configuration Manager console, go to Assets and Compliance\Overview\Devices. Right click Windows 11 device and click Install Client.

The Configuration Manager client push installation wizard will help you to push the client agents to Windows 11 devices. On the before you begin window, click Next.
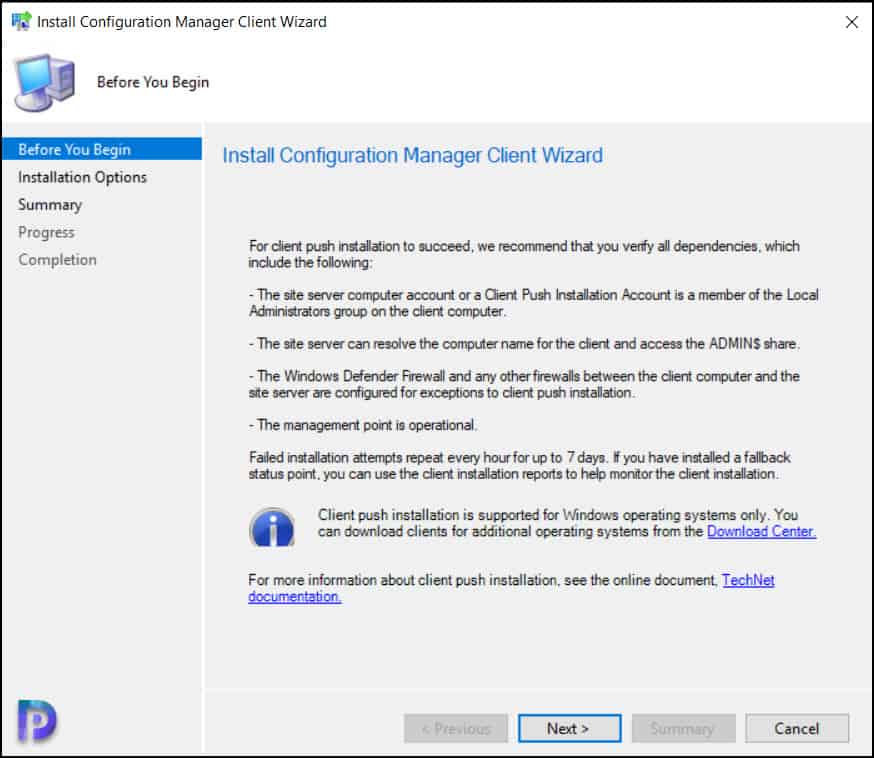
On the Installation Options window, you see client push options. Select Install the client software from a specified site, click the drop-down and choose the correct site. Click Next.

Review the settings on Summary window and click Next.

On the Completion window, click Close.

For troubleshooting client push installation issues, the log files are located in C:\Windows\ccmsetup\Logs folder on the client computer.
On our Windows 11 computer, let’s check if the SCCM client agent has been installed successfully or not. Using the CMTrace log file viewer, open the ccmsetup.log.
The ccmsetup.log contains the entire client agent installation process. If there are any errors during client installation, it should show up in this log file along with error code.
The line Ccmsetup is exiting with return code 0 confirms the client agent has been installed successfully.

If the client agent is installed on Windows 11 machine, the client agent should report the details to the SCCM console.
In the SCCM console, go to Assets and Compliance and select Devices. Look for the Windows 11 device and here the client column shows as Yes and client activity as Active.
This means the client agent can now talk to SCCM without any issues. You can also see the client version details along with site code and currently logged on user.

Method 3 – Windows 11 SCCM Client Agent Software update-based installation
One of the methods that you can use to install SCCM client agent on Windows 11 is software update-based installation.
I can say this method isn’t used much, at least, I have not seen many using this method to install client agents. You can always prefer client push installation over this method.
Software update-based client installation publishes the client to a software update point as a software update. Use this method for a first-time installation or upgrade.
If the Configuration Manager client is installed on a computer, the computer receives client policy from the site. This policy includes the software update-point server name and port from which to get software updates.
For software update-based installation, use the same Windows Server Update Services (WSUS) server for client installation and software updates. This server must be the active software update point in a primary site.
If the Configuration Manager client isn’t installed on a computer, configure and assign a Group Policy Object. The Group Policy specifies the server name of the software update point.
Here is now you can enable Software update-based installation in Configuration Manager.
- In the Configuration Manager console, go to the Administration > Site Configuration, and select the Sites node.
- Select the site for which you want to configure software update-based client installation.
- On the Home tab of the ribbon, in the Settings group, select Client Installation Settings, and then select Software Update-Based Client Installation.
- Select Enable software update-based client installation.

Method 4 – Install SCCM Client Agent on Windows 11 using Group Policy
Group policy is another method to deploy client agents to Windows 11 computers. You can use Group Policy in Active Directory Domain Services to publish or assign the Configuration Manager client.
The client installs when the computer starts. When you use Group Policy, the client appears in Add or Remove Programs in Control Panel. The user can install it from there.
Let’s create a group policy to deploy SCCM client agents to Windows 11 machines. You don’t need to create and link a GPO at domain level.
If you have got computers running Windows 11, you can move them to a OU and apply the new GPO to Windows 11 OU.
Create a GPO to deploy ConfigMgr Agent to Windows 11 Computers
Launch the group policy management console. Expand your domain and create a new group policy object.
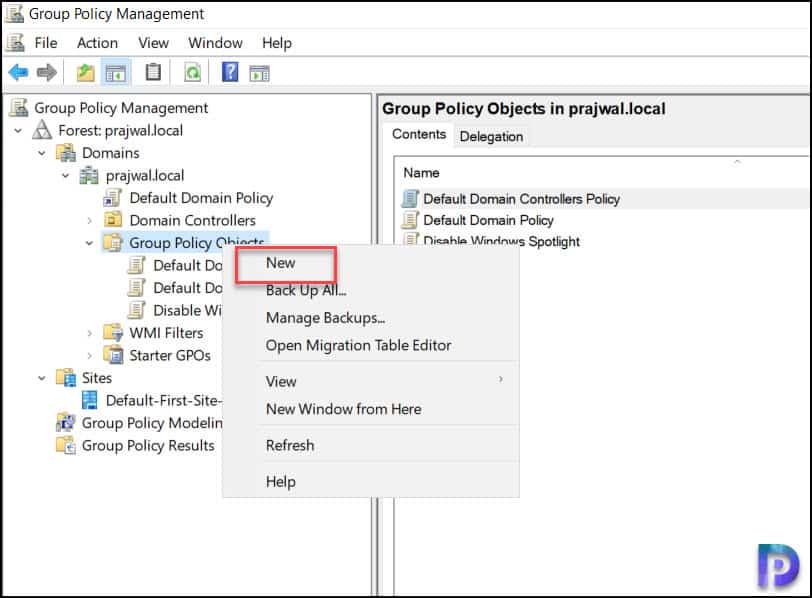
Specify the GPO name as Install ConfigMgr Agent and click OK.

in the Group Policy Management Editor, expand Computer Configuration, Policies and right click on Administrative Templates and click on Add/Remove Templates.

You can add the ConfigMgr assignment and install templates by clicking on Add button.
ConfigMgr ADM Templates
The Configuration Manager templates (ConfigMgr ADM Templates) are located in ConfigMg Media\SMSSETUP\TOOLS\ConfigMgrADMTemplates.
You can also add the templates from <Drive>:Program Files\Microsoft Configuration Manager\tools\ConfigMgrADMTemplates. You need to add 2 templates ConfigMgrAssignment.adm and ConfigMgrInstallation.adm.
- ConfigMgrAssignment.adm – This policy configures site assignment for Configuration Manager clients. The Site Assignment Retry Interval (Mins) specifies how frequently the client attempts to assign to the site. The Site Assignment Retry Duration (Hours) specifies how long the client attempts to assign to the site before failing.
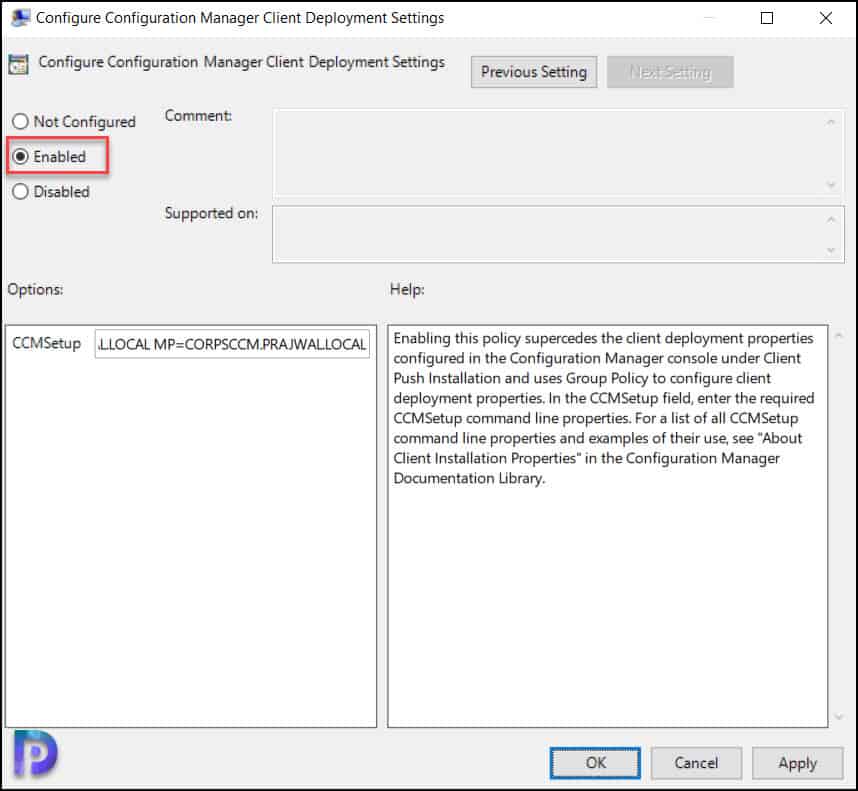
- ConfigMgrInstallation.adm – Enabling this policy supersedes the client deployment properties configured in the Configuration Manager console under Client Push Installation and uses Group Policy to configure client deployment properties. In the CCMSetup field, enter the required CCMSetup command line properties. For a list of all CCMSetup command line properties and examples of their use, see “About Client Installation Properties” in the Configuration Manager Documentation Library.

When you add the ConfigMgr ADM templates, they are in not configured state. Meaning, each of these templates needs to be configured separately.

First edit the Configure Configuration Manager site assignment ADM template.
- Enable the template by selecting Enabled.
- Assigned Site – Enter the site code.
- Site Assignment Retry Interval – 60 minutes by default
- Site Assignment Retry Duration (Hours) – 12 hours by default
Click Apply and OK.

Edit the Configure Configuration Manager client deployment settings template. Enable the policy and specify the ccmsetup options as per below command.
CCMSetup.exe SMSSITECODE=sitecode FSP=FSP name MP=management point server name
Click Apply and OK.
Assign ConfigMgr Client Package
Under Computer Configuration expand Policies, Software Settings. Right click Software Installation and click New > Package.

Use the Windows Installer package CCMSetup.msi for Group Policy-based installations. This file is found in the ConfigMgr Install directory\bin\i386 folder on the site server.
Browse to the .msi file and Select the deployment method as Assigned. Click OK.

In the GPMC editor, select software installation, and you should find the ConfigMgr client agent.

Finally, you can choose to apply this policy at domain level or at OU level. Select the Windows 11 OU and link this new policy to deploy the SCCM client agents.
Method 5 – Automatically Install ConfigMgr Agents on Windows 11
You can configure the site to automatically use client push for newly discovered Windows 11 computers. This method works best when you want to upgrade ConfigMgr client agent on existing computers.
- In the Configuration Manager console, go to the Administration> Site Configuration, and select the Sites node.
- Select the site for which you want to configure automatic site-wide client push installation.
- On the Home tab of the ribbon, in the Settings group, select Client Installation Settings, and then select Client Push Installation.
- On the General tab of the Client Push Installation Properties window, select Enable automatic site-wide client push installation.

