In this article, I will show you can send custom notifications using Intune (Endpoint Manager). Microsoft Intune can be used to send custom notifications to managed iOS/iPadOS and Android devices.
Custom notifications is an useful feature in Intune to send important message to users. For example, you can send a notification to the user of a single device to communicate an urgent request, such as restarting the device to complete installation of an update.
You can send notifications to a single user or even include Azure AD group to target notifications to multiple users. The Intune custom notifications aren’t supported by macOS and Windows devices. You cannot send the custom notifications to macOS, Windows 10 and Windows 11 devices enrolled in Intune.
When you send custom notifications using Intune, the notifications appear as standard push notifications from the Company Portal app on a user’s device. Very similar to what you see notifications from other applications on the device.
On iOS/iPadOS devices, if the Company Portal app is open when the notification is received, the notification displays in the app instead of being a push notification. The notification remains until the user dismisses it.
So, what exactly is Intune custom notification message? The custom notification messages include a short title and a message body of 500 characters or fewer. These messages can be customized for any general communication purpose.
If you are testing the custom notifications feature for the first time, I recommend sending the notification to a test user group. Once you find it works well, you can send it to other groups.
Intune Custom Notifications Prerequisites
To send custom notifications in Intune requires the following prerequisites:
- To send custom notifications to groups, your account must have the following RBAC permission in Intune – Organization > Update.
- Your account must have the following RBAC permission in Intune: Remote tasks > Send custom notifications.
- Notifications will appear on enrolled devices only. Use the following guides to enroll devices in Intune.
- The Company Portal app must be installed and updated to latest version on MDM enrolled devices.
- The Company Portal app must be allowed to send push notifications.
Limitations of Custom Notifications
The custom notifications in Intune have got following limitations:
- Remember that Custom notifications have the character limit where the title of the message has a 50-character limit and 500-character message limits.
- Intune doesn’t save text from previously sent custom notifications. If you want to send the same message, you must create a new notification.
- Intune has a limit of sending 10 custom messages per hour to the same device.
- The Intune custom notifications aren’t supported by macOS and Windows devices.
- On Android, Google Play Services is a required dependency.
Send Custom Notifications using Intune
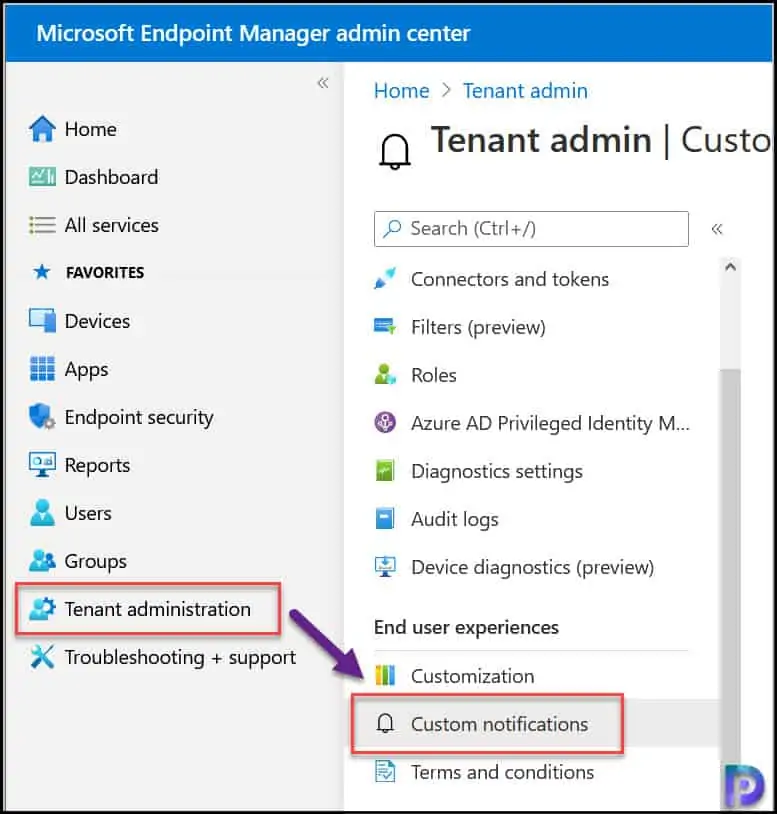
Let’s see how to send custom notifications using Intune. First, sign in to the Microsoft Endpoint Manager admin center. Go to Tenant administration > Custom notifications.

On the Basics tab, specify the title and body of the custom notification. Keep it precise and meaningful.
- Title – Specify a title for this notification. The titles are limited to 50 characters.
- Body – Specify the message. Messages are limited to 500 characters. Yes, the symbols and special characters can be included in the message.
Click Next.

On the Assignments tab, you must select groups to send this notification to. Custom notifications are meant for users and not devices. The groups that you include here must contain users. If the group contains devices, they will be ignored and notifications will be sent to only users.
Click Add Groups.

Select the Azure AD groups to which you want to send the notification. Click Next.

On the Review + Create tab, review the information and when ready to send the notification, select Create.

After you click Create, the Intune processes message. A notification appears in the top-right corner of the screen with the message Sending Custom Notification – Successfully sent custom notification. This confirms the custom notification is sent.

How Custom Notifications Looks on Android Devices
The notification appears on the Android device and should be visible on the lock screen. The message details are shown based on the settings that you have configured on your phone. Most people avoid displaying sensitive information on lock screen and the message can be read only after unlocking the phone.
The below screen is an example of custom notification message on Samsung Note 10 Android phone. The notification remains until the user dismisses it. If you have set the notifications to display additional information, you can read the custom notification message on the screen.

How Custom Notifications looks on iPadOS/iOS devices
On iOS/iPadOS devices, if the Company Portal app is open when the notification is received, the notification displays in the app instead of being a push notification.


