In this post I will show you how to manually backup the BitLocker recovery key to Active Directory. This should also help you to backup recovery information in AD after BitLocker is turned ON in Windows OS.
BitLocker is an encryption feature available in Windows 10 Professional and Enterprise editions. However it requires a Trusted Platform Module (TPM) on the system. When used with TPM, BitLocker provides the best security.
There are some situations where you might need to manually upload the BitLocker key to AD :-
- Imagine that you have imaged a machine with Windows 10 OS. You enable BitLocker encryption and join the machine to domain.You might now want to backup the BitLocker key to AD.
- May be the machine was not connected to the network when BitLocker was enabled. Hence the recovery information couldn’t be saved to Active Directory.
- Probably the Group policy setting to save the recovery information to AD was not enabled at the time of encryption.
- You notice that computer object in AD doesn’t show the BitLocker recovery key. You troubleshoot the issue and fix the group policy issue. However you might want to manually save the key to AD.
Manually Backup BitLocker Recovery Key to AD
There is an easy way to manually backup BitLocker Recovery key to Active Directory. You do not need to decrypt and re-encrypt the drive to store the recovery information in AD.
First of all you require local admin rights to run manage-bde commands. So ensure you are using the correct account to perform the steps.
On your Windows 10 computer, you can use manage-bde.exe command to save the recovery information in AD. If you have not enabled BitLocker encryption, you must first do that. Encrypt your hard drive and temporarily save the recovery key in a file.
Most of all remember that the below steps will work only if the client machine has received the group policy setting to save the information to AD. Otherwise you will see the error: Group Policy does not permit the storage of recovery information to Active Directory. The operation was not attempted.
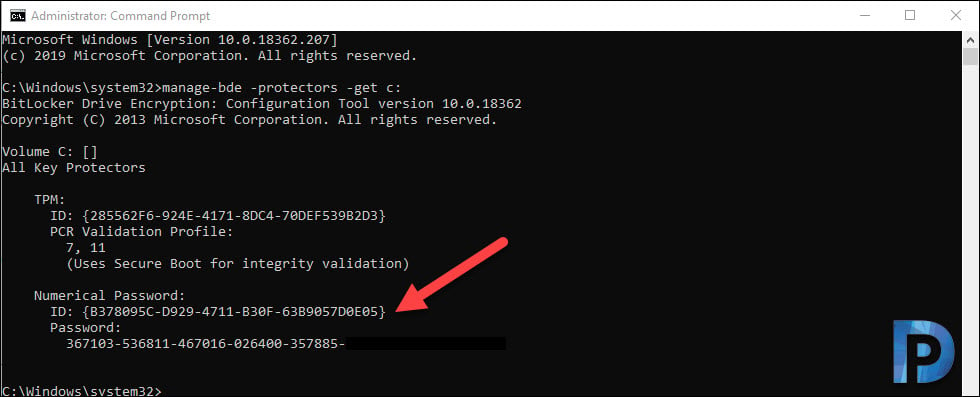
Open an elevated command prompt and run the below command.
manage-bde -protectors -get c:
Running the above command outputs the TPM details, Numerical password and BitLocker recovery key. Note down the numerical password protector of the volume.
To manually backup BitLocker recovery key to Active Directory, run the below command. Remember to replace -id with your Numerical Password.
manage-bde -protectors -adbackup c: -id {B378095C-D929-4711-B30F-63B9057D0E05}
Finally look for the message “Recovery information was successfully backed up to Active Directory”.


So … what do you do when you need to get that key?
Just… you know, minor question there…
How do you backup keys to Azure AD through Command Line after the enabling Bitlocker through command prompt and backed up on AD. I just wanted to add another backup to Azure AD via command line.
Is there a way to automate this for machines that were encrypted before the GPO was applied? Don’t want to have to touch 25 machines if I can help it.
I’m running a test machine at home, disconnected from our work network….
Even though the GPO is applied, the system was able to enable Bitlocker AND when I type those commands, it even tells me the backup was successful!!!
Sounds like a bug.
Because BitLocker is on your machine, not the work network and once you’re connected to the internet, you’re connected to Azure.
Thanks Prajwal !!
Maybe a stupid question… how can you find the information in AD ?
Is there a way to query the server for a list of computers for which the recovery key was already backed up?
There’s also a PowerShell module available (must have Bitlocker feature enabled if in Server OS):
https://docs.microsoft.com/en-us/powershell/module/bitlocker/?view=win10-ps
Same functionality just different interface if you want/need.
Thank you Prajwal. This post really helped me.
Thanks that is really helpful