


This post covers the steps to configure Active Directory for LAPS. In short we will prepare our Active Directory for implementing LAPS.
In my previous post, we saw how to install and deploy Microsoft LAPS. We installed the LAPS on management computer and using the GPO we deployed the local administrator password solution to the client machines.
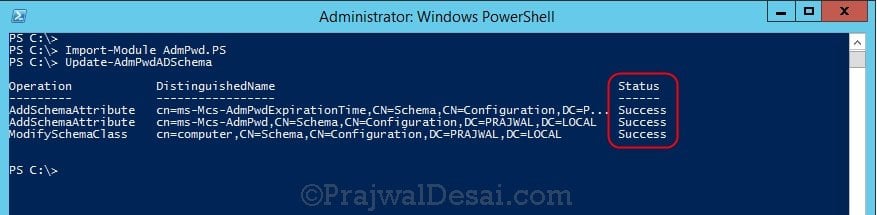
First of all the Active Directory Schema must be extended by two new attributes. These store the password of the managed local Administrator account for each computer. In addition ot that the time-stamp of password expiration is also stored. We will update the Schema by importing the PowerShell module.

How to Configure Active directory for LAPS
To configure Active Directory for LAPS, you must first extend the AD Schema. Most of all ensure that the user account that you use for this process should be a member of Schema Admins Active Directory group.
- ms-Mcs-AdmPwd – Stores the password in clear text
- ms-Mcs-AdmPwdExpirationTime – Stores the time to reset the password
Update the Schema using PowerShell
To update the Schema you first need to import the PowerShell module. Open up an Administrative PowerShell window and enter the below command:
Import-module AdmPwd.PS
Update-AdmPwdADSchema (This command updates the schema)
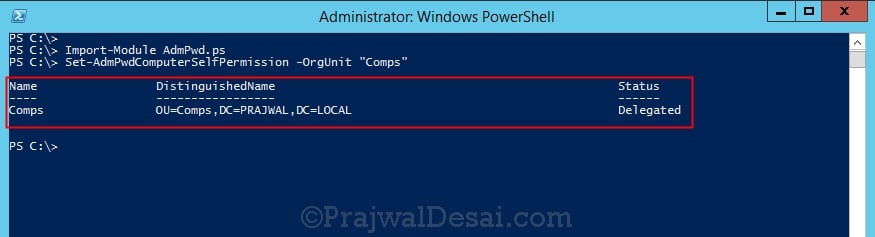
In the next step we will grant computers the ability to update their password attribute using the Set-AdmPwdComputerSelfPermission command.
In this example I have got the client computers in “Comps OU”. The Write permission on the ms-Mcs-AdmPwdExpirationTime and ms-Mcs-AdmPwd attributes of all computer accounts has to be added to the SELF built-in account. This is required so that the machine can update the password and expiration timestamp of its own managed local Administrator password. You may need to run Import-module AdmPwd.PS if this is a new window.
Set-AdmPwdComputerSelfPermission -OrgUnit <name of the OU to delegate permissions>
Repeat this procedure for any additional OUs that contain computer accounts.
Removing the extended rights
In the next step you must restrict the ability to view the password to specific users and groups. Therefore remove “All extended rights” from users and groups that don’t require to read the value of attribute ms-Mcs-AdmPwd. This is required because the All Extended rights/permissions permission also gives permission to read confidential attributes.
If you want to do this for all computers just repeat the next steps on each OU that contains those computers. You may skip this on sub-containers of already processed OUs unless you have disabled permission inheritance.
1. Open ADSIEdit
2. Right click the OU that contains the computer accounts that you are installing this solution on and select Properties.
3. Click the Security tab.
4. Click Advanced.
5. Select the Group(s) or User(s) that you don’t want to be able to read the password and then click Edit.
6. Uncheck All extended rights.
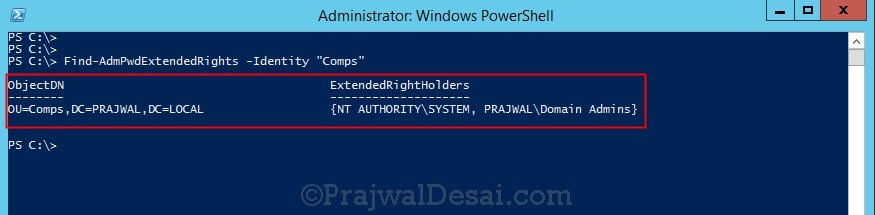
To quickly find which security principals have extended rights to the OU you can use PowerShell cmdlet. You may need to run Import-module AdmPwd.PS if this is a new window.
Find-AdmPwdExtendedrights -identity “OU NAME”
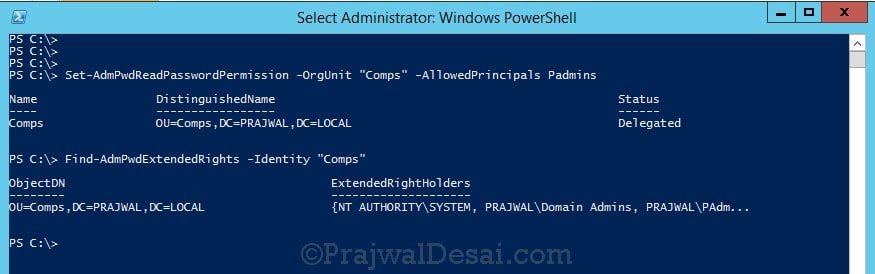
In the next step we will grant rights to users to allow them to retrieve a computer’s password. We will use Set-AdmPwdReadPasswordPermission command to do this.
Set-AdmPwdReadPasswordPermission -OrgUnit <name of the OU to delegate permissions> -AllowedPrincipals <users or groups>

it anyone have problem import admpwd.ps1 in dc windows 2016?
Import-Module : The specified module ‘AdmPwd.PS1’ was not loaded because no valid module file was found in any module directory.
At line:1 char:1
+ Import-Module AdmPwd.PS1
+ ~~~~~~~~~~~~~~~~~~~~~~~~
+ CategoryInfo : ResourceUnavailable: (AdmPwd.PS1:String) [Import-Module], FileNotFoundException
+ FullyQualifiedErrorId : Modules_ModuleNotFound,Microsoft.PowerShell.Commands.ImportModuleCommand
I have several computers that are not registering LAPS passwords. They are in the same OUs as others that are and looking under Control Panel/Apps I can see LAPS installed.
Eliminating computers that have no LastLogon date, I have about 30 out of 220 that are not registering.
Any thoughts on what to try? Thanks
I audit enrollment with the PowerShell
Get-ADComputer -Filter {Enabled -EQ $True} -Properties * | sort-object -property Name | Select-Object Name,OperatingSystem,ms-Mcs-AdmPwd, @{Name=”ms-mcs-admpwdexpirationtime”;Expression={$([datetime]::FromFileTime([convert]::ToInt64($_.”ms-MCS-AdmPwdExpirationTime”,10)))}} , @{Name=”Last Logon”;Expression={$([datetime]::FromFileTime([convert]::ToInt64($_.”LastLogon”,10)))}} | ConvertTo-Csv -Delimiter “,” -NoTypeInformation | Out-File $CSVFile -Encoding ASCII
Do you know what could be the reason update-admpwdadschema fails to perform the 3rd step
error is
Operation AddschemaAttributes Success
Operation AddschemaAttributes Success
Operation Update-AwdPWdAdSchema Failed
Update-AdmPwdADSchema : The requested attribute does not exist.
At line:1 char:1
+ Update-AdmPwdADSchema
Has anyone ever encountered an error with the Set-AdmPwdReadPasswordPermission cmdlet where “the trust relationship between the primary domain and the trusted domain failed”? I can confirm that the trust relationship between the LAPS management server, AD/DS, and clients are valid, as the execution of the Test-ComputerSecureChannel returns as True.
I found out what the issue was. Apparently, the cmdlet only accepts the sAMAccountName of the group which to delegate permissions, and not the common name or display name, nor the PowerShell object when storing the results of the get-adgroup cmdlets to a variable.
Thank you for providing an easy manual how to implement LAPS into our forest. Like a Sir! Best Regards from Switzerland
In a default installation of Active Directory Domain Services, would there be any side effect to removing users’ “All extended rights” to an OU or a computer object?
Hameedullah,
Due to the default inheritance model, all subordinate containers (including OUs) will inherit the permission set using Set-AdmPwdComputerSelfPermission. This can be seen in the LAPS_TechnicalSpecification, as item 6.2.2. The specification document can be downloaded from Microsoft at the same location as the LAPS installer.
An important note, Set-AdmPwdCOmputerSelfPermission does automagically apply to sub-OUs. Set-AdmPwdReadPasswordPermission cmdlet does not apply permissions to sub-OUs. Each sub-OU requires you explicitly set read/reset permissions separately.
I think I get why, but it’s a pain to remember later.
Hey,
It cobbled together a powershell script to do this through all OUs from a top OU container. The thought is I will now schedule this to run or just remember it and run it manually and it will set the Read permission. Hope it is helpful for someone.
# ERROR REPORTING ALL
Set-StrictMode -Version latest
#———————————————————-
# LOAD ASSEMBLIES AND MODULES
#———————————————————-
Try
{
Import-Module ActiveDirectory -ErrorAction Stop
}
Catch
{
Write-Host “[ERROR]`t AdmPwd.PS Module couldn’t be loaded. Script will stop!”
Exit 1
}
#———————————————————-
#START FUNCTIONS
#———————————————————-
Function Start-Commands
{
Add-Read-Permissions
}
Function Add-Read-Permissions
{
#Change the search criteria in Searchbase as needed
Get-ADOrganizationalUnit -filter * -Searchbase “OU=Computers,OU=subOUname,DC=Domain_name,DC=org” |
foreach {
try
{
Write-Host “OU Name:” $($_.DistinguishedName)
Set-AdmPwdReadPasswordPermission -Identity “$($_.DistinguishedName)” -AllowedPrincipals “IT-LAPS”
}
Catch { Write-Host “[ERROR]`t Error : $($_.Exception.Message)” }
}#End foreach
}#Closes Add-Read-Permissions
Write-Host “STARTED SCRIPT`r`n”
Start-Commands
Write-Host “STOPPED SCRIPT”
Dear Sir Desai,
many thanks from your Article, but i have one question if we have an OU within another OU so how we can apply LAPS of that OU.
Mumbai (Main OU)
Workstations (Inside Mumbai OU)
Here to to access Workstations inside Mumbai in Powershell