


In this post I will cover the steps to install SCCM 2012. This post is a part of SCCM 2012 installation guides. After installing prerequisites, configuring firewall exceptions, SQL server installation, it’s now time to install Configuration Manager 2012.
If you want to install SCCM 2012 from scratch, here are the posts that you must go through.
- SCCM 2012 Lab Setup – Link
- Active Directory Installation – Link
- Creating System Management Container, Extend schema – Link
- Configuration Manager 2012 Prerequisites – Link
- SQL Server Installation for SCCM 2012 – Link
- Configuring Firewall Exceptions – Link
Step-by-Step Guide to Install SCCM 2012
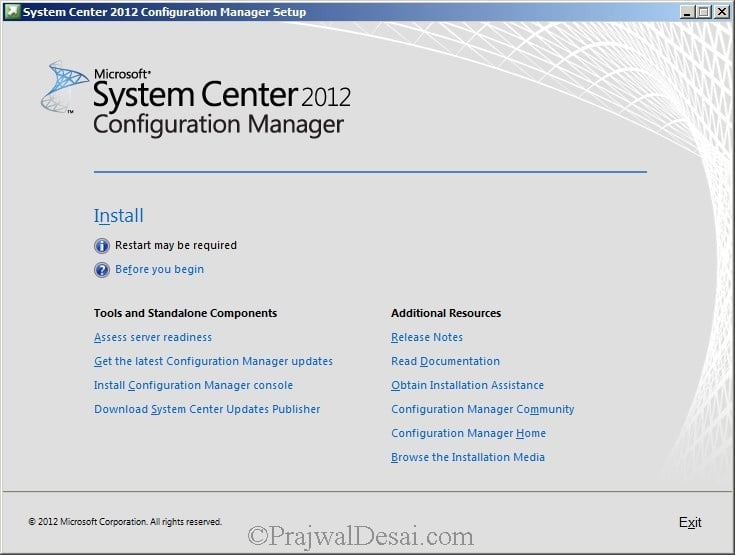
Insert the Configuration manager 2012 DVD into the DVD drive or you can copy the setup files to a folder. Run the file splash to launch the Setup screen. Click Install to the begin the Installation.

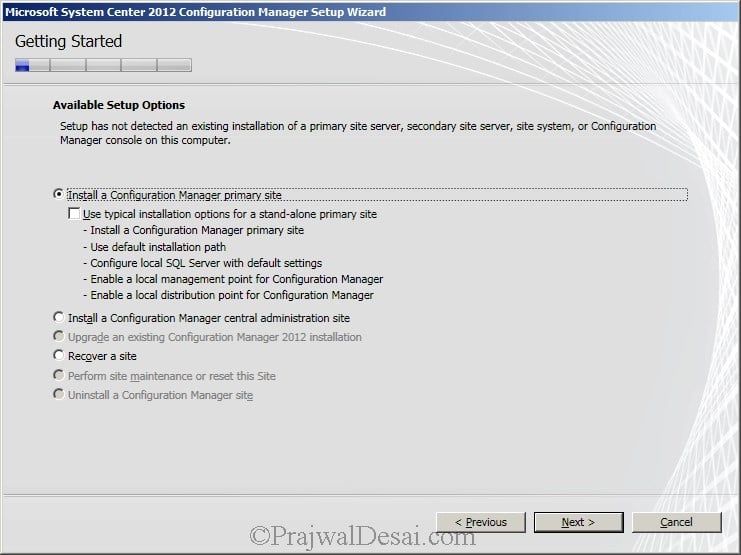
Select Install a Configuration Manager Primary Site. Click Next.
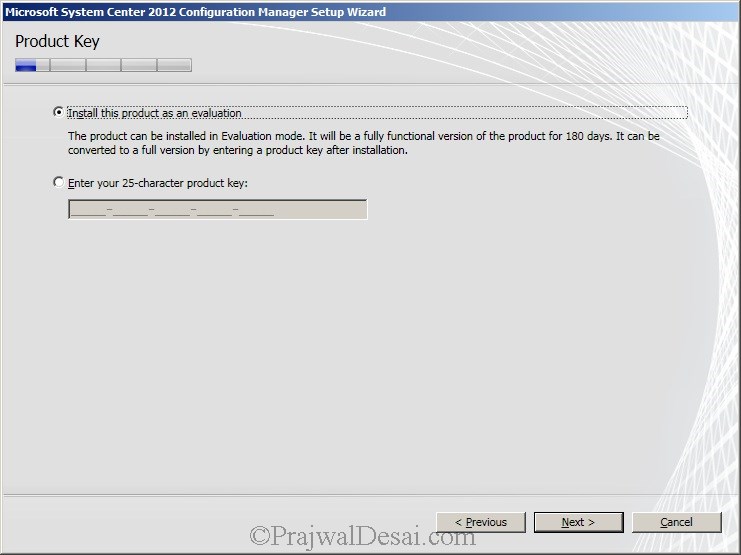
Choose Install the Product as an evaluation. If you have the key, enter the key. Click Next.
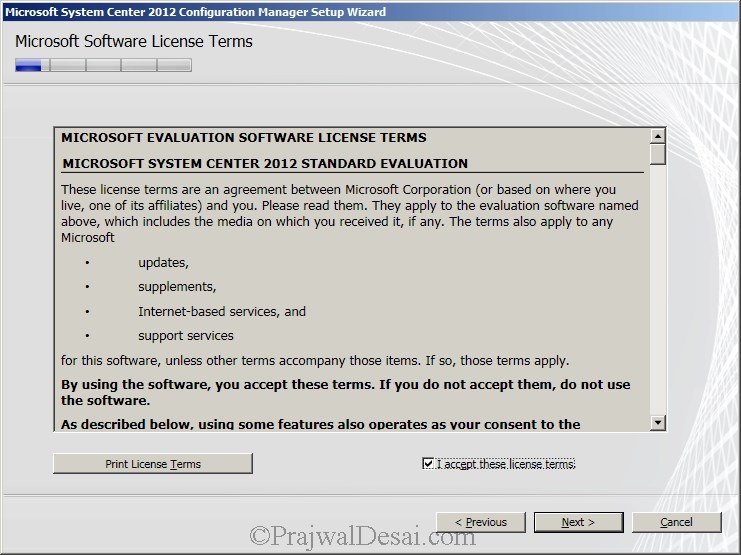
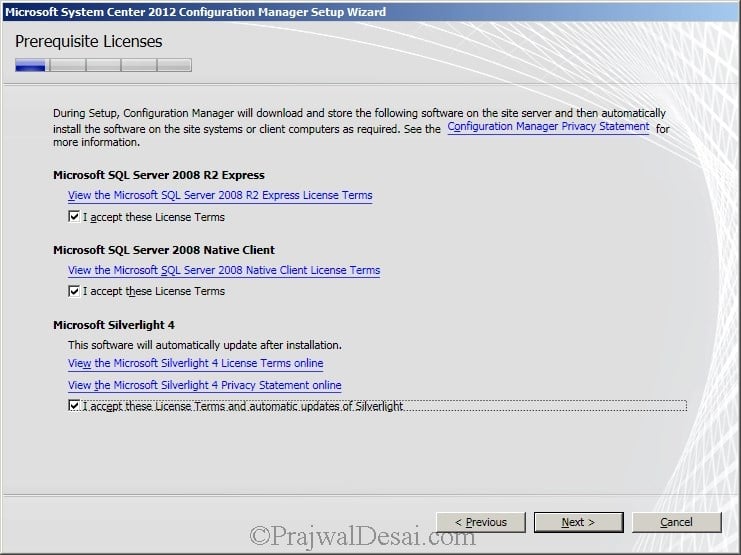
Check the box I accept these license terms. Click Next.
Accept the license terms and click Next.
Prerequisite Download
To download prerequisite files there are 2 options. The first option Download Required Files downloads the updates directly from Microsoft.
Choose the second option Use previously downloaded files if you have downloaded the updates to your computer.
In my case I will go with first option. Click Browse and store the updates in a folder. Click Next.

On the Server Language Selection Page choose the desired language and click Next.

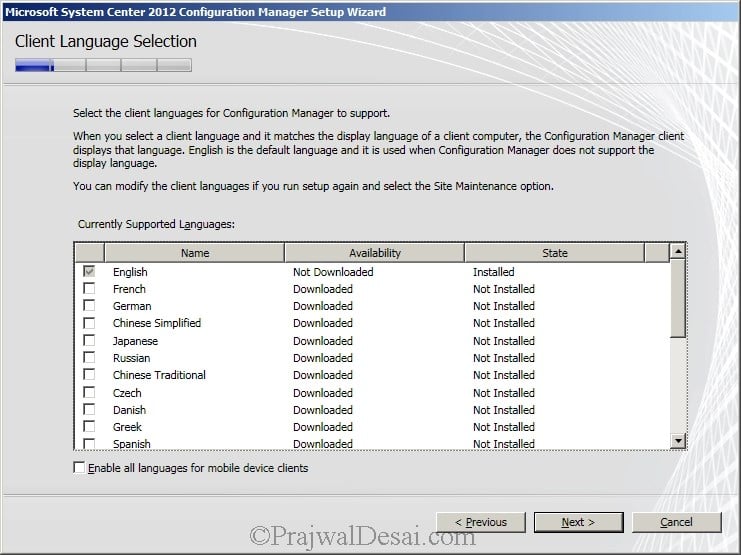
On the Client Language Selection Page choose the desired language and click Next.
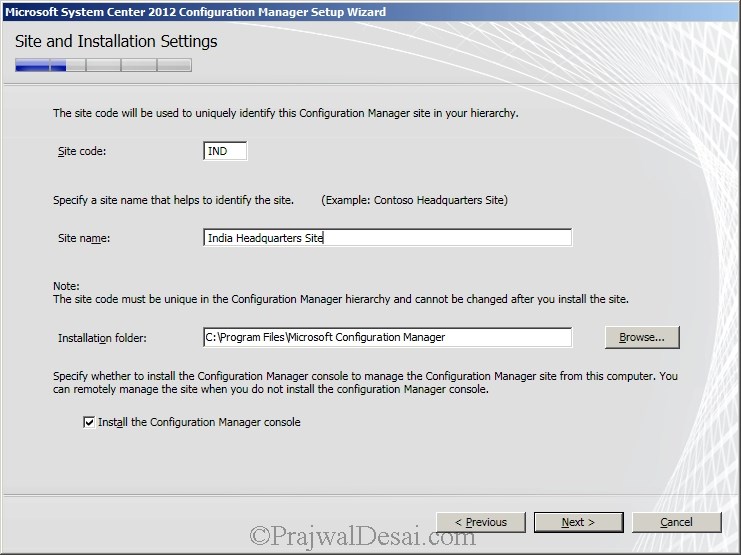
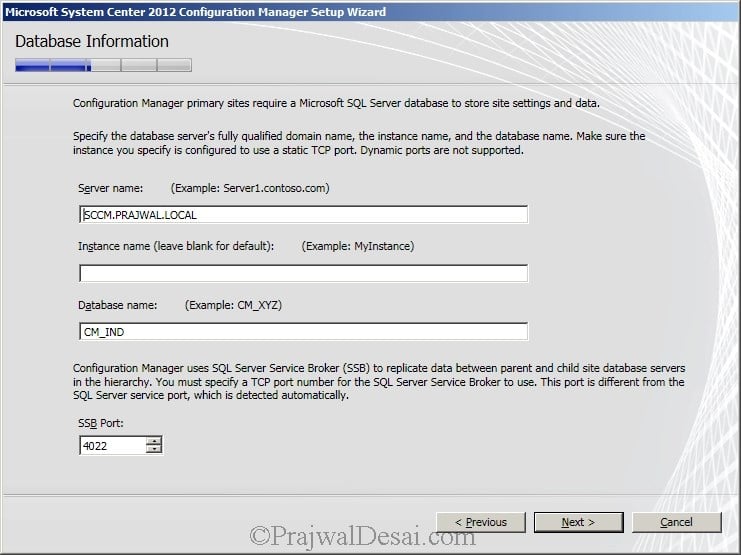
Provide the Site Code and Site Name. Site Code identifies the site if you have multiple sites where SCCM is installed. Click Next.
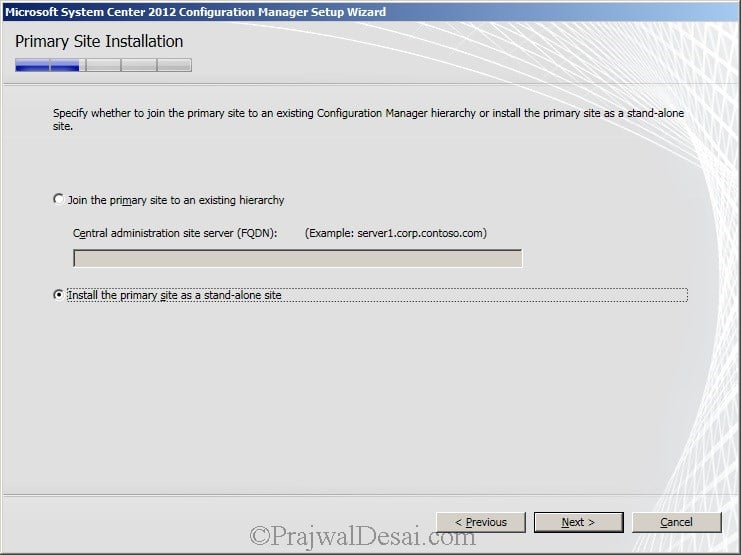
A stand-alone primary site supports up to 1,00,000 clients. If your Organizations has more than 1,00,000 clients then you must choose Central Administration Site Server. In our lab I have less than 10 clients so Select Install the Primary Site as a standalone site. Click Next.
Once you install primary site you will not have an option to join it to hierarchy. Click Yes to continue.

Leave the options to default and click Next.
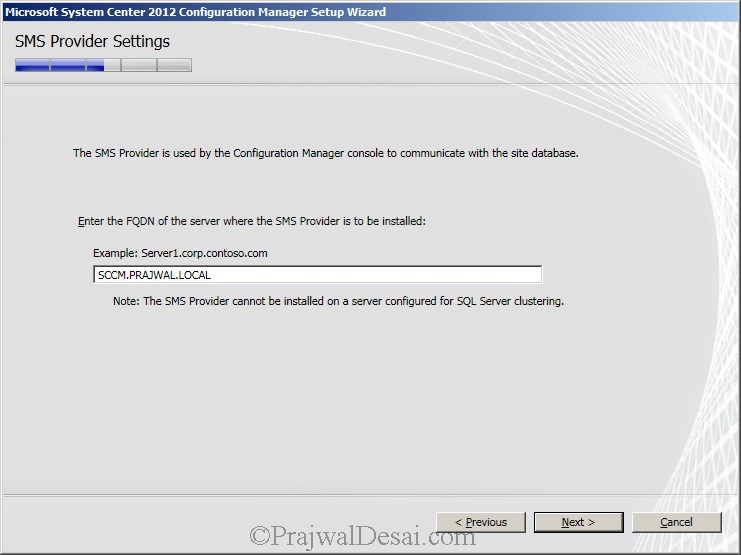
The SMS provider is the current server. Click Next.
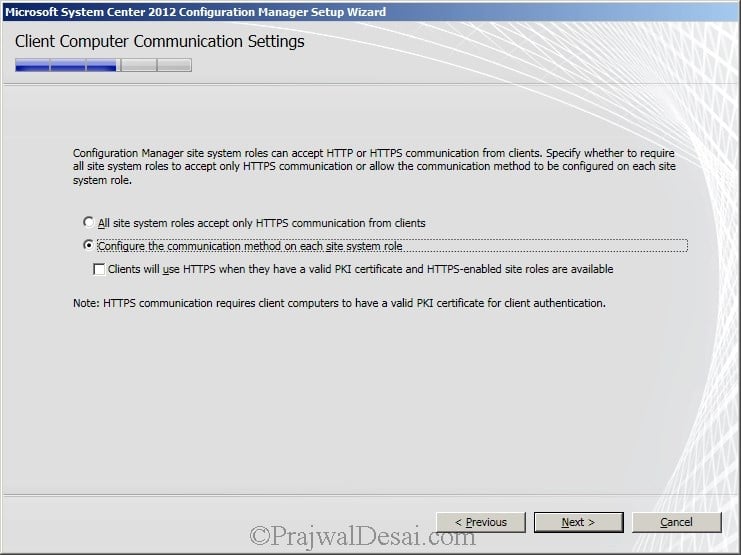
Select the option Configure the communication method on each site system role and do not check the check box below it.
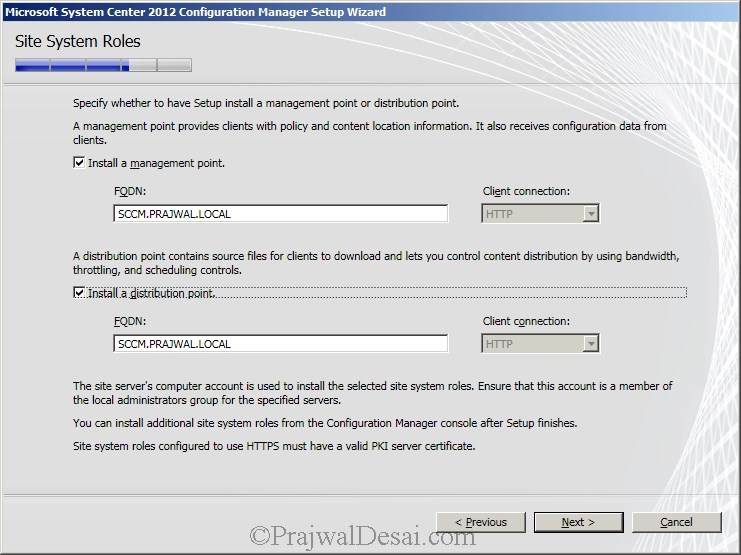
Make sure Install a Management point and Install a Distribution point are selected. Click Next.
On the CEIP Page, select the appropriate option and click Next. On the Settings Summary page click Next.

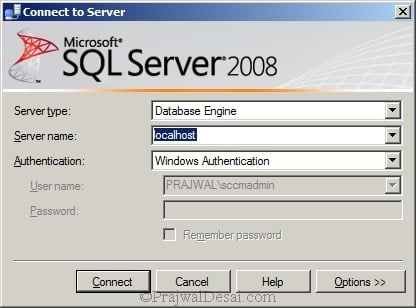
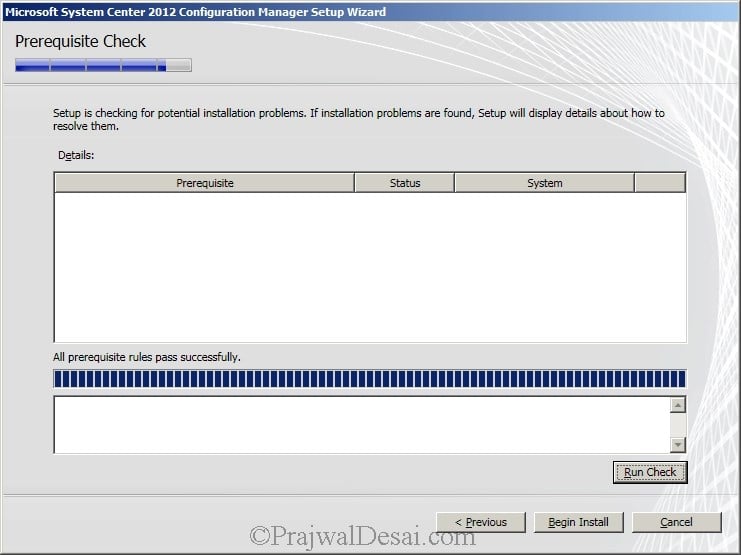
Configuration Manager 2012 Prerequisite Checks
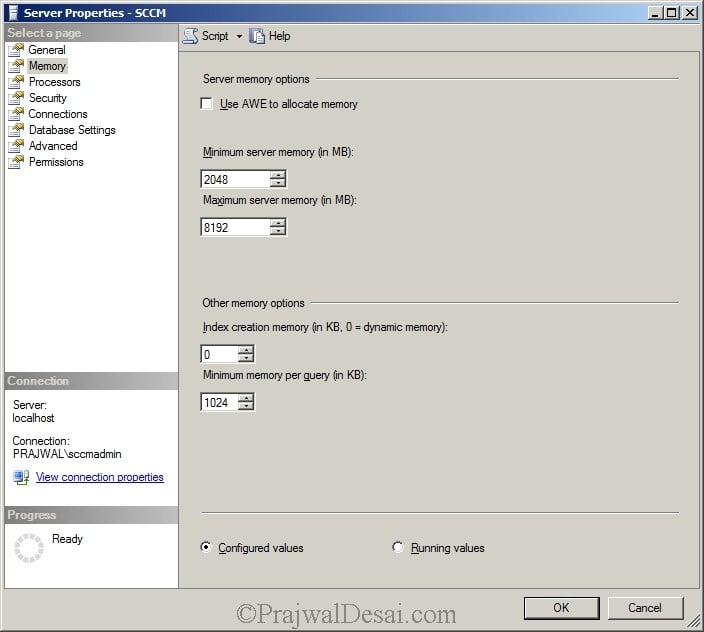
You can see there are 2 warnings related to SQL server memory usage. By Default SQL server is configured to use unlimited memory. You must limit the SQL memory to avoid this warning.
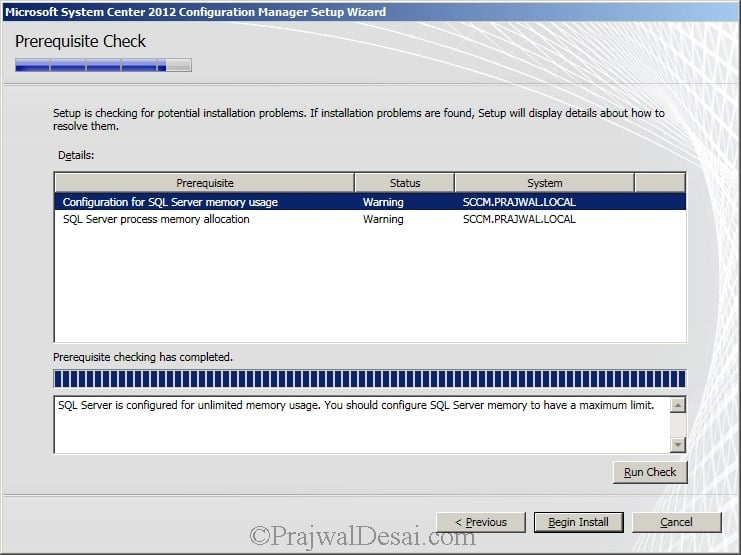
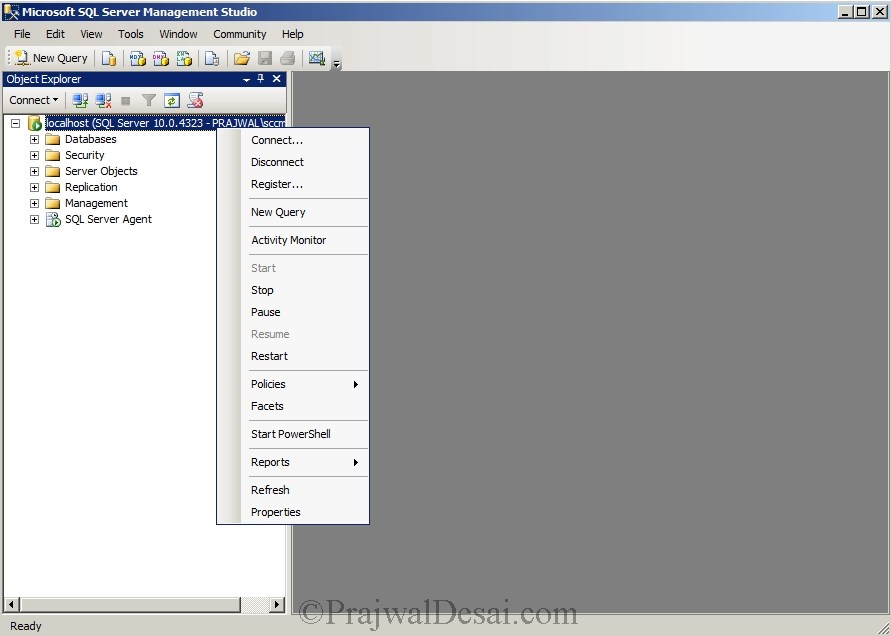
To limit the SQL memory, click All Programs, Microsoft SQL Server 2008, SQL Server Management Studio.

Type in the server name as localhost and click Connect.
Now right click SQL server and select Properties.
Select the memory option and provide 2048 MB as Minimum server memory and Maximum server memory as 8192 MB. Click OK and close the SQL management studio.
Now let’s run the check again. The Setup Wizard will recheck for prerequisites and now it should not show any warnings. Click Begin Install.
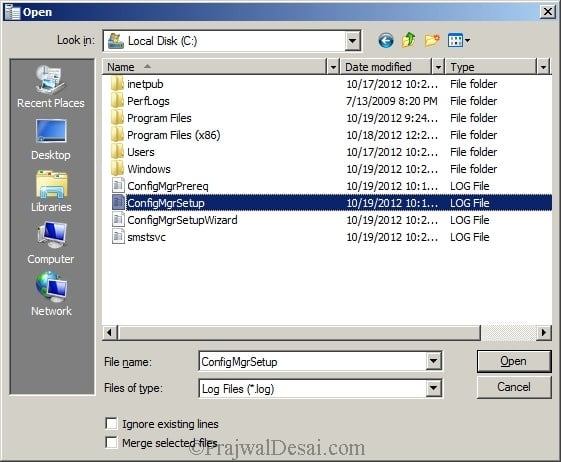
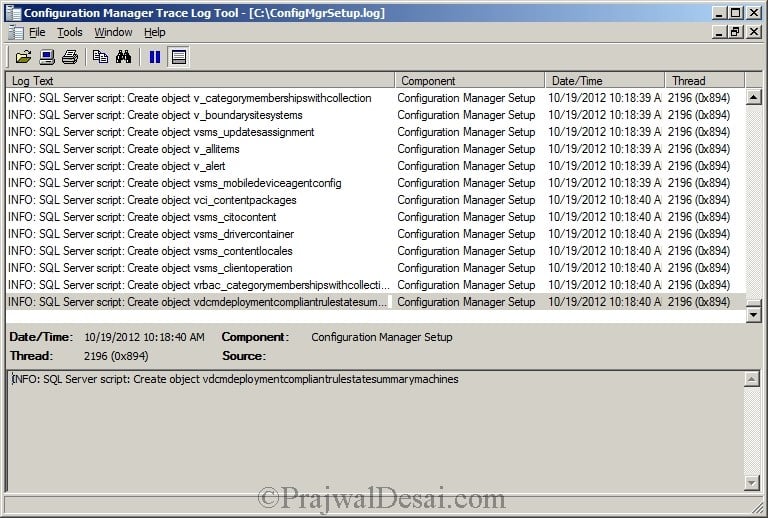
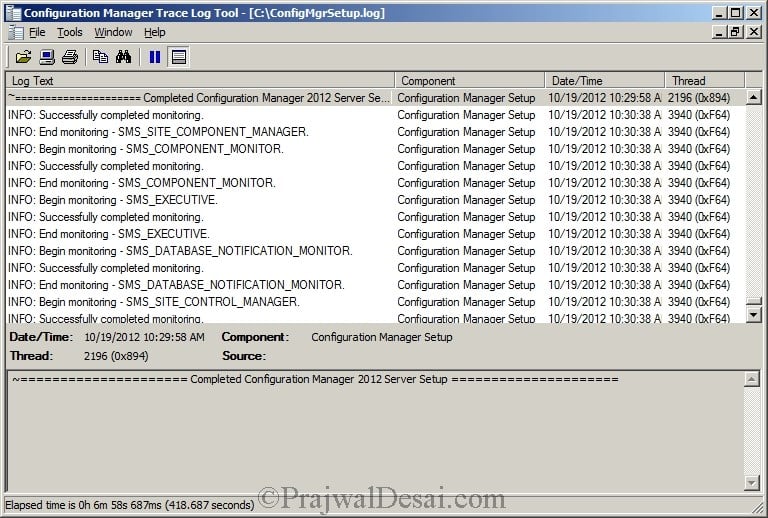
You can view the setup log file with a tool called CMTrace. The tool is located in SCCM 2012 source DVD under SMSSETUPTOOLS. Launch the CMTrace tool, open the log file ConfigMgrSetup.log located in C drive.
Monitor the SCCM 2012 installation by opening the ConfigMgrSetup.log file.
Finally the setup is complete. In the next post, we will take a look at post setup installation tasks.
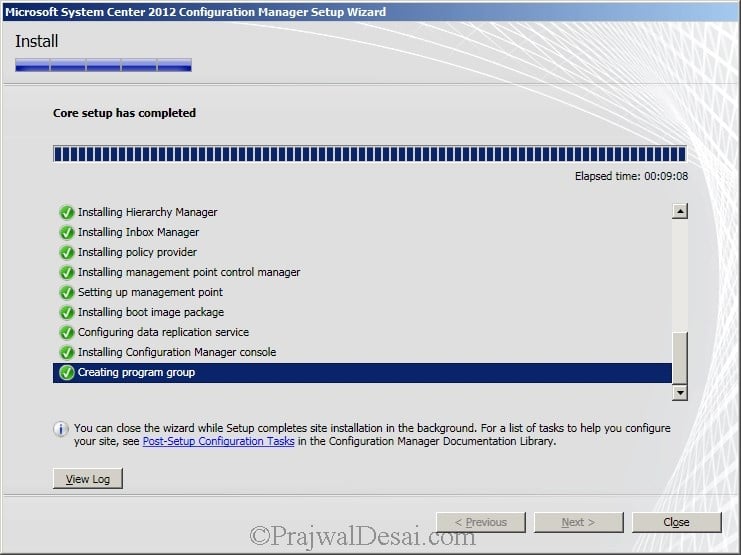 Notice the success message is also recorded in the log file.

What are your recommandation about the database files? Temp file?
@Ismael – Are you talking about the storage space required for DB files ?
HI,
What’s your recommandation about the configuration of the Database?
What’s size, how many files?
Hi,
What are your recommandation about the database files?
Temp file?
Error Logs :
INFO: Executing SQL Server Script: Create object fngetsitetablecheckconstraintstatements $$
INFO: Executing SQL Server Script: Create object fncompareuk $$
INFO: Executing SQL Server Script: Create object fnispknull $$
INFO: Executing SQL Server Script: Create object spcolltrackchangesforcollections $$
INFO: Executing SQL Server Script: Create object sp_createresourcefunction $$
INFO: Executing SQL Server Script: Create object sp_createresourceview $$
INFO: Executing SQL Server Script: Create object sprefreshallresourceviews $$
INFO: Executing SQL Server Script: Create object fngetsitetablefkrefconstraintstatements $$
INFO: Executing SQL Server Script: Create object spaddpartitionscheme $$
INFO: Executing SQL Server Script: Create object fncreatecolumnsfullex $$
INFO: Executing SQL Server Script: Create object spcreatedbmasterkey $$
INFO: Executing SQL Server Script: Create object spcreateandbackupsqlcert $$
INFO: Executing SQL Server Script: Create object sprenewssbcertificate $$
INFO: Executing SQL Server Script: Create object spconfigurefkforglobaltablespergroup $$
INFO: Executing SQL Server Script: Create object fngetsitetabledefaultconstraintstatements $$
INFO: Executing SQL Server Script: Create object fngettabletriggers $$
INFO: Executing SQL Server Script: Create object fngetsitetablefkconstraintstatements $$
INFO: Executing SQL Server Script: Create object fnquerycolumns $$
INFO: Executing SQL Server Script: Create object sprethrowerror $$
INFO: Executing SQL Server Script: Create object spconfiguresqldistributorandpublisher $$
INFO: Executing SQL Server Script: Create object spgeneratesiteapplicationdeleteupsertprocs $$
INFO: Executing SQL Server Script: Create object sp_removeinventoryview $$
INFO: Executing SQL Server Script: Create object fnisvalidsitetabletopartition $$
INFO: Executing SQL Server Script: Create object fnprimarykeycolumnswithdir $$
INFO: Executing SQL Server Script: Create object fngetsitetableuniquekeyconstraints $$
INFO: Executing SQL Server Script: Create object fngetsitetableindexstatements $$
INFO: Executing SQL Server Script: Create object fncreatecolumnsfull $$
INFO: Executing SQL Server Script: Create object fngetsitetableukconstraintstatements $$
INFO: Executing SQL Server Script: Create object spconfiguresitepartitiontable $$
INFO: Executing SQL Server Script: Create object spconfigurecasforsitepartitiontable $$
INFO: Executing SQL Server Script: Create object fnprimarykeycolumns $$
INFO: Executing SQL Server Script: Create object fnuniquekeycolumns $$
INFO: Executing SQL Server Script: Create object fnnecomparepk $$
INFO: Executing SQL Server Script: Create object spgeneratechangeapplicationdeleteupsertprocs $$
INFO: Executing SQL Server Script: Create object spsedoconfigurelockableobjecttypes $$
INFO: Executing SQL Server Script: Create object vdrstables $$
INFO: Executing SQL Server Script: Create object vdrstableswithidentity $$
INFO: Executing SQL Server Script: Create object spdrscreategetfunctionsec $$
INFO: Executing SQL Server Script: Create object spconfigureservicebroker $$
INFO: Executing SQL Server Script: Create object spaddpartitioncheckconstraint $$
INFO: Executing SQL Server Script: Create object sp_createcollectionview $$
INFO: Executing SQL Server Script: Create object sp_createcollectionviewandfunction $$
INFO: Executing SQL Server Script: Create object sp_renewcollectionviews $$
INFO: Executing SQL Server Script: Create object spdrscreategetfunctionsecex $$
INFO: Executing SQL Server Script: Create object spdrscreategetfunctions $$
INFO: Executing SQL Server Script: Create object spdrsregeneratealldrssprocsandfuncs $$
INFO: Executing SQL Server Script: Create object fn1primarykeycolumn $$
INFO: Executing SQL Server Script: Create object spgenerateaudittriggers $$
INFO: Executing SQL Server Script: Create object spextrenewinvgroupextractviews $$
INFO: Executing SQL Server Script: Create object sp_renewresourceviews $$
INFO: Executing SQL Server Script: Create object spdrsresetlastversionsenttosite $$
INFO: Executing SQL Server Script: Create object spupgraderesetlastversionsentforallconnectedsites $$
INFO: Executing SQL Server Script: Create object sp_renewinvgroupviews $$
INFO: Executing SQL Server Script: Create object sp_renewsmsschemaviews $$
INFO: Executing SQL Server Script: Create object splogerror $$
INFO: Executing SQL Server Script: Create object spupdatessbroutes $$
INFO: Executing SQL Server Script: Create object spconfigurereplication $$
INFO: Executing SQL Server Script: Create object spconfigurecasforsitepartitiontables $$
INFO: Executing SQL Server Script: Create object spconfigurefkforglobaltables $$
INFO: Configuring database replication… $$
INFO: SQL Connection succeeded. Connection: DC01.RIMDC.COM CM_RN1, Type: Secure $$
INFO: Importing Asset Intelligence data. $$
INFO: SQL Connection succeeded. Connection: DC01.RIMDC.COM CM_RN1, Type: Secure $$
INFO: Starting to import data from CSV files… $$
INFO: Successfully created the dir D:\SCCMROOT\AI~ $$
INFO: Successfully retrieved data file, now expanding $$
INFO: Counted 9 files in AI cabfile $$
INFO: Extracted file D:\SCCMROOT\AI\LU_LicensedProduct.csv $$
INFO: Extracted file D:\SCCMROOT\AI\LU_Category.csv $$
INFO: Extracted file D:\SCCMROOT\AI\LU_HardwareRequirements.csv $$
INFO: Extracted file D:\SCCMROOT\AI\LU_MSProd.csv $$
INFO: Extracted file D:\SCCMROOT\AI\LU_SoftwareCode.csv $$
INFO: Extracted file D:\SCCMROOT\AI\LU_SoftwareHash.csv $$
ERROR(13): Failed to iterate cab file.~ $$
ERROR(13): Failed to expand the look up table files to the folder: D:\SCCMROOT\AI.~ $$
ERROR: Failed to import Asset Intelligence data into the site database.~ $$
~~===================== Completed Configuration Manager 2012 Server Setup ===================== $$
*****************************************************
***** Exiting ConfigMgr 2012 Setup Bootstrapper *****
*****************************************************
Hi, Finally I’ve done with my installation, i think so SCCM Setup files may be corrupted so re-downloaded setup package and its now working for me…and get installation done finally.
Many Thanks..
That’s nice..
Really, I am struggling with the error while installing CM 2002 on Srv 2019.
Hi,
I’ve installed all per-requisites ADK & UMT Tools kits, MS SQL 2012 with CU2. but now durring SCCM 2012 SP1 setup its error logs says that unable to create some tables on MSSQLSERVER SQL database, that’s why fails to create SCCM Database which causes failure to setup SCCM 2012 SP1 setup.
I’ve installed SQL Server and configured all sql services running with Domain User which is SCCM Admin.
Hi, I’ve done all pre-requisites setup before installing SCCM 2012 on my Test-Lab, but while setup of SCCM 2012 pre-requisites asking for UMT & ADK Tools not installed on server.
Can you please help-out me for the same ??
I believe you are installing SCCM 2012 SP1. As a prerequisite you have to download and install Windows Assessment and Deployment Kit for Windows 8 which can be downloaded from Microsoft.
Once downloaded, install Deployment tools, Windows PE and USMT.
I don’t see in any of your walk throughs where you mention you have to install 3.1GB of ADK or SCCM will not install.
You also didn’t specify (that I saw) that you have to disable dynamic ports on the SQL server. Which caused an hour of headache that Nirmesh was seeing.
I would mention in my post to disable the dynamic ports on SQL server only during the SQL installation, when you create a named instance that you want to use for SCCM or you have a default SQL instance installed and you create another named instance that you want to use for SCCM. In my post i have not created any named instance (except default instance) for SCCM 2012. Zak, Thanks for letting me know about this, i shall add a note in my post regarding this..
ADK must be installed before you install SCCM 2012 SP1, however this post shows the installation of SCCM 2012 and not SP1.
Can you share details about how to install ADK for SCCM 2012 SP1 ??
My posts on SCCM 2012 SP1 are on the way..
Hi Prajwal Thanks for sharing all this Materials with us I am currently doing some labs and I have problem with installation of SCCM.
I checked all the possible solutions but still didn’t able to resolve the issue: SQL server and SCCM installed on same server and working perfactly fine but some reason during the installation its saying : setup is unable to connect SQL server with the connection information provided verify the following:
instance name entered correctly
SQL instance name is not configure to use dynamic ports
Check the firewall for correct allowed port
account has permission to setup and connect sql instance
I checked all these and there is no issue with all so please help me to solve this issue.
Many Thanks
Nirmesh – what version of SQL server are you using ? Lab setup is here for your reference – https://www.prajwaldesai.com/deploying-sccm-2012-lab-setup/
Hi Prajwal Issue is solved now thanks…….
Great.. What made it work ?
Easy to understand,I like it!