

This article covers the steps to enable and configure third-party software updates using SCCM (ConfigMgr). You can use this SCCM third-party software updates deployment guide in your enterprise to setup 3rd party patching with SCCM.
The Third-Party Software Update Catalogs node in the Configuration Manager console allows you to subscribe to third-party catalogs, publish their updates to your software update point (SUP), and then deploy them to clients.
If you are planning to deploy third-party software updates using SCCM, there are a series of configurations that you require in place. I have covered the steps required to enable and configure SCCM Third-Party software updates. Refer to the guide on deploying software updates using SCCM.

Prerequisites for Setting up third-party software updates
The following are the list of prerequisites that are required for setting up the third-party software updates in SCCM.
- Make sure there is a sufficient disk space on the top-level software update point’s WSUSContent directory to store the source binary content for third-party software updates.
- The third-party software update synchronization service requires internet access.
- For the partner catalogs list, download.microsoft.com over HTTPS port 443 is needed.
- Internet access to any third-party catalogs and update content files. Additional ports apart from 443 may be needed.
- Third-party updates use the same proxy settings as the SUP.
Steps to Enable SCCM Third-Party Software Updates
We’ll now go through the steps to enable SCCM Third-Party software updates on the server. Perform each of the steps in sequential order to configure the third-party updates.
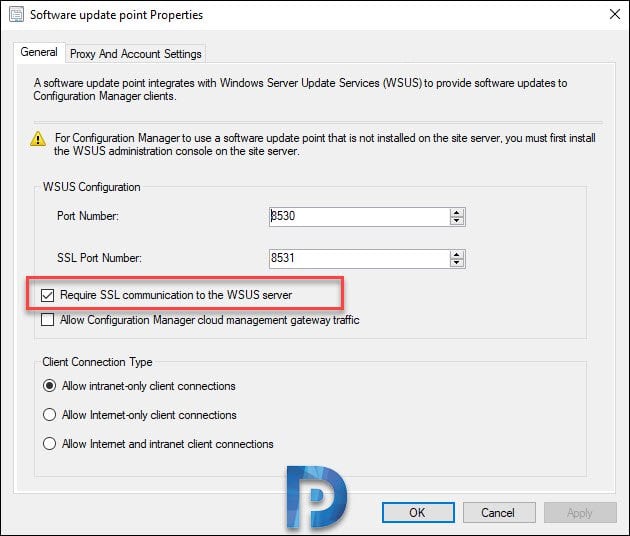
Step 1: Enable SSL on Software Update Point
Since custom SCCM catalogs require HTTPS, you must enable SSL communication on the Software Update Point. Note that SSL must be enabled on the SUP when it’s remote.
Use the following steps to enable the SSL on Software Update Point:
- Go to Administration > Overview > Site Configuration > Servers and Site System Roles.
- Select the server and in the bottom pane, right click Software Update Point and click Properties.
- Under WSUS configuration, enable “Require SSL Communication to the WSUS server“.
- Click Apply and OK.
Step 2: Enable third-party updates on Software Update Point
You can subscribe to third-party update catalogs in the Configuration Manager console if you enable this option. The updates can then be published to WSUS and distributed to clients. To enable and configure the feature for use, repeat the steps below once per hierarchy. If the top-level SUP’s WSUS server is ever replaced, the steps may need to be repeated.
Perform the following steps to enable third-party software updates on software update point:
- Launch Configuration Manager console.
- Navigate to Administration > Overview > Site Configuration > Sites.
- Select the site, right click and then select Configure Site Components > Software Update Point.
- Switch to Third-Party Updates tab and select the option Enable third-party software updates.
- Click Apply and OK.

Step 3: Configure WSUS Signing Certificate
In the above step, you enabled third-party updates on SUP. The next step is to configure WSUS signing certificate. This is important because custom catalogs must use HTTPS and the updates must be digitally signed.
Under SUP Properties > Third-party updates tab, you will find two options to configure WSUS signing certificate.
- Configuration Manager manages the certificate
- Manually manage the certificate
Both the above options are self-explanatory. Microsoft gives you two options to manage the WSUS signing certificate. You can tell Configuration Manager to automatically manage the third-party WSUS signing certificate using a self-signed certificate. If you need to manually configure the certificate, for example use a PKI certificate, you can do that using SCUP tool.

Step 4: Enable third-party software updates on the clients
In this step, you’ll learn how to enable third-party updates on the clients in the SCCM client settings. The setting sets the Windows Update agent policy for Allow signed updates for an intranet Microsoft update service location. This client setting also installs the WSUS signing certificate to the Trusted Publisher store on the client.
- Launch Configuration Manage console.
- Navigate to Administration > Overview > Client Settings.
- Right-click Default Client Settings and click Properties.
- Click Software Updates on left pane. Select Yes to Enable software updates on clients.
- Set Enable third-party software updates to Yes. Click Apply and OK.

Steps to Configure Third-Party Updates in SCCM
After you have enabled the third-party updates in SCCM, we will look at some basic configurations which involve adding custom catalogs, synchronizing third-party updates etc.
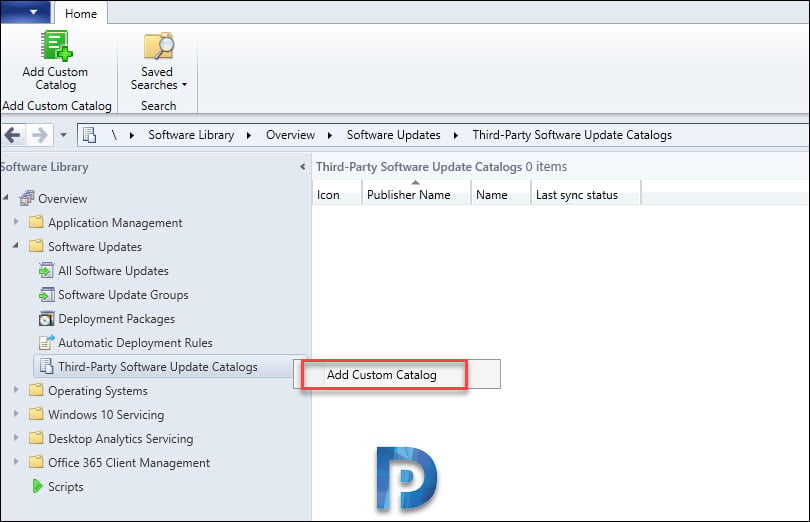
Step 1: Adding Custom Catalog in SCCM
Before you add a custom catalog in SCCM, you must know the differences between the Partner Catalogs vs Custom Catalogs. As an example, I will show you how to import a custom catalog (basically an Adobe SCUP catalog) which will enable us to deploy Adobe Reader updates using SCCM.
I will be adding the Adobe catalog whose URL is https://armmf.adobe.com/arm-manifests/win/SCUP/ReaderCatalog-2017.cab.
To import a custom catalog in SCCM, use these steps:
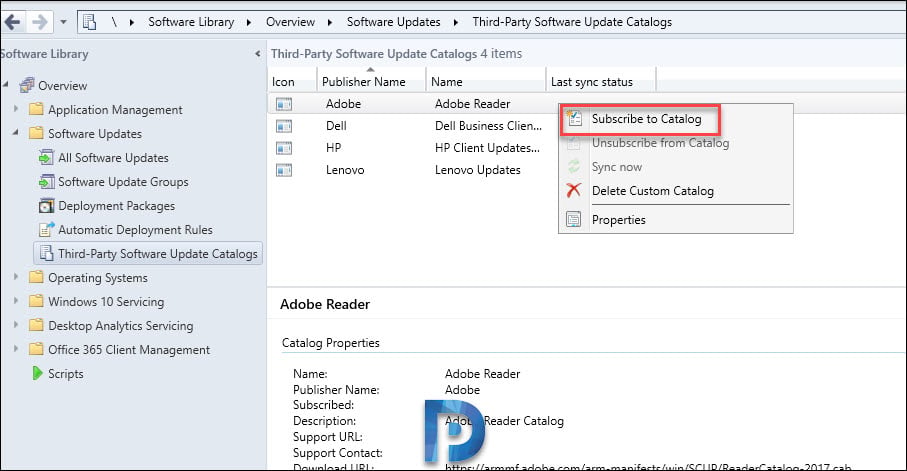
- Go to Software Library > Software Updates > Third-Party Software Update Catalogs.
- Right click Third-Party Software Update Catalogs and click Add Custom Catalog.
On the General tab of the Third-Party software updates custom catalogs wizard, enter the Download URL of the catalog. You must also enter the catalog description. Click Next.

On the Summary page, review the settings of the catalog that you are importing and click Next.
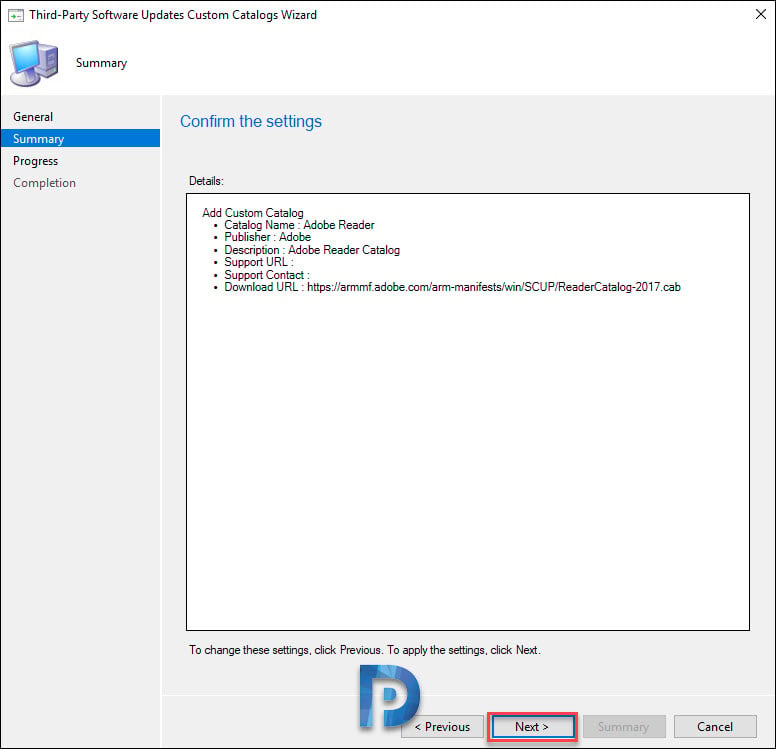
On the Completion window, click Close. This completes the steps to add a custom catalog in SCCM.

Step 2: Subscribe to SCCM Third-Party Catalog
In the above step, we successfully imported the Adobe Reader custom catalog into SCCM. After you import the catalog, the next step is to subscribe for the third-party catalog. Use the below procedure to subscribe to a third-party updates catalog in the SCCM.
Navigate to Software Library > Software Updates > Third-Party Software Update Catalogs. On the right pane, right-click the Adobe Reader catalog and select Subscribe to Catalog.
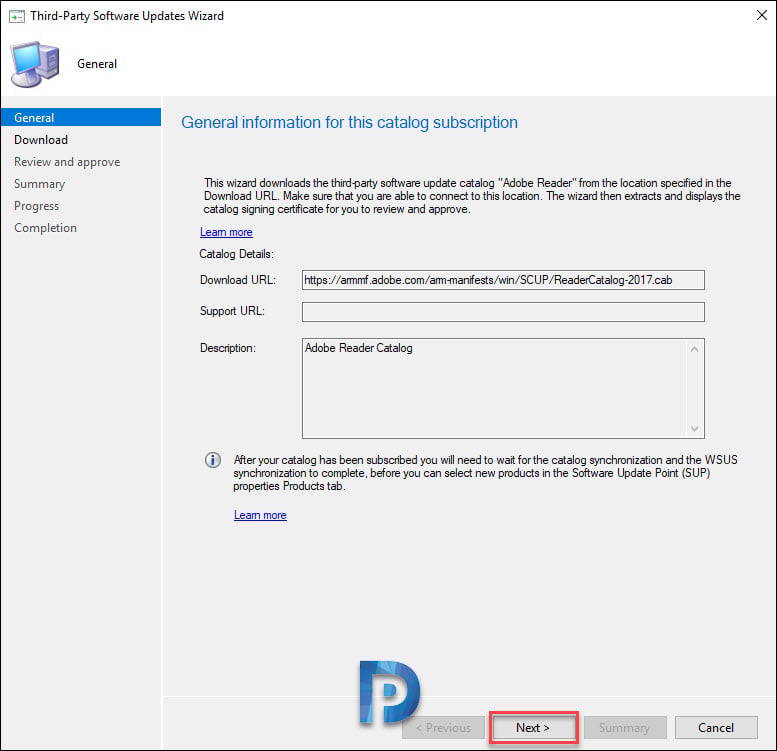
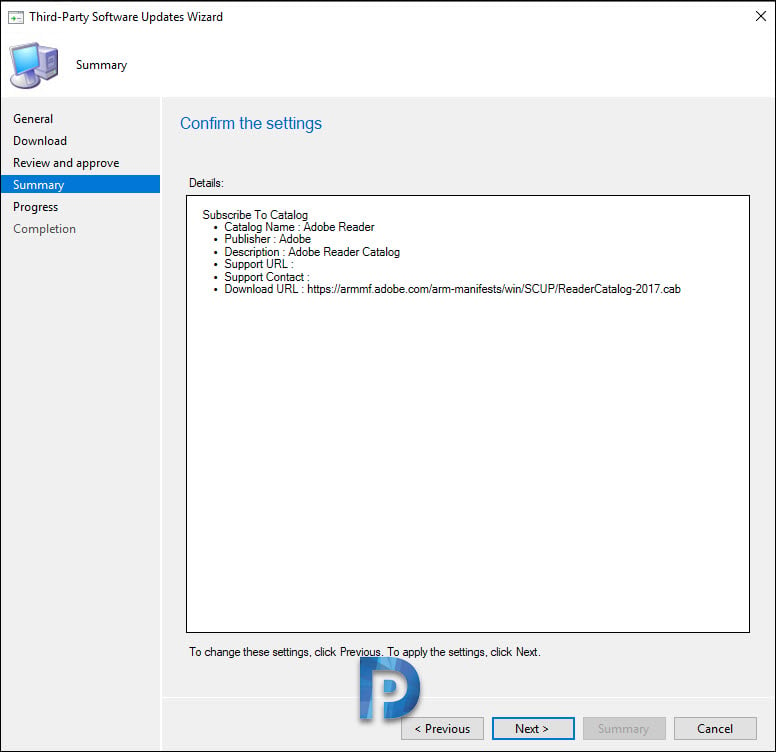
Notice that download URL is the same that you provided while adding the catalog. Click Next.
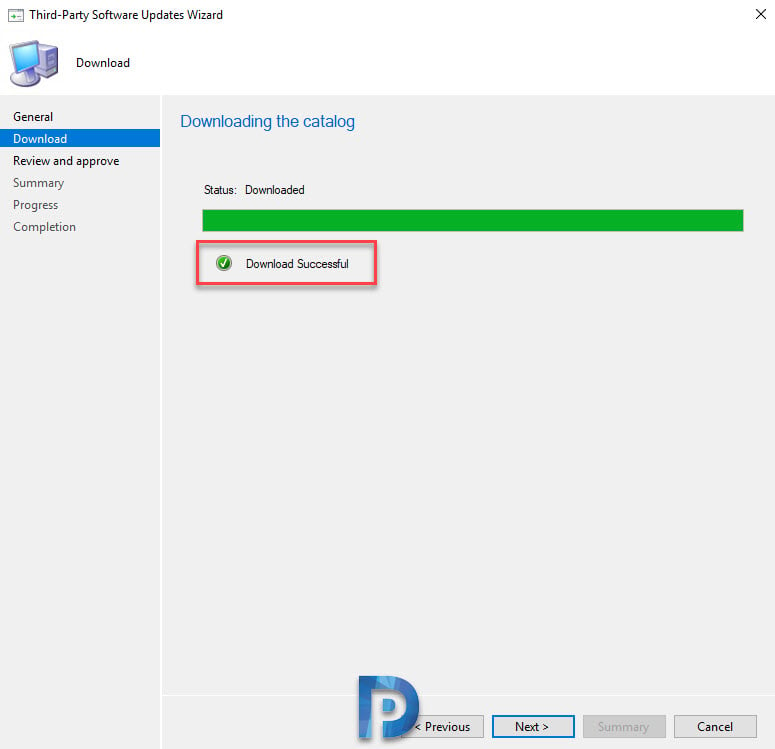
The catalog download was successful. Click Next.
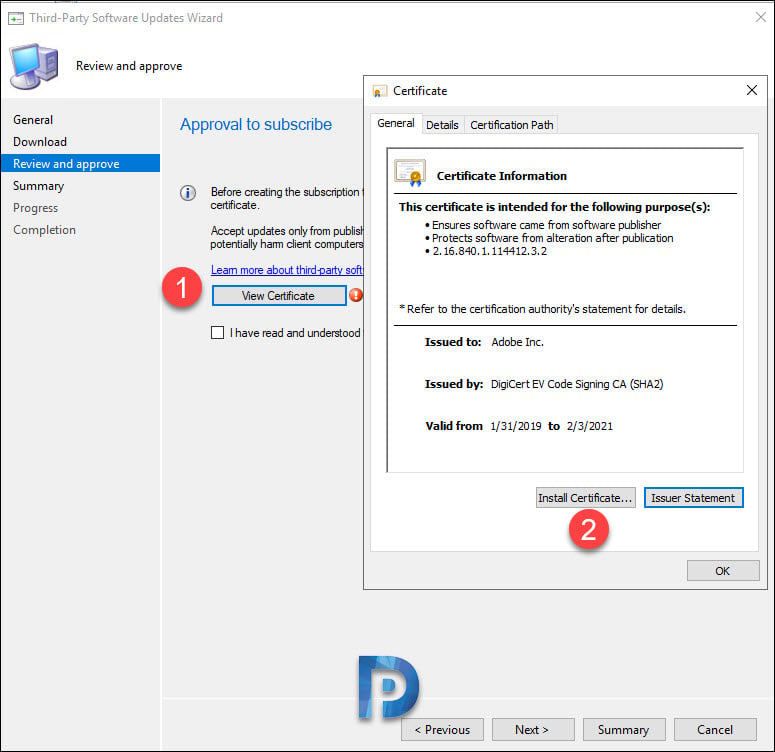
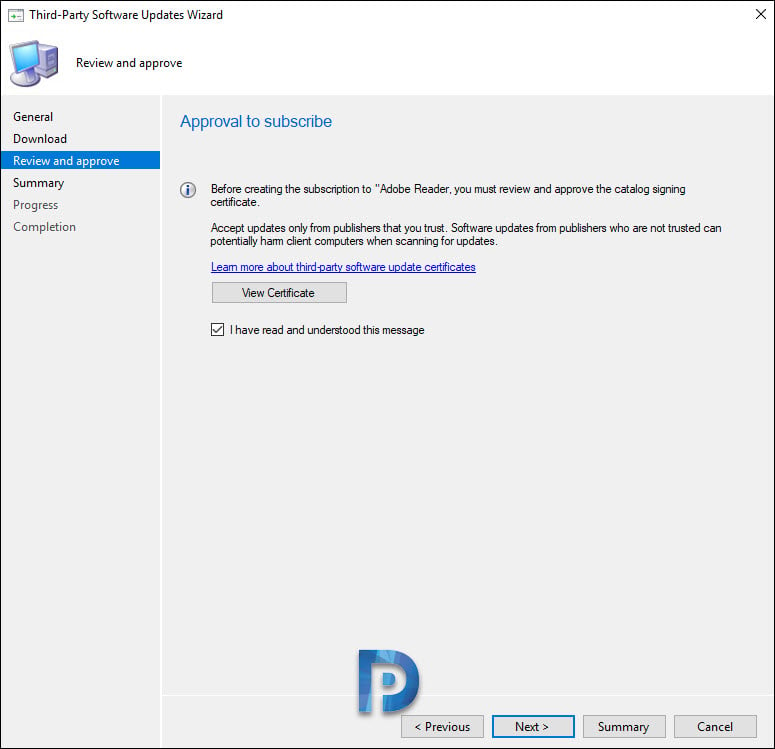
Before creating a subscription to Adobe Reader SCUP catalog, you must review and approve the catalog signing certificate. Click View Certificate. In the Certificate window, click Install Certificate. Ensure that you import the certificate and close the certificate import wizard.
Enable the checkbox, “I have read and understood this message“. Click Next.
On the Summary Page, click Next.
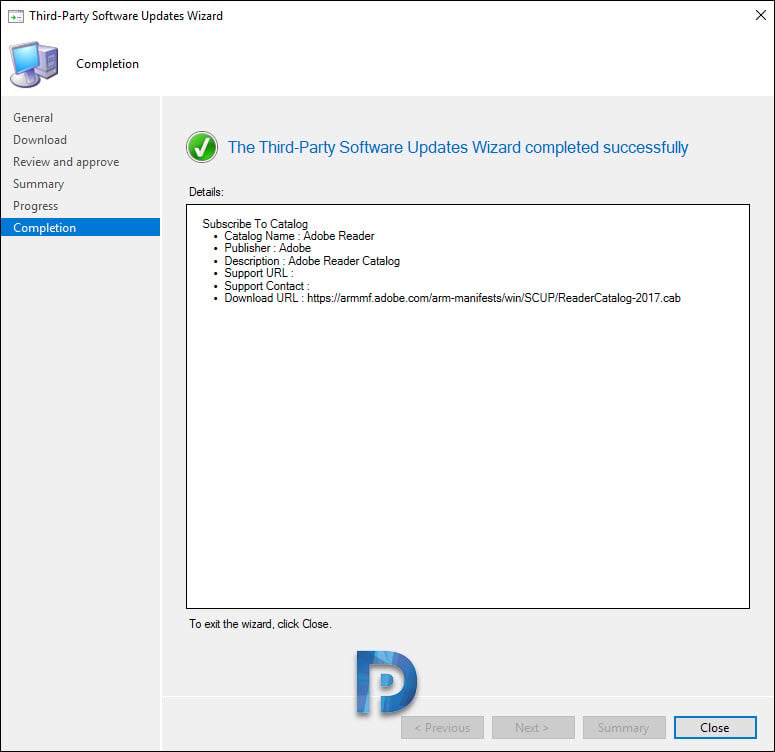
Click Close. That completes the steps to subscribe to a custom catalog.
Step 3: Synchronize Third-Party Updates in SCCM
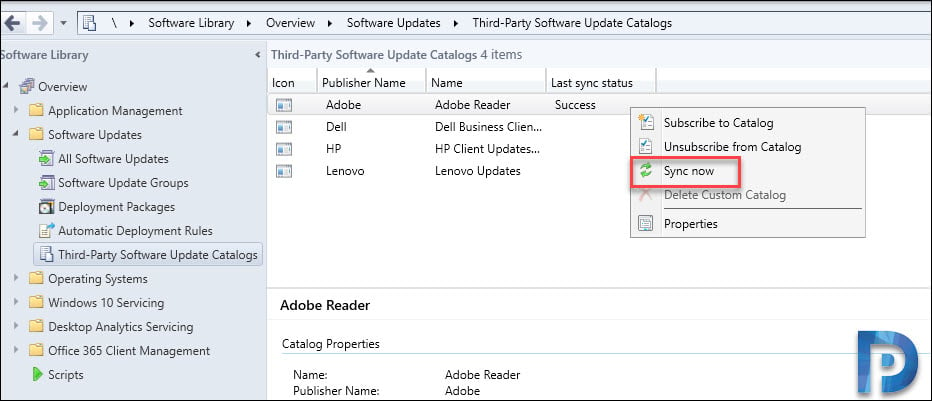
After you have successfully subscribed to the third-party updates catalog, you must synchronize the catalog so that you see the product updates contained in this catalog. To achieve that, right-click the Adobe Reader catalog and select Sync now. At this point, perform a manual software updates synchronization.
Step 4: Publish and deploy third-party software updates
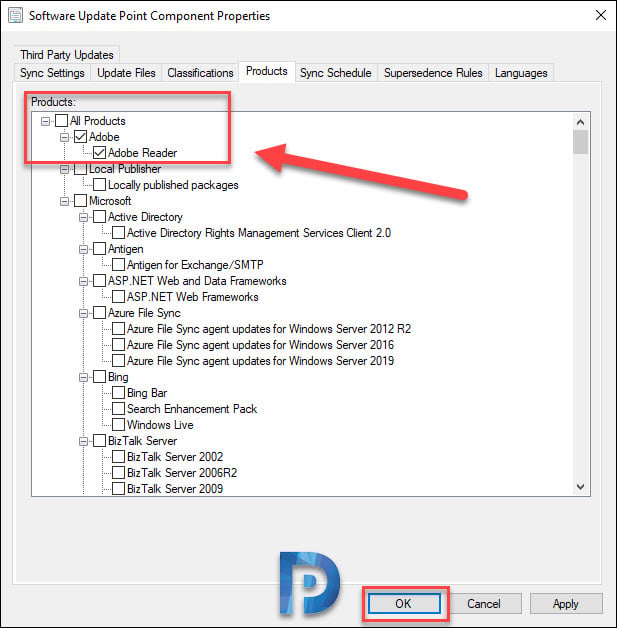
After you perform the software updates synchronization, go to Software Update Point component properties. Click Products tab, and you should find Adobe as one of the products listed. Select Adobe Reader and click OK.
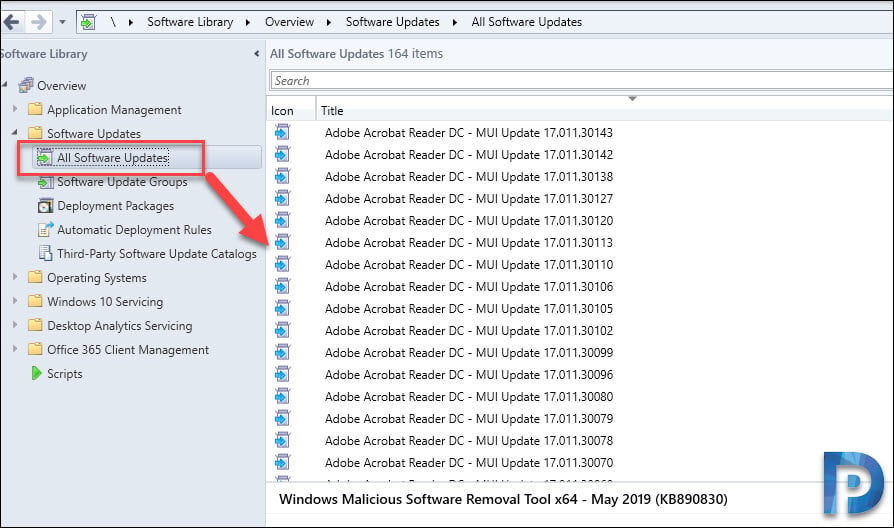
We still don’t see the third-party updates yet until we run a software updates sync again. Under All Software updates, you will find all the Adobe Reader Updates. Wait for the Sync to complete and refresh the Software Updates node. Now that you see the third-party updates, you can easily deploy them using SCCM.
SCCM Third-party software updates Log Files
It is important to monitor the log files during the software update synchronization. Out of all the SCCM log files, open wsyncmgr.log file to monitor the synchronization of updates.
In the screenshot below, we see the Adobe Acrobat Reader DC updates being synchronized in SCCM. These updates will also appear in the software updates node of the Configuration Manager console.

Synchronization of third-party software updates is handled by the SMS_ISVUPDATES_SYNCAGENT component on the top-level default software update point. You can review this log file located on th
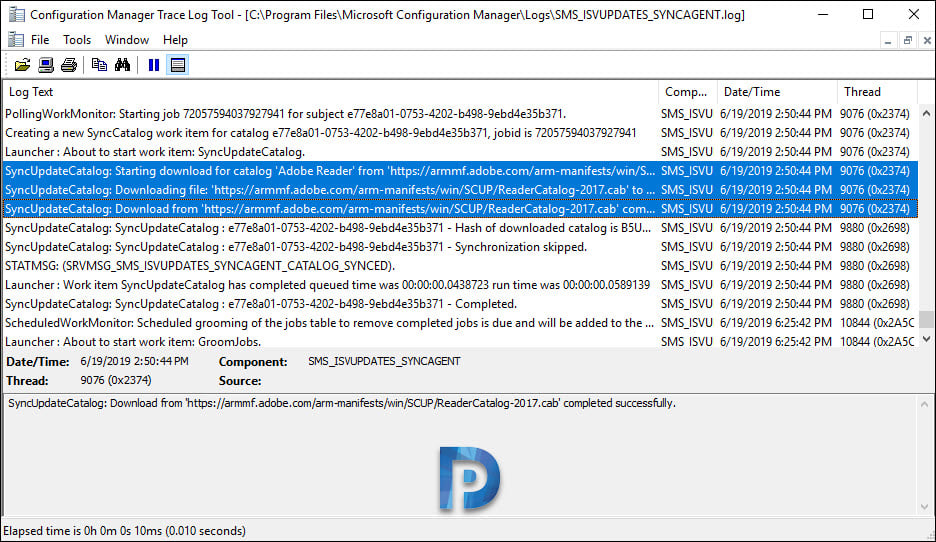
A code snippet from the SMS_ISVUPDATES_SYNCAGENT.log file shows the process of synchronizing and downloading the Adobe Reader third-party software updates into SCCM.
SyncUpdateCatalog: Starting download for catalog 'Adobe Reader' from 'https://armmf.adobe.com/arm-manifests/win/SCUP/ReaderCatalog-2017.cab' ...	SMS_ISVUPDATES_SYNCAGENT
SyncUpdateCatalog: Downloading file: 'https://armmf.adobe.com/arm-manifests/win/SCUP/ReaderCatalog-2017.cab' to 'C:\Program Files\Microsoft Configuration Manager\ISVTemp\iydaylkb.q1m\ReaderCatalog-2017.cab'.
SyncUpdateCatalog: Download from 'https://armmf.adobe.com/arm-manifests/win/SCUP/ReaderCatalog-2017.cab' completed successfully.
Read Next

Great guide, just a quick question. Is it the same process as normal WSUS to export to a disconnected environment? export the meta data etc.