


In this post I will cover the steps to deploy Snagit using SCCM. The steps are very much similar to deploying camtasia using SCCM. You can use this guide to deploy Snagit in your production using SCCM.
If you talk about image capture tool, Snagit stands out from rest of the softwares. Snagit is the only screen capture software with built-in advanced image editing and screen recording. Not only it is easy to use but it also features great tools to edit the captured images. Snagit is owned by Techsmith, the same company that features Camtasia product.
When you deploy any paid software, you are most worried about licensing. You cannot pass the key to users because it might be used for personal use. Using Techsmith deployment tool, you can customize Snagit installation. In addition you can also specify the license info. This tool works only with Techsmith products.

Customize Snagit using Techsmith Deployment Tool
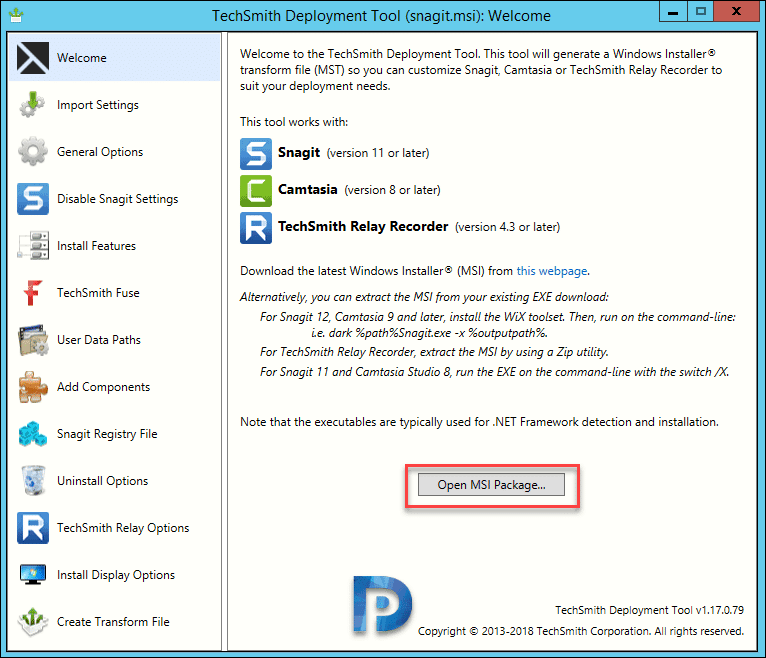
Snagit is usually available for download as executable file. However Snagit is also available as msi installer for enterprise deployments. You download the .msi installer and customize it using deployment tool. Techsmith deployment tool is free and you can download it when you visit Enterprise deployment page.
Download the tool and run as administrator. On the Welcome page, click Open MSI Package. Open the Snagit msi installer. I noticed that there are more options to customize Snagit.
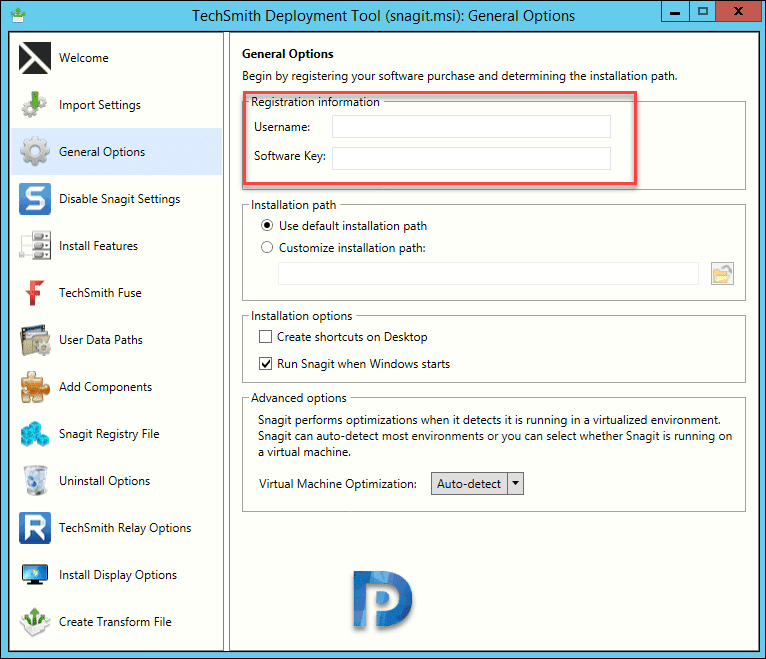
Under General Options, you can specify username and software key. You can also specify custom installation path. Under installation options, you can select the option to create shortcuts on Desktop and specify if Snagit runs when the windows starts. This is optional but you can enable if it’s required in your environment.
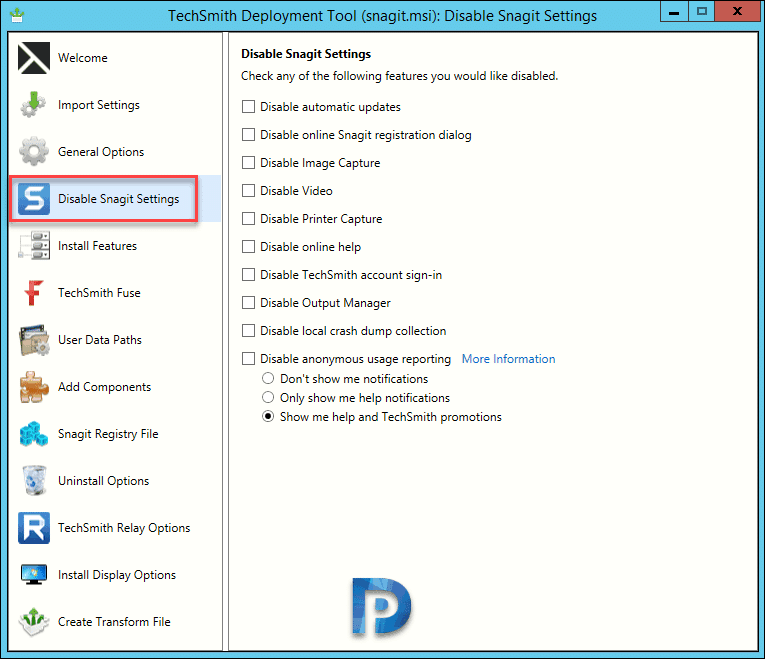
Under Disable Snagit Settings, there are many features that you can disable. All the Snagit settings are listed below.
- Disable automatic updates
- Disable online Snagit registration dialog
- Disable Image Capture
- Disable video
- Disable Printer Capture
- Disable Online Help
- Disable TechSmith account Signin
- Disable Output Manager
- Disable local crash dump collection
- Disable anonymous usage reporting
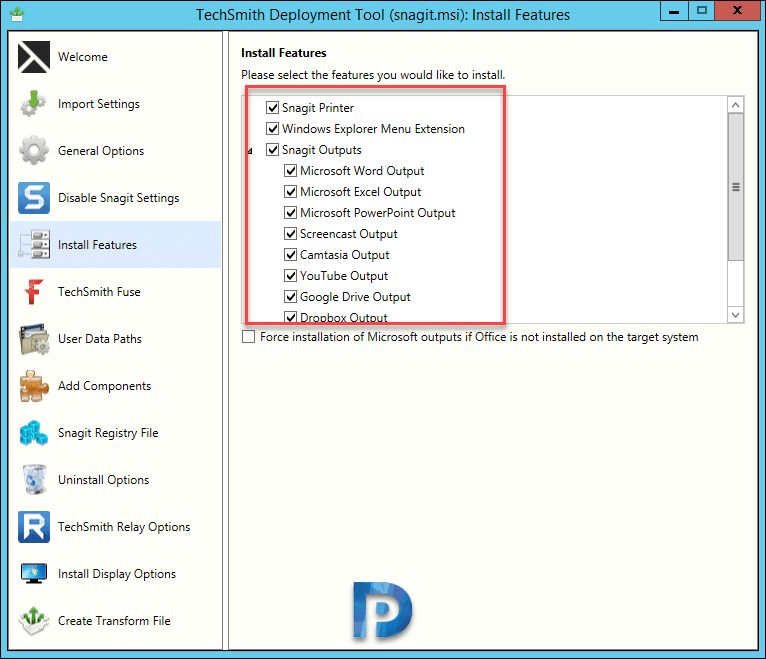
You can also customize features that are installed.
- Snagit Printer
- Windows Explorer Menu Extension
- Snagit Outputs
- Microsoft Word Output
- Microsoft Excel Output
- Microsoft PowerPoint Ouput
- Screencast Output
- Camtasia Output
- YouTube Output
- Google Drive Output
- Dropbox Output
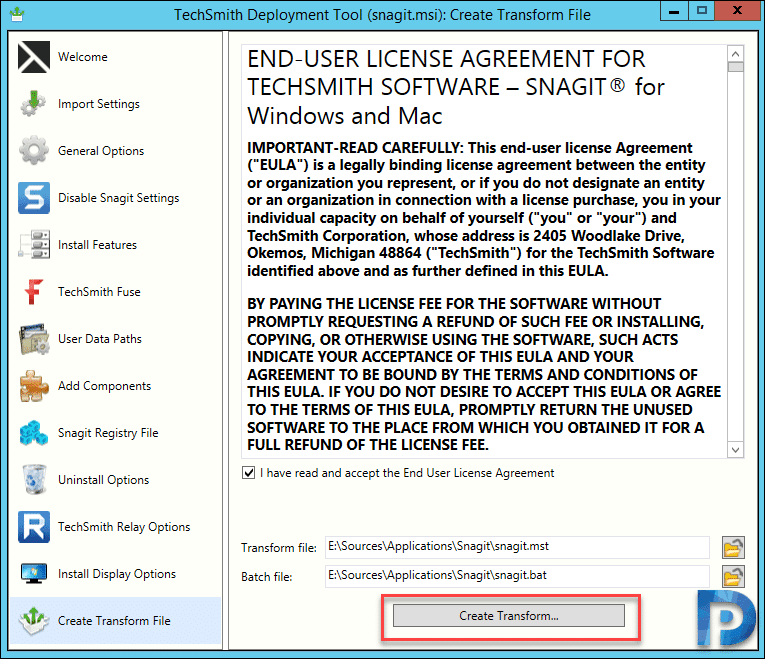
Create a transform file (.mst file) and close the tool. You will notice that you now have a batch file, .mst file and Snagit .msi installer file. We will use all the three to deploy Snagit using SCCM.
Deploy Snagit using SCCM [Enterprise Deployment Guide]
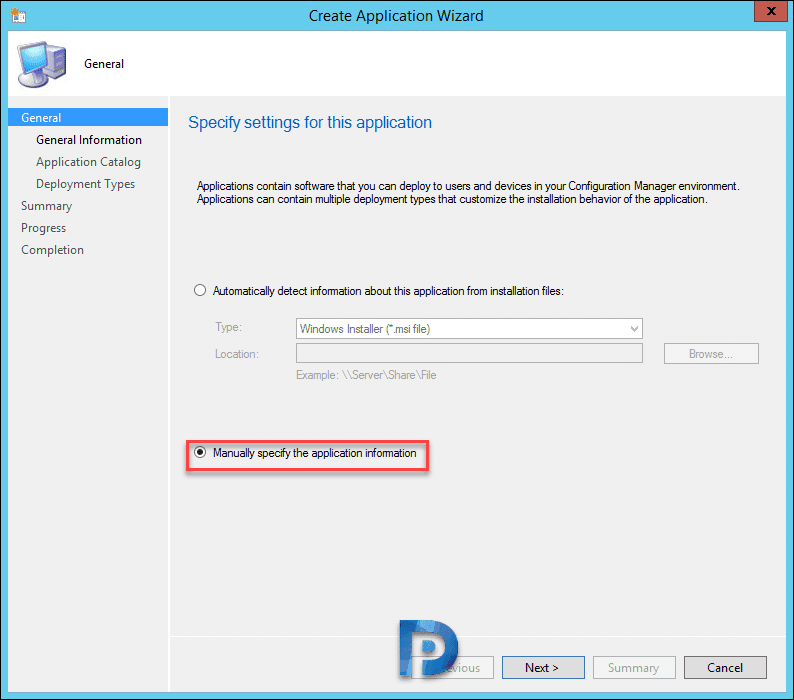
We will take a look at steps to deploy Snagit using SCCM. Launch configuration manager console. Right click Applications and click Create Application. Choose Manually specify the application the application information.
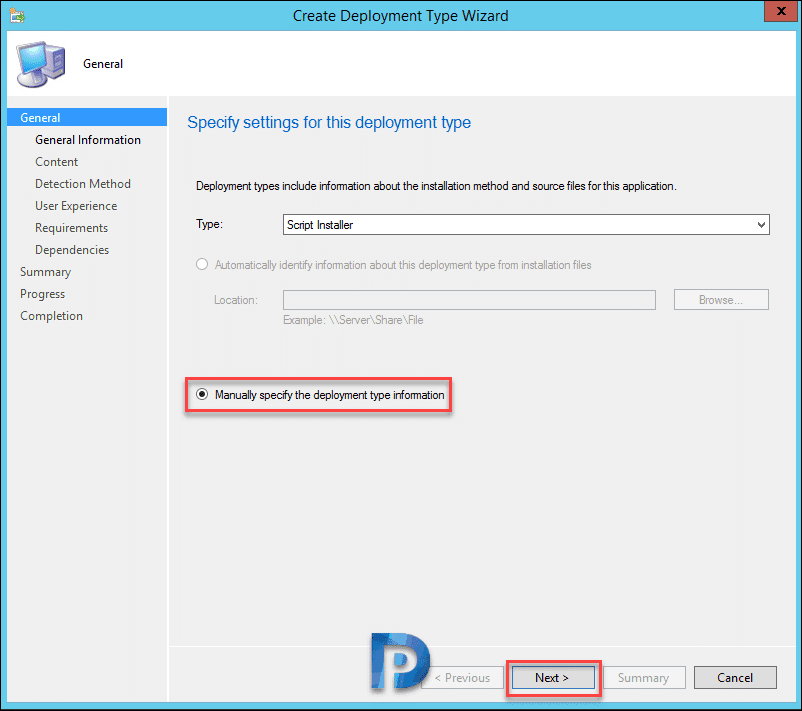
In the next step, specify information about the application. Add a new deployment type and click Manually specify the deployment type information. Click Next.
Specify the content location. Choose the batch file as install program. Your uninstall command will be msiexec /x {product ID} /qn. Click Next.

Let’s add a detection method. Choose Windows Installer as Setting Type. Click Browse and select Snagit msi file. The product code gets populated automatically. Click OK and complete the remaining steps.

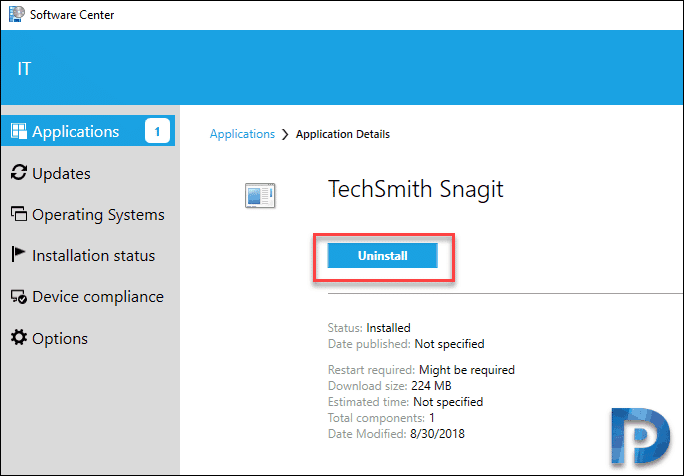
The Snagit application is packaged now. Distribute the application content to the distribution points. Next deploy the Snagit application to desired device collection. On the client machine, launch software center. Select Snagit app and click Install. The installation should work fine.

I have tested the Snagit application uninstall and it works well.

Hi Prajwal Sir,
I want to uninsall version and install new version but problem is old version is installed by PDAST. So now I want to install new version as you guide us but how to do on Script ?
Please guide me. how to uninstall scripted old version and install new version with your method.
I’ve gone through this and tried everything, and I’m getting 0x80070643 and “Lowright users might fail to install this application if it required higher privileges” it IS installing in System Context, however.
Has anyone ever seen an MSI give this error when installing as system context?
-Corey
I got it working.. I removed the MST file, must be something in there causing an issue.
-Corey
Hi Prajwal Desai
The Snagit 2022 I can deploy but when I attach to a Task Sequences I have the follow Error.
IT Organization
Running: OSD Win10 21H2-Office Test
Running: OSD Win10 21H2-Office Test Running action: Install Standard Application I 100% done
Installing 9 of 9 programs-‘Snagit_2022’
Task Sequence Error
IT Organization
Running: OSD Win10 21H2-Office Test Task sequence ‘OSD Win10 21H2-Office Test’
‘OSD Win10 21H2-Office Test’ has failed with the error code 0x80004005 in the task sequence step ‘Install Standard Application I’. For more information, contact your system administrator or helpdesk operator.
This window will automatically close in 00:11:48.
Hi -I’ve followed and tried this multiple times. I get 0x653(1619) error once it downloaded to the client machine. I’ve tried many different options and configuration but they did not resolved the error.
My goal for this customization is to embed the software key so no users action needed once completed.
I tested the msi deployment without customization alone and it worked but of course software key is needed when launched.
any suggestions is helpful.
thanks!
I get this same error.
I do not run it as a script. I use the msi selection under applications. Creating the MST file allows you to put in your product key so the end users do not have to when the launch the program.
msiexec /i “snagit.msi” TRANSFORMS=”snagit_2020.mst”
Hi
the best practice for Snagit is install with a Modified mst
Install-cmd
@ECHO OFF
REM ————————————————————————————–
REM
REM Author : Fidel Geroninimo
REM Datum : 26.02.20202
REM Function : Installation TechSmith_Snagit_2022
REM Geändert :
REM Info : Paketname: TechSmith_Snagit_2022
REM OS : Win10
REM Architecture : x64
REM
REM Note : snagit32.exe
REM
REM —————————————————————————————
SET PACKAGENAME=TechSmith_Snagit_2022
SET LOGFILE=%SystemRoot%\Logs\SWInstlog\TechSmith_Snagit_2022.log
SET JOBLOG=%SystemRoot%\Logs\SWInstlog\TechSmith_Snagit_2022.log
:: Create Log-Directory if not exist
if not exist “%SystemRoot%\Logs\SWInstlog” md “%SystemRoot%\Logs\SWInstlog”
:: Uninstall old version
taskkill /IM “snagit32.exe” /F
msiexec.exe /X {D9CEF484-B598-412D-BCC4-2FA0B1BFE0C8} /quiet /l* “%LOGFILE%”
timeout 5
ECHO [%Date% – %Time%] Installs %PACKAGENAME% … >>%JOBLOG%
msiexec /i “%~dp0snagit.msi” TRANSFORMS=”snagit-modified.mst” /quiet /l* “%LOGFILE%”
ECHO [%Date% – %Time%] Installation success or error status: %ERRORLEVEL% >> %JOBLOG%
ECHO [%Date% – %Time%] ——————————————— >> %JOBLOG%
the uninstall is for the new Snagit
Uninstall.cmd
@ECHO OFF
REM ————————————————————————————–
REM
REM Author : Fidel Geronimo
REM Datum : 26.01.2022
REM Function : Uninstall TechSmith_Snagit_2022
REM Geändert :
REM Info : Paketname: TechSmith_Snagit_2022
REM OS : Win10
REM Architecture : x64
REM
REM Note :
REM
REM —————————————————————————————
SET PACKAGENAME=TechSmith_Snagit_2022
SET LOGFILE=%SystemRoot%\Logs\SWInstlog\TechSmith_Snagit_2022.log
SET JOBLOG=%SystemRoot%\Logs\SWInstlog\TechSmith_Snagit_2022.log
:: Uninstall TechSmith_Snagit_2022
ECHO [%Date% – %Time%] Removes %PACKAGENAME% … >>%JOBLOG%
msiexec.exe /X {FC3B8229-3AAC-42D0-88BD-E471146C6322} /quiet /l* “%LOGFILE%”
ECHO [%Date% – %Time%] Removal success or error status: %ERRORLEVEL% >> %JOBLOG%
ECHO [%Date% – %Time%] ——————————————— >> %JOBLOG%