


This post covers the steps to deploy Camtasia using SCCM. Camtasia is one of the most popular software that is both screen recorder and video editor software.
The tool has got tons of options to explore. In fact, I use this tool create videos and edit them. Exporting the videos is effortless and overall the tool is superb.
You can refer to this guide as enterprise deployment guide. It’s because you can use the steps to package and deploy Camtasia using SCCM to computers in your enterprise.

Camtasia is available for download as a free trial. You need to buy it once the trial period expires. When you download Camtasia, it’s an executable file.
However, for enterprise deployments Techsmith provides msi installers and deployment tool. There is no joy in deploying the msi file directly as we need to customize it before we deploy. I will explain more about this in the next section.
What is TechSmith Deployment tool ?.
TechSmith deployment tool allows you to customize Camtasia installation. You can customize the installation and at the end a transform file (.mst) is created. This file contains all the customizations that you do use this tool. During the deployment, this file is deployed along with the actual installer. We will see how this tool makes it easier to deploy Camtasia using SCCM.
How to use TechSmith Deployment tool
First download the deployment tool from Camtasia site. This tool works only with specific versions of Techsmith software products.
You can also download msi installers for Camtasia and Snagit. For now, I have got the Camtasia msi installer downloaded.
We can simply deploy this msi file using SCCM however we would want to customize few things before you deploy it to enterprise systems.
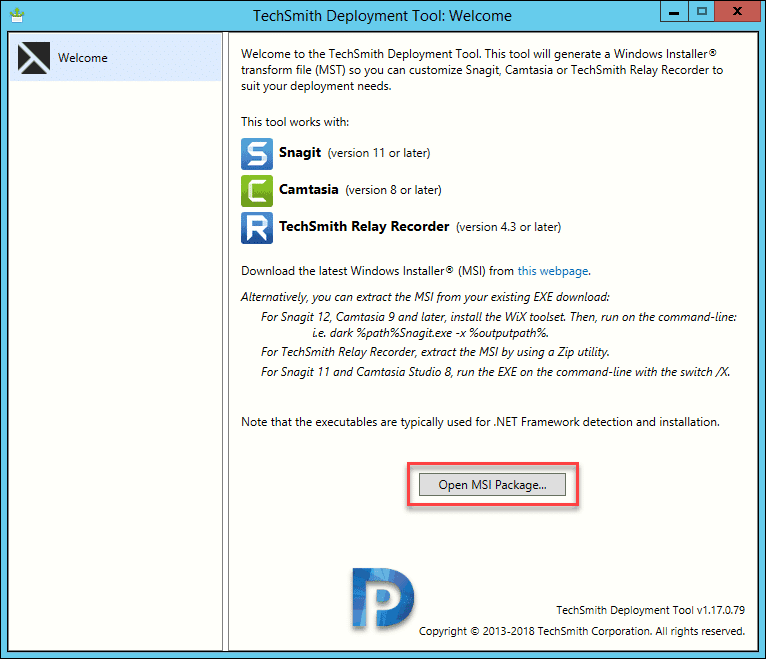
Run this tool as administrator. Click Open MSI Package and open the Camtasia msi file.
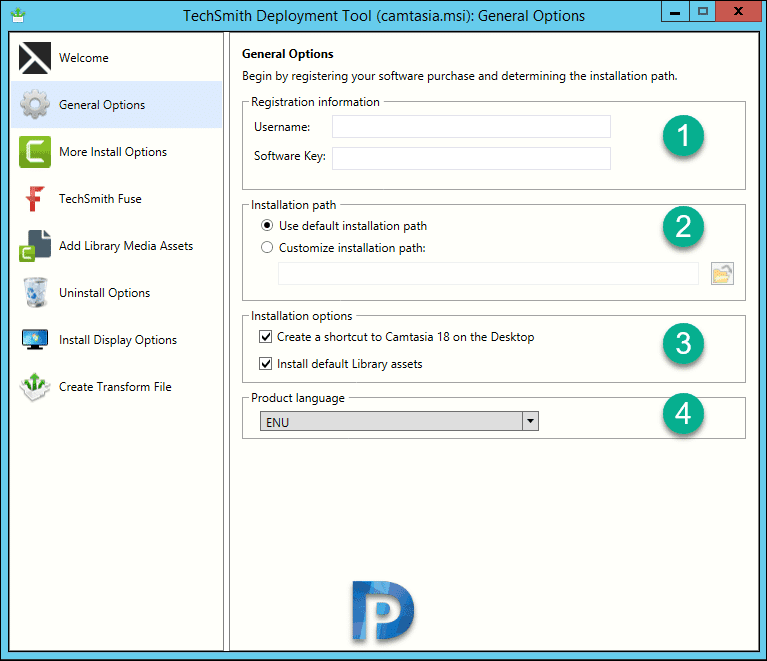
On the General Options, you can specify the username and software key. You can then choose default installation path or specify custom installation path. There are few more installation options and at last you can choose product language. Based on your requirements, you can configure these options.
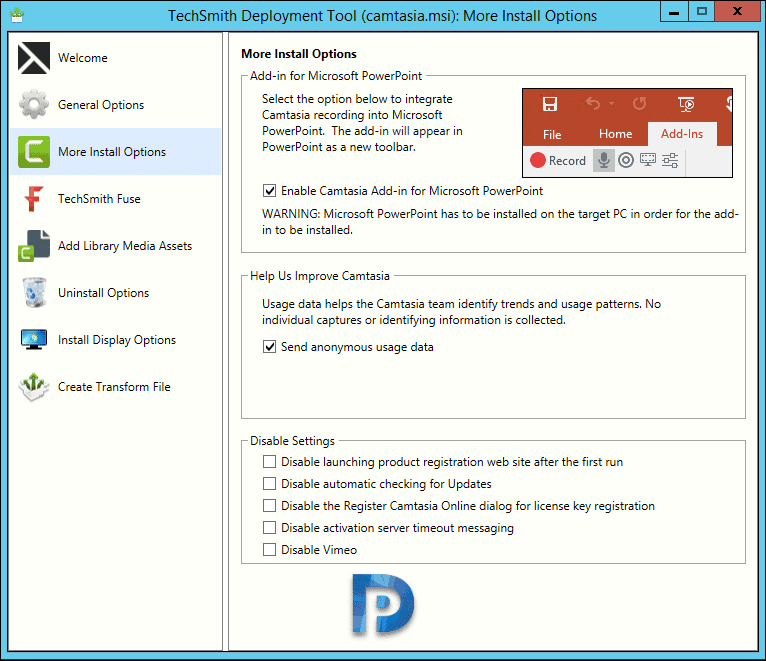
On More Install Options page, you can enable features such as camtasia add-in for powerpoint. Furthermore a lot of other settings can be disabled if they are not required.
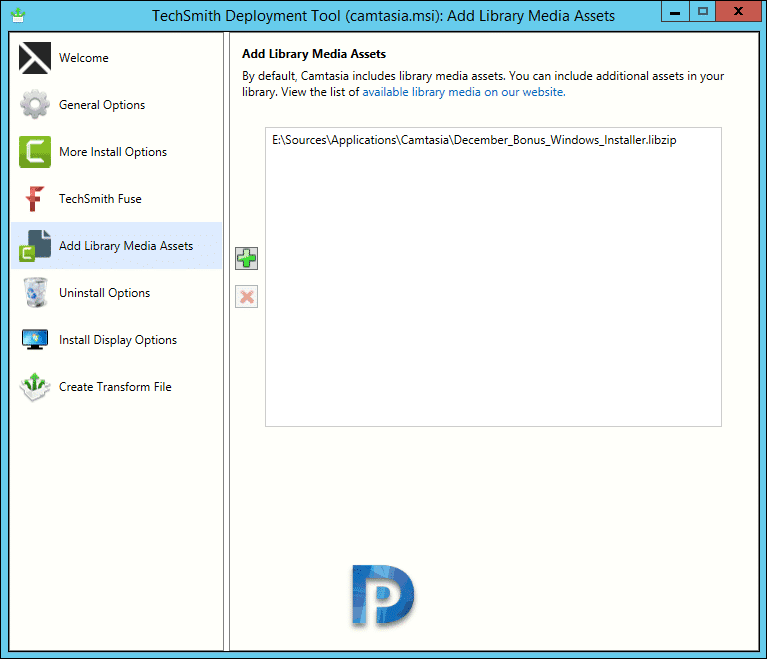
You can then add library media assets if you have got any.
In addition you get to specify uninstall options, where you can choose to keep files or delete them upon app uninstallation.

Install Display Options – You can choose between passive display and quiet display. Quiet switch wouldn’t display any setup boxes and progress to users. And for restart options, it is always recommended to go with option Never restart.

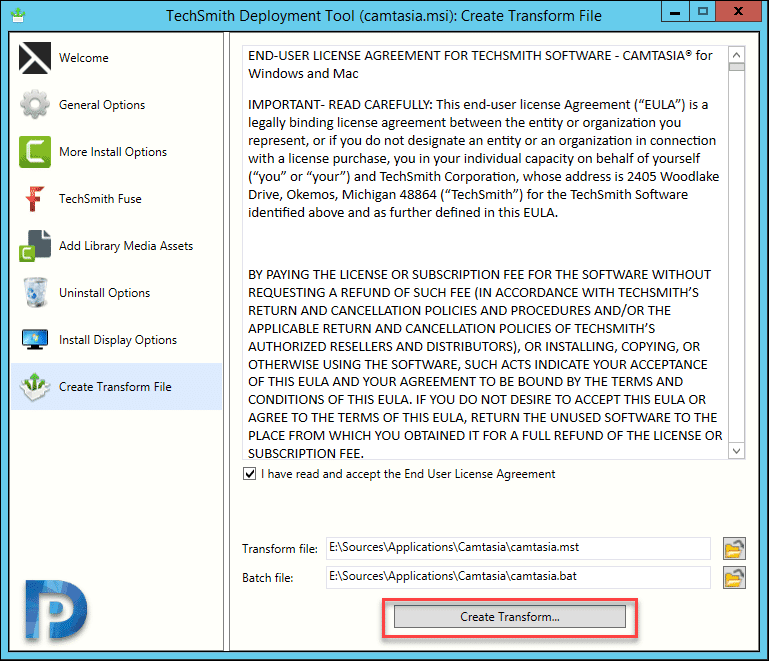
Create Transform File
Finally you have to create a transform file that contains all the customizations that you just did. Click Create Transform and save the file. The transform file saves with .mst extension. There is a batch file that is also created which contains the setup command plus path to transform file.
Here is what the batch contains after using deployment tool.
msiexec.exe /I "\\corpsccm\Sources\Applications\Camtasia\camtasia.msi" TRANSFORMS="\\corpsccm\Sources\Applications\Camtasia\camtasia.mst" /quiet /norestart
You can now close the deployment tool. We have got the batch file, transform file and the msi installer with us. Copy these to over sources folder or any other shared folder. We will use them as source and deploy camtasia using SCCM. The next section shows how to package and deploy Camtasia using SCCM.
Deploy Camtasia Using SCCM [Enterprise Deployment Guide]
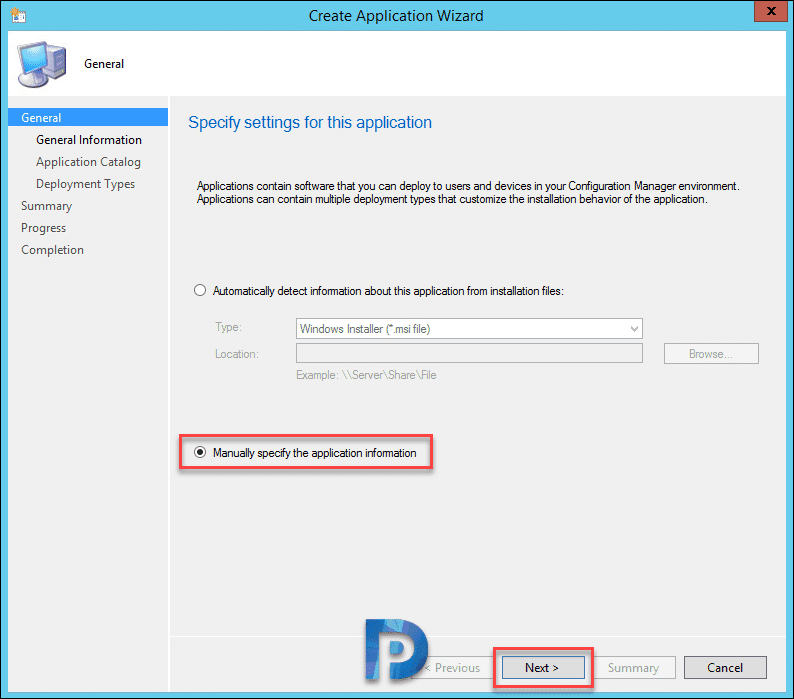
To deploy Camtasia using SCCM, follow these steps. Launch Configuration Manager console and under Application Management, right click Applications and click Create Application. Select Manually specify the application information and click Next.
Add some info about the app and click Next.

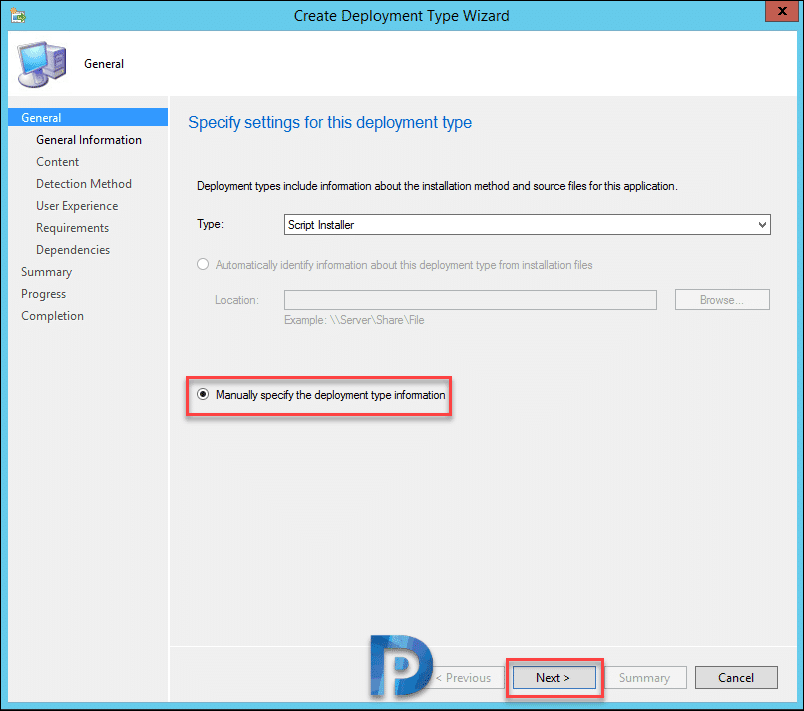
Add a new deployment type and select Manually specify the deployment type information. Click Next.
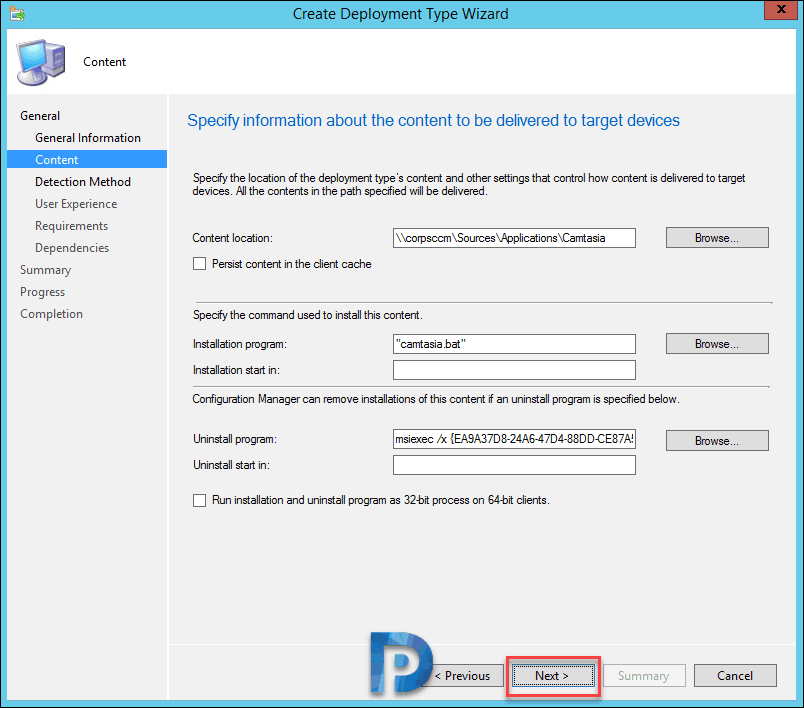
Specify the content location. Next, specify the installation program, click Browse and select the batch file. For uninstall command, specify the command as msiexec /x {product code} /qn. Click Next.
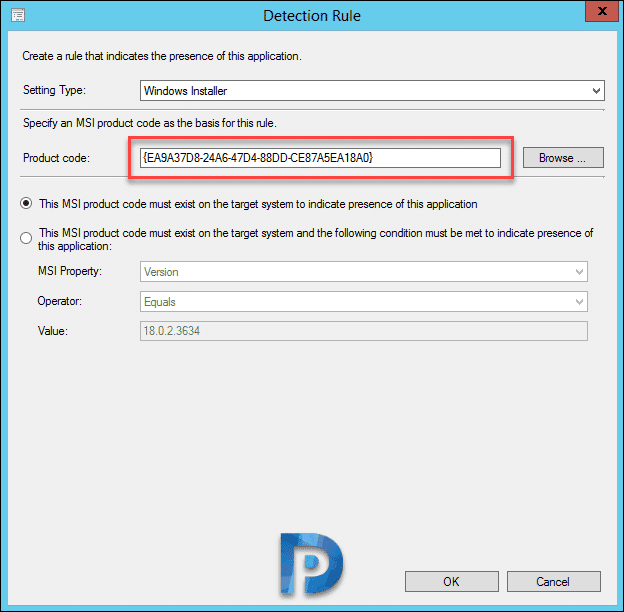
You need to add detection rule. So choose the setting type as windows installer. Click Browse and select the camtasia.msi file and that should automatically pick up the product code. Note that the product code matches the one that we used in uninstall command.
Specify the user experience settings and click Next.

Complete the remaining steps and close the wizard. Deploy the camtasia application to device collection.
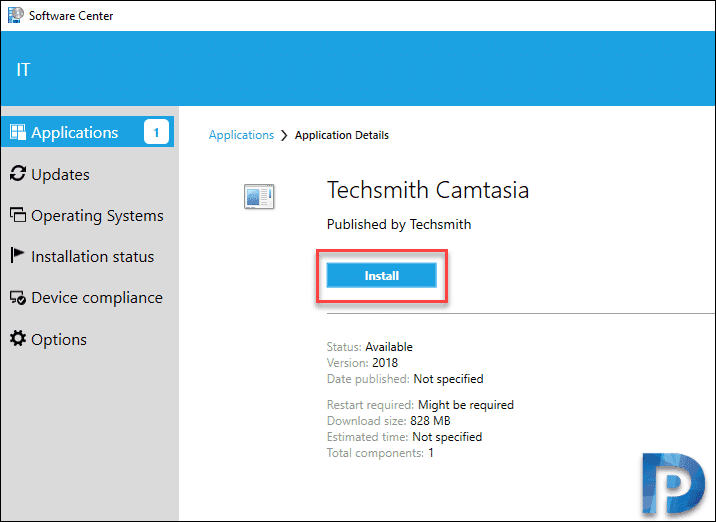
It’s time to verify the app install. On the client machine, open software center and select Techsmith camtasia app. Click Install and the app should be installed silently. I have tested both install and uninstall, it works flawlessly.
Any issues with installation, please post it in comments section.

Worked well up to a point. My issue is the Visual C++ dependency, which the deployment tool doesn’t take into account.
looks like I may have to do this with the PSAppDeployToolkit unless you’ve got any suggestions
Maybe I add the the Visual C 2019 redistributable package as a dependency in SCCM
Worked flawlessly for both Camtasia and Snagit! Thank you!
Awesome stuff. Thanks Prajwal for wonderful guide.