


In this step-by-step guide, I will show you how to deploy HP support assistant using Intune. The HP Support Assistant application is available as an executable file and is packaged and deployed as a Win32 app through Intune.
HP Support Assistant is a free utility software developed by HP for their desktops and laptops. It is designed to help users manage and maintain their HP devices by providing tools for troubleshooting, diagnostics, updates, and system optimization. It is included on new HP desktop and notebook PCs.
If your setup includes older HP laptops or desktops without the Support Assistant app installed, you can distribute it using either Intune or SCCM. Refer to the guide on deploying HP support assistant using SCCM. Since the HP Support Assistant app is not available in Intune’s Enterprise App Catalog, you will need to manually package it as a Win32 app and then deploy it.

Download the HP Support Assistant Installer
Visit the official HP Support Assistant website and download the latest version of the installer (usually in .exe format). The browser downloads sp163238.exe file which is the main setup file that will be used for deployment.

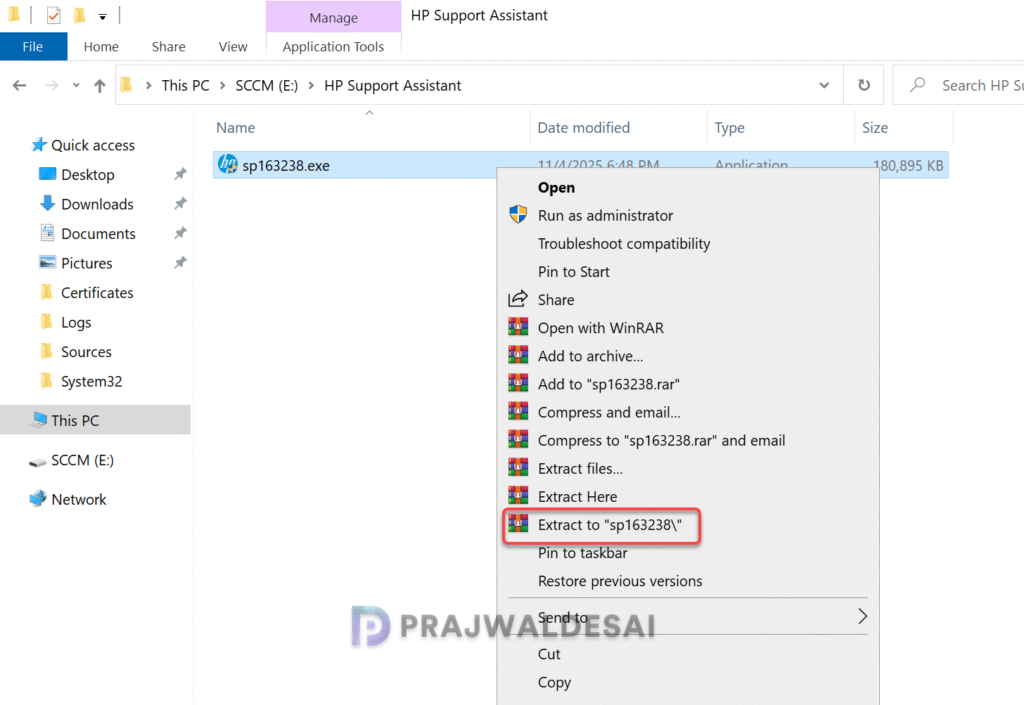
Extract the HP Support Assistant Setup
The HP Support Assistant setup file cannot be directly deployed via Intune or SCCM, as it requires extraction to access the actual setup file, uninstall file, and framework. To extract the setup file contents into a folder, you can use the 7-zip app or WinRAR app. Right-click the setup file and select extract to a folder.
The extracted folder contains several files and folder. The important ones are InstallHPSA.exe that installs the HP support assistant and UninstallHPSA.exe which removes the HP support assistant app from your computer.
In addition to the setup files, you may download an icon file for HP support assistant. You can assign this as app logo for Intune or application icon during SCCM deployment.

Deploy HP Support Assistant using Intune
Deploying the HP support assistant via Intune involves converting the setup file to create a .intunewin file using the Microsoft Win32 Content Prep Tool.
Step 1: Create InstallHPSA IntuneWin File
First, open PowerShell with administrative privileges on your computer. Navigate to the directory where the Win32 Content Prep Tool has been extracted. Run IntuneWinAppUtil.exe and enter the following details.
- Specify the source folder: The directory containing the HP Support Assistant installer file.
- Specify the setup file: Enter the file name as InstallHPSA.exe.
- Provide the output folder location: Specify the folder where you want the Win32 app to be created.
- Do you want to specify the catalog folder: Type N

The content prep tool converts the HP support assistant setup file into the .intunewin format. The tool also detects some of the attributes that Intune requires to determine the application’s installation state. After running this tool, we have the InstallHPSA.intunewin file ready for deployment.

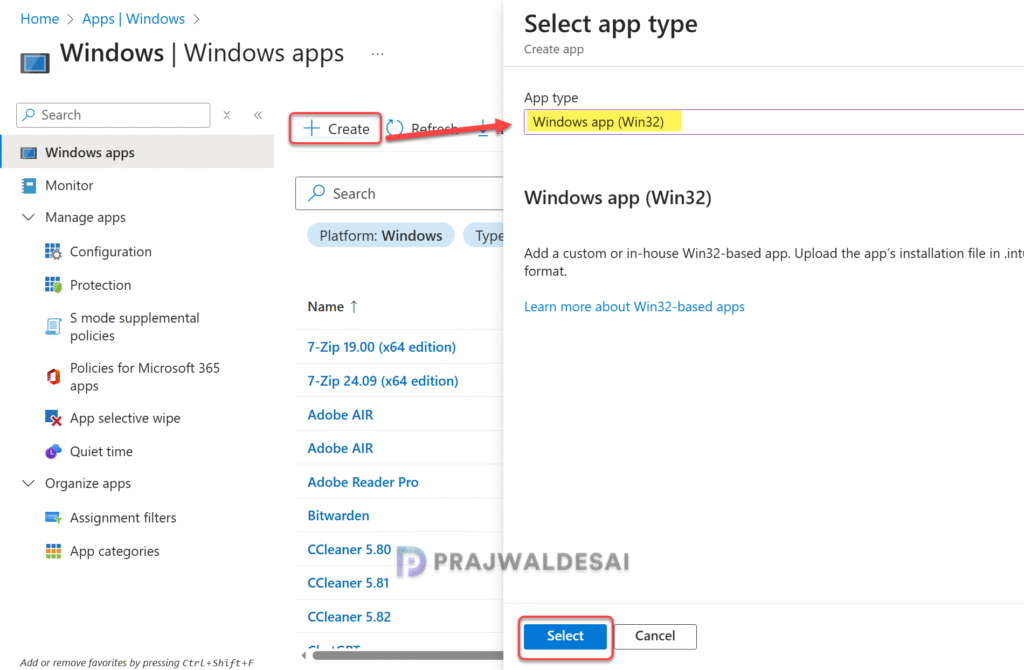
Step 2: Create Win32 app deployment for HP Support Assistant
Sign in to the Microsoft Intune admin center. Select Apps > All Apps > Create. In the Select app type pane, under the other app types, select Windows app (Win32).
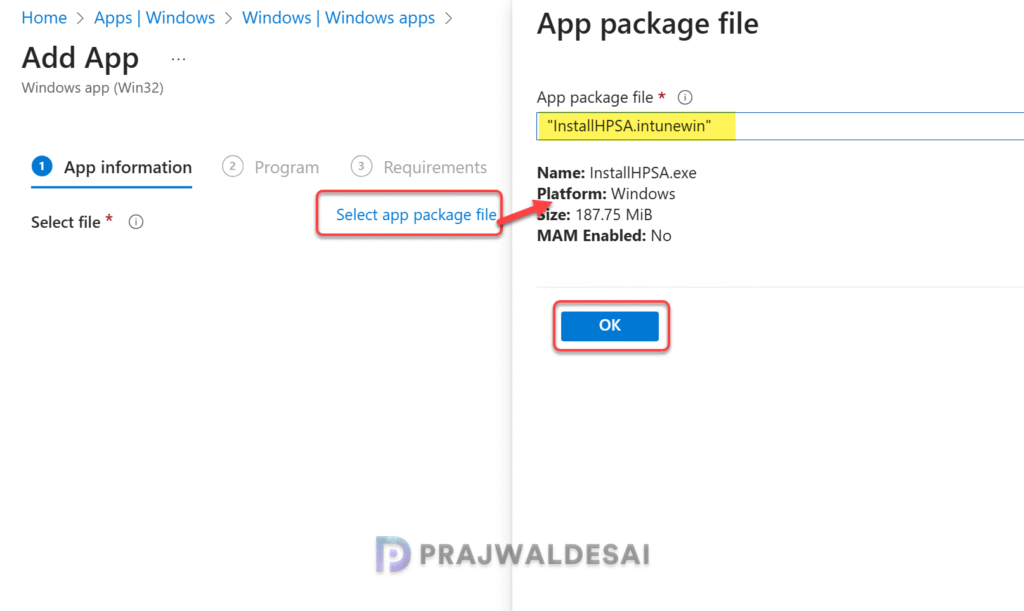
On the Add app pane, click Select app package file. Upload the InstallHPSA.intunewin installation file to Intune and select OK.
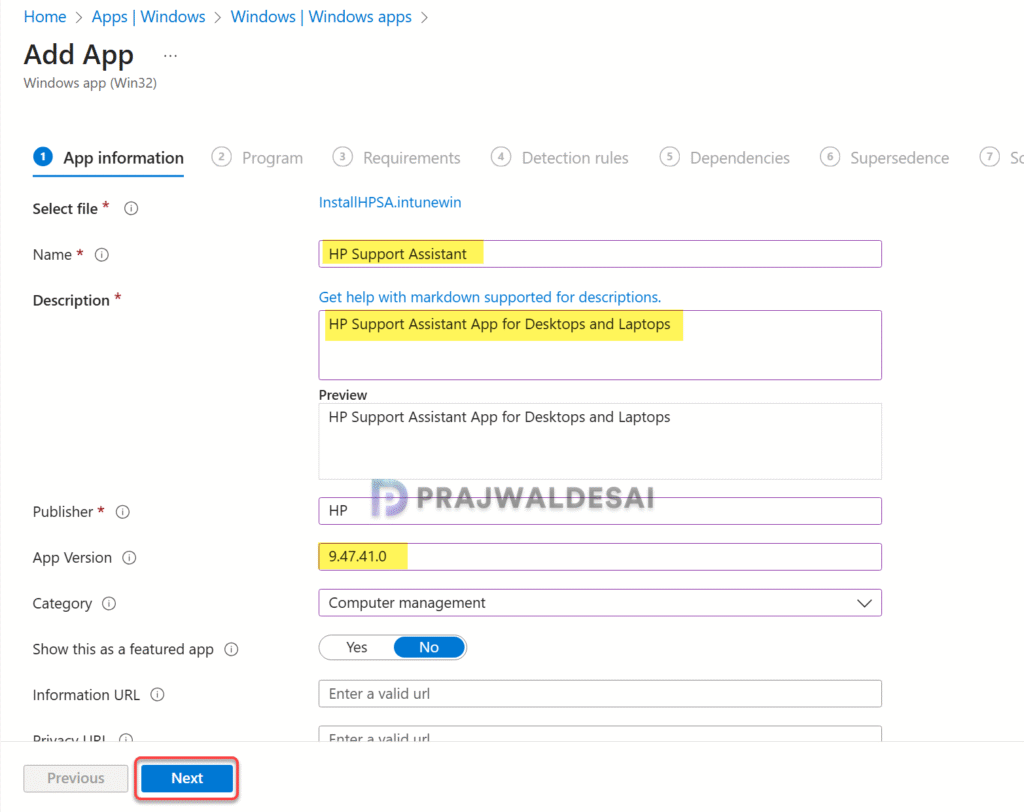
Step 3: Configure App Information
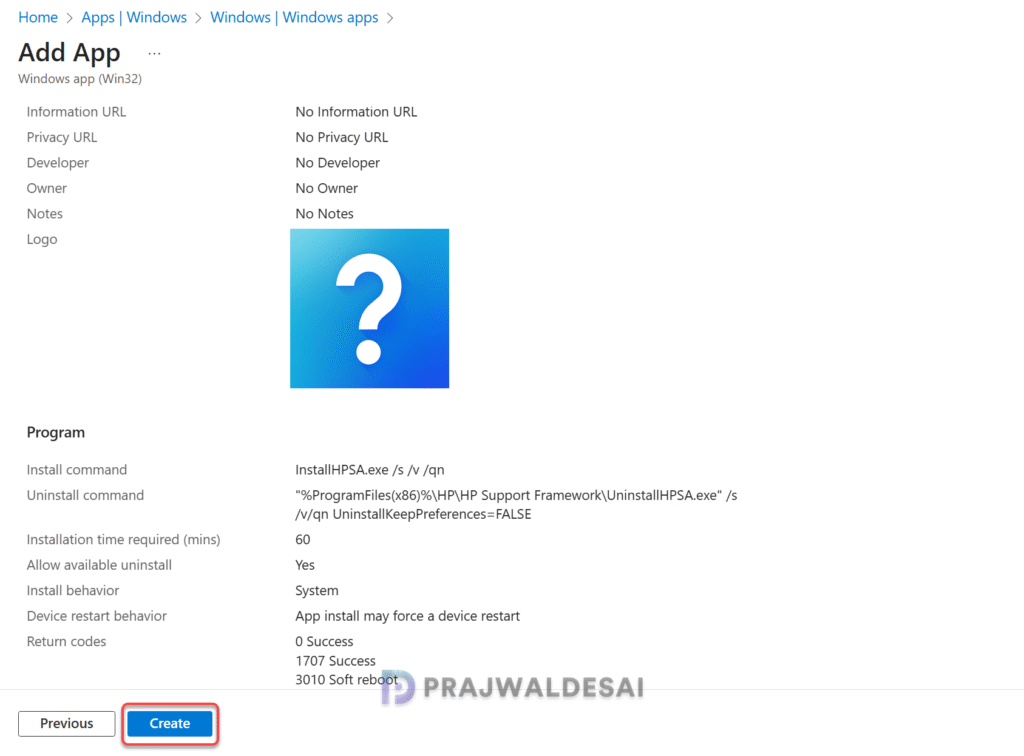
Configure the app information by providing basic details about the app such as Name, Publisher, Description, App Logo, etc. The details that you specify will be presented to users when they launch the company portal app and view the application.
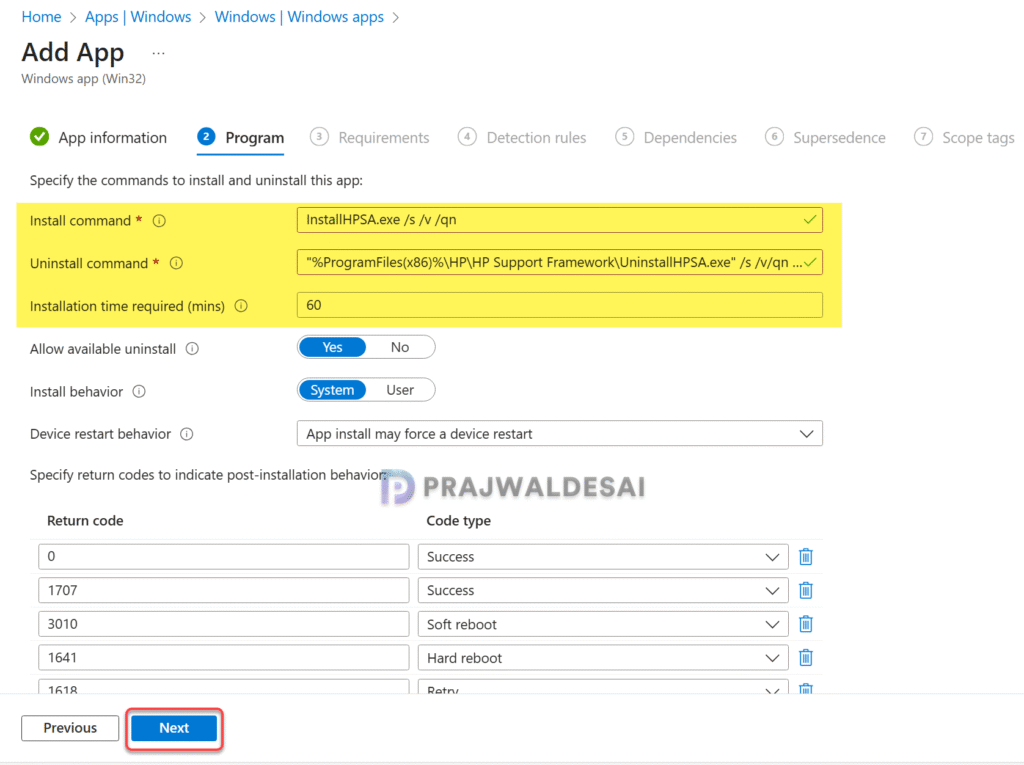
In the Program tab, configure the app installation and removal commands for the app. Visit the HP support to find out the silent install and uninstall commands for support assistant app.
- Install command: InstallHPSA.exe /s /v/ qn
- Uninstall command: “%ProgramFiles(x86)%\HP\HP Support Framework\UninstallHPSA.exe” /s /v/qn UninstallKeepPreferences=FALSE
- Installation time required: 60 minutes
- Install behavior: System
Click Next.
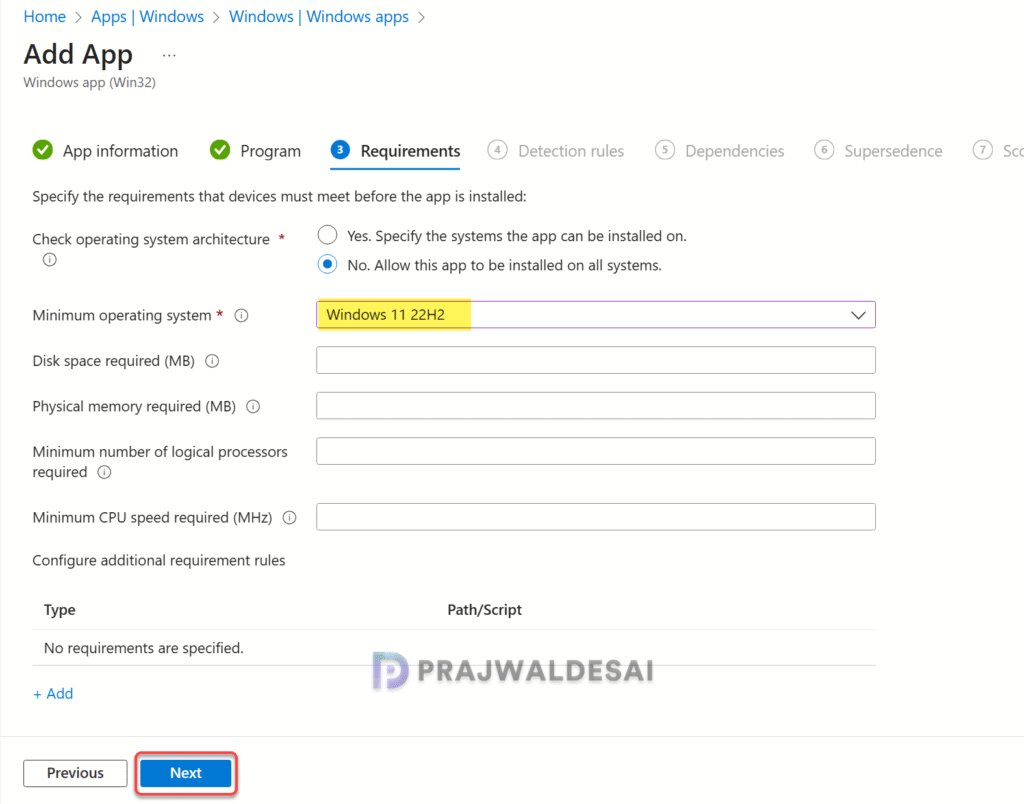
On the Requirements page, specify the requirements that devices must meet before the app is installed. I have selected the minimum operating system as Windows 11 22H2. Click Next.
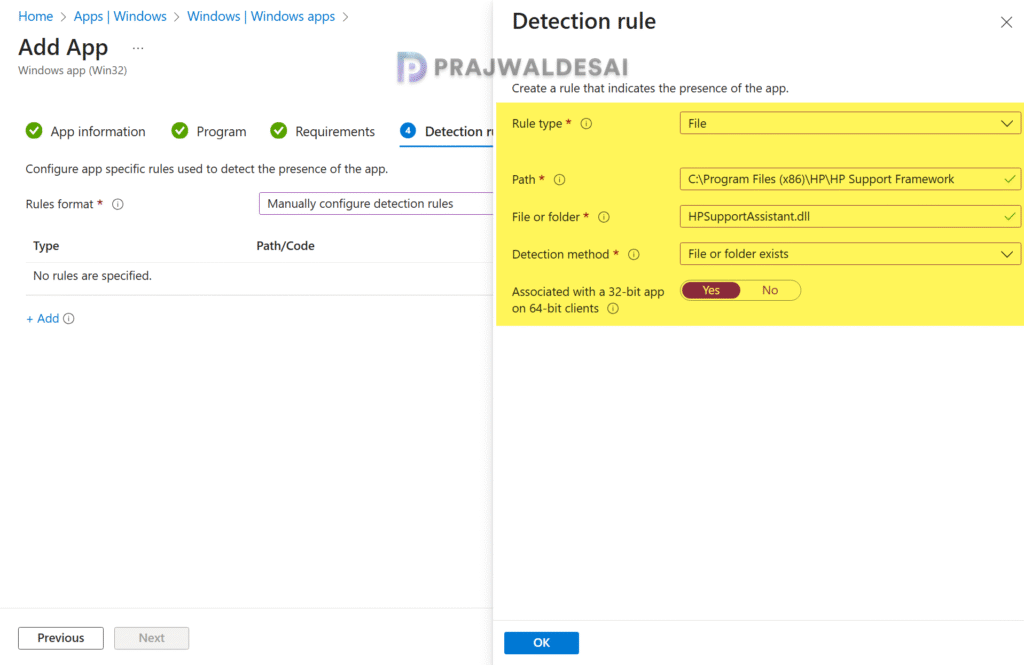
On the Detection rules pane, specify the rules to detect the presence of the app. I have used the following options to detect the presence of the HP support assistant app on Windows devices:
- Rule type: File
- Path: C:\Program Files (x86)\HP\HP Support Framework
- File or folder: HPSupportAssistant.dll
- Detection method: File or folder exists
- Associated with a 32-bit app on 64-bit clients is configured to Yes.
Click OK to add the above detection rule and select Next.
Step 5: Add Scope Tags and App Assignments
In the scope tags section, add your scope tags. If you haven’t created them, I have published a step-by-step guide on creating Intune scope tags. Note that specifying scope tags is optional, and you may skip this step. Click Next.
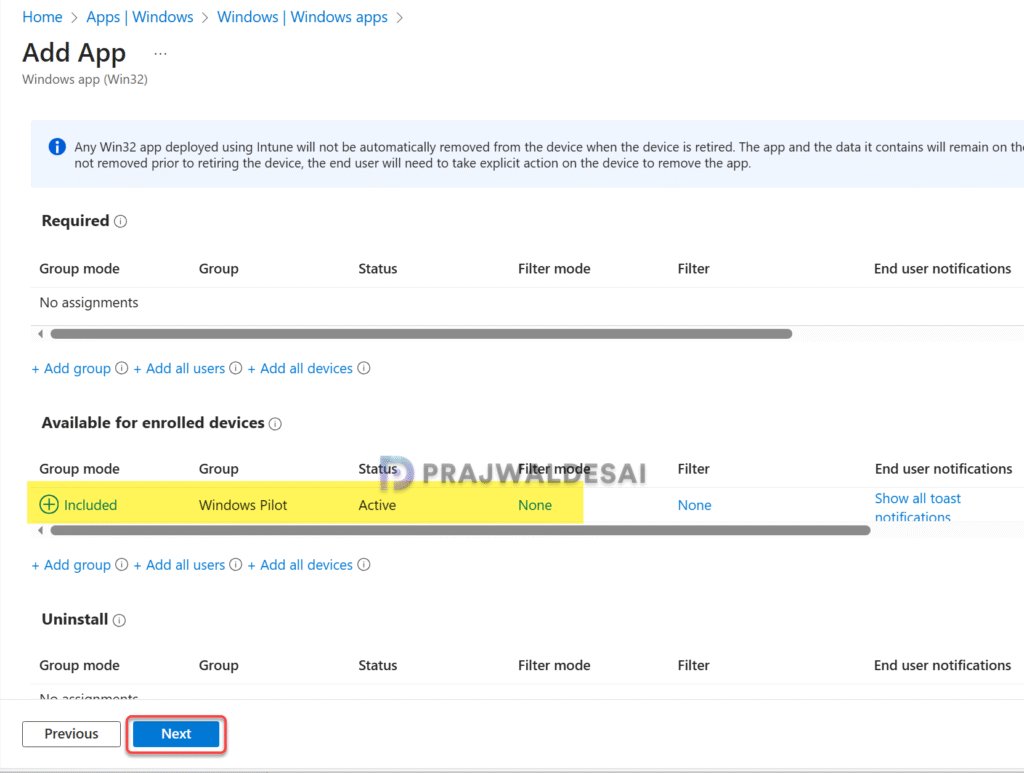
On the Assignments tab, you can either assign the app as Required or Available for enrolled devices. Select an applicable device group or groups that should install the HP support assistant app. I have assigned the app as available for enrolled devices. Click Next.
On the Review+Create page, you can find the summary of all the configuration that you have performed for the HP support assistant app. If everything looks good, click Create.
Sync Intune Policies
If you’re testing the HP support assistant app deployment on targeted groups, you can speed up the policy assignments by manually syncing Intune policies. I have demonstrated different methods to initiate Intune policy sync, including PowerShell method. The sync action will force devices to immediately check-in with Intune and retrieve the latest policies.
Monitor App Deployment Progress
After you have assigned the app to the device groups, you can track the deployment to see how many devices successfully installed the support assistant app and how many failed or were not installed.
In the Intune admin center, go to Apps > All Apps and use the search box to locate the HP Support Assistant app. Select the application, and on the Overview blade, you can see how many users or devices have successfully installed the app.
The screenshot below shows that the app deployment is successful on our devices. For the remaining devices, the deployment is in progress, and once that is completed, the dashboard will be updated.

End User Experience
To install the HP support assistant application, sign in to one of the Windows devices. Open the Company Portal and from the list of apps, select HP Support Assistant and click Install. The app installation begins now and once it’s complete, the status is updated to Installed.

If the app installation fails with an error, check the AppWorkload.log to troubleshoot and analyze Win32 app management events on the client.
End users can verify the installation of the app by clicking on the Start button and typing ‘HP Support’ in the search box. The app appears in the search results if it is installed. To launch the app, click Open. On Windows 11, the HP support assistant app also appears in the Settings > Apps > Installed Apps.


Fantastic! worked 100%. Thanks
Hi, I followed your instructions exactly. Unfortunately, the app cannot be started afterwards, and I don’t get any errors in the log. Apparently, the program is installed correctly.
The app should launch unless it is restricted. Check the event viewer to investigate why this is happening.
Thanks for the guide! Do you know if there is any app configuration possible? Like skipping login, eula, no notifications for end users. I like the tool but the amount of questions end-users get is pretty rough.