

This step-by-step guide covers the process of bulk enrollment for Windows 11 devices in Intune using a provisioning package. Organizations can mass enroll Windows devices into Microsoft Entra ID and Intune by generating a provisioning package (.ppkg) using the Windows Configuration Designer (WCD) tool.
For any organization, managing large numbers of Windows devices can quickly become time-consuming if each system has to be enrolled into Microsoft Intune manually. For IT admins, Windows bulk enrollment via a provisioning package allows registration of multiple corporate-owned devices into Intune without requiring each user to go through the normal interactive enrollment flow.
When you apply the provisioning package to corporate-owned devices, it joins the new devices to your Microsoft Entra tenant and enrolls them for Intune management. Upon successful enrollment, Microsoft Entra users can sign in and receive assigned Intune policies and required apps. While this might seem complicated initially, once you’ve prepared the PPKG file, enrolling is very straightforward, especially if you have many devices in your setup.
Why Use a Provisioning Package?
Using a provisioning package for Windows bulk enrollment offers several benefits:
- A single provisioning package that essentially provides large organizations with faster enrollment across numerous Windows devices.
- Reduced manual effort and minimal end-user involvement for IT teams for enrolling the devices.
- Consistent configuration and minimal errors during enrollment. It works well for new or reset devices.
Usage Scenarios
If your organization is considering using a provisioning package for device enrollment in bulk, consider the following scenarios.
- Set up devices in bulk for large organizations for MDM management.
- Set up kiosks, such as ATMs or point-of-sale (POS) terminals.
- Set up school computers, industrial machinery, and handheld POS devices.
Ways to apply the provisioning package to devices
There are different ways to apply the provisioning package while bulk enrolling Windows devices in Entra ID or Intune. These are described below.
- USB drives: Copy the .ppkg file to a USB drive. Insert it into the target Windows 11 device and apply it during initial setup.
- Manual apply on the device: Manually run the .ppkg file on the device and confirm that you want to apply the package.
- Windows Settings: Via Add or Remove provisioning package located in the settings app.
- OOBE: Provisioning packages can also be applied during the Out-of-Box Experience (OOBE), making them useful for new device deployment scenarios.
- PowerShell: You can use the Install-ProvisioningPackage cmdlet to install the .PPKG package onto the local machine.
Prerequisites
To start with, make sure you have the following prerequisites in place.
- Windows Configuration Designer (WCD) tool to generate a provisioning package that can be obtained from the Microsoft Store.
- Automatic enrollment for Windows must be enabled in Entra admin center.
- The service principal for Microsoft.Azure.SyncFabric (AppID 00000014-0000-0000-c000-000000000000) must be present in your Microsoft Entra tenant. There are one-liner commands to check this, and I have mentioned them in the upcoming section.
- To create a bulk enrollment token, use an account with one of the following Microsoft Entra roles.
- Global administrator
- Cloud Device Administrator
- Intune Administrator
- Password Administrator
- The account used to request the bulk enrollment token in the Windows Configuration Designer app must be included in the MDM user scope in Microsoft Entra ID.
- Wi-Fi credentials, computer name scheme, and anything else required by your organization.
- Supported versions of Windows 11 for Intune enrollment: Windows 11 Pro, Enterprise, or Education.
All the above requirements are referenced from Microsoft documentation.
Steps for bulk enrolling Windows 11 devices into Intune
Before we go further, understand that I am choosing a Windows 11 device to demonstrate the enrollment using a provisioning package. Windows 10 devices can still be enrolled and managed in Intune, but the same functionality won’t be guaranteed. So, I recommend upgrading your existing Windows 10 devices to Windows 11 first before planning for bulk enrollment.
Here are the steps to follow for successfully enrolling your devices into Entra ID and Intune with a provisioning package. I’ve divided the entire process into steps to make it easier for you to follow.
Step 1: Enable Automatic Enrollment for Windows devices
Automatic MDM enrollment is a premium Microsoft Entra feature that allows Windows 11 devices to automatically register with Microsoft Intune as soon as a user signs in with an organizational account. If you have already configured it, jump to the next step.
To enable automatic MDM enrollment for Windows devices:
- Sign in to the Microsoft Intune admin center.
- Go to Devices and expand Device onboarding and select Enrollment.
- Go to the Windows tab and then select Automatic Enrollment.
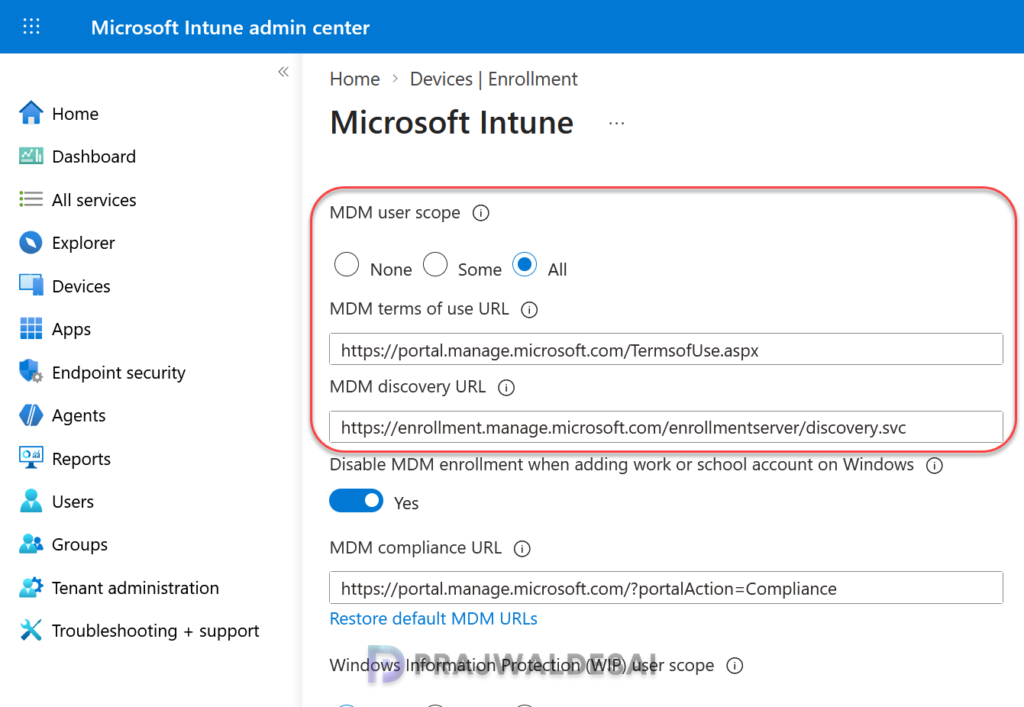
- Configure the MDM user scope for Microsoft Intune.
- All: Automatic MDM enrollment is enabled for all users.
- Some: Automatic MDM enrollment is enabled for the users you select.
Click Save to apply the changes.
Step 2: Verify service principal for Microsoft.Azure.SyncFabric
The service principal for Microsoft.Azure.SyncFabric (AppID 00000014-0000-0000-c000-000000000000) must be present in your Microsoft Entra tenant. Microsoft clearly states that without the service principal, Windows Configuration Designer can’t retrieve the bulk enrollment token, and it could lead to an error.
If you don’t have the graph PS module installed, I recommend reading my detailed guide on installing the Microsoft Graph PowerShell module. Once the modules are installed, open the PowerShell window and connect to Microsoft Graph by running the below command.
Connect-MgGraph -Scope Application.Read.All, AppRoleAssignment.ReadWrite.AllNext, run the below PowerShell command to check if the service principal for Microsoft.Azure.SyncFabric exists in your tenant.
Get-MgServicePrincipal -Filter "AppId eq '00000014-0000-0000-c000-000000000000'"In the below image, the command output displays the service principal for Microsoft Azure Sync Fabric (AppID 00000014-0000-0000-c000-000000000000).
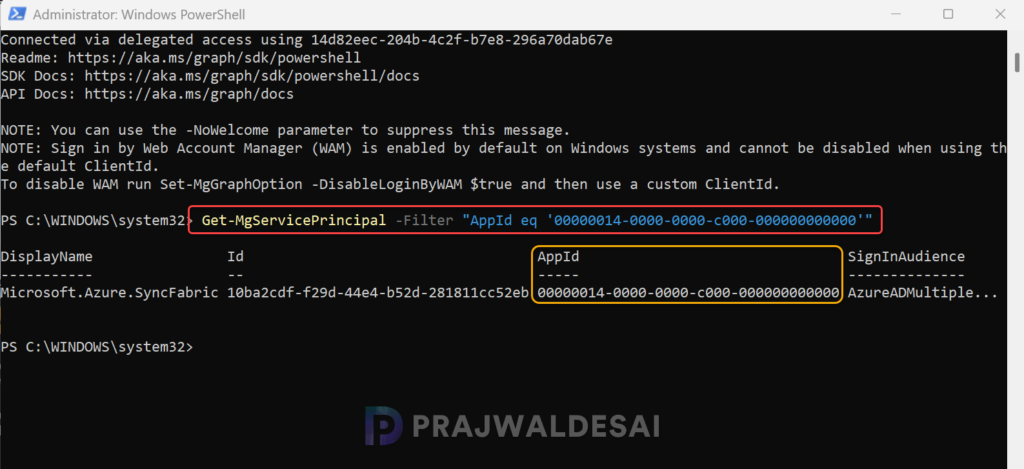
In case the service principal doesn’t exist, you can run the below command to register a new one for your Entra tenant.
New-MgServicePrincipal -AppId "00000014-0000-0000-c000-000000000000"Step 3: Install Windows Configuration Designer
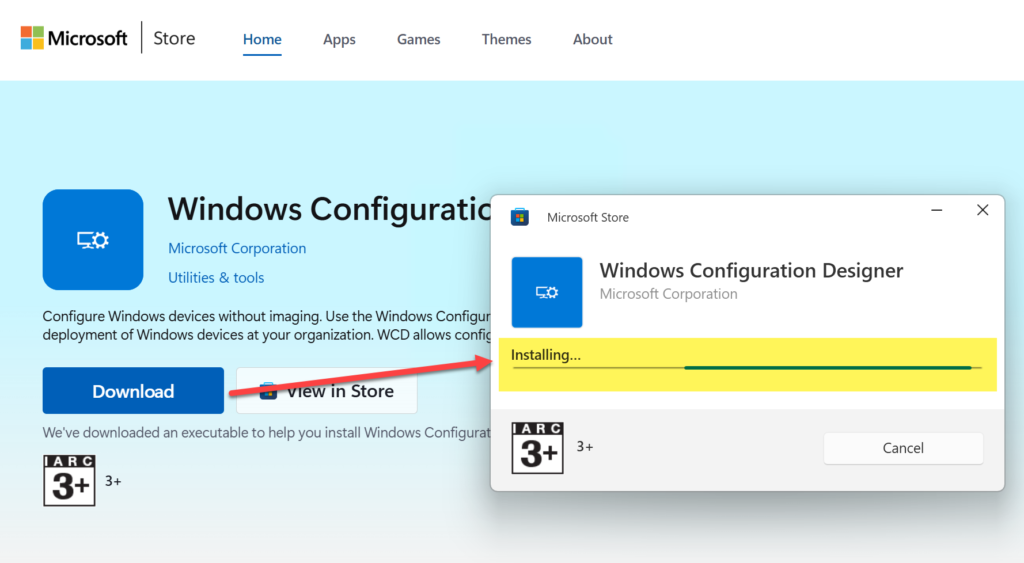
Administrators can use the Windows Configuration Designer tool (WCD) to create provisioning packages to easily configure devices running Windows client. On devices running Windows client, first install the Windows Configuration Designer app from the Microsoft Store.
Step 4: Create a provisioning package
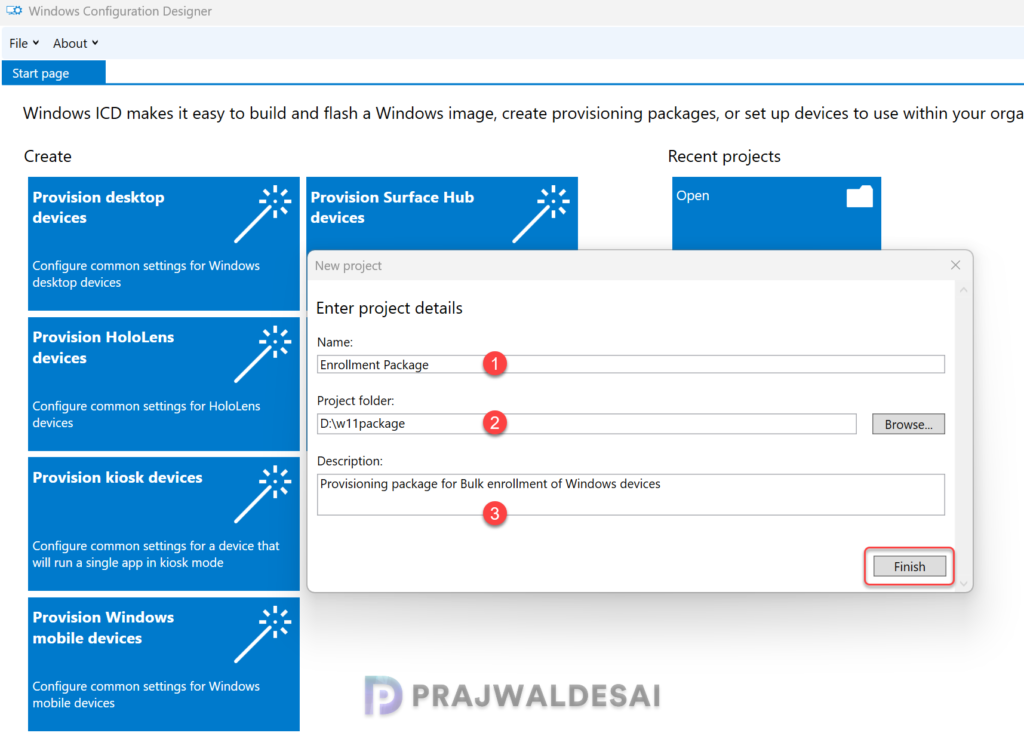
In this section, I’ll demonstrate how to generate a provisioning package (.ppkg) using the Windows Configuration Designer tool. To launch the app, on the Start menu or Start menu search, type ‘Windows Configuration Designer‘, and then select the Windows Configuration Designer shortcut. On the Start page, select Provision desktop devices.
Enter the following project details.
- Name: Enter the package. For example, Windows 11 enrollment package.
- Project folder: Specify a folder location to generate a provisioning package (.ppkg) and related files. You should store the project files in a secure location and delete the project files when they are no longer needed.
- Description: A brief description about the package and what it does.
Once you’ve entered the above information, click Finish.
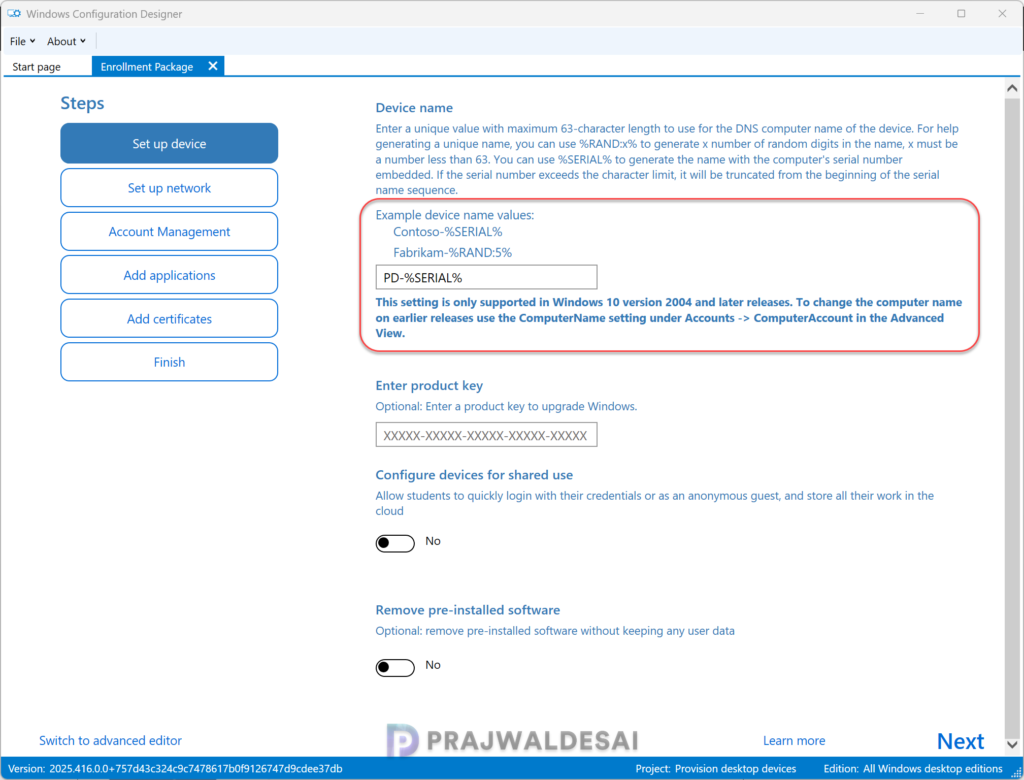
If you want to enable device setup, select Set up device, and configure the following settings:
- Device name: Required. Enter a unique 15-character name for the device. You can use variables to add unique characters to the name, such as Contoso-%SERIAL% and Contoso-%RAND:5%. I have used PD-%SERIAL% in my case.
- Enter product key: This is optional. Enter the product key to upgrade Windows client to a different edition.
- Configure devices for shared use: Select Yes or No to optimize the Windows client for shared use scenarios.
- Remove pre-installed software: Optional. Select Yes if you want to remove preinstalled software. You may also use the settings catalog to remove pre-installed packages from Windows 11.
Click Next to continue.
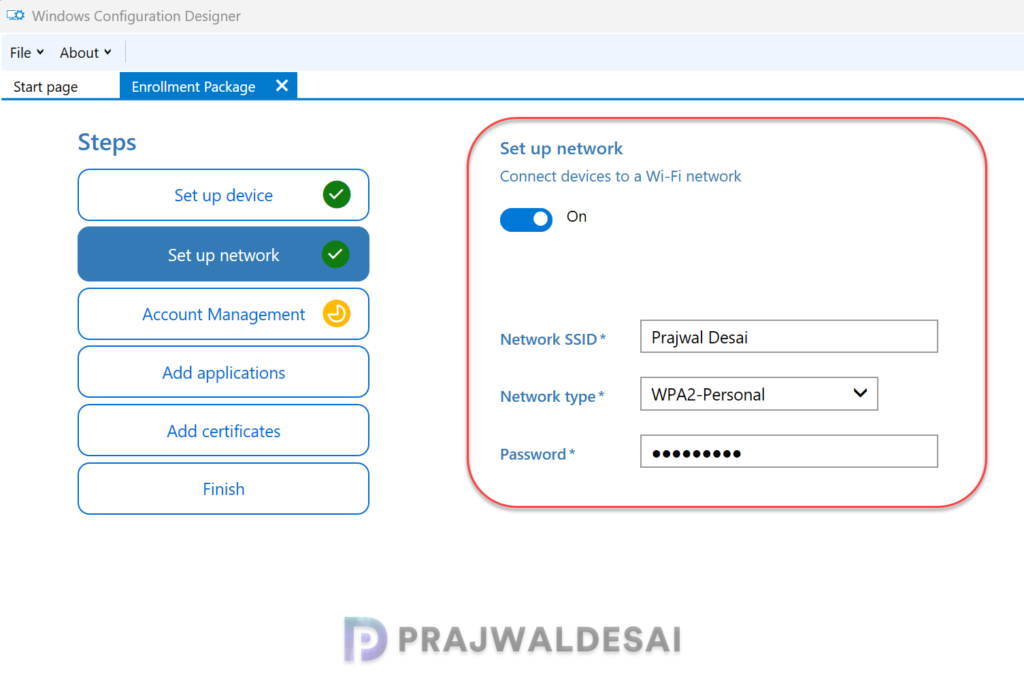
If you would like to enable network setup, select Set up network, and configure the following settings:
- Set up network: To enable wireless connectivity, select On.
- Network SSID: Enter the Service Set Identifier (SSID) of the network.
- Network type: Select Open or WPA2-Personal. If you select WPA2-Personal, enter the password for the wireless network.
Click Next.
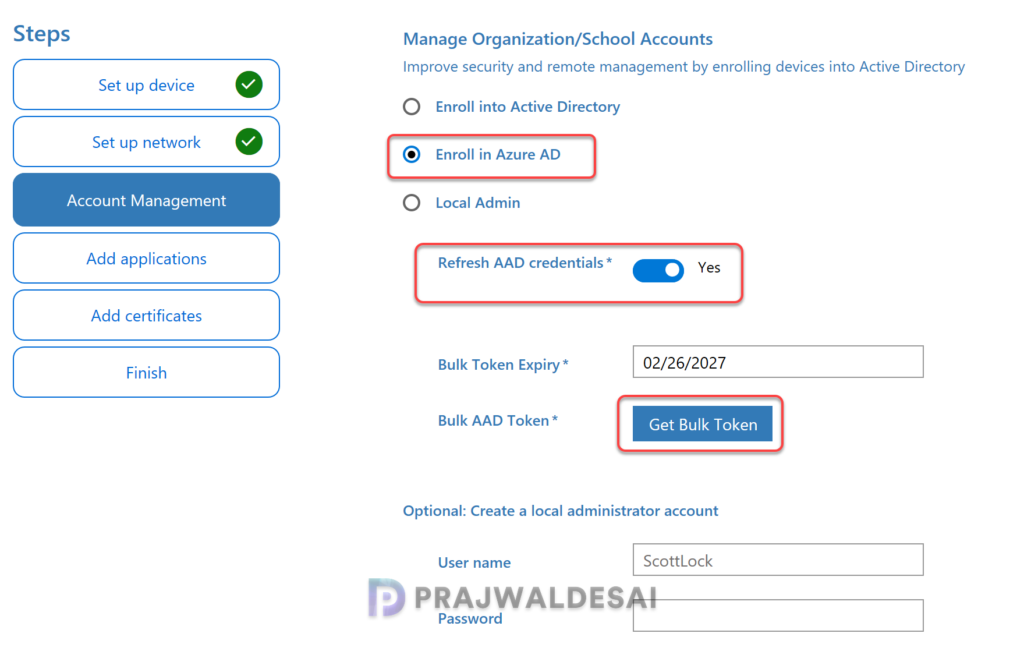
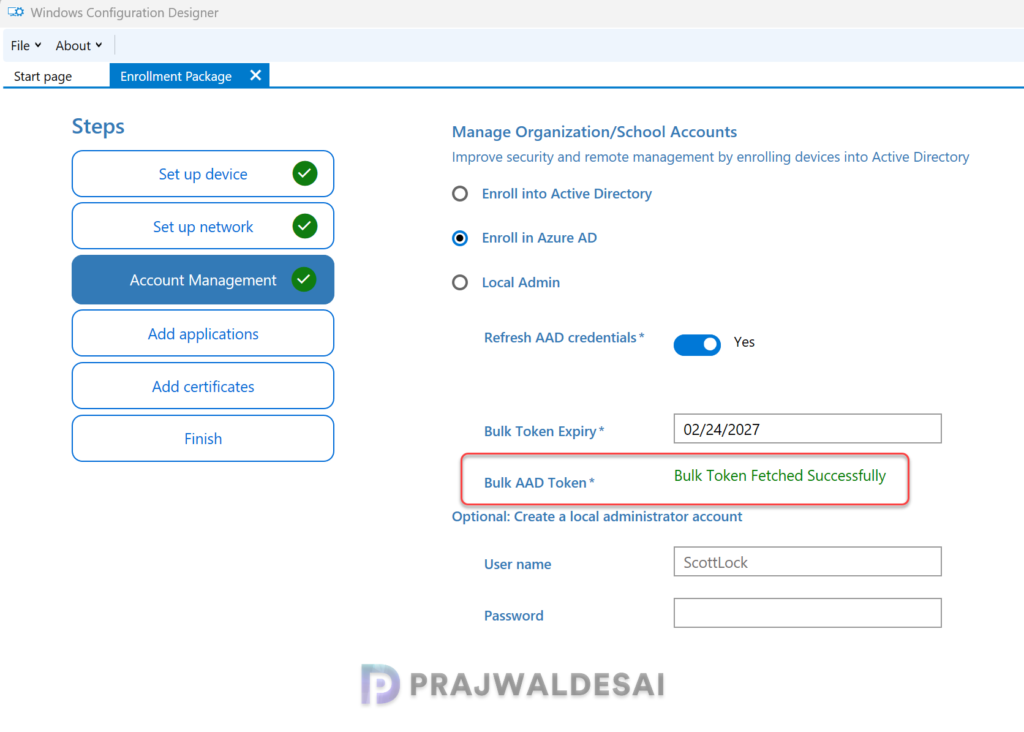
In the Account Management section, configure the following settings under Manage organization/school accounts.
- Enroll in Azure AD (Entra ID): Choose how devices are enrolled. Since we want our devices to be enrolled in Entra ID, select Enroll in Azure AD.
- Refresh AAD credentials: Select Yes.
- Bulk Token Expiry: Define a valid expiry date (MM/DD/YYYY) for the bulk enrollment token. The token validity period is 180 days. Make sure you track the validity period and renew them when needed.
- Bulk AAD Token: Creates a bulk enrollment token.
- Create a local administrator account: If you wish to create a local admin account along with device enrollment, specify the username and password.
Click on the Get Bulk Token to generate a new bulk enrollment token.
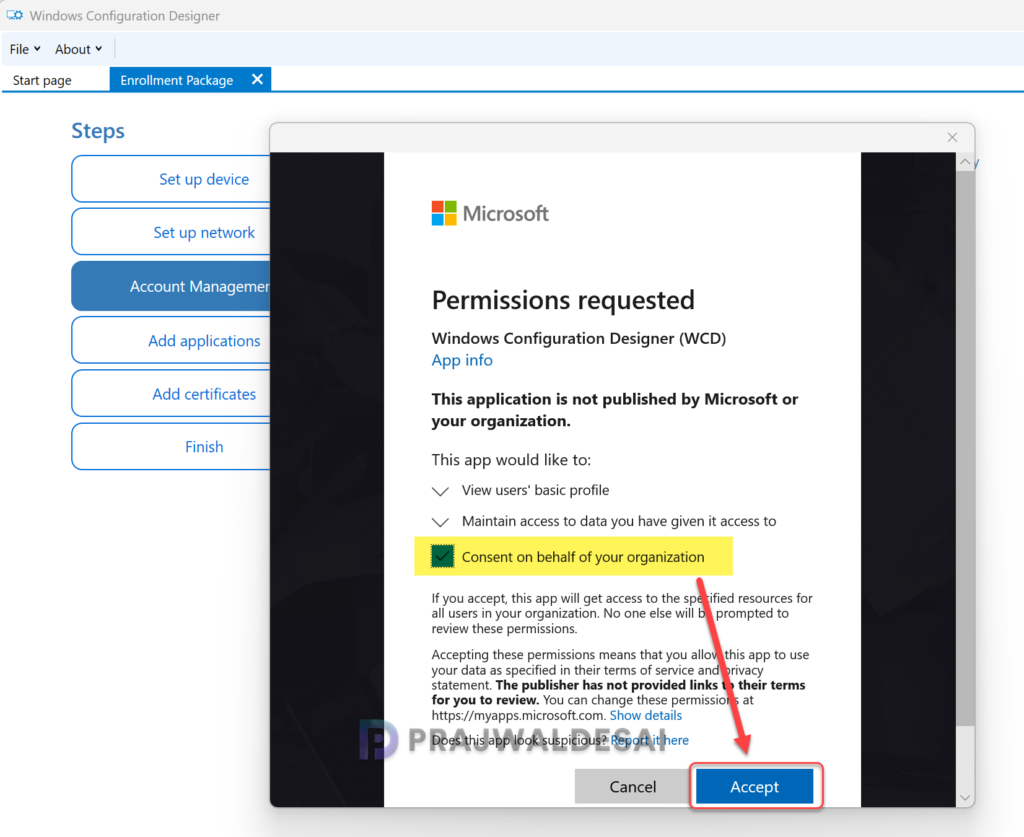
Provide your Microsoft Entra credentials to get a bulk token. WCD application requests certain permissions to generate a bulk enrollment token, click Accept.
From the below image, we see that the bulk token has been fetched successfully. Click Next to continue.
On the Sign in to all apps and websites on this device page, select No, this app only. If you select Yes, the device you are using will be managed by your organization. If you do not intend for your device to be managed, make sure to select No, this app only. For more information, see how to disable MDM enrollment when adding a work or school account in Intune.
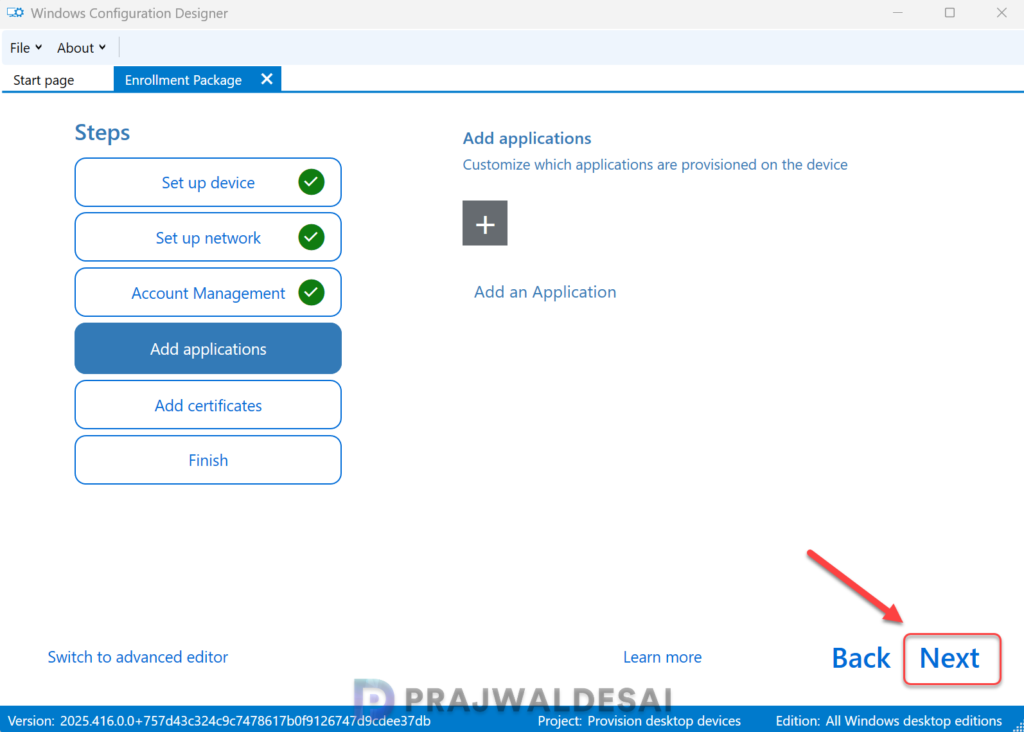
On the Add applications tab, you may click on the plus icon to add apps. These apps will be provisioned on the device during the enrollment. If you’re managing the application deployments via Intune, you may skip adding the apps here and deploy them later via Intune admin center. Click Next.
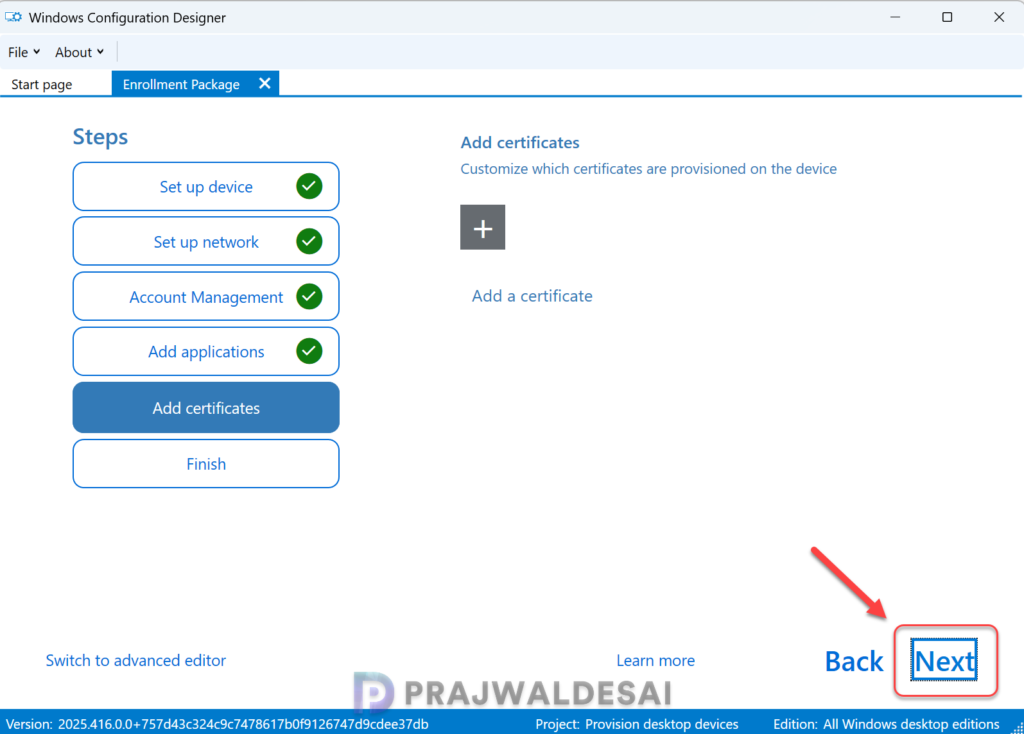
On the Add certificates tab, you may add certificates to provision on the device. Click Next to continue.
On the Finish tab, you may choose to password protect your provisioning package. Once you’re done with configuring the settings, verify them once and click the Create button to generate a provisioning package (.ppkg).
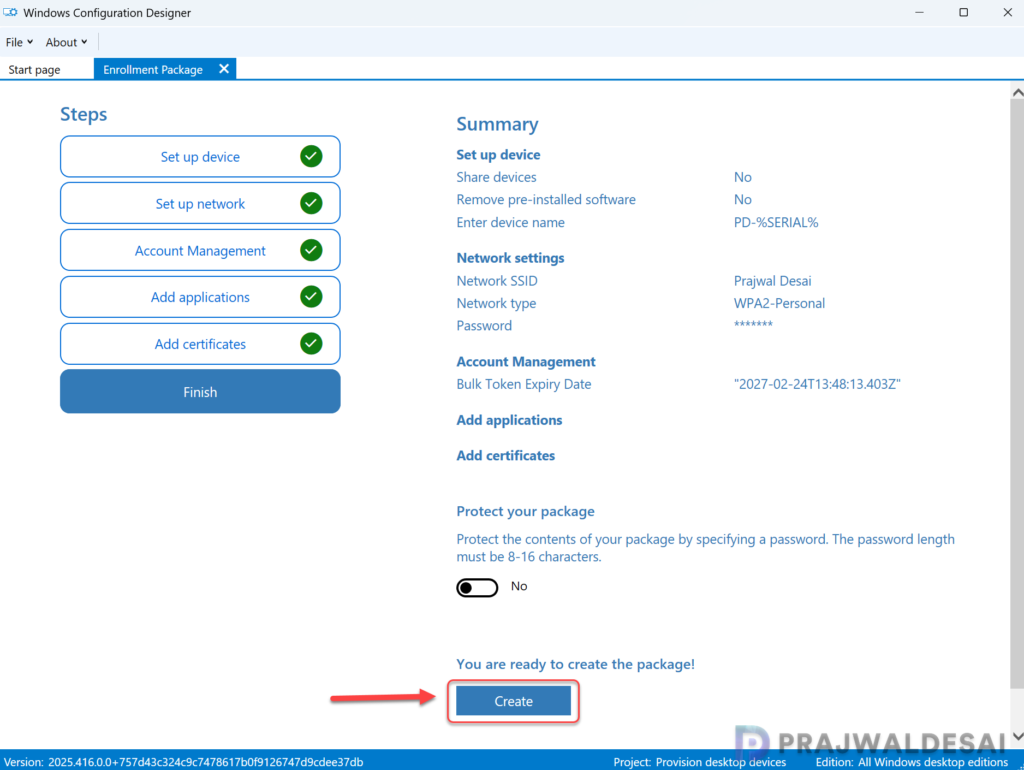
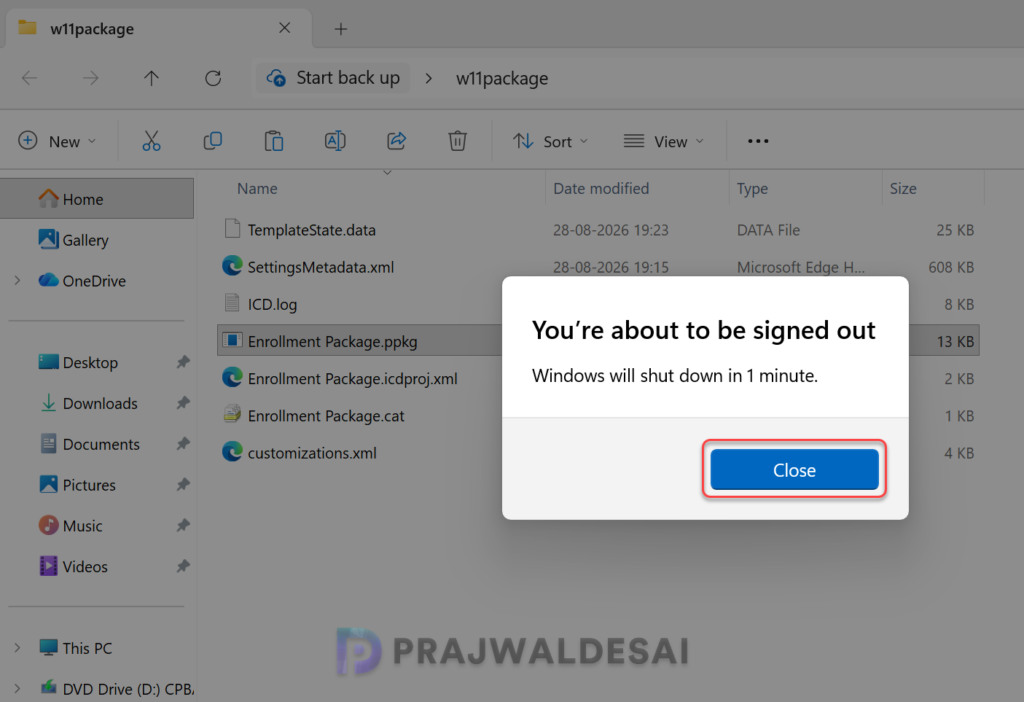
Let me now show you the contents of the enrollment package. Go to the folder location that you specified to generate the provisioning package and here you can see several files. The Enrollment Package.ppkg is the file that contains configuration settings that can automatically join the device to Entra ID and further enroll it into Intune.
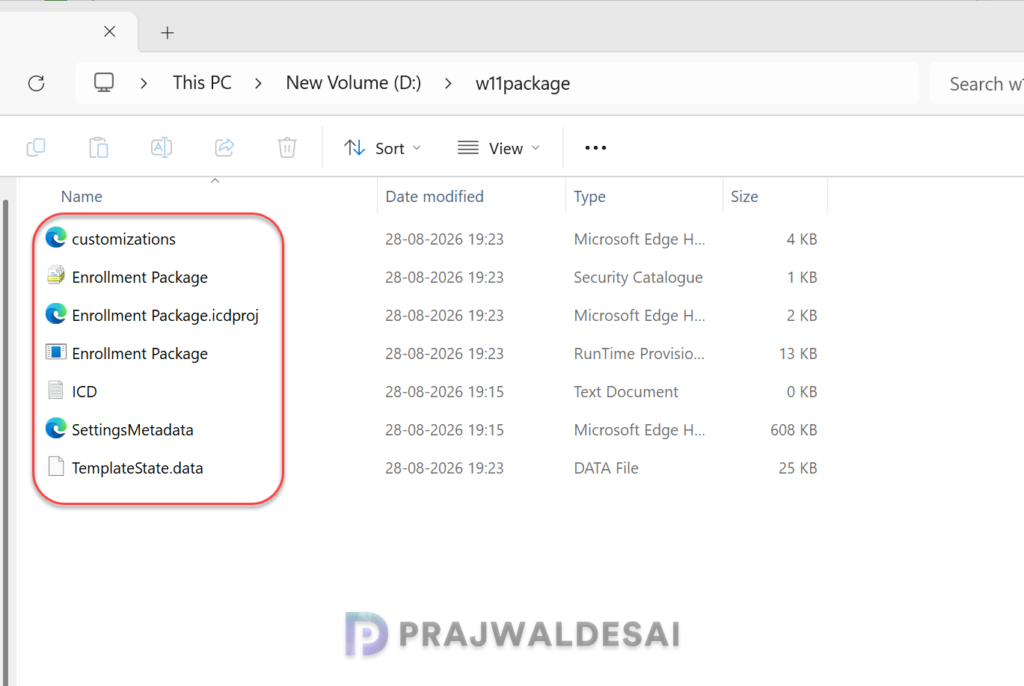
Step 5: Enroll Windows 11 devices using Provisioning Package
This is an important step where the actual device enrollment begins. Running the provisioning package (.ppkg file) connects the device to the Microsoft Entra ID and the device can be managed via the Microsoft Intune admin center. Ensure the device has proper connectivity while it joins the Microsoft Entra tenant.
As mentioned earlier, a provisioning package can be applied to your Windows devices in various ways. The easiest approach is to manually run the package on the Windows device to enroll it. For bulk enrollment, you can apply it via USB drives or during OOBE.
First, sign in to your Windows device using the administrator account you want to enroll. Then, copy the enrollment package folder that was created in the previous step. Now right-click the EnrollmentPackage.ppkg file and select Open.
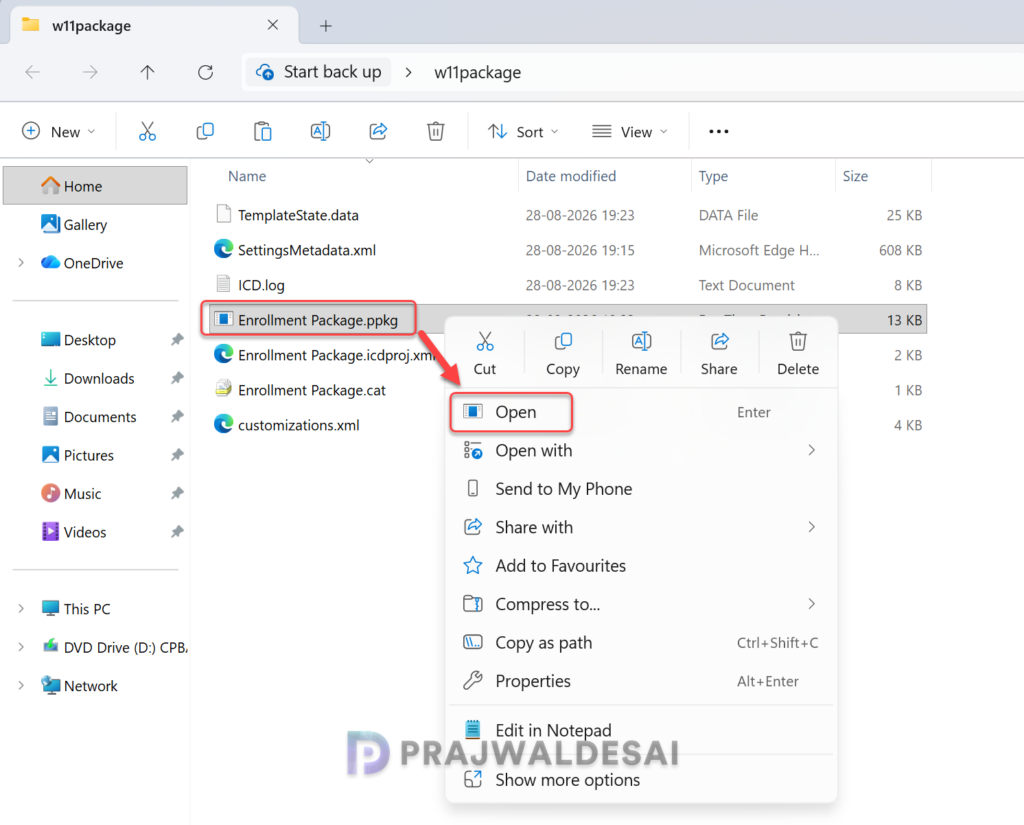
Provisioning packages require administrator privileges as they can modify system policies and run scripts at the system level. Ensure you trust the package you’re installing before accepting the UAC prompt. Select Yes.
The provisioning runtime asks if the package is from a source you trust. Verify that you’re applying the correct package and that it’s trusted. Select Yes, add it.
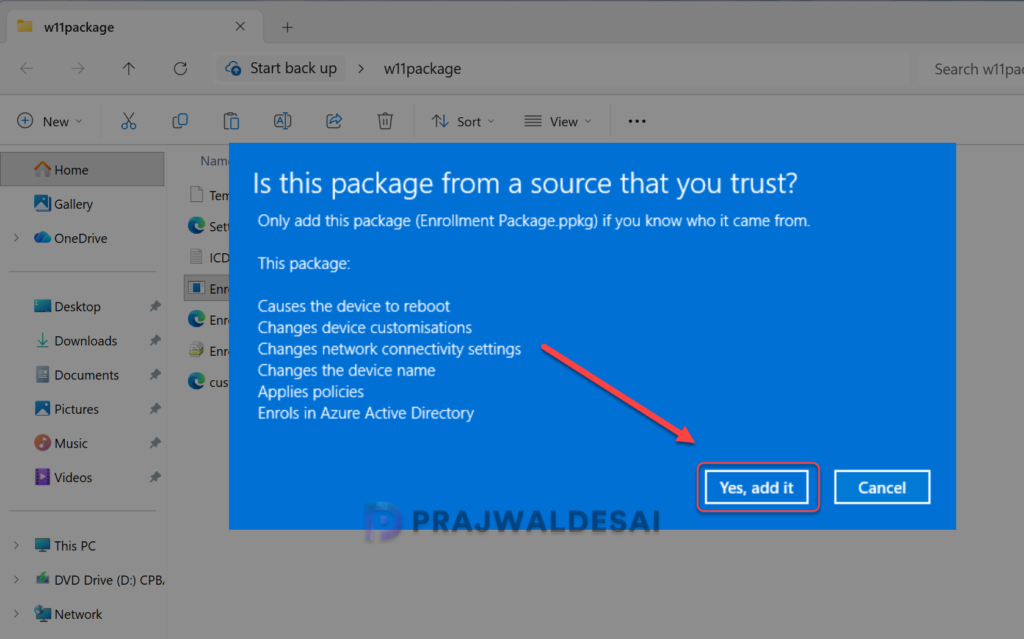
Click Close and the device restarts within a minute. When the device restarts, it is joined to the Microsoft Entra ID and enrolled in Microsoft Intune. This completes the actual provisioning process of a Windows device using the enrollment package.
Step 6: Verify Bulk Enrolled devices in Entra and Intune
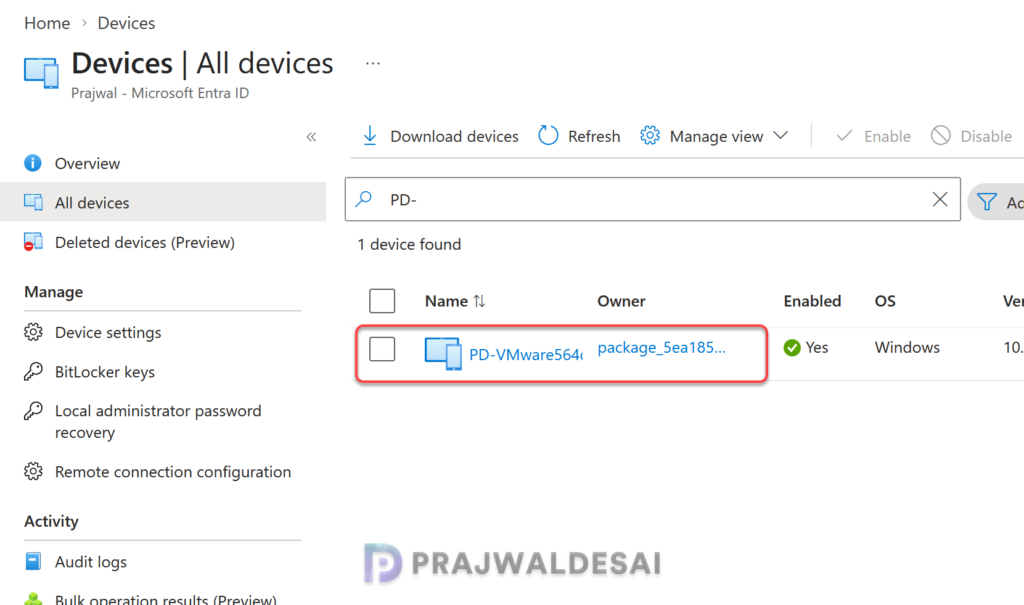
After applying the package, allow a few minutes for the device to complete enrollment. Sign in to the Microsoft Entra admin center and navigate to Devices > All Devices. To identify the devices that are enrolled using the provisioning package, check the Owner column that includes the package_{GUID} as seen in the below image.
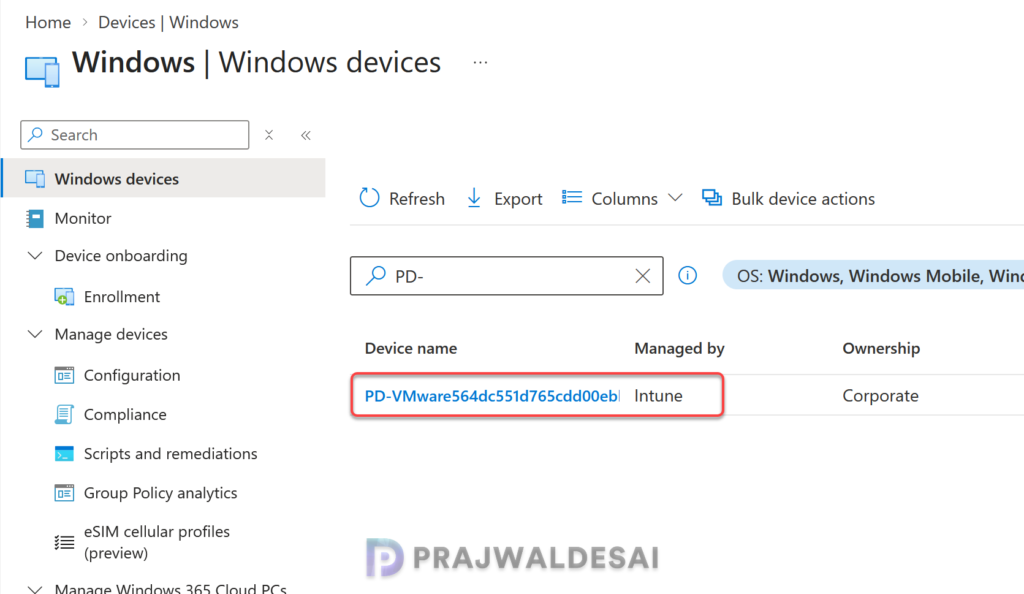
The device should also show up in the Intune admin center under All devices once it is joined to Microsoft Entra ID. From here, you can apply the policies and configuration settings and manage the device like any other.
Step 7: End User Experience
After you’ve enrolled a Windows 11 device using the provisioning package, let me show you what end users see on the login screen and some basic checks that confirm the enrollment.
The first difference that a user notices on the login screen is the option to sign in with another account. The user must select other user and enter the credentials provided by the organization.
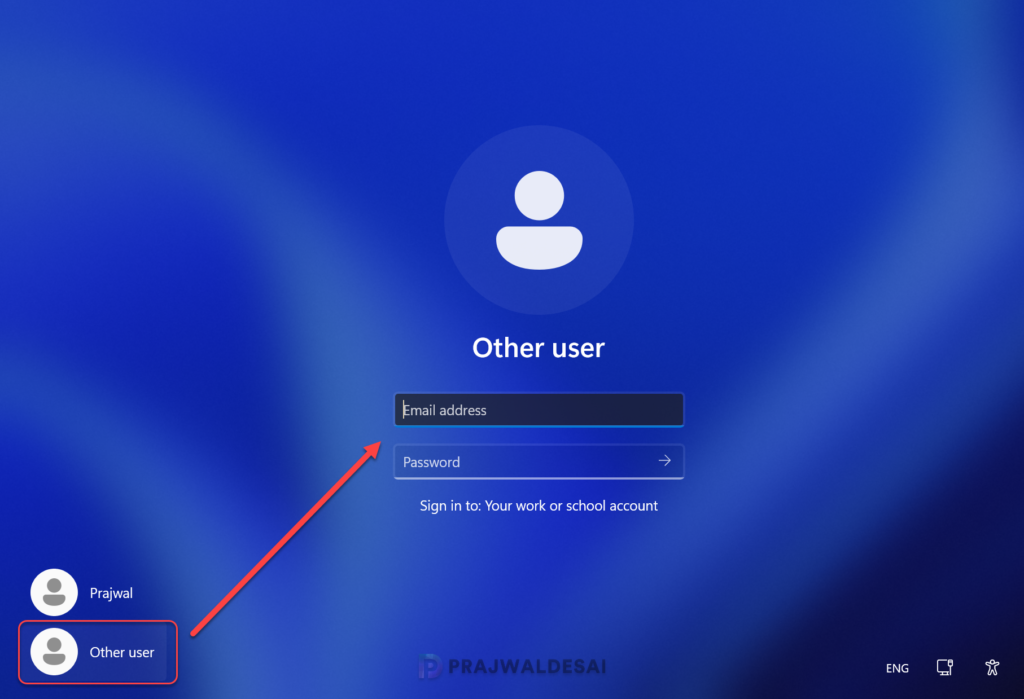
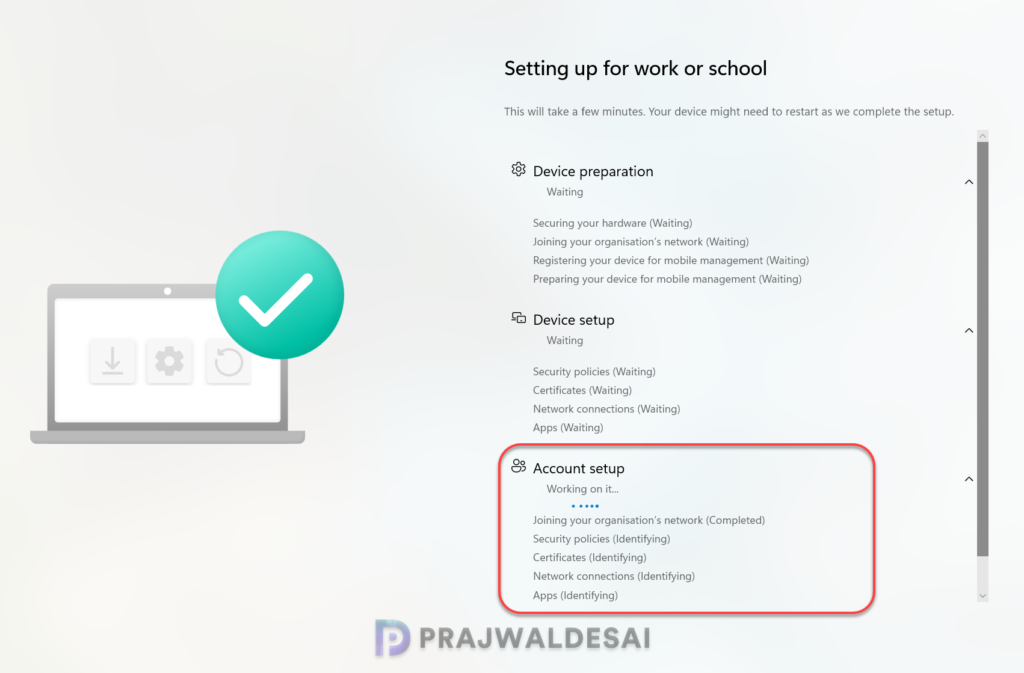
After the user signs in with their organizational credentials, the device provisions user-specific policies, certificates, and applications. This should take a couple of minutes to complete.
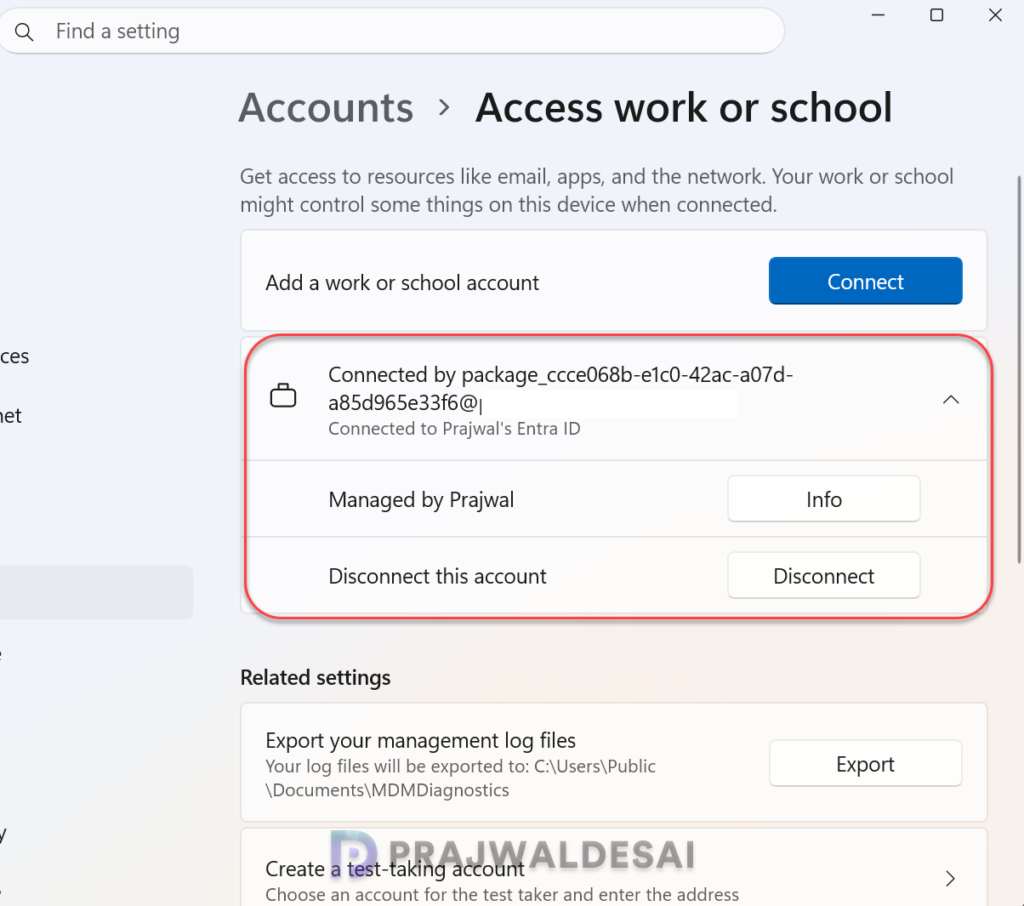
Once the user signs on to the device, go to Settings > Account > Access work or School. Notice that there are two things to look for on this screen which confirms the device enrollment is successful.
- Connected to Organization’s Entra ID: This confirms that the device is successfully joined to your organization. For example, in the below image, we see the device is connected to Prajwal’s Entra ID.
- Connected by Package_{GUID}: Confirms that the device was enrolled using the provisioning package.
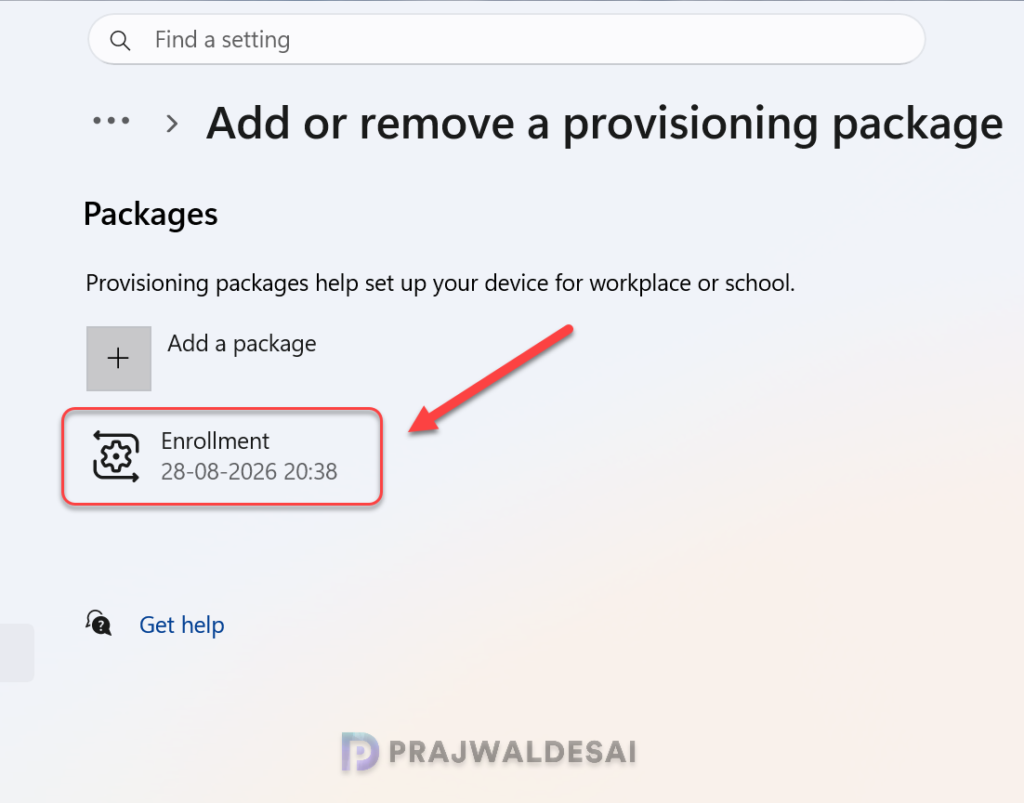
When you select Add or remove a provisioning package, you can see the name of the package and the exact date and time when the enrollment took place. The below image is from a different device that was applied with a new provisioning package.
Troubleshooting Windows bulk enrollment
Microsoft says that provisioning is designed for use on new Windows devices. If provisioning fails, the device may need to be wiped or recovered using a boot image. Most importantly, ensure the .ppkg file is not corrupted, and the package was created correctly using WCD.
For any provisioning related issues, you can check for success/failure of the settings in your package in the Provisioning-Diagnostics-Provider Admin log in Event Viewer.
Conclusion
Bulk enrolling Windows 11 devices into Intune using a provisioning package is a practical and efficient option for IT teams managing corporate-owned devices at scale. It reduces repetitive manual setup, speeds up onboarding, and gives administrators a reliable way to standardize device enrollment.
While Windows Autopilot often gets most of the attention for modern deployment, provisioning packages still play an important role, especially in hands-on staging, shared device scenarios, and environments where speed and simplicity matter.
If you’re looking for a straightforward way to enroll many Windows 11 devices into Intune, a provisioning package is absolutely worth considering. That’s all I wanted to cover in this guide. If you need any clarification, please let me know in the comments section.
