


This post covers the steps to use SCCM servicing plans to upgrade Windows 10 devices. You can create servicing plans in SCCM and deploy them to upgrade Windows 10 devices in your setup.
Using Servicing plans in SCCM, I will show you how to upgrade Windows 10 version 1809 to Windows 10 version 1903. This guide should also work when you want to use servicing plans to upgrade to a higher version of Windows 10.
With Configuration manager servicing plans you can ensure that all the Windows 10 systems are kept up-to-date when new builds are released. If you know the build is stable and wish to roll-out, servicing plan makes it very easy to accomplish the task.

In my previous post, I covered the steps to perform Windows 10 1903 upgrade using SCCM. In addition to that you use SCCM 1902 to deploy updates to Windows 10 version 1903. For more info, read this post.
If you are using SCCM, remember that you cannot use the servicing plans to upgrade Windows 7 or Windows 8.1 machines. So the steps mentioned in this post strictly applies if you want to upgrade Windows 10 to latest builds.
Windows 10 Servicing Dashboard Prerequisites
First of all let’s start with Prerequisites. Note that if all the below prerequisites are not met, you may not see data in Windows 10 Servicing dashboard.
- WSUS 4.0 with the hotfixes 3095113 and 3159706 must be installed on your software update points and site servers.
- Both the above hotfixes are applicable if you are using Windows Server 2012, 2012 R2 in your setup.
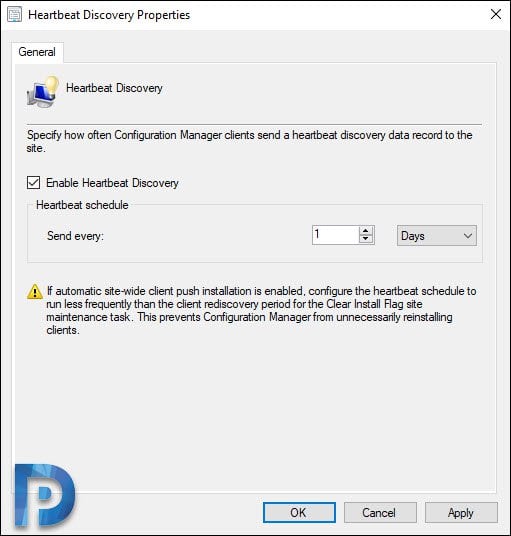
- You must enable heartbeat discovery. When you install SCCM, the heartbeat discovery is enabled by default. However go to discovery methods and check once.
- Ensure the service connection point is installed and configured for Online, persistent connection mode.
- You must configure software updates to deploy Windows 10 feature updates.
Configure Software Update Point
You must install and configure software update point prior to creating servicing plan. If you want to deploy Windows 10 updates, the product “Windows 10” must be first selected. Here is a guide to install and configure software update point.
- Launch SCCM Console
- Go to Administration > Site Configuration > Sites.
- On top ribbon click Configure Site component and then click Software Update Point.
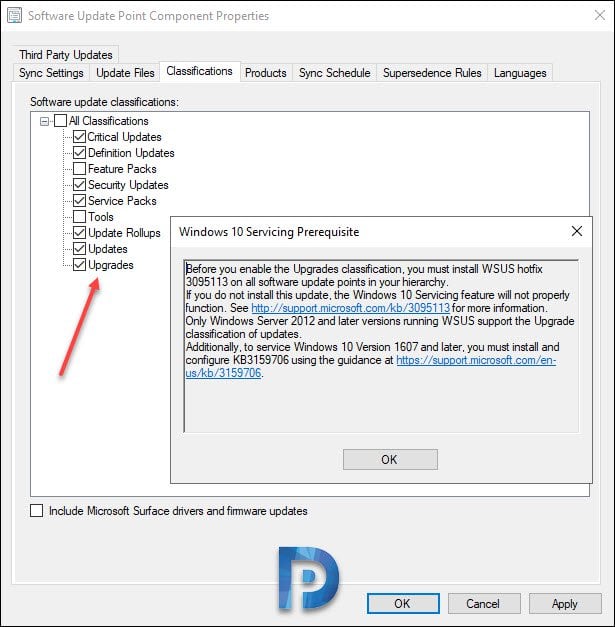
- Click Products tab and select Windows 10.

Click Classifications tab and under Software update classifications, select Upgrades.
You get a Windows 10 Servicing prerequisite box. Those two hotfixes are the ones that are covered in Prerequisites section above.
Click OK.
Enable Heartbeat Discovery
You only need to check if the Heartbeat discovery is enabled. The data displayed in the Windows 10 servicing dashboard is found by using this discovery.
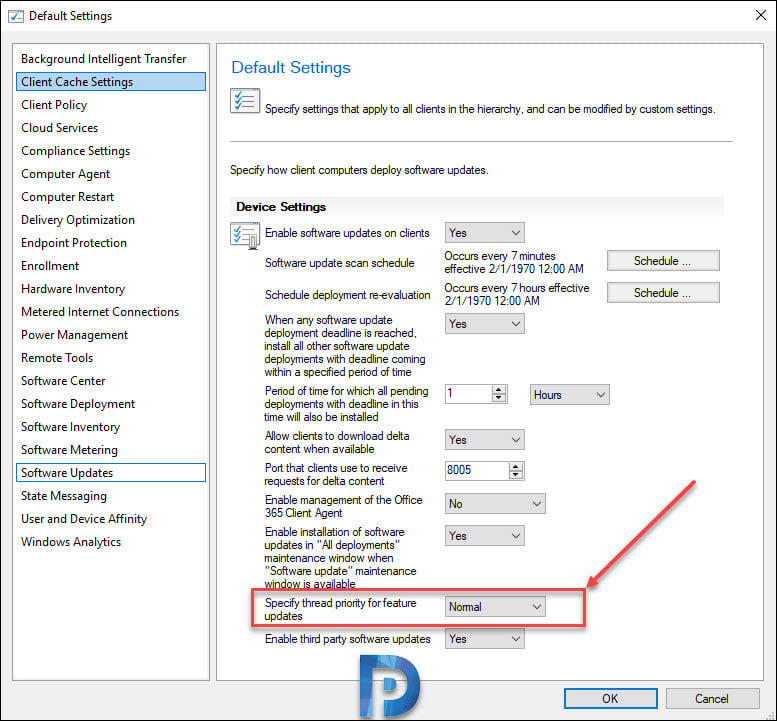
 A quick note about priority for feature updates. If you are using Configuration Manager 1902, under Default Client Settings > Software Updates you will find a new setting.
You can now adjust the priority with which clients install a feature update through Windows 10 servicing.
Synchronize Software Updates
After making the changes to Software Update Point, you must sync the software updates.
To synchronize software updates in SCCM
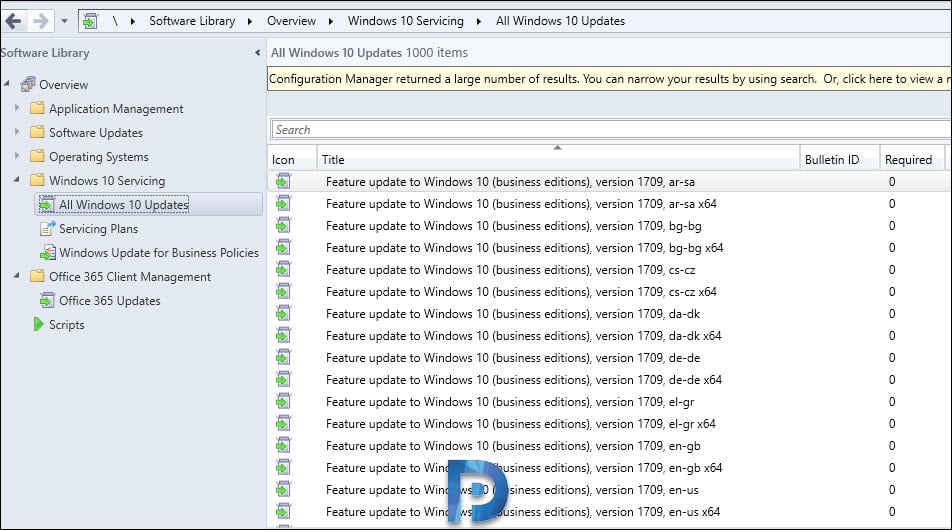
- Go to Software Library > Overview > Windows 10 Servicing.
- Right click All Windows 10 Updates and click Synchronize Software Updates.
- To monitor the synchronization process, open wsyncmgr.log file.

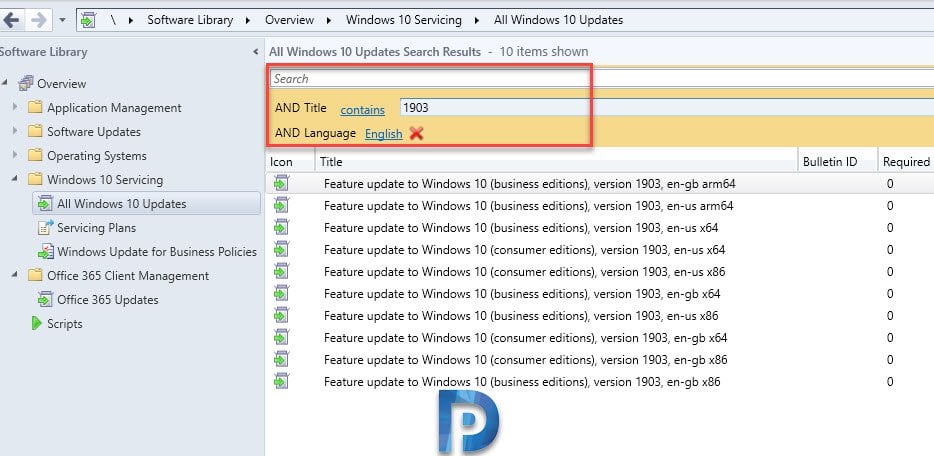
So here is what you see when you complete the updates synchronization. Notice that there are lot of feature updates, as a result you may not see all the updates in just glance.
In this case, I will filter the updates using a simple search criteria. Click Add Criteria and select Title and Language.
Choose Title contains as 1903 and Language as English. This criteria returns very few and specific updates which I want.
So now that we see Windows 10 version 1903 feature updates, we can go ahead and create servicing plan for Windows 10.
Click Windows 10 servicing dashboard. That should show count of machines running Windows 10 versions. In my case all the Windows 10 machines are at version 1809.

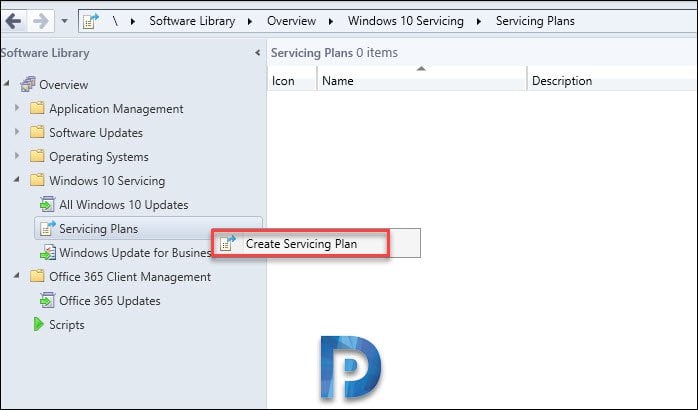
Create SCCM Windows 10 Servicing Plans to Upgrade Windows 10
To create a new SCCM Windows 10 Servicing Plans
- In the SCCM console, go to Software Library > Overview > Windows 10 Servicing.
- Right click Servicing Plans and click Create Servicing Plan.
Specify the name and description for servicing plan. Click Next.

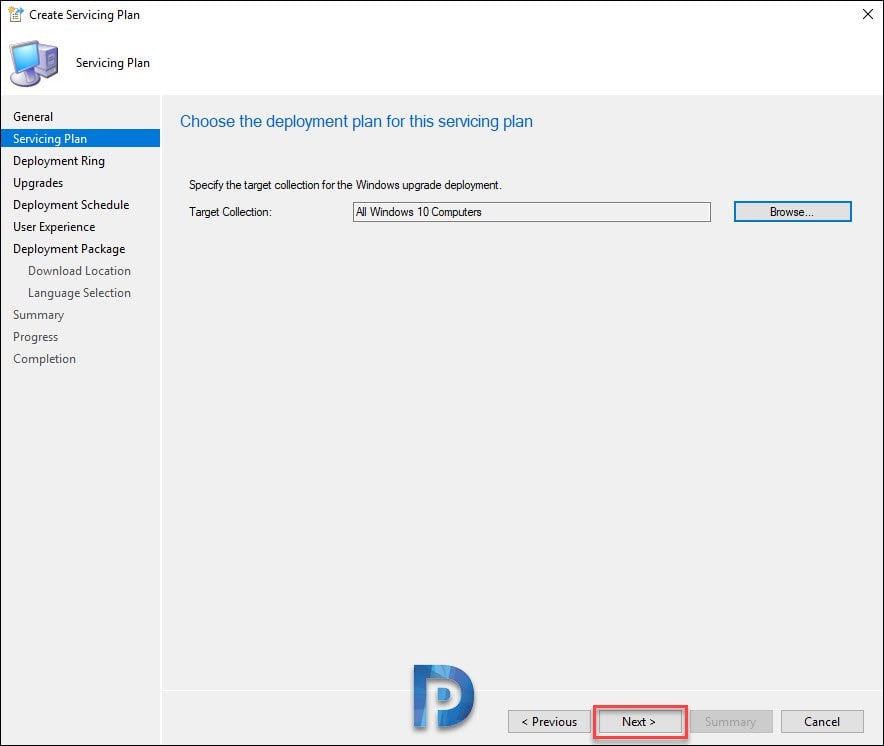
To perform Windows 10 upgrade deployment, click Browse and select Target Collection. Click Next.
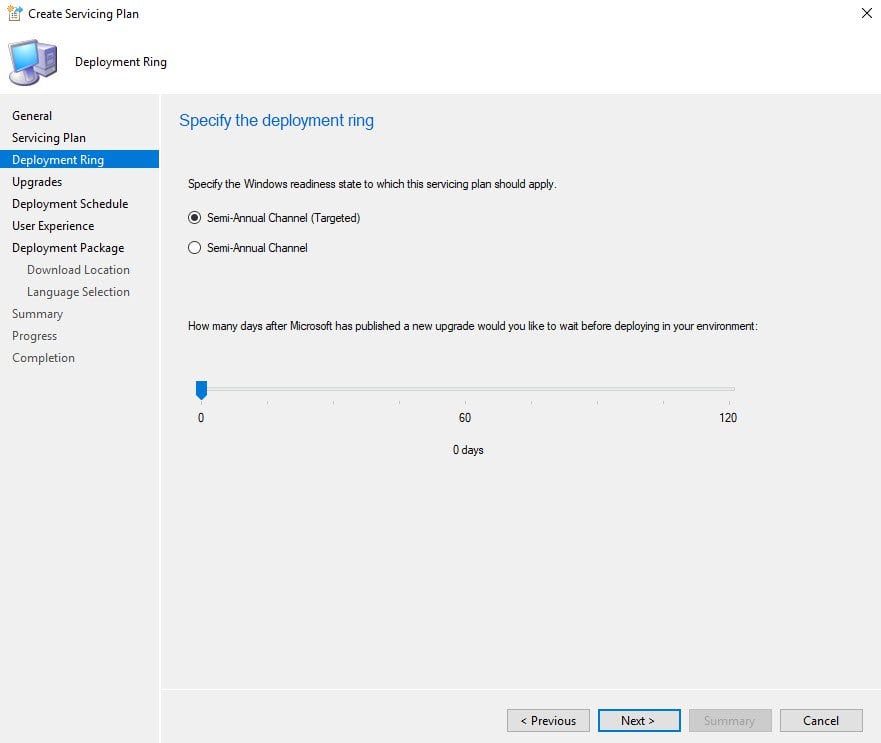
Windows 10 Servicing Deployment Rings
When you are creating Windows 10 servicing plans using SCCM, you should have an idea about Deployment Rings.
- Semi-Annual Channel (Targeted) – Targeted deployment refers to the phase immediately following the release of a new Windows version. Choose this when devices across various teams evaluate the major release prior to broad deployment.
- Semi-Annual Channel – With this channel, With the Semi-Annual Channel, Microsoft releases two Windows Feature Updates, one in March and the other in September. Each of these have 18-month servicing timeline.
For more information on deployment rings for windows 10 updates, read this article.
Since I am deploying the updates in my test lab, I am going to select Semi-Annual Channel (Targeted) deployment ring.
Before you deploy updates, you must specify how long you want to wait after MS has published a new upgrade. This is a very important decision and if you are deploying feature updates in an organization, a proper planning is must.
In this step you got some good options to filter upgrades. I have got only 64-bit Windows 10 enterprise machines with English as default langauge. Hence my search criteria looks something like this.
- Architecture – x64
- Language – English
- Title – 1903
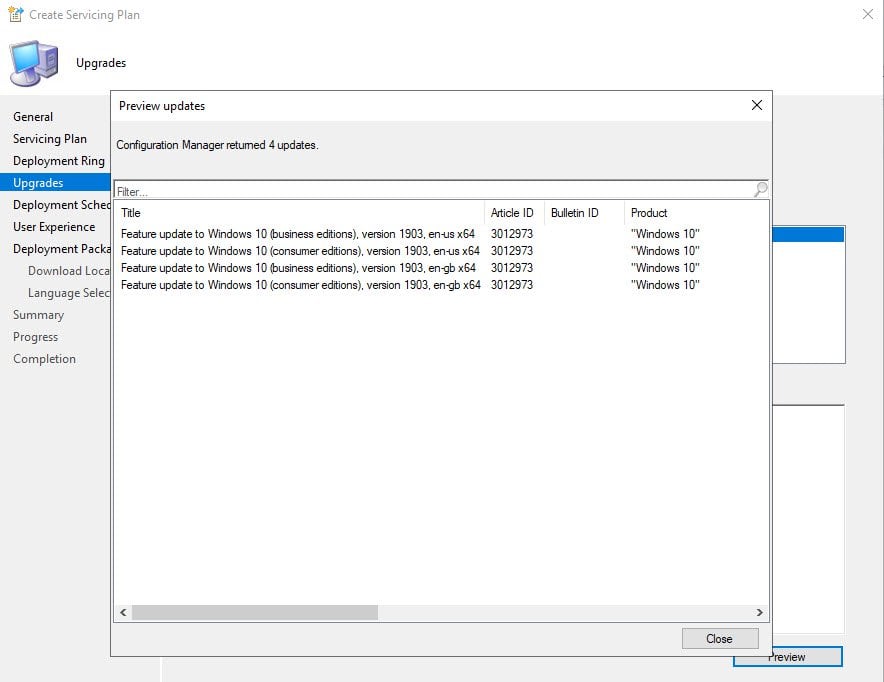
Before you click Next, click Preview button.

In the Preview updates window, you now see the updates based on the search criteria that you specified. If you don’t see the desired updates, check your criteria again.
Click Close and then Next.
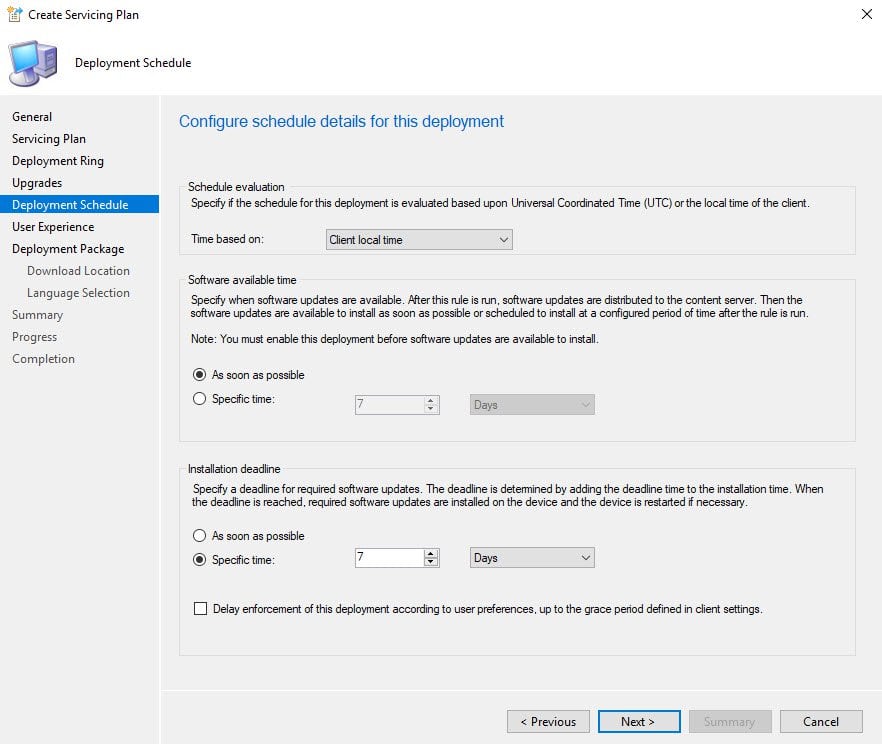
Under Deployment Schedule, specify the time based on which is either UTC or Client Local time.
Specify the Software available time and software installation deadline. Click Next.
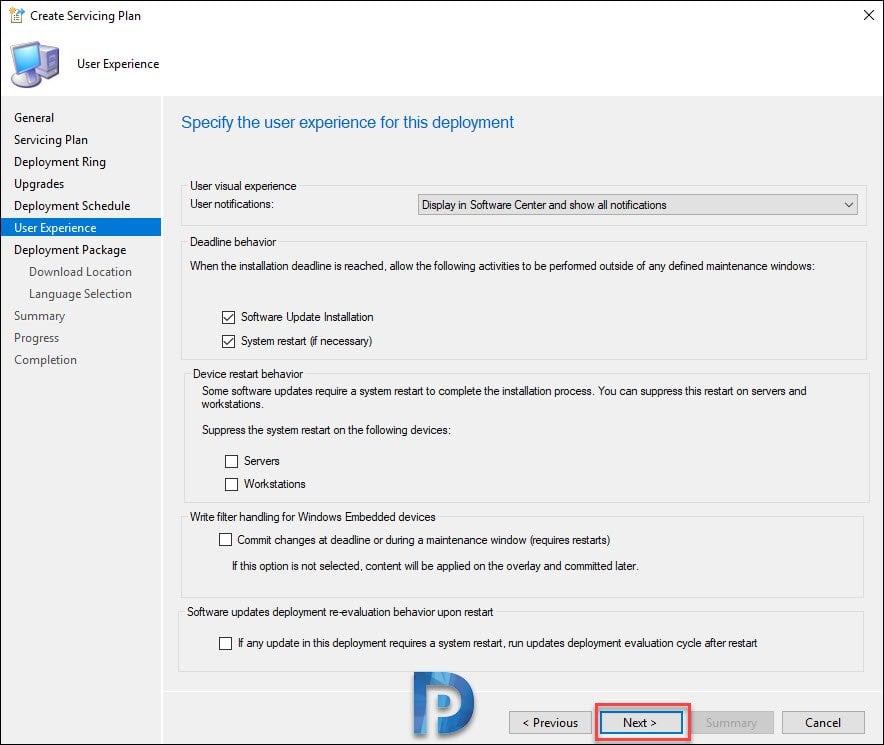
Specify the user experience for this deployment. Click Next.
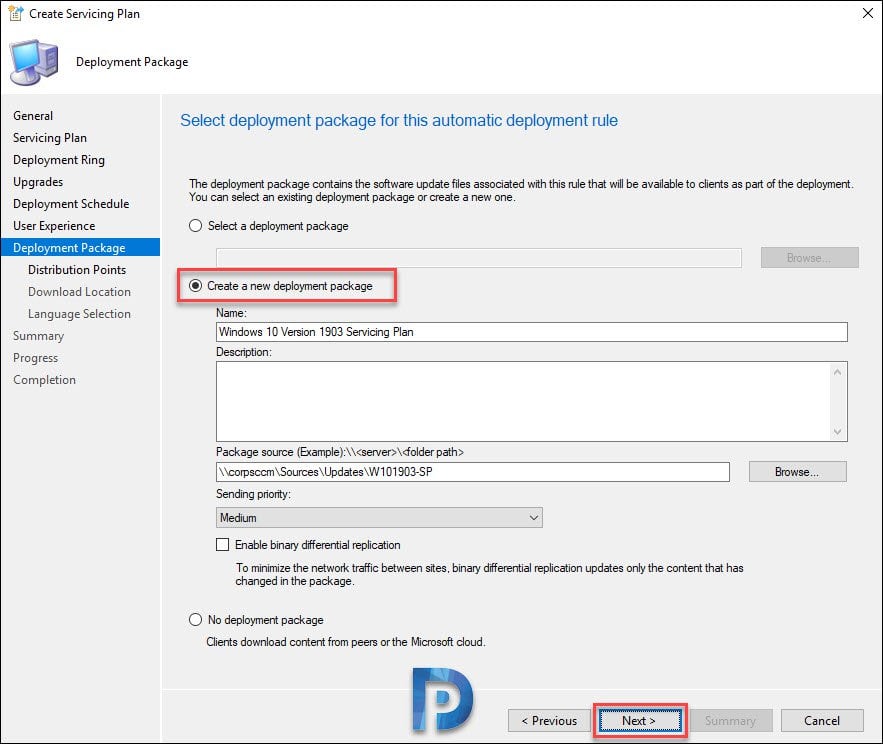
Create Windows 10 Deployment Package
Select Create a new deployment package. Specify Name and package source. Click Next.
Add the distribution points to host the content. Click Next.

Select Download software updates from the internet. Click Next.

Specify the update languages for the products. Click Next.

On the Summary page, verify the settings. Click Next.
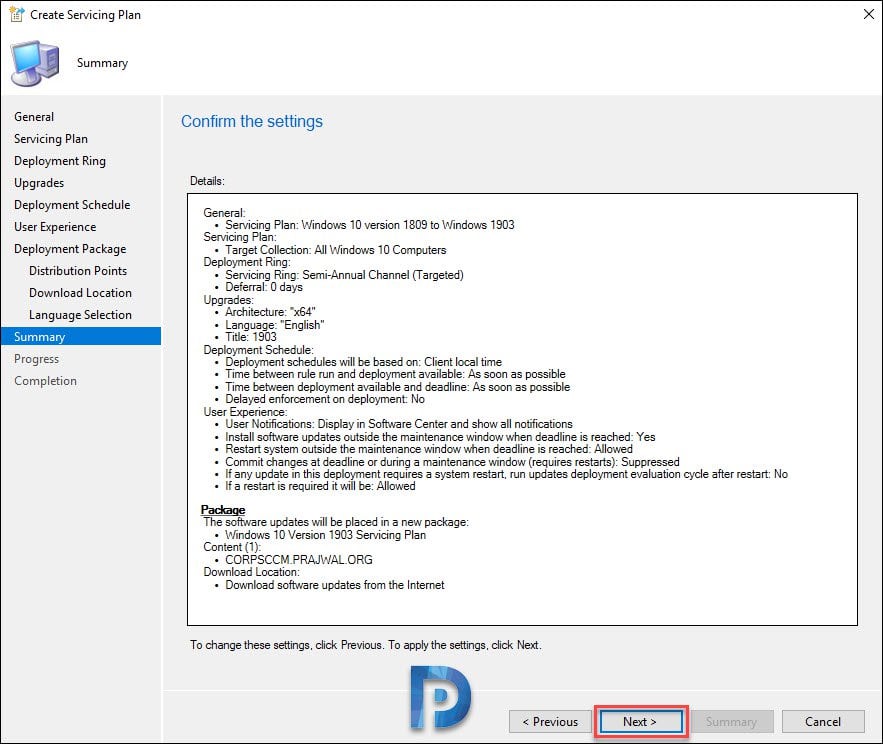
On Completion page, click Close.

Deploy Windows 10 using SCCM Servicing Plans
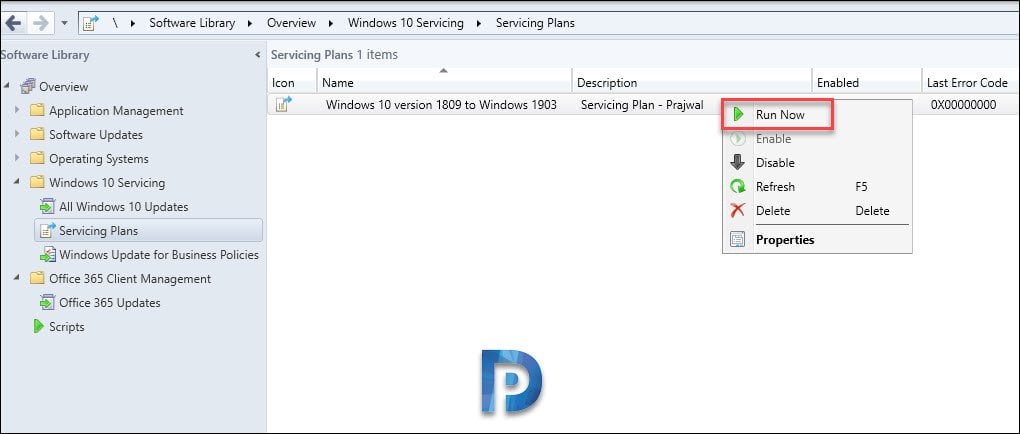
The servicing plan that you just created is shown under Servicing plans. Right click Servicing plan and click Run Now. When you click Run Now, the deployment begins to specified Windows 10 collection.
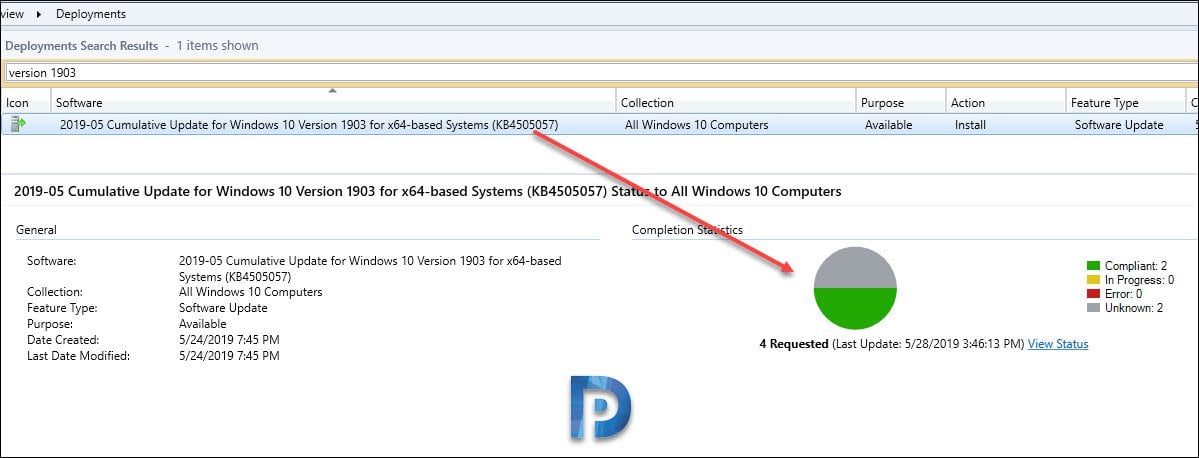
Go to Monitoring > Overview > Deployments. Select the deployment and that should show how many machines are compliant.
Confirming the Windows 10 Upgrade
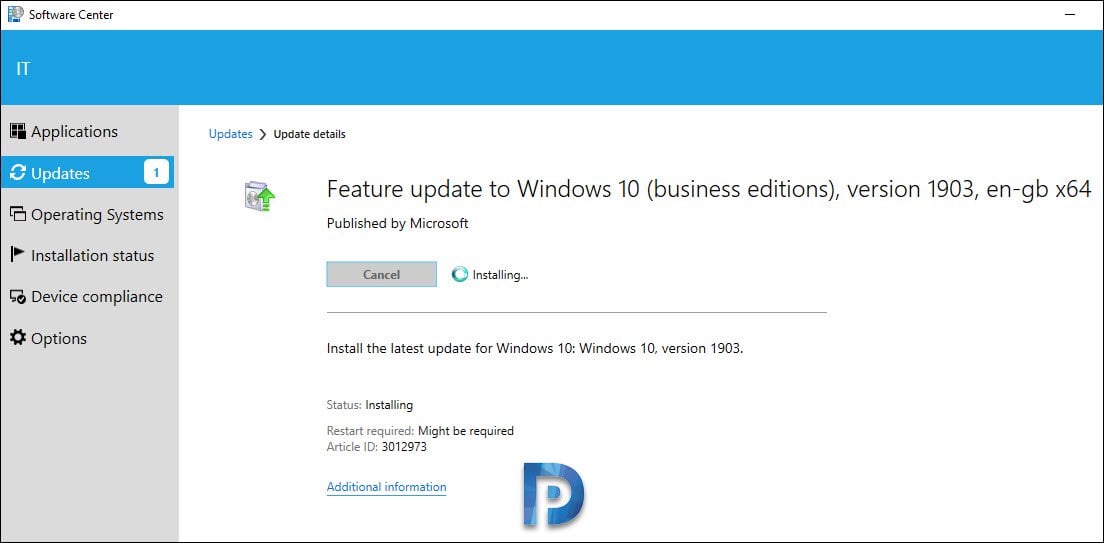
After few minutes, in the Software Center, i could see the update getting installed. This was on all the Windows 10 machines in my test setup.
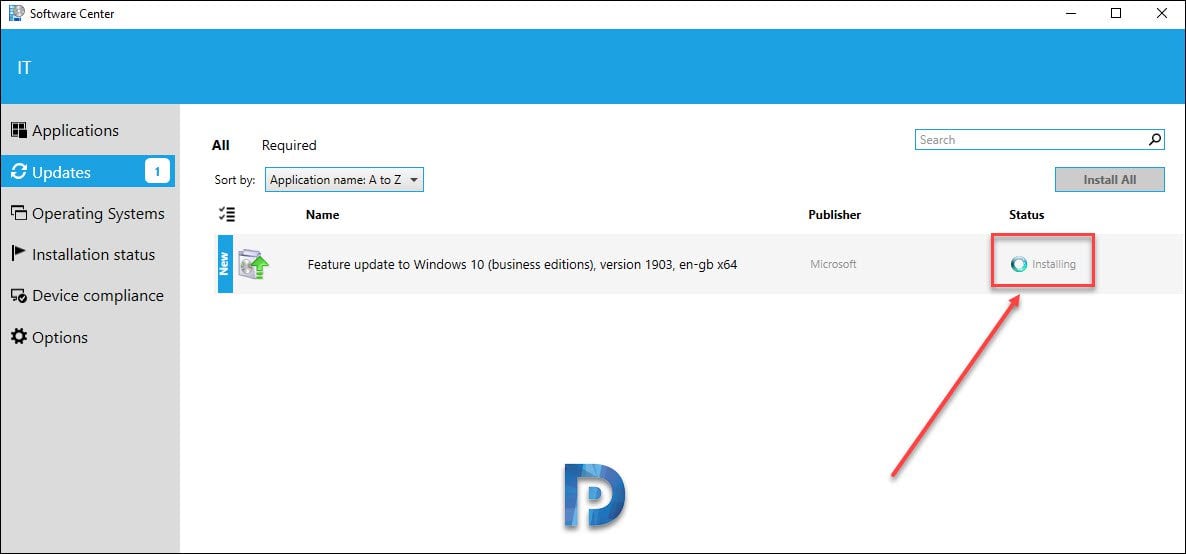
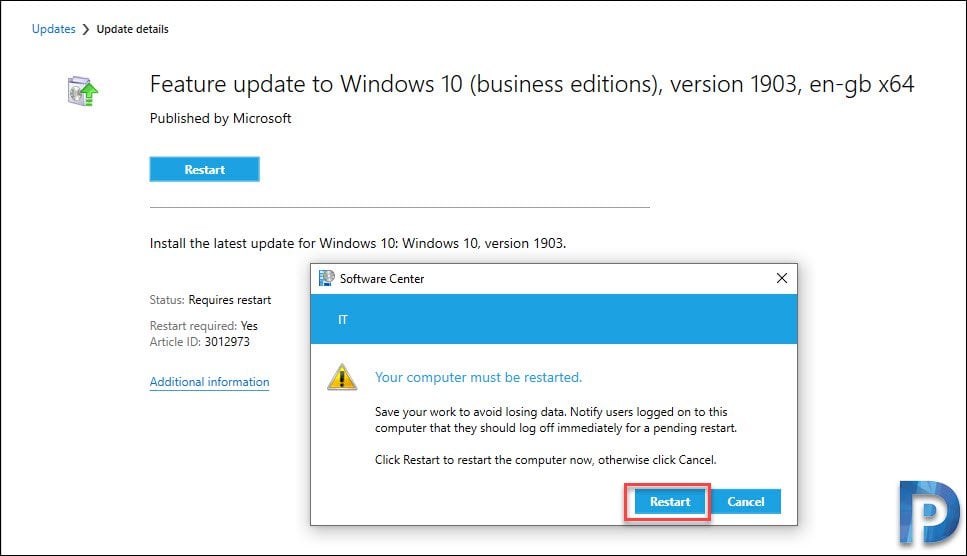
The update installation takes good amount of time. In my case it took around 20 minutes before i saw a restart popup.
You must restart the computer to complete the upgrade.
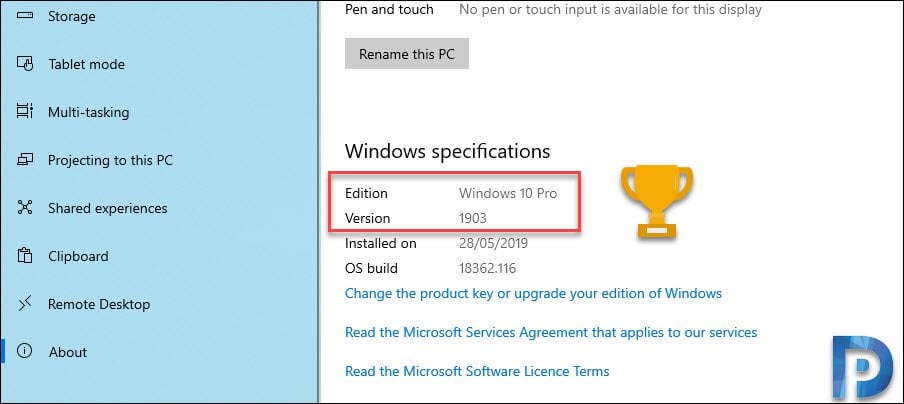
Log in back to computer and check Windows 10 version. Using SCCM servicing plan, we upgraded Windows 10 1809 to Windows 10 1903 without any errors.
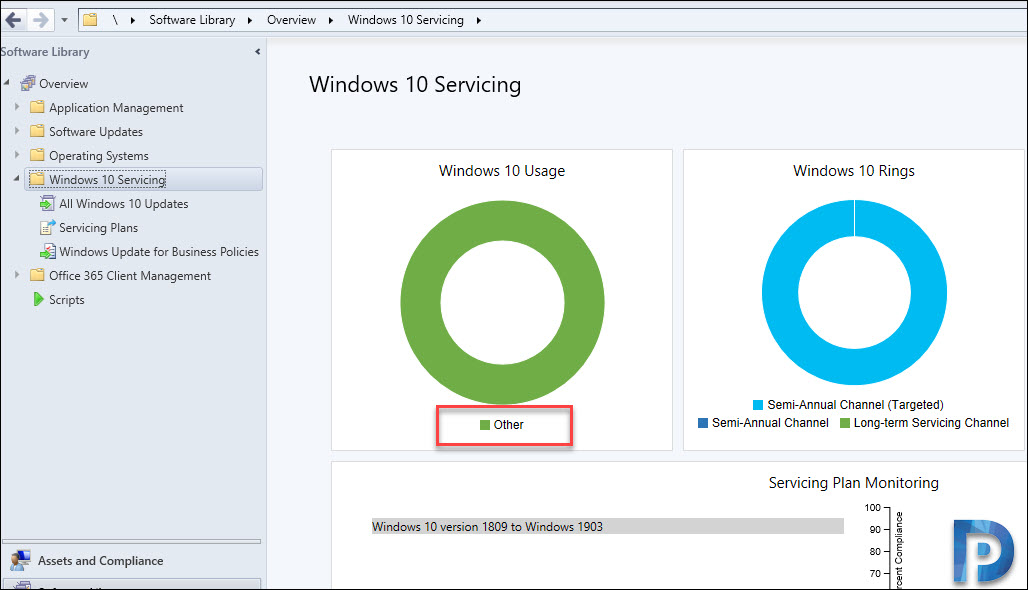
 During my testing, Windows 10 upgrade was successful on almost all devices in my lab setup. However the Windows 10 version 1903 wasn’t shown under Windows 10 usage.
Rather I saw the version as “Other” which means Configuration Manager failed to figure out the Windows 10 build. I am checking this with Microsoft team and shall the update the post once i get more info.

We have total 1800+ windows 10 & windows 11 devices in our environment but we have different versions.
I can’t download and deploy on windows 10 servicing. the icon of the patch update and upgrade it is loading the cross icon. May you help me on this?
Hi Prajwal,
First of all thank you for this great site. It has helped me tremendously over the years as I am learning SCCM and you’ve put together some great tutorials.
I am trying to get servicing plan set up in my environment as we have a lot of Windows 10 that are on 1703 and 1809, and i’d like to get them to 20h2. I’ve checked the hotfixes and it says it is not applicable, and validated that upgrade option is checked in SUP.
When I go to “All Windows 10 Updates”, I see the 20h2 update, however if i create a servicing plan and click on preview, it doesn’t show anything. I even tried previewing with just the title and no filter. Do you know what could be the issue?
Here are details on the environment:
Server 2012r2
configmgr 2002 (5.0.8968.1000) all hotfixes installed from console.
Thanks for any assistance in advance!
Hi. Where to set Windows 10 Servicing Refresing time for Cake Graph.Is this connected with Asset Inteligence Catalog Synchronization?
Thank you.
Hello:
Prajwal do you already know how to fix the issue related to Win 10 servicing Dashboard showing the version as “Other”
Thanks.
Doo the hotfixes have to be installed if we are running Windows server 2019?
Can you add more details please.
I have created a Servicing Plan for upgrade from 1903 to 20H2. I can see the the future update to 2004 in the software center and its says installing for a while but after 2.4 hours nothing has happended. it reboots and says failedand i get the error code 0x87d00664(-2016410012) which referes to Maximum Run time. This is set to 240min.
Hi I tired above the steps as it is.Deployment status unknown “category client check passed/active”. End machine i dont receive anything on software center side.i can see in c drive this folder C:\$WINDOWS.~BT
I have setup a Serving Plan for Windows 10 2004 based on your instructions. Everything in SCCM seems to be correct. The Pilot group I am using shows the 4 computers in the Monitoring/Deployments. Once computer shows Compliant (still at ver 1909), the other three show as Unknown/Client check passed/Active. This was done over a week ago, but the update still does not show in Software Center. The boundaries are correct, I can ping the computers from SCCM. Not sure where to look from here…
Hi Prajwal,
Just want to know whether “Windows Update Service” needs to be started for Servicing Plan to work. In our environment, we have disable Windows Update Service and the Servicing plan is not working.
Yes you must ensure the Windows updates are working.
Thanks for the article, is servicing plan work for upgrading 1903 to 1909, and 1709 to 1909 as well?
I have tried to upgrade from 1809 to 1909, work super, have also tried 1909 to 2004.
Hi Lowen could you help me on this
Couple questions. After I run the servicing plan, it does not show up under Deployments monitoring. Also even though it says it’s enabled and ran successfully, there is no ‘last evaluation time’ on the plan. Not sure if there should be? I’m on 1910.
Thank you for your article, I have one question though. Its all well with the name of the service plan being “Windows 10 Version 1809 to Windows 1903”, but nowhere do you actually set the variable to ONLY look for 1809 versions that needs to be updated. Your collection points to “All Windows 10 Computers”, so it will basically then upgrade ANY version of Win10 to the 1903 build.
And in all the other articles I have search they all leave out the part where you set or create the collection rule to only contain the build number that is targeted.
Can someone please give me an idea if I actually have a point here?
Kind regards.
how can i do this with sccm 1702
Feature Update to 1909 using a Servicing Plan stuck at 0% downloading. The same plan worked for 1903
Hey Tony.
Could be some problems with the boundary. I would look at wua.log or contenttransfer.log to see if you could find the cause.
Hi,
there is some progress log to check whats appen after clicking “Run Now” ?
Thanks
Fra
If you want to see the progress for the upgrade i would recommend checking the log inside C:\$WINDOWS.~BT\Sources\Panther, the log name is setupact.log. There you can read the progress of the upgrade,
Best of luck.
Good afternoon Prajwal.
Excellent article. But when in implementation it is generating an error with code 0XC1900208 on most Windows 10 clients. What to do in this case?
Thanks.
Hi Prajwal, I am currently working to configure Servicing throughout my organization and had a question. We have a hierarchy that includes 1 CAS, 1 Primary Site, and 13 Secondary Sites. Do I only need to configure WSUS on the CAS or will all the other sites require WSUS as well?
“You must restart the computer to complete the upgrade” …Can you force the restart, without user interaction, once the update has been installed?
I there, your stuff is great and I always try you first as its always good. one issue I have now is I cant copy anything from your site(s) anymore, right click and nothing pops up to copy, cntrl+c doesn’t work either, as soon as I go to another link that’s not your it copies normally, arggg, have you heard of this .. thanks for any help,..
I am testing a new feature, so for now no one can copy the content from my site.
sorry prajwal but all i do to copy from your website is that i disable javascript which allows me to copy any content from your site.
just disable javascript on your browser then you good to go to copy content.
I am using SCCM v1902 and working on to setup Win10 SP, if i select SAC (target) in deployment rings then filter preview will bring up the 1903 feature updates so, it is fine. If i select SAC in deployment ring then filter preview it comes with 0 feature update. Why? Am i missing something. Property filter are set same for SAC-T and SAC deployment rings.
Why is my computer name and desktop background changing after completing the Windows 10 Servicing Plan?
That’s strange. A servicing plan doesn’t change any of that.
I want to upgrade from 1803 to 1809 using the Servicing Model. Through SCCM we can defer only for 120 days, does it mean all my machines will get the update? and how to set Readiness branch on the client machines?
I cannot see any entries when i preview a servicing plan with windows 10 1903 upgrade with deployment ring set to Semi-Annual channel??? why is that??
I am experiencing the same issue as well.
Which Logs we need to check the progress of deployment
Hi,
Can you think of any reason why systems with 1607 aren’t detecting that this feature packed is needed? I mean, I deployed the feature pack update to a group of 1607 systems and it says that they are already compliant. Do they need to be on at least 1809?
Thanks!
Jason
hey Jason, did you ever figure this out?
I have the same issue.
Cheers,
Nick
Good explanation, just to add if you use “business editions), version 1903, en-us” in upgrade criteria (1903) query then this will return only business editions.
Great article but you help answer this? I’m trying to do an OS upgrade via Servicing Plans and I can see the Feature Update I want to use in “All Windows 10 Updates” BUT I can’t see the Feature Update I want when creating a Servicing Plan. Even if I don’t enter any criteria at the Upgrades section, I only get a very small search result and not the ones I’m expecting?
Hi Dean,
I came across this same problem and discovered the issue. Check these steps.
Within the SCCM Console, browse to Administration – Overview – Site Configuration – Sites.
Select the site name then click “Configure Site Components” in the Ribbon at the top.
Select “Software update point” and then select the “Products Tab.
Scroll down this list of options and look for “Windows 10, Version 1903 and later”. Select this, apply and OK. You should now see the versions available when creating a Servicing Plan.
based on your text filtering “1903”, this servicing plan will stop working when the next version of win 10 is out? so you’ll have to go back and adjust it. if you don’t include a title filter, it should always deploy whatever branch of windows 10 you selected.
I can’t work with Windows 10 Servicing Plans like your blog.
My test environment is SCCM 1902 and WINDOWS 10 1703, and when I look at the WINDOWS UPDATE log, 0x80244019 error occurs
Corrected the .esd MIME type to “application / octet-stream” in WSUS.
However, you can not see the UPDATES screen in Software Center.
Thanks for this, i’ve been deploying the Feature Updates manually previous to 1903, but i thought i’d set this up to test 1903. My problem is that when i’ve set this up, and deployed it to my laptop as a test, it’s not actually getting out to the laptop, the preview shows the required updates, but when i check the deployment the device just shows as Client check passed/Active and nothing else happens.
Greate Artikel Thanks.
have you get any information from MS about the “Other” on Windows 10 Servicing Graphic?
Br
Mela
No I haven’t got any response on that. I have even sent the feedback via SCCM console but no response yet.
Hi
the issue was resolved, now 1903 is shown correctly.
BR
Mela
What’s the solution? In my organization still no 1903.
I not do anything. I just enter a Feedback on the Windows 10 Sevicing Page asking for this and after 8 days they send me an Eamil wiht this: “This issue has bin resolved. If you wait 24 hours, your enviroment sould be populated with correct data.”
I am using SCCM 1902, you to?
BR
Mela
Hello:
Prajwal do you already know how to fix this issue?
Thanks.
Thanks for posting this article.
thank you..
Fantastic
Thanks..
hi Prajwal i was trying to update my client machines from 1803,1809 to 1909. I was facing the below error. The error code 0x80246002. A download manager operation could not be completed because the file digest was not recognized. any solution. Due to this i am using task sequence process for upgrade. help me to resolve this issue.
I have never come across that issue before. Can you post the question in community forums. We might need to dig into log files to understand what that errors mean.