Installing And Configuring Active Directory Domain Services For SCCM 2012 SP1 – SCCM 2012 SP1

Installing And Configuring Active Directory Domain Services for SCCM 2012 SP1 – In this post we will see the steps to Install and Configure Active Directory Domain Services on windows server 2008 R2 SP1. We will install the AD DS on the server, install and configure the DHCP service, create a container and extend the active directory schema. If you extend the Active Directory schema for System Center 2012 Configuration Manager, you can publish Configuration Manager sites to Active Directory Domain Services so that Active Directory computers can securely retrieve site information from a trusted source. When you extend the Active Directory schema for Configuration Manager and a site is configured to publish to Active Directory Domain Services, Configuration Manager clients can automatically find management points through Active Directory publishing using an LDAP query to a global catalog server. If you do not extend the Active Directory schema for Configuration Manager, management points cannot be published to Active Directory Domain Services and clients must have an alternative mechanism to locate their default management point.

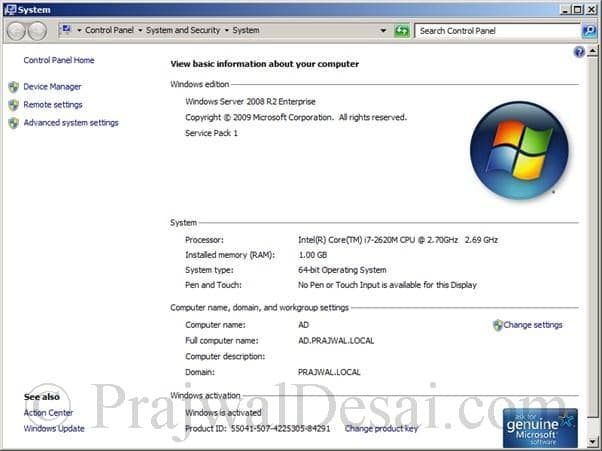
We have our lab setup diagram with us and a server installed with Windows 2008 R2 SP1 enterprise edition OS. This is the first step in the process of deploying system center configuration manager 2012 SP1. So what is Active Directory ? Active Directory is a directory service created by Microsoft for Windows domain networks. Server computers that run Active Directory are called domain controllers. An AD domain controller authenticates and authorizes all users and computers in a Windows domain type network assigning and enforcing security policies for all computers and installing or updating software. Configuration Manager uses Active Directory Domain Services for security, service location, configuration, and to discover the users and devices that you want to manage. So lets go ahead and install AD DS.

Installing Active Directory Domain Services

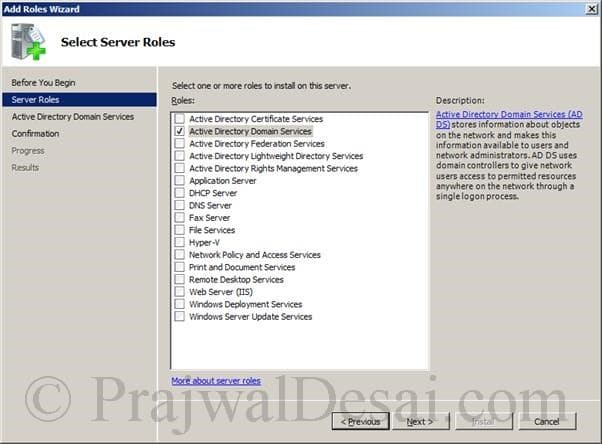
Click on Server Manager, right click on Roles and click on Add Roles. The computer is currently in Workgroup and after installing the AD DS role, the computer will be a Domain Controller.

PatchMyPC HorizontalAD
Patch My PC Sponsored AD

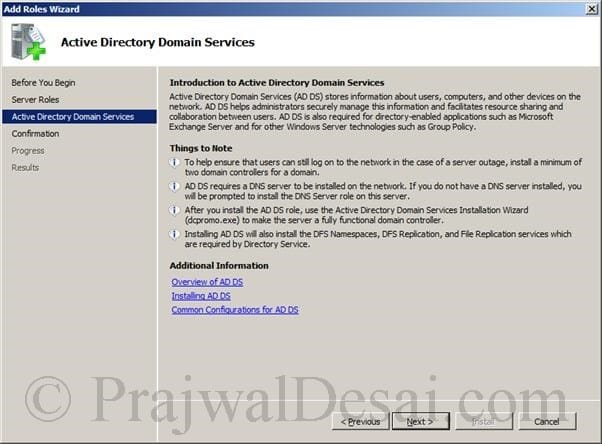
Installing And Configuring AD DS SCCM 2012 SP1 Snap 1

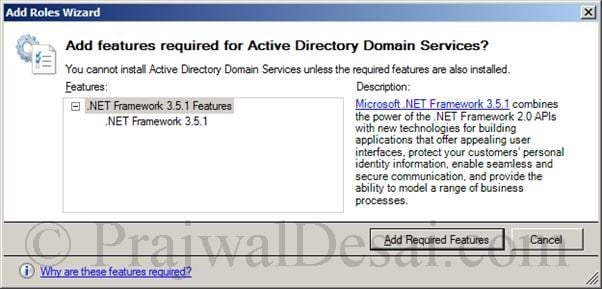
Check the box Active Directory Domain Services and click on Next.

Installing And Configuring AD DS SCCM 2012 SP1 Snap 2

Click on Install.

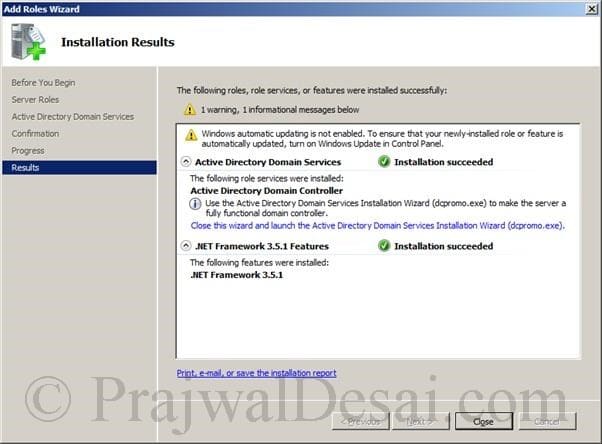
Installing And Configuring AD DS SCCM 2012 SP1 Snap 3

On the Installation Results page, click on close this wizard and launch the Active Directory Domain Services Installation Wizard.

Installing And Configuring AD DS SCCM 2012 SP1 Snap 4

Check the box Use advanced mode installation. Click on Next.

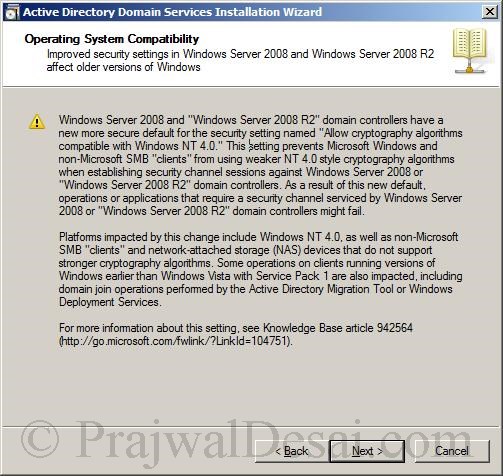
Installing And Configuring AD DS SCCM 2012 SP1 Snap 5

Click on Next.

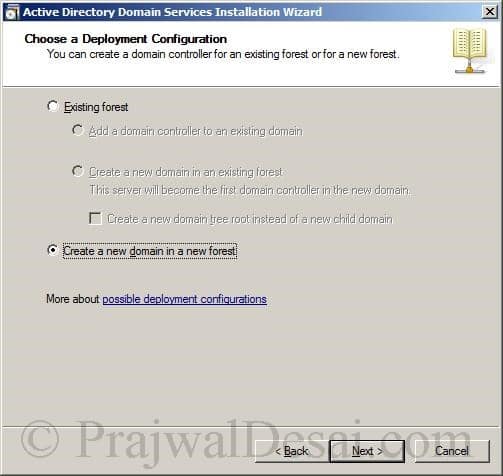
Installing And Configuring AD DS SCCM 2012 SP1 Snap 6

We will be creating a new domain, so choose Create a new domain in a new forest. Click on Next.

Installing And Configuring AD DS SCCM 2012 SP1 Snap 7

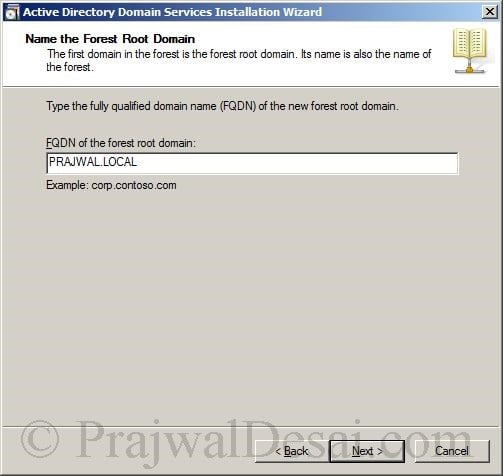
Type the fully qualified named of the forest root domain. Click on Next.

Installing And Configuring AD DS SCCM 2012 SP1 Snap 8

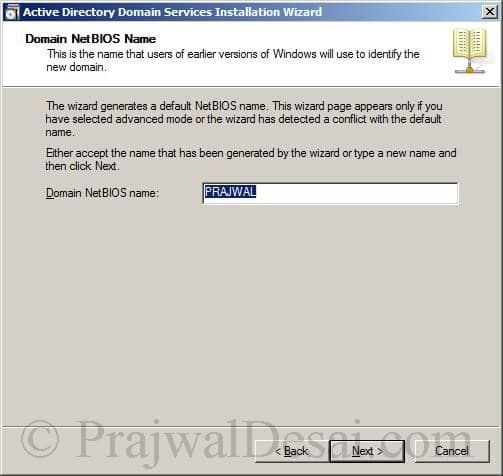
Click on Next.

Installing And Configuring AD DS SCCM 2012 SP1 Snap 9

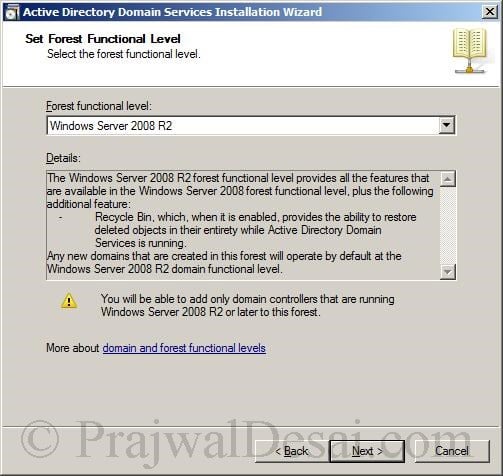
We will set the Forest Functional Level as Windows Sever 2008 R2 and click on Next. If you are not sure about choosing the Forest Functional Level then click here.

Installing And Configuring AD DS SCCM 2012 SP1 Snap 10

On the Additional Domain Controller Options, choose the additional options for the domain controller. The Global catalog and DNS Server is selected by default. Click on Next.

Installing And Configuring AD DS SCCM 2012 SP1 Snap 11

We will be installing the DNS server role on the same computer, click on Yes to close the message box and click on Next.

Installing And Configuring AD DS SCCM 2012 SP1 Snap 12

Click on Next.

Installing And Configuring AD DS SCCM 2012 SP1 Snap 13

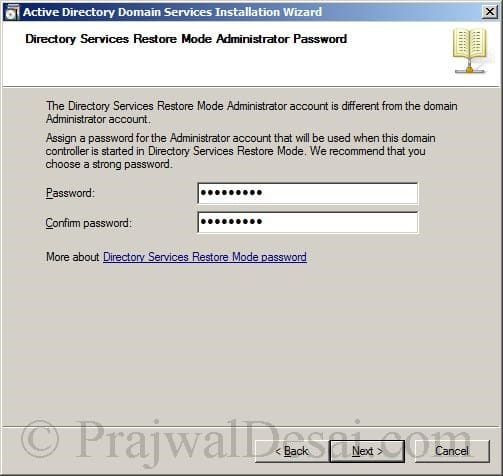
Provide the Directory Services Restore Mode Administrator Password. Click on Next.

Installing And Configuring AD DS SCCM 2012 SP1 Snap 14

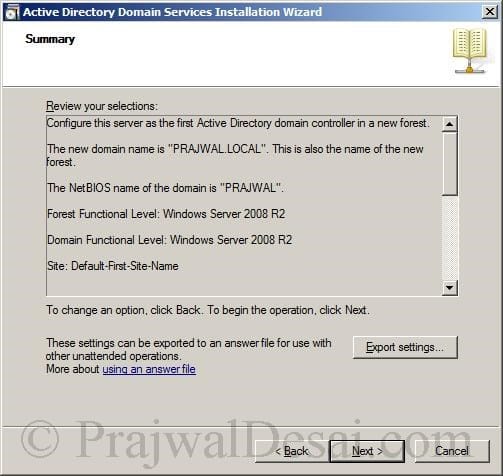
On the Summary Page click on Next to start the Installation of AD DS.

Installing And Configuring AD DS SCCM 2012 SP1 Snap 15

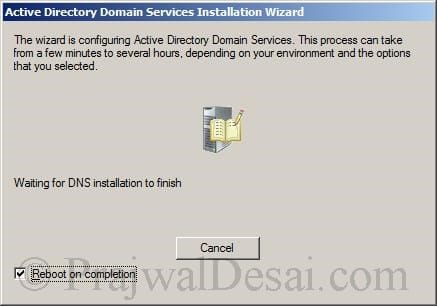
You can choose the manually restart the server after the AD DS installation is complete. To reboot automatically, check the box Reboot on completion.

Installing And Configuring AD DS SCCM 2012 SP1 Snap 16

After the reboot, we see that the full computer is AD.PRAJWAL.LOCAL and instead of Workgroup it’s now a part of Domain PRAJWAL.LOCAL.

Installing And Configuring AD DS SCCM 2012 SP1 Snap 17


Installing and Configuring DHCP Server

We will now install DHCP server role, DHCP allows a server to dynamically distribute IP addressing and configuration information to clients. To install the DHCP role, launch the Server Manager, right click on Roles and click on Add Roles. Check the role DHCP server and click on Next.

Installing And Configuring AD DS SCCM 2012 SP1 Snap 18

On the Select Network Connection Bindings page, click on Next.

Installing And Configuring AD DS SCCM 2012 SP1 Snap 19

On the Specify IPv4 DNS Server Settings page, click on Validate and you must see a green check before Valid. Click on Next.

Installing And Configuring AD DS SCCM 2012 SP1 Snap 20

We will not require WINS server, so choose WINS is not required for applications on this network. Click on Next.

Installing And Configuring AD DS SCCM 2012 SP1 Snap 21

On the Add or Edit DHCP Scope page, click on Add to add a new scope. Provide the Scope name, Starting IP address, Ending IP address, Default gateway. Click on Next.

Installing And Configuring AD DS SCCM 2012 SP1 Snap 22

Choose Disable DHCPv6 stateless mode for this server. Click on Next.

Installing And Configuring AD DS SCCM 2012 SP1 Snap 23

To authorize the DHCP server, choose Use current credentials. This will authorize the DHCP server with currently logged on user account. If you want to use a different account to authorize DHCP server choose the second option, Use alternate credentials. If you want to authorize the server later choose the option Skip authorization of this DHCP server in AD DS. Click on Next.

Installing And Configuring AD DS SCCM 2012 SP1 Snap 24

On the Confirm Installation Selections page, click on Install to start the installation of DHCP.

Installing And Configuring AD DS SCCM 2012 SP1 Snap 25

The DHCP role is installed on the server. Click on Close.

Installing And Configuring AD DS SCCM 2012 SP1 Snap 26

Open the DHCP console, expand IPv4, expand Scope, click on Address Leases and you will find that clients have been assigned IP through our DHCP server. If you want to reserve the IP address, then right click on the IP address and click Add to Reservation. With this the client will get the reserved IP no matter you restart the client multiple times. Close the DHCP console.

Installing And Configuring AD DS SCCM 2012 SP1 Snap 27

 Create the System Management Container


[us_message color=”red”]Configuration Manager does not automatically create the System Management container in Active Directory Domain Services when the schema is extended. The container must be created one time for each domain that includes a Configuration Manager primary site server or secondary site server that publishes site information to Active Directory Domain Services.[/us_message]

To create a container, Click on Start , All Programs, Administrative Tools, click on ADSI Edit. Right click ADSI Edit and click on Connect to…

Installing And Configuring AD DS SCCM 2012 SP1 Snap 28

You will see a Connection Settings window, the naming context should be Default naming context. Do not change anything here, click on OK.

Installing And Configuring AD DS SCCM 2012 SP1 Snap 29

In the ADSI Edit Console, expand the Default Naming Context, right click CN=System, click on New and create an Object. 

Installing And Configuring AD DS SCCM 2012 SP1 Snap 30

Select the container object and click on Next.

Installing And Configuring AD DS SCCM 2012 SP1 Snap 31

Type the value as System Management and click on Next.

Installing And Configuring AD DS SCCM 2012 SP1 Snap 32

The object has been created. Click on Finish.

Installing And Configuring AD DS SCCM 2012 SP1 Snap 33


Setting Security Permissions on System Management Container

After you have created the System Management container in Active Directory Domain Services, you must grant the site server’s computer account the permissions that are required to publish site information to the container.

The primary site server computer account must be granted Full Control permissions to the System Management container and all its child objects.

Click on Start, click on Administrative Tools, click on Active Directory Users and Computers. Click on View and click Advanced Features. Expand System, right click System Management and click on Delegate Control.

Installing And Configuring AD DS SCCM 2012 SP1 Snap 34

Click on Next.

Installing And Configuring AD DS SCCM 2012 SP1 Snap 35

Click on Add. The primary site server computer account must be granted Full Control permissions to the System Management container. So click on Object Types.

Installing And Configuring AD DS SCCM 2012 SP1 Snap 36

Make sure the Computers is checked. Click on OK.

Installing And Configuring AD DS SCCM 2012 SP1 Snap 37

Look for the primary site server computer account and click on OK and click on Next.

Installing And Configuring AD DS SCCM 2012 SP1 Snap 38

On the Tasks to Delegate page, click on Create a custom task to delegate. Click on Next.

Installing And Configuring AD DS SCCM 2012 SP1 Snap 39

On the Active Directory Object Type window, select the option This folder, existing objects in this folder and creation of new objects in this folder. Click on Next.

Installing And Configuring AD DS SCCM 2012 SP1 Snap 40

We need to select the permissions to delegate, choose General, Property Specific and Creation/deletion of specific child objects. Under the permissions, click on Full Control. Click on Next.

Installing And Configuring AD DS SCCM 2012 SP1 Snap 41

We have delegated full permissions to primary site server computer account on System Management container. Click on Finish.

Installing And Configuring AD DS SCCM 2012 SP1 Snap 42


 Extending the Active Directory Schema

The Active Directory Schema can be extended in two ways. The first way is by using the extadsch.exe utility. The second method is by using the LDIFDE utility to import the schema extension information by using the ConfigMgr_ad_schema.ldf file. We will use the extadsh,exe utility to extend the schema because I feel this method is more easy and simpler one. You can perform this step on a domain controller or member server.

Shoud I extend the schema again if It was done earlier with SCCM 2007/ SCCM 2012 ??

If the Active Directory schema was extended with the Configuration Manager 2007 schema extensions, you do not have to extend the schema for System Center 2012 Configuration Manager SP1. The Active Directory schema extensions are unchanged from Configuration Manager 2007. If you had extended the schema for System Center 2012 Configuration Manager with no service pack, you do not have to extend the schema again for System Center 2012 Configuration Manager SP1.

What user account must I use to extend the schema ?

Extending the schema must be done by a user who is a member of the Schema Admins Group or who has been delegated sufficient permissions to modify the schema. Extending the Active Directory schema is a forest-wide action and can only be done one time per forest.

When can I extend the Active Directory Schema ?

You can extend the Active Directory Schema before or after SCCM 2012 SP1 Setup. It is recommended to extend the schema before you run the Configuration Manager Setup. If the AD schema is not extended, during the installation of SCCM 2012 SP1 setup, you can see a warning that schema is not extended in to the active directory.

Should I extend schema again if I have upgraded operating system on domain controller ?

You have to extend the Active Directory schema only once for the forest that contains site servers, you do not have to extend the schema again if you upgrade the operating systems on the domain controllers or after you raise the domain or forest functional levels. Similarly, if you extended the schema for ConfigMgr 2012 with no service pack, you do not have to extend the schema again for ConfigMgr 2012 SP1.

When you extend the Active Directory schema for ConfigMgr 2012, the following attributes and classes are added to Active Directory Domain Services:

Attributes:

cn=mS-SMS-Assignment-Site-Code

cn=mS-SMS-Capabilities

cn=MS-SMS-Default-MP

cn=mS-SMS-Device-Management-Point

cn=mS-SMS-Health-State

cn=MS-SMS-MP-Address

cn=MS-SMS-MP-Name

cn=MS-SMS-Ranged-IP-High

cn=MS-SMS-Ranged-IP-Low

cn=MS-SMS-Roaming-Boundaries

cn=MS-SMS-Site-Boundaries

cn=MS-SMS-Site-Code

cn=mS-SMS-Source-Forest

cn=mS-SMS-Version

Classes:

cn=MS-SMS-Management-Point

cn=MS-SMS-Roaming-Boundary-Range

cn=MS-SMS-Server-Locator-Point

cn=MS-SMS-Site

To extend the Active Directory Schema using extadsh.exe utility, locate the extadsh.exe which can be found in SMSSETUPBINX64 of the configuration manager setup DVD. Hold the shift key on your keyboard and right click extadsh.exe and click on Copy as Path.

Installing And Configuring AD DS SCCM 2012 SP1 Snap 43


Launch the command prompt. Right click and click paste and hit enter. You should see the line Successfully extended the Active Directory Schema.

Installing And Configuring AD DS SCCM 2012 SP1 Snap 44

To verify whether schema extension was successful, open the log file extadsch.log located in the root of the system drive. You should see the line “Successfully extended the Active Directory Schema”. 

Installing And Configuring AD DS SCCM 2012 SP1 Snap 45

8 Comments

  1. Avatar photo Jason Moran says:

    Hello Prajwal
    Thank you for all of your great information on SCCM. I am new to SCCM but your pages have helped me greatly. I am having troubles with some clients either not getting WindowsOffice 365 Updates and some client not being able to connect to the site. The site I am dealing with is new to me as I just started with this company but I have discovered that there are entries in System Management (in ADSI Edit) that refer to servers and sites that no longer exist. Two entries that refer to decommisioned servers start with CN=SMS-MP-XXX-DECOM and CN=SMS-SUP-XXX-DECOM. Could these entries have anything to do with my troubles on the Clients? Can these entries be removed or updated to reflect servers that exist safely?
    Jason

  2. Hai Prajwaldesai, I am shameer . I am new to the SCCM can you please provide me any document related to it to my mail

  3. Avatar photo Deepak Kumar Pattanayak says:

    Hi
    Thank q for such a nice post , as i am very new about SCCM so can u plz tell me details , if you have any document related to sccm so plz share to my mail id .

    Deepak

  4. This saved my time buddy.. Thanks for step by step post..

  5. Avatar photo saravanan says:

    hi
    i just want add another other thing, please add more blogs about windows server 2012 hyper v. i am into virtualizaton environment, i have knowledge in vmware products.
    however company currently migrating to Hyper v, if help me will be great stuff

  6. Avatar photo saravanan says:

    i am sure i didnt find any, i would love show the screen shot unfortunately i couldnt paste it here.

  7. Avatar photo saravanan says:

    hi praj
    i have iso of windows server 2008 r2 standard, after the installation, screen goes to cmd prompt. i tried your 2012 cmd to gui method to bring it up. unfortunatley that ISO doesnt has install.win file. so i couldnt do anything to bring up in GUI mode. Can you recommand anyother way.

    1. Are you sure you have checked the folder named “Sources” inside the .iso file and you didn’t find install.wim ?

Leave a Reply

Your email address will not be published. Required fields are marked *