


This post covers the steps to integrate Patch My PC with Intune tenant (Microsoft Endpoint Manager). When you integrate Patch My PC with Intune, you can easily publish Win32 applications to your Intune tenant.
There are two ways to create applications in Configuration Manager and Intune. You can create the applications manually, or use a third-party tool such as Patch MY PC to automatically create applications.
The steps to integrate Patch My PC with Intune are pretty simple. To make it easier I will break the big topic into sections, and we will go step by step.

We will first create an app registration in the Azure AD environment. Configure the Graph API permissions required for the Publisher to automatically create, update and assign Win32 applications in your Intune tenant. Finally, we will configure the tenant authority, application ID and application secret within the Patch My PC tool.
Prerequisites to Integrate Patch My PC with Intune
You need to ensure the following prerequisites are in place before you integrate Patch My PC with Intune.
- Access to Intune tenant.
- You must have installed Patch My PC and a valid license is must.
- To register Patch My PC application and configure API permissions, I recommend using global administrator account. A global administrator account has access to all administrative features.
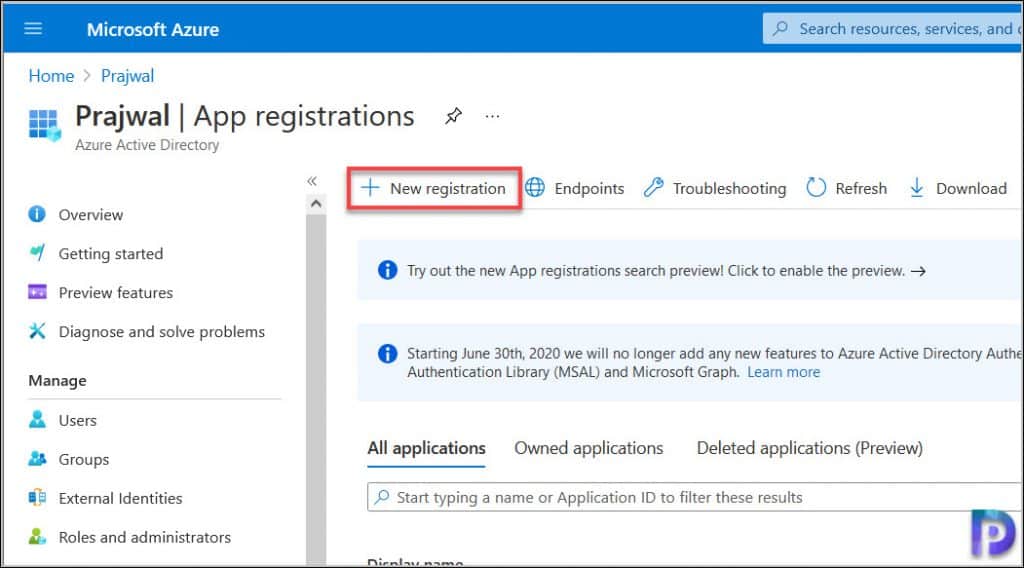
Register Patch My PC Application in Azure AD
The first step in integrating Patch My PC with Intune is to register the application in Azure AD. The Patch My PC service needs permissions to Intune tenant for application management.
First login to the Azure AD portal. Navigate to App registrations. On the App Registrations window, click New Registration.
On the Register an application window, specify the following.
- Specify the name which is a user-facing display name for this application.
- You must specify who can use this application or access the API. Select Accounts in this organizational directory only.
- Redirect URI – Do not specify anything here.
Click Register.

You have successfully registered Patch My PC application in Azure AD. On the application page, you will find some details which we will use later to integrate Patch My PC with Intune.

Configure Patch My PC Application API Permissions
In the above step, we registered a new application in Azure AD. In this step we will configure API permissions for this new application.
The permissions are required by Patch My PC Publisher to create and update Win32 applications in your Intune tenant. And also to view Azure groups and create assignments for the applications automatically.
On the new application page, select API Permissions. Under Configured Permissions, click + Add a permission.

You must select an API. Select Microsoft Graph API.

After you select Microsoft Graph, you are prompted to choose the type of permission that application requires. There are two options here.
- Deleted Permissions – Delegated permissions allow an application in Azure Active Directory to perform actions on behalf of a particular user.
- Application Permissions – Application permissions allow an application in Azure Active Directory to act as its own entity, rather than on behalf of a specific user.
Select Application permissions.

Under Select permissions, type DeviceManagement and enable the following.
- DeviceManagementApps.ReadWrite.All
- DeviceManagementManagedDevices.Read.All
- DeviceManagementRBAC.Read.All
- DeviceManagementServiceConfig.ReadWrite.All
Click Add Permissions.

We are not yet done with configuring the API permissions. Just one more step and we can view all permissions in one window.
On the same application page, select API Permissions. Under Configured Permissions, click + Add a permission and select Microsoft Graph API. Select Application Permissions.
Under Select Permissions type GroupMember and under Group permissions, enable GroupMember.Read.All. Click Add Permissions.

On the Configured Permissions window, you can see all the API/Permissions name. They are all application permissions, however, notice the Status. It shows not granted for Tenant. You must be logged into an Azure AD account with permissions to perform this task.

To approve the new permissions, click Grant admin consent for Tenant. Choose Yes if you are prompted to consent for the required permissions.

Create a New Client Secret
In this step we will create a new client secret, a string that the application will use to prove its identity when requesting a token. This is an important part before you integrate Patch My PC with Intune.
Navigate to the Certificates & secrets node in the left column, and to add a new client secret, click + New client secret.

Provide a description and set expiration date. Click Add.

You have successfully created the client secret. This secret key value must be entered when you integrate Patch My PC with Intune.

Integrate Patch My PC with Intune
This is the last step where we integrate Patch My PC with Intune. Launch the Patch My PC tool. Click Intune Apps and select enable creation of Win32 applications in Microsoft Intune. Click Options.
On the Intune options window, specify the following.
- Authority – The authority is https://login.windows.net/<tenantdomainname>. Ensure you specify the correct tenant domain name here.
- Application ID – Enter the application ID. The application ID is available on the application page > overview.
- Application Secret – Enter the application secret value here. Please refer to the above screenshot to find the client secret value.
After entering the details, click Test. If the details are correct, you see Successfully connected to Intune. Click OK. That completes the Patch My PC integration with Intune.

