


Looking to use Windows Sandbox in your environment? Welcome to this useful post where I will demonstrate different ways to enable or disable Windows sandbox in Windows 11.
Windows Sandbox is a lightweight, isolated desktop environment built into Windows 11 Pro and Enterprise editions. It allows you to run untrusted applications or files in a temporary, disposable virtual machine (VM) without affecting your main operating system.
When you install applications within the sandbox, they remain isolated from the host machine using hypervisor-based virtualization. All changes (e.g., downloaded files, installed software) are permanently deleted when the Sandbox closes.

Where is Windows Sandbox used?
Let’s explore the specific use cases of Windows Sandbox and the advantages it offers:
- Testing Untrusted Software: Many organizations develop in-house applications that require thorough and reliable testing. The sandbox feature provides a secure environment to safely evaluate new or potentially suspicious apps.
- Opening Unknown Files: If you are a part of the infosec team, Windows Sandbox is very useful in inspecting email attachments or downloads without risk.
- Secure Web Browsing: You can visit risky websites without exposing your main system.
- Software Compatibility Checks: You can test legacy apps in a clean Windows environment and fix the critical bugs.
Prerequisites
To enable the sandbox on Windows 11, you require the following prerequisites.
- OS Editions: Windows 11 Pro, Enterprise, Pro Education/SE, & Windows Education (Not available in Home edition)
- RAM: 4GB+ RAM (8GB recommended)
- BIOS Requirement: Virtualization enabled in BIOS/UEFI
- Disk Space: 1GB+ free disk space
On Windows 11/10, the Windows Sandbox feature is typically turned off by default, but you can enable or disable it using several methods, which I am going to cover now. Go with the method that best suits your needs.
Enable or Disable Windows Sandbox via Advanced Settings
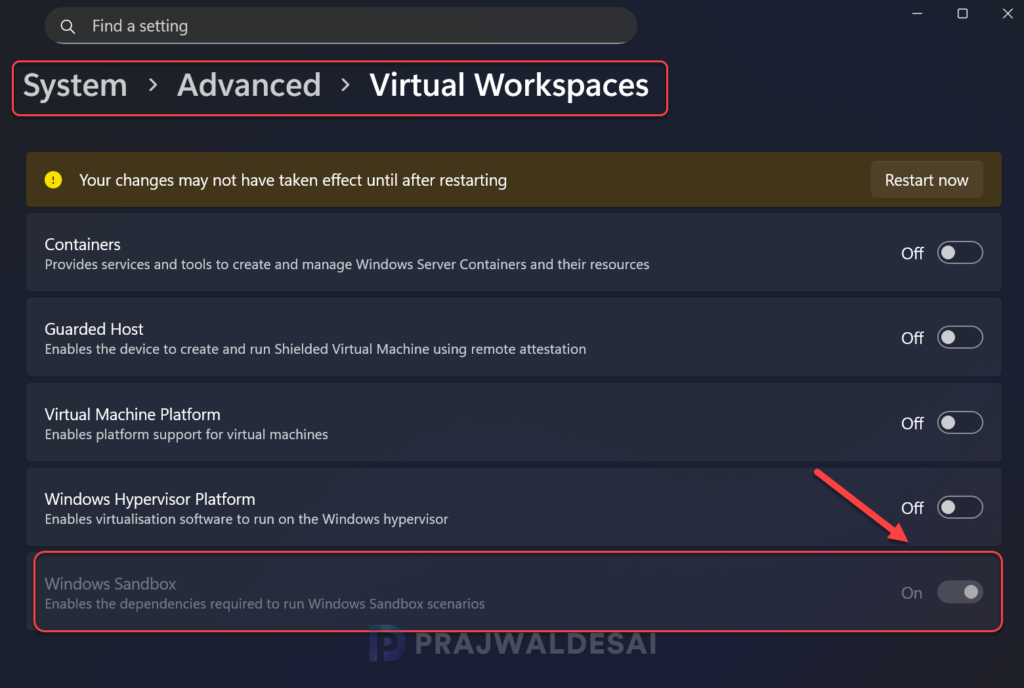
The recommended way to enable or disable Windows Sandbox is through the Advanced settings in Windows 11. Starting with the December 2025 update (KB5072033) for Windows 11 25H2, you can now enable Windows Sandbox and other virtualization features directly from a new “Virtual Workspaces” page in Settings > System > Advanced.
Sign in to Windows 11 PC. Press Win + I to open the Settings app. Go to System > Advanced > Virtual Workspaces. Scroll down to find the Windows Sandbox toggle. Turn it On or Off, depending on whether you want to enable or disable it. You must restart the computer to ensure the changes are applied.
Enable or Disable Windows Sandbox via Optional Features
Most of the features on Windows 11 can be turned on or off via Control Panel’s Windows features. Press the Windows Key + R to open the Run. Type in OptionalFeatures.exe, and press the Enter key. In the Turn Windows features on or off window, scroll down and checkbox Windows Sandbox feature to enable it. To disable, uncheck the Windows Sandbox feature. Click OK to apply the changes.

Enable or Disable Windows Sandbox using PowerShell
Enabling or disabling the Windows Sandbox on your Windows 11 computer is simple with PowerShell. On your Windows 11 PC, click Start and type “PowerShell“. Select Windows PowerShell and choose Run as Administrator.
Run the below PS command to enable the Windows Sandbox (DisposableClientVM) feature on your Windows 11 PC.
Enable-WindowsOptionalFeature -Online -FeatureName "Containers-DisposableClientVM" -AllAfter entering the above command, type ‘Y‘ to reboot the computer.

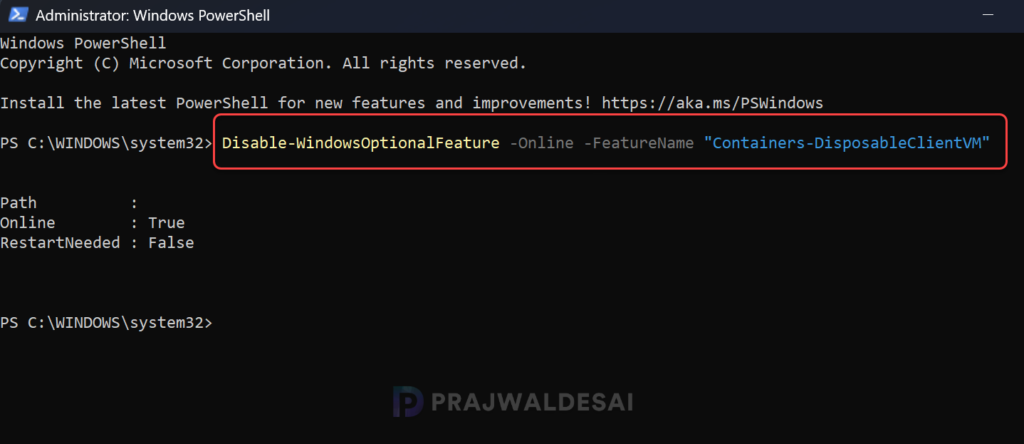
The below PowerShell command disables the DisposableClientVM (Windows Sandbox) feature on your Win 11 PC.
Disable-WindowsOptionalFeature -Online -FeatureName "Containers-DisposableClientVM"Disabling the sandbox doesn’t require a computer reboot, but I highly recommend restarting for optimal results.
Enable or Disable Windows Sandbox via Command Prompt
Using DISM (Deployment Image Servicing and Management), you can enable or disable the Sandbox feature on Windows 11 computer. Click the Start button or the search icon on the taskbar. Type CMD or Command Prompt in the search bar and select it to launch.
Run the below command to enable the Windows 11 Sandbox feature. After the feature is enabled, type ‘Y‘ to restart your computer.
DISM /Online /Enable-Feature /FeatureName:"Containers-DisposableClientVM" /All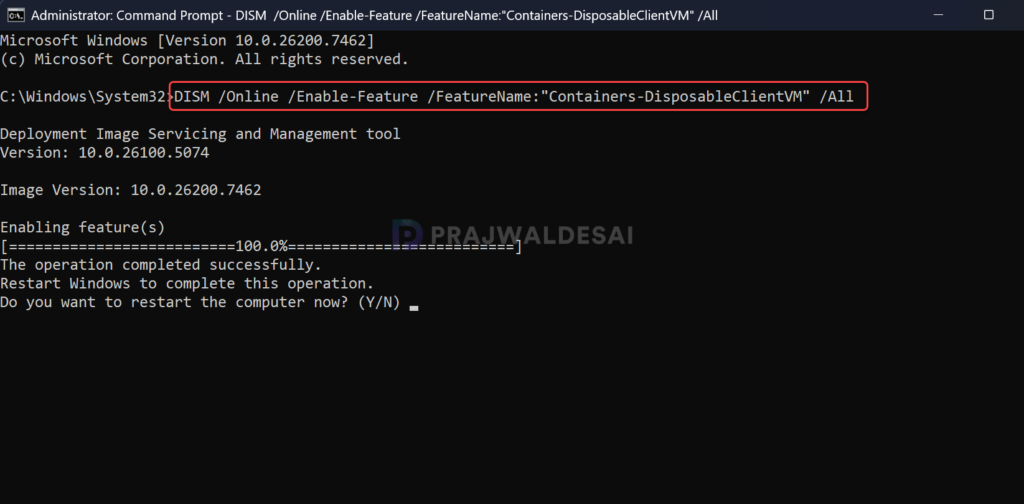
The below command uses DISM to disable the Windows Sandbox feature on Windows 11.
DISM /Online /Disable-Feature /FeatureName:"Containers-DisposableClientVM"
Limitations of Windows Sandbox
Be aware of the limitations of the sandbox feature before using it.
- Windows Sandbox is not available on Windows Home editions. You must use either the Pro or Enterprise editions of Windows 11.
- It is intended for short-term use and functions primarily as a temporary workspace.
- Resource-intensive for low-end systems, so ensure you have enough memory to turn on and use this feature.
Conclusion
In conclusion, I hope this guide has effectively assisted you in enabling or disabling the Windows Sandbox feature on your PC. Windows Sandbox is ideal for quick, secure testing without the overhead of traditional virtualization tools. For advanced users, pairing it with tools like Process Monitor or Wireshark can provide more in-depth insights into application behavior.
That’s all for this post, if you have any questions, please let me know in the comments below. Don’t forget to bookmark this site for more such useful guides on Windows 11.
