

In this guide, I’ll show you how to create an Azure Network Connection for Windows 365. An Azure network connection (ANC) allows Cloud PCs to be created in your organization’s Azure Virtual Network. I will also cover the requirements for creating ANCs and show you how to verify it’s status.
Integrating your Windows 365 Cloud PCs with an Azure network is essential for businesses that require a seamless connection between their cloud resources and on-premises infrastructure. An Azure Network Connection allows you to manage network traffic efficiently and ensures secure communication for your Cloud PCs.
What is an Azure Network Connection?
Azure Network Connections allow Windows 365 to connect Cloud PCs to your existing Azure infrastructure. This connection plays a crucial role in facilitating communication between Cloud PCs and other resources hosted in Azure or on-premises environments, such as databases, applications, and file shares. You can have up to 50 ANCs per tenant. If the count exceeds, unused Azure network connection (ANC) can be deleted.
From what I see, Windows 365 supports creating two types of ANC: Microsoft Entra join and Hybrid Microsoft Entra Join. Both allow you to manage traffic and Cloud PC access to network resources, but they have varying connectivity needs.
- Microsoft Entra join: Doesn’t require connectivity to a Windows Server Active Directory (AD) domain.
- Hybrid Microsoft Entra Join: Requires connectivity to a Windows Server AD domain. You must provide the AD domain details when you create the ANC.
After creating ANCs, they are used in two situations:
- When Windows 365 periodically checks the connection to the on-premises infrastructure to ensure the best end-user experience.
- When a Cloud PC is initially provisioned.
Prerequisites
Before you begin creating an Azure Network Connection, ensure you have the following:
- Azure Subscription: An active Azure subscription with permission to create resources.
- ANC Permissions: To create the first ANC, you must have the Subscription Owner or User Administrator role in the subscription where the Azure Virtual Network resides; for any subsequent ANCs, only the Subscription Reader role is required.
- Existing Virtual Network: A pre-configured Azure Virtual Network (VNet) where the Cloud PCs will connect. If not available, you’ll have to create it in the Azure portal.
- Subnet Configuration: A dedicated subnet within the VNet for the Cloud PCs to ensure proper routing and security.
- PS Execution Policy: Make sure that your PowerShell execution policy is configured to allow RemoteSigned scripts. For more information, see how to set PowerShell execution policy using Intune.
- IP Addresses for DR: For Disaster Recovery (DR) purposes, make sure that there are at least 50% of the IP addresses available in your subnet. If re-provisioning for DR is required, sufficient new IP addresses are required for each Cloud PC provisioned on the subnet.
Create an Azure Network Connection for Windows 365
Let’s go through the steps to create an Azure Network Connection for your Windows 365 Cloud PCs.
- Sign in to the Microsoft Intune Admin Center with your administrator credentials.
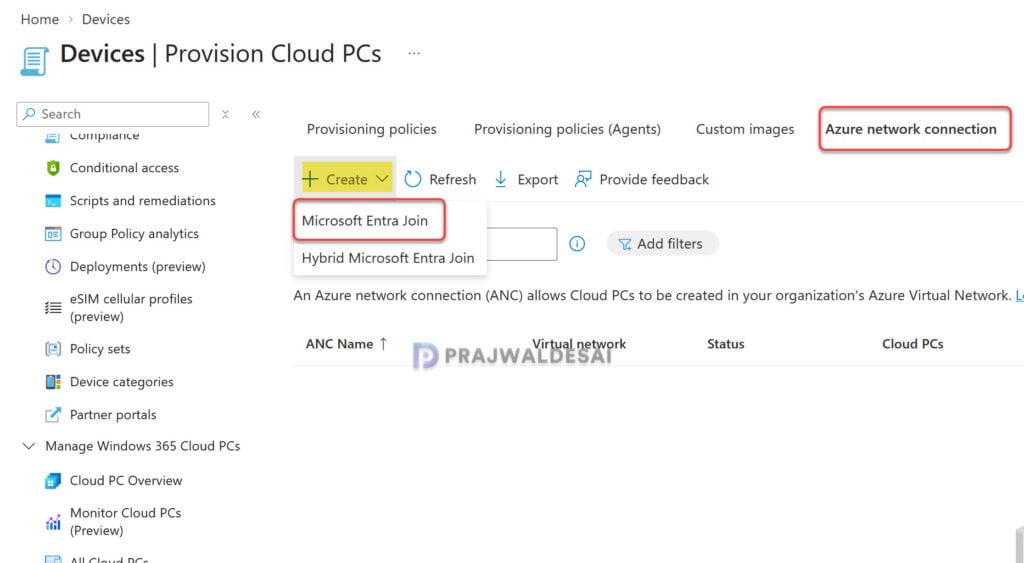
- Select Devices > Provision Cloud PCs > Azure network connection.
- Click on Create and select either Microsoft Entra Join or Hybrid Microsoft Entra Join to initiate the process of setting up a new Azure Network Connection.
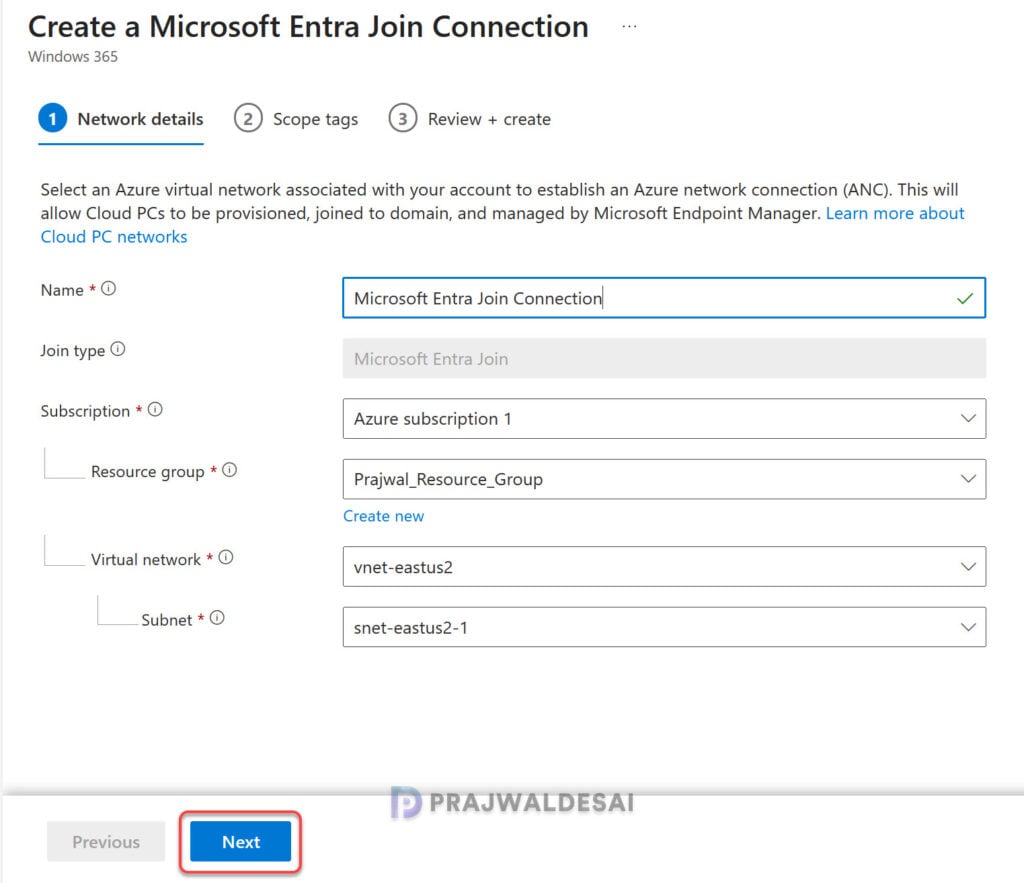
On the Network details tab, configure the following:
- Name: Specify a connection name that can be easily identified when provisioning your Cloud PCs.
- Join Type: The join type determines how this Cloud PC will be joined to Microsoft Entra ID. In this case, it’s Microsoft Entra Join.
- Subscription: Select the Azure subscription that includes the virtual network connected to your on-premises domain controller and network.
- Resource Group: Select the Azure resource group that will contain the Network Interface Cards created by the Windows 365 service.
- Virtual Network: Select the virtual network to which Cloud PCs will be attached. For provisioning to succeed, the virtual network must be connected to a Microsoft Entra domain.
- Subnet: Select the subnet for which Cloud PCs will assign an IP address for.
Click Next to continue.
On the Scope tags page, you may select any desired scope tags to apply. This is optional, and you can skip to the next step. Learn how to create new scope tags in Intune.
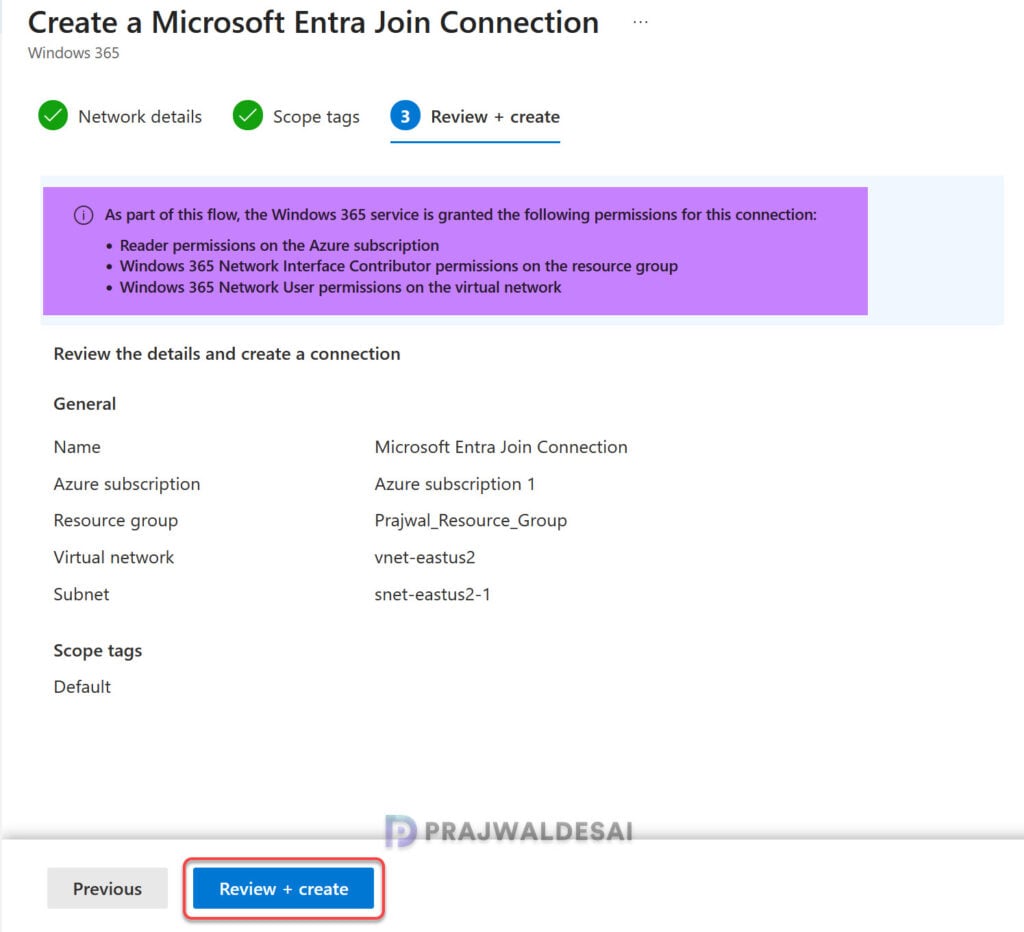
On the Review+create page, you see the following information. As part of this flow, the Windows 365 service is granted the following permissions for this connection:
- Reader permissions on the Azure subscription
- Windows 365 Network Interface Contributor permissions on the resource group
- Windows 365 Network User permissions on the virtual network
If you’ve reviewed your Cloud PC Azure network connection details, click on Review+create. This should now initiate the creation of ANC with the details you’ve provided.
Monitor ANC Setup Status
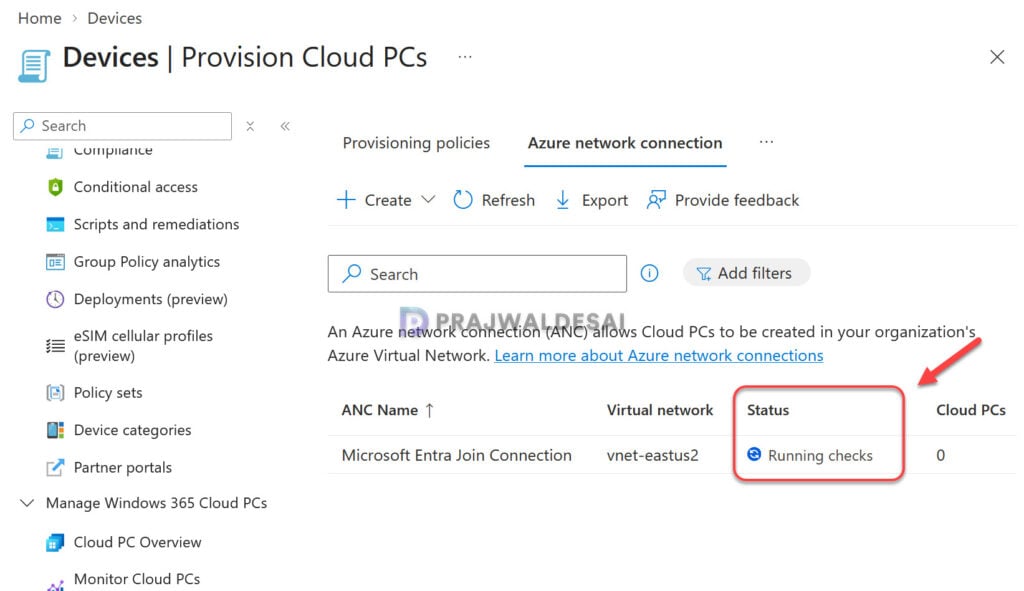
After creating the Azure network connection, the next step is to monitor the status. This status assists in assessing if new Cloud PCs are likely to be provisioned successfully and ensures existing end-users have an optimal Cloud PC experience. All Azure network connections (ANC) get periodically checked to make sure that the environment is ready for provisioning Cloud PCs.
In the Intune admin center, go to Devices > Provision Cloud PCs > Azure network connection. Review the Status column to verify if the ANC health checks have been completed. In the below image, we see the ANC health checks are currently running.
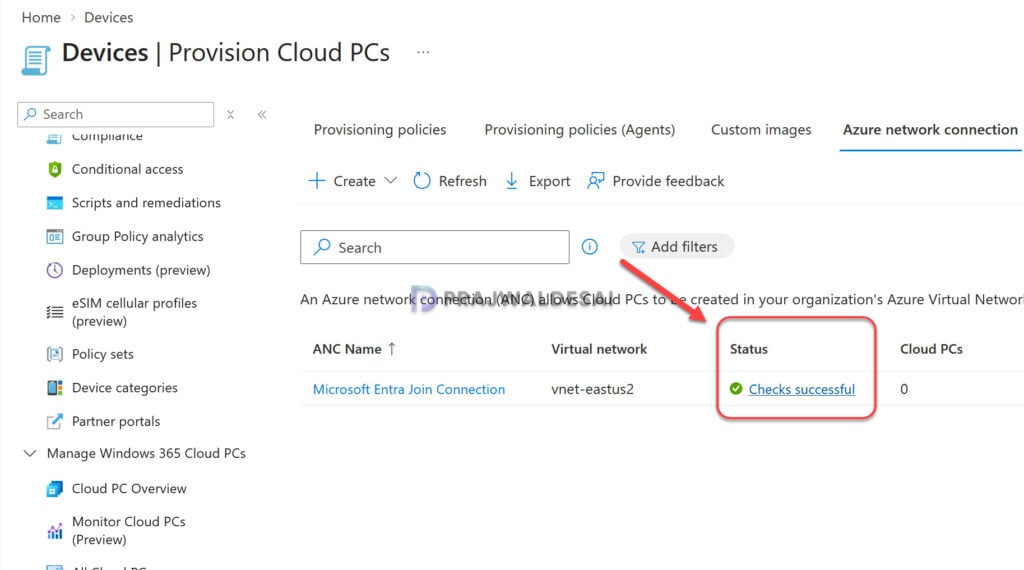
After a few minutes, we see the ANC health checks are successful. Once the checks are completed, you can next proceed with assigning it to a provisioning policy.
Troubleshooting Common ANC Setup Issues
If you encounter issues or failures when creating the Azure Network Connection, consider the following troubleshooting steps:
- Check Permissions: Ensure that you have the necessary permissions to access and manage the Azure resources.
- Verify Subnet Configuration: Make sure that the subnet is correctly configured and associated with the right VNet.
- Inspect Network Security Groups: Review the NSGs to confirm that they allow the required traffic.
- Endpoint Connectivity: During provisioning, Cloud PCs must connect to multiple publicly available Microsoft services. These services include Microsoft Intune, Microsoft Entra ID, and Azure Virtual Desktop.
For more information, refer to the Microsoft documentation on troubleshooting Azure Network Connections.
Conclusion
That’s all I wanted to cover in this guide, and if you’re setting up a new ANC in your organization, I hope the steps are easy to follow. Creating an Azure Network Connection for Windows 365 Cloud PCs is a vital step in ensuring a secure and efficient integration with your existing Azure infrastructure. By following the steps outlined in this guide, you can enhance the connectivity and performance of your Cloud PCs.
For more detailed information, refer to the official Microsoft documentation on Creating Azure Network Connections for Windows 365.
