


In this post, you’ll learn how to configure SSL certificate for SSRS in SCCM. I will show you how to create and assign a self-signed SSL certificate for the report server ensuring the SCCM reports can be accessed in the web browser with secure port 443.
Within SQL Server Reporting Services there is no option for requesting, generating, downloading, or installing a certificate. Microsoft says it’s up to you to choose the properties that you specify for the certificate and the certificate authority that you obtain it from.
To create a self-signed SSL certificate for SSRS in SCCM, you can utilize a simple PowerShell script. Alternatively, if IIS and SSRS are hosted on the same machine, you can request and install the certificate using the IIS Manager console application.

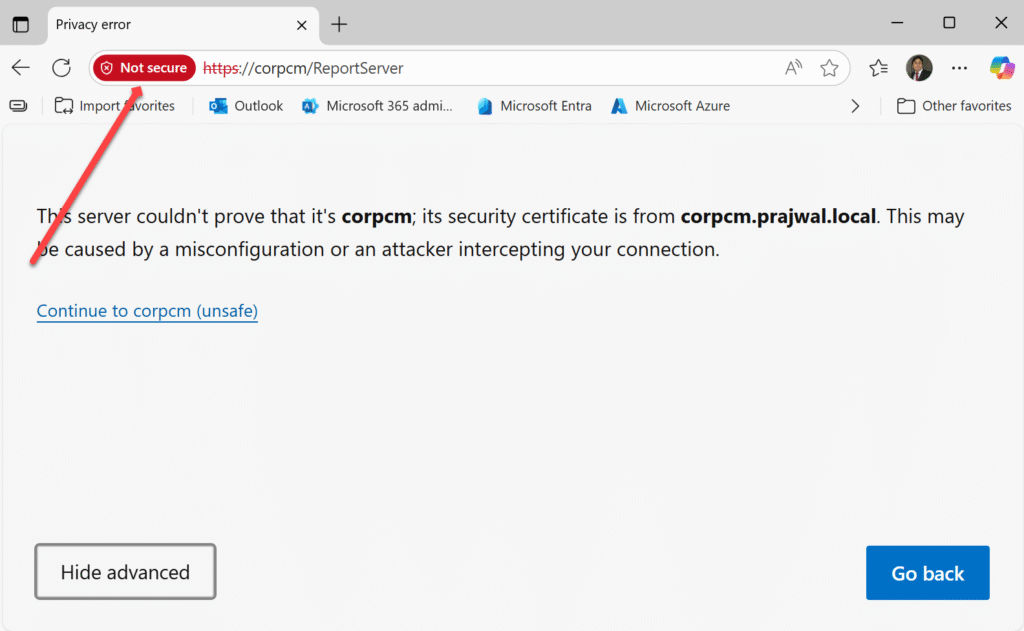
SCCM Report Server URL shows ‘Not Secure’
If you access the SCCM Report Server URL (https://sccmserverfqdn/reportserver) in the web browser and it shows “Not Secure“, it indicates an issue with the SSL/TLS configuration for SQL Server Reporting Services (SSRS), which hosts the SCCM reports. This typically means the connection is not encrypted, or there is a problem with the SSL certificate. The below screenshot represents the above-mentioned issue.
When you install SSRS for SCCM, the default web service URL configured uses port 80 for displaying reports in the web browser. If you wish to use HTTPS (port 443) for accessing SCCM reports via a web browser, you will have to generate a self-signed certificate and assign it within the web service URLs section of the report server.
If you have implemented PKI certificates for SCCM in your organization, then why not secure your report server URL with a proper certificate? Let me show you how to do that.
Step 1: Create a Self-Signed Certificate for SSRS
In my case, IIS and SSRS are hosted on the same machine. Hence, I will request a self-signed secure certificate using the IIS Manager console application. Launch the IIS management console. Select the server, then double click Server Certificates as illustrated below. You may right-click Server Certificates and select Open Feature.

In the Actions pane, select Create Self-Signed Certificate.

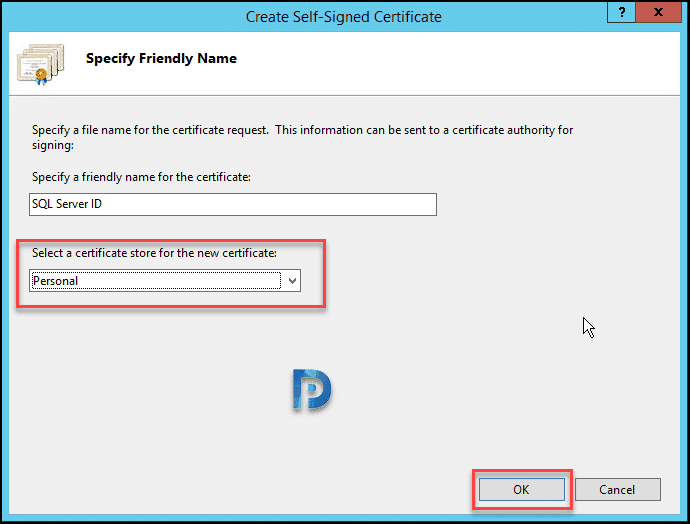
In the Create Self-Signed Certificate wizard, specify a friendly name for the certificate such as “SSRS SSL Certificate” and select the certificate store as Personal. Click OK.

When you review the details of this newly created certificate, you will see additional information about the recipient of the certificate and the issuer.

Step 2: Export the Certificate
In the Internet Information services (IIS) Manager console, right-click the newly created self-signed certificate for SSRS and select Export.

Choose the location where you want to export the certificate. Also, enter the complex password for the certificate. The certificate in the below example is exported as SSRSCert.pfx.

Step 3: Assign the SSL Certificate for SSRS
In this step, I will assign the SSL certificate to the report server and setup the report service web url to use port 443. Launch the Report Service Configuration Manager and sign in with your credentials. On the left-hand side, choose “Web Service URL.” Then, open the “HTTPS Certificate” drop-down menu and select the “SSRS SSL Certificate.”

Click Apply and you’ll see a new report server web service URL is generated with port 443. The new URL https://sccmserverfdqn:443:/ReportServer is now listed under URLs.

Step 4: Test the SSL for SCCM Web Reports
Access the SCCM Report Server URL (https://sccmserverfqdn/reportserver) in the web browser and we see the there are no HTTPS warnings displayed. This confirms that the SSL/TLS configuration for SQL Server Reporting Services (SSRS) which hosts the SCCM reports is configured correctly.

Read Next
