In this post, I will show you how to create a dynamic team in Microsoft Teams. The procedure involves creating a Microsoft 365 group based on a dynamic user membership in Microsoft Entra ID and then adding this group to Teams.
As a prerequisite, you’ll first require a dynamic Microsoft 365 group before you add it to Teams. When applying a rule to a dynamic membership group, the system evaluates user and device attributes to determine if they meet the membership criteria.
The following points are critical when using teams with dynamic groups:

- Rules can define who is a team member, but not who is a team owner. Owners have to be defined separately.
- Owners can’t add or remove users as members of the team since dynamic group rules define members.
- Teams clients do not support member management for teams. Functions such as adding members, editing member roles, approving or sending join requests, and leaving the team are all unavailable.
Keeping the above key points in mind, let’s move forward with creating a Microsoft 365 dynamic group and add it to Microsoft Teams.
Step 1: Determine User Attributes
When creating a dynamic membership rule, you can make use of the user attributes, such as department, location, job title, or other custom attributes. If these attributes don’t exist, the dynamic rules may not work as intended.
For example, I am going to create a dynamic M365 Group – IndiaIT, that will include IT users from Bengaluru and Mumbai.
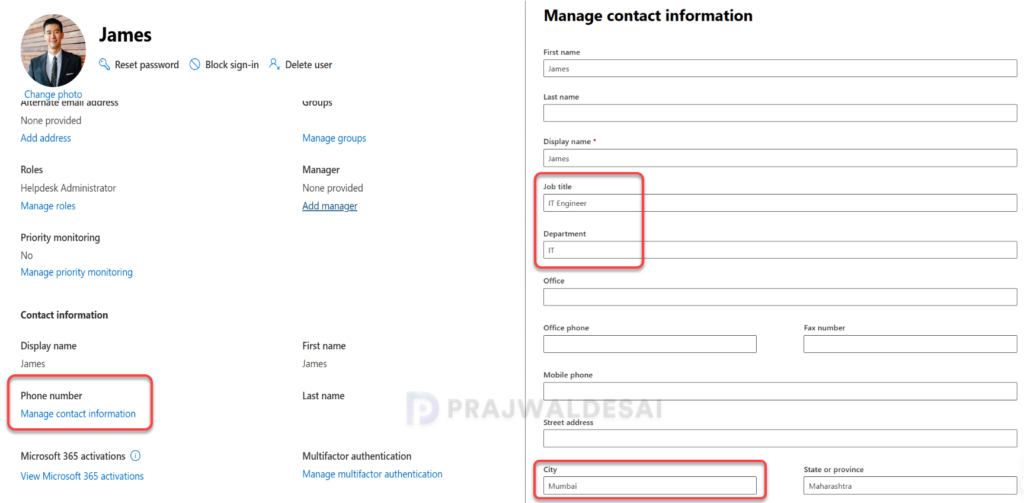
To view the user attributes, sign in to the Microsoft 365 admin center and go to Users > Active Users. Select a user, and on the user information pane, select Manage contact information. Here you can see the attributes configured for the selected user.
In the image below, we can see that the user has the following attributes:
- Job title: IT Engineer
- Department: IT
- City: Mumbai
- Country: India
In the next step, I will use the above attributes to create a dynamic user group in Microsoft Entra ID.
Step 2: Create a Dynamic Microsoft 365 Group
To create a new dynamic Microsoft 365 group in the Entra admin center, follow these steps.
- Sign in to the Microsoft Entra admin center.
- Select Groups > All Groups and click on New Group.
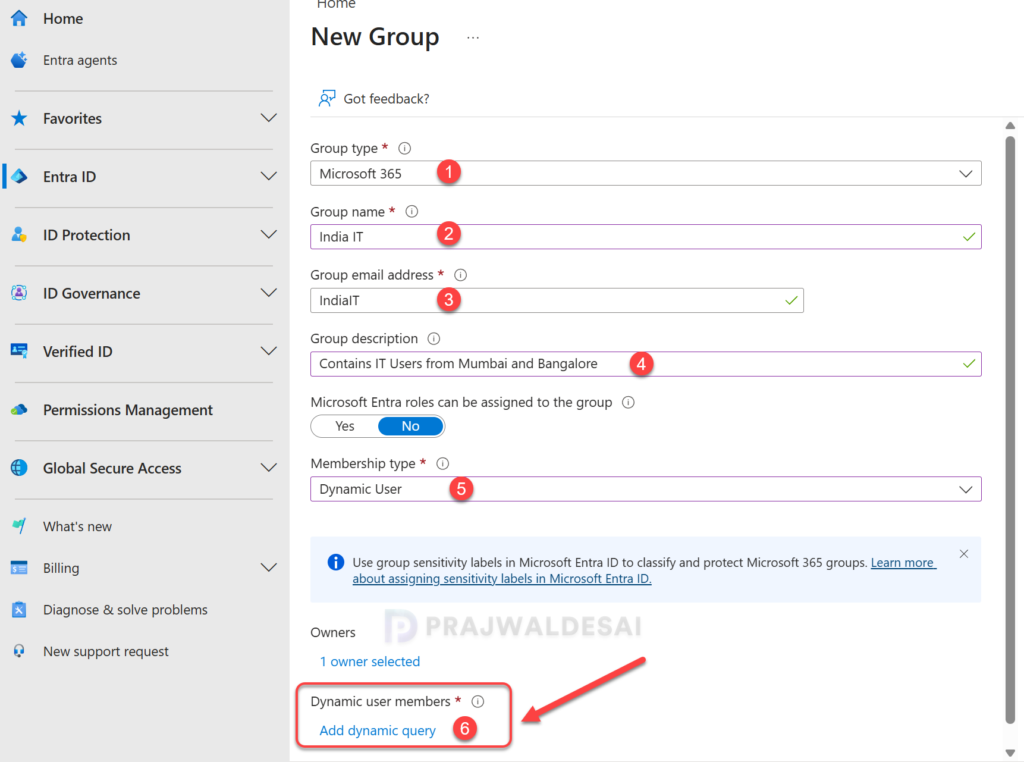
- Specify the following details for the dynamic group.
- Group Type: Microsoft 365.
- Group name: Specify a name for the group.
- Group email address: Specify the email address for this group.
- Group description: State the objective of this group.
- Microsoft Entra roles can be assigned to the group: Select No.
- Membership type: Dynamic User.
- Owners: You may specify owners for this group.
- Dynamic user members: Click Add dynamic query.
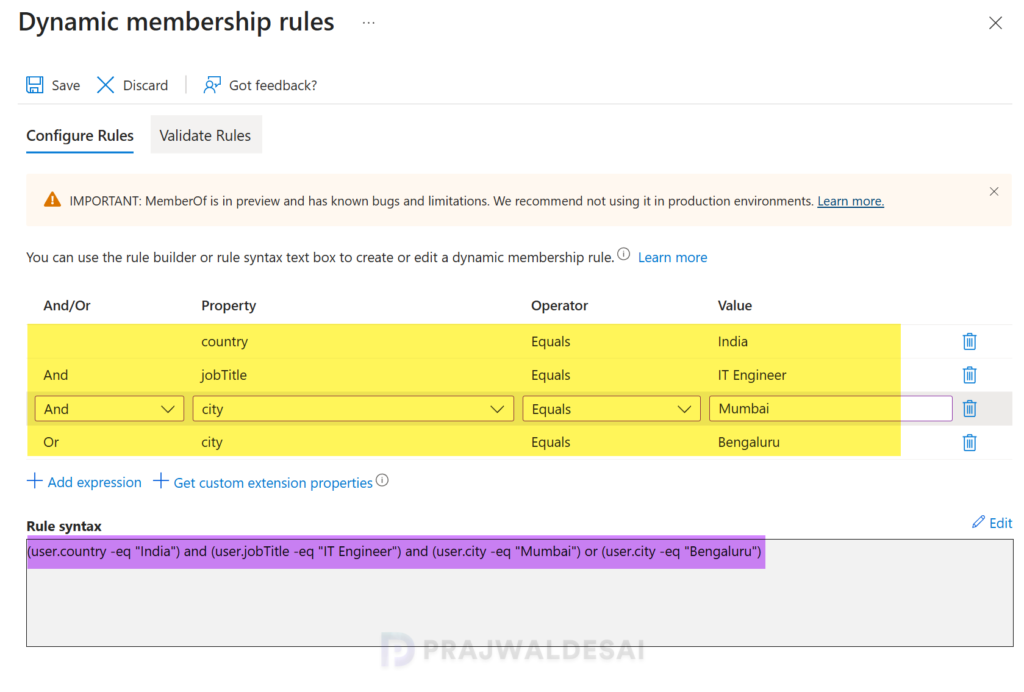
On the Dynamic Membership Rules page, enter the query. Use the rule builder or rule syntax text box to easily create your own query with just a few simple expressions. If you’re new to creating rules, I suggest reviewing the guide on creating or updating a dynamic membership group in Microsoft Entra ID.
In my scenario, the dynamic M365 Group is configured using the following dynamic rule, which uses attributes of users such as job titles, locations, and city details. I have used expressions to create the rule, and the query is shown below.
(user.country -eq "India") and (user.jobTitle -eq "IT Engineer") and (user.city -eq "Mumbai") or (user.city -eq "Bengaluru")Once the dynamic rule is created, click Save.
Once the group is ready, you can next verify the membership of the Microsoft 365 dynamic group. In the Entra admin center, go to Groups > All Groups, select the dynamic group, and then select Members. You should see the users and devices listed here if they meet the criteria for a dynamic membership group.

Step 3: Add Teams to Microsoft 365 Group
Microsoft Teams integrates with Microsoft 365 groups to enable dynamic membership. This feature automatically adds or removes users from the appropriate teams as their attributes change or as they join or leave the organization.
In this step, I will demonstrate how you can add a teams to the existing dynamic Microsoft 365 group.
- Sign in to the Microsoft 365 admin center.
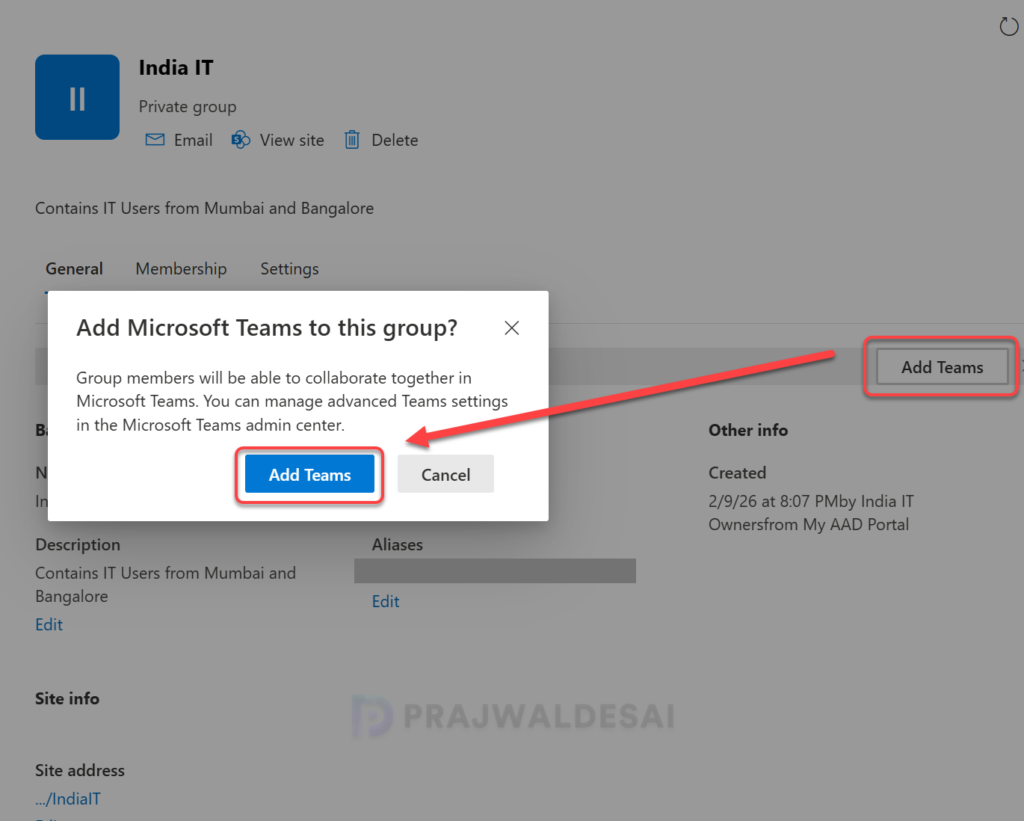
- Navigate to Teams & Groups > Active Teams & Groups.
- Select the dynamic Microsoft 365 group and click Add Teams.
When prompted with the confirmation box asking if you want to add Microsoft Teams to the group, select “Add Teams” to create a dynamic team linked to the Microsoft 365 group.
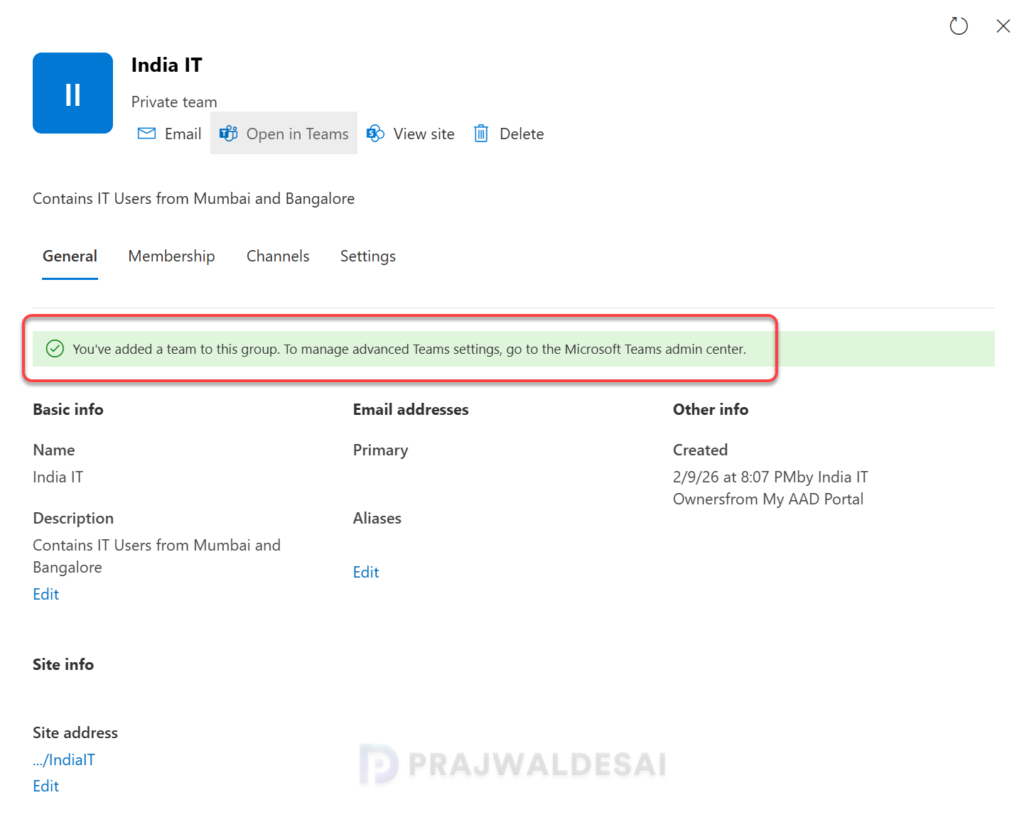
Note: Microsoft Teams might take anywhere from a few minutes to up to 2 hours to reflect dynamic membership changes once they take effect in the Microsoft 365 group for a team.
A confirmation message is displayed: “You’ve added a team to this group. To manage advanced Teams settings, go to the Microsoft Teams admin center.”
Step 4: End User Experience
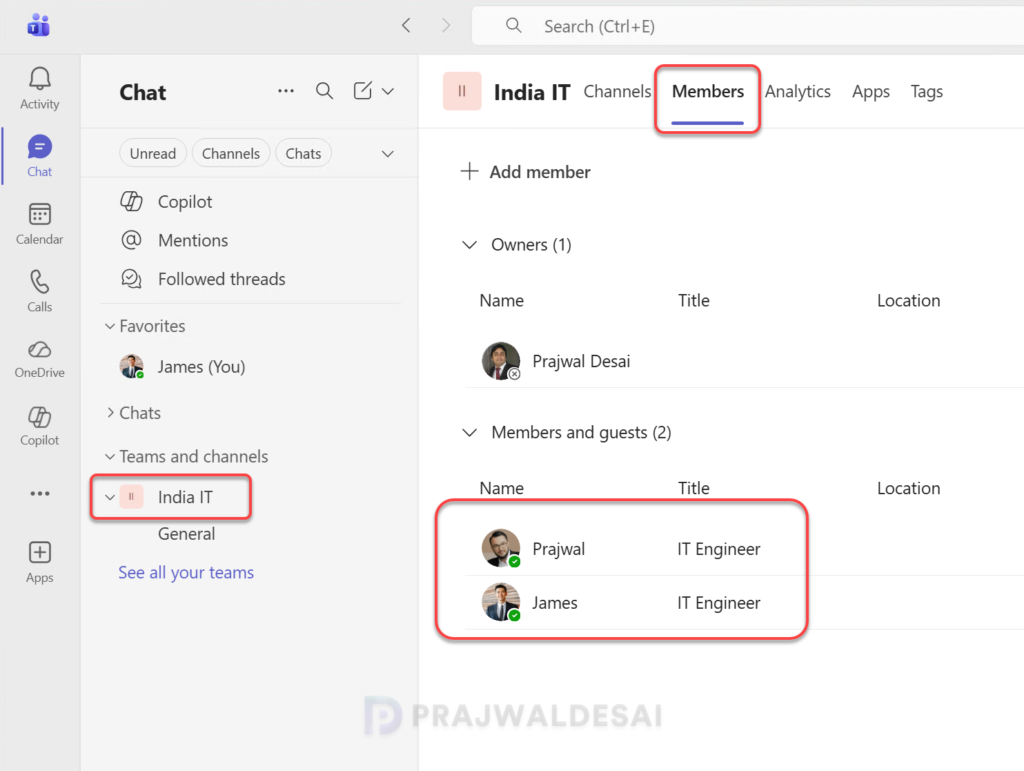
In this step, I will show you where end users can view the newly added teams from the previous step. The team that you created from the dynamic Microsoft 365 Group will be visible to the users in the Chat > Teams and Channels section of Microsoft Teams.
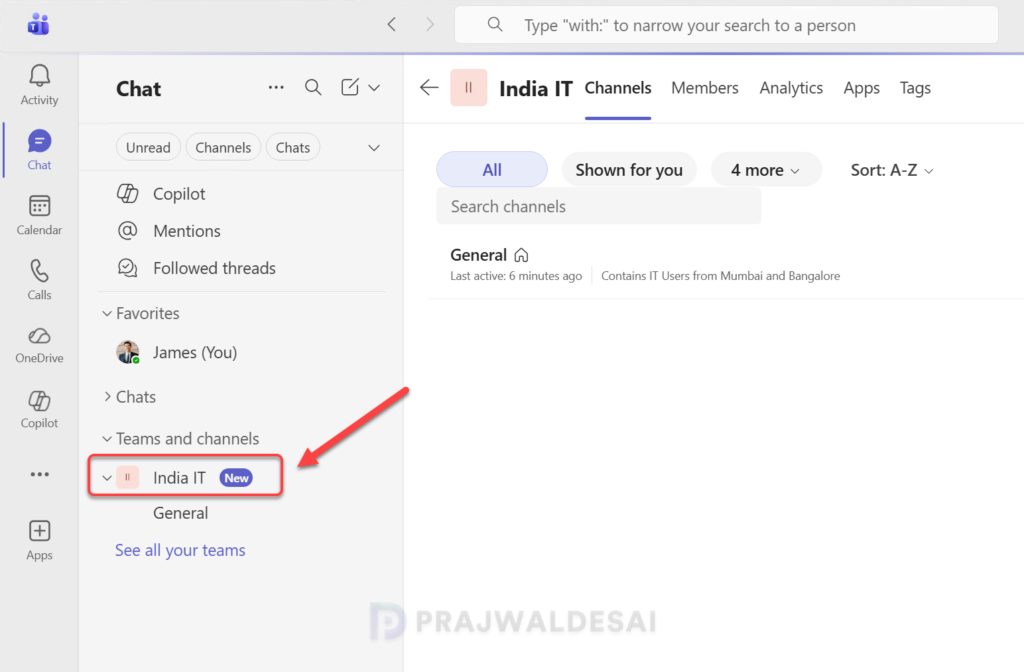
When the user launches MS Teams, a new activity is also created that an admin has added you to a group (dynamic M365 group).

To view the owners and members of a Teams group, click on the three horizontal dots next to the group, select “Manage team,” and navigate to the “Members” tab.