


In this guide, we will demonstrate the steps to install WSUS console on Windows Server and Windows 11. There are several ways to install the WSUS admin console, including Server Manager, Windows PowerShell, and optional features.
Organizations often use WSUS as the primary solution to help keep up with and manage the frequent release of security updates, software upgrades, and service packs. WSUS plays an important role in distributing updates to your devices. For example, the software update point integrates with WSUS to provide software updates to Configuration Manager clients.
When you install the WSUS role on a Windows Server, the WSUS console is automatically installed. However, there are different procedures to follow if you want to manually install the WSUS console on Windows Server or Windows 11.

The most recent Microsoft product updates can be deployed by administrators using Windows Server Update Services (WSUS). Installing WSUS in your setup will allow you to efficiently manage and distribute updates.
What is WSUS Admin Console?
The WSUS administration console is a software or tool that allows you to connect to the WSUS Server and manage Windows updates. The WSUS admin console allows you to connect to a remote Windows Server Update Services server.
The Windows Server Update Services Tools can be installed on both Windows Server and Windows 11. By installing the WSUS administration console on a Windows 11 laptop, you can manage multiple WSUS servers without logging in to them.
Ways to Install WSUS Administration Console
There are three ways to install the WSUS administration console.
- Manually install the WSUS console using Server Manager
- Install WSUS admin console using PowerShell
- Install WSUS administration console on Windows 11 via optional features
On a Windows server, the WSUS admin console installed using PowerShell is quicker than Server Manager. However, the server manager is not available in Windows 11, and PowerShell is not supported for installing the WSUS console. The only way is to do it via the optional features.
Method 1: Install WSUS Console on Windows Server
Let’s look at the steps to install the WSUS console on Windows Server. On Windows Server, launch the Server Manager. In the Server Manager window, under the Configure this local server heading, click Add roles and features.

Click Next on the page titled “Before you begin.” If you want to avoid seeing this window again, you can choose to skip this page by default.

Select the installation type as role-based or feature-based installation. Click Next.

Make sure the server you select to install the WSUS console is the correct one in the server selection window. Click Next.

You do not need to make any choices in the Select Server Roles window. Click Next.

You can enable the installation of the WSUS console in the Features window. Expand “Role Administration Tools” and select the Windows Server Update Services Tools. The API and PowerShell cmdlets and User Interface Management console are also selected. Click Next.

On the Confirmation window, click Specify an alternate source path. Enter the path of the SXS folder from the Windows Server installation media. Click Next.

The WSUS console is now installed, and the Results window displays the installation status. The Windows Server message “Feature installation succeeded” verifies the installation of the WSUS console.
Installing the WSUS console on a server doesn’t require restarting the computer. Close the Add roles and features wizard window.

Method 2: Install WSUS Admin Console using PowerShell
The steps below explain how to install the WSUS console on a Windows server using PowerShell.
- Launch the PowerShell as an administrator.
- Run the command Install-WindowsFeature -Name UpdateServices-Ui to install the WSUS console.
- Exit code success means the WSUS console has been installed successfully.
- You can now launch the Windows Server Update Services console and connect to the WSUS server.

Method 3: Install WSUS Console on Windows 11
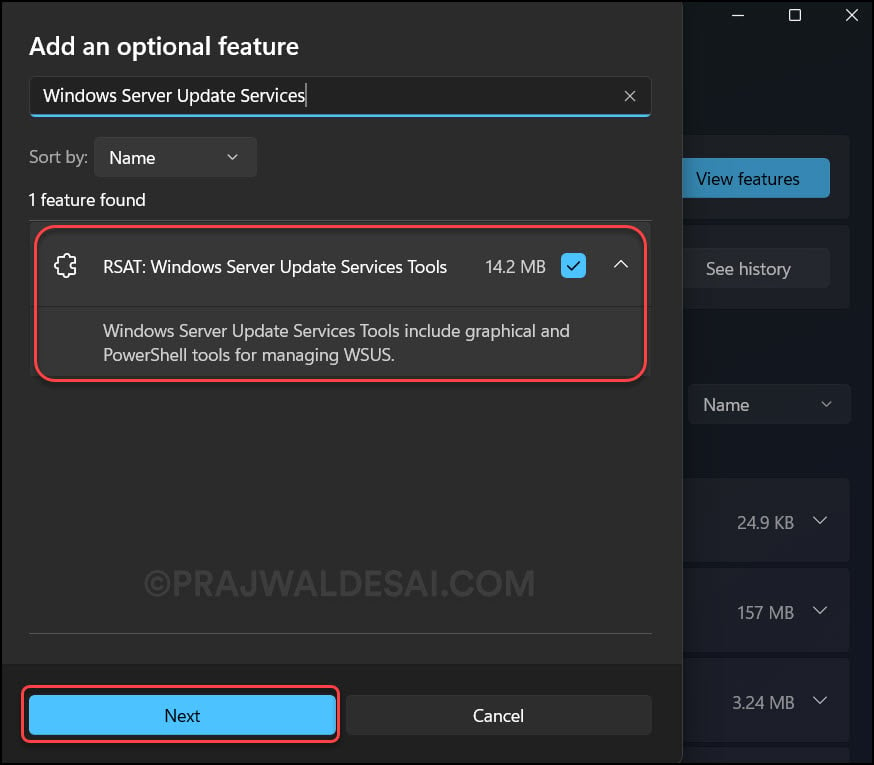
On Windows 11, you can install the WSUS administration console using optional features. The optional feature “RSAT: Windows Server Update Services Tools” contains both graphical and PowerShell tools for managing WSUS.
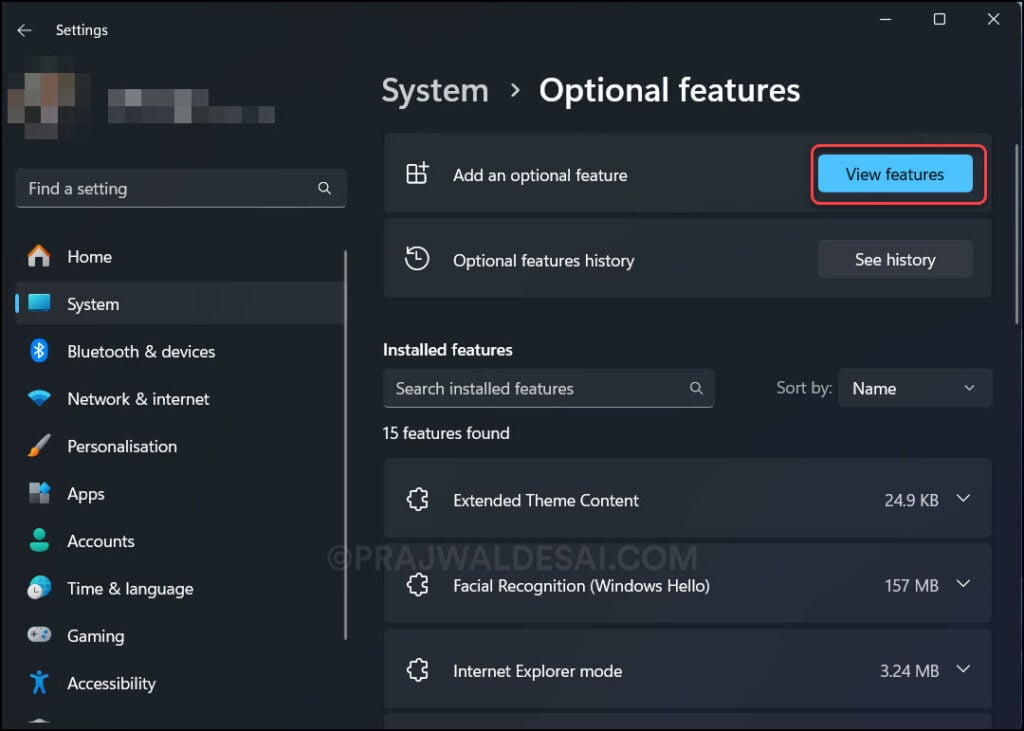
Click Start and launch the Settings app. Go to System > Optional Features. Next to the option “Add an optional feature,” select View Features.
Windows 11 has several optional features that you can install. To make it easier, type “Windows Server Update Services” in the search box. From the search results, select the optional feature RSAT: Windows Server Update Services Tools. Click Next.
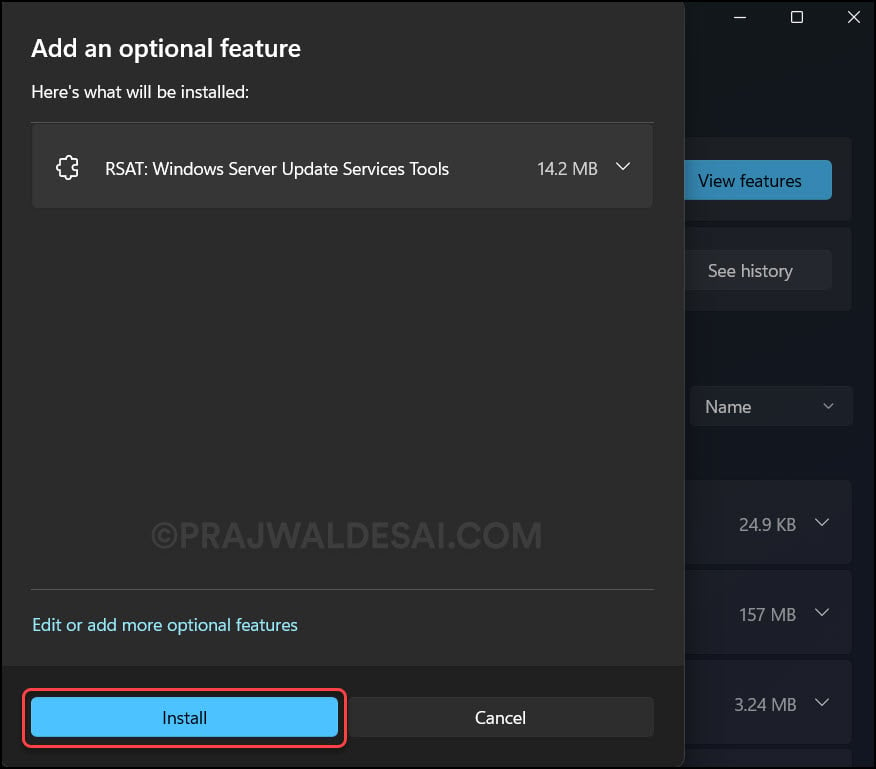
The RSAT: Windows Server Update Services Tools optional feature that you selected above is shown on the confirmation screen. Click on Install.
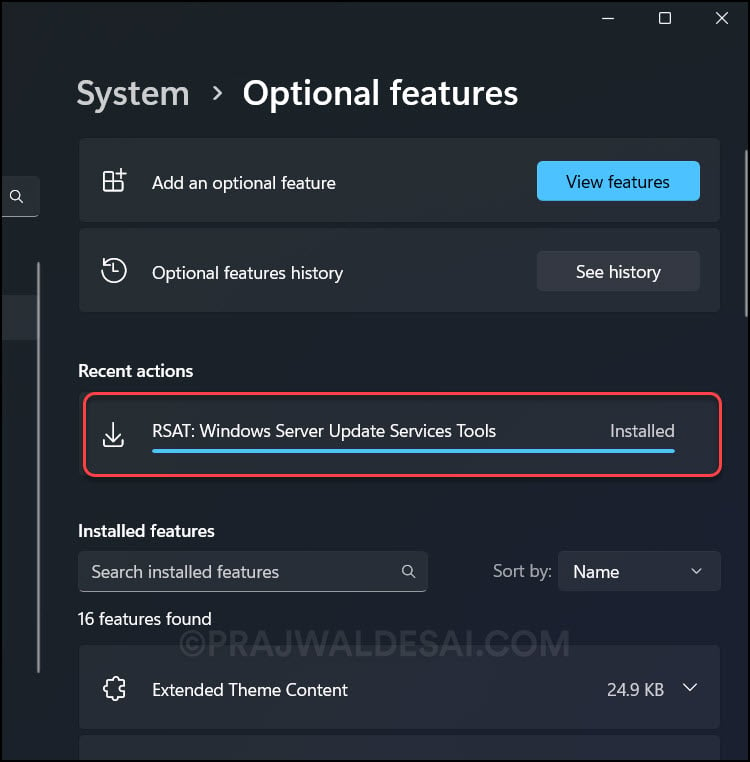
The RSAT: Windows Server Update Services Tools are now downloaded and installed on your Windows 11 PC. Installing this optional feature doesn’t require a reboot.
How to Launch the WSUS Administration Console
The steps to launch the WSUS administration console vary based on the operating system that you have installed it on.
- WSUS Server: On your WSUS server, click Start, point to All Programs, point to Administrative Tools, and then click Windows Server Update Services.
- Windows Server: Open the Server Manager on the WSUS server. Select Tools from the top menu, then select Windows Server Update Services. This will open the WSUS administration console.
- Windows 11: Click Start, type “WSUS” in the search box, and open the Windows Server Update Services console.
- Shortcut: You can use the following shortcut to directly open the WSUS console: C:\Program Files\Update Services\AdministrationSnapin\wsus.msc
You must be a member of the local administrators group or the WSUS administrators group on the server on which WSUS is installed to use the WSUS console.

How to Connect to WSUS Server
The WSUS Server can be accessed in two different ways.
- You can use the WSUS console to connect to a remote WSUS server
- Open the administration console from Microsoft Edge on any server or computer by going to http://WSUSServerName[:portnumber]/WSUSAdmin/.
Using the WSUS admin console is the simplest method to gain access to the WSUS server. Launch the WSUS console, right-click Update Services and select Connect to Server.

In the Connect to Server window, specify the WSUS server to which you want to connect. If you have an existing WSUS server, enter the WSUS server name and port number.
If you wish to use SSL to communicate with the WSUS server, select the Use Secure Sockets Layer (SSL) to connect to this server check box. You may connect to as many servers as you need to manage through the console.

Video Tutorial
Take a look at the YouTube video tutorial that explains how to install the WSUS console. If you feel the video helped you, please subscribe to the channel for more such videos.
Read Next
Listed below are some useful WSUS guides.
