


Windows Autopatch is a cloud service that updates Windows, Microsoft 365 Apps for Enterprise, Microsoft Edge, and Microsoft Teams automatically to make your organization safer and more productive.
This step-by-step guide should help you set up and configure Windows Autopatch in your setup and automate the distribution of updates in Microsoft Intune. We will also go through the prerequisites for the Autopatch service and licensing details.
In May 2022, the Autopatch service was initially released for public preview. Starting July 11, 2022, the Autopatch is available to everyone with a Windows Enterprise E3 or E5 license. Every month on the second Tuesday, Microsoft will continue to deliver updates. With the introduction of Windows Autopatch, updating procedures are now more efficient, and opportunities for IT professionals are now available.

Before we set up the Windows Autopatch Service in Intune, let’s learn more about how it works. Before enabling Autopatch for your tenant, make sure you know what this service can do. Microsoft has published the Windows Autopatch documentation, you can go through to understand the capabilities of the Windows Autopatch service and how it works.
What is Windows Autopatch?
Windows Autopatch is a cloud service that automates updates for Windows, Microsoft 365 Apps for enterprise, Microsoft Edge, and Microsoft Teams to improve security and productivity across your organization.
Autopatch is a brand-new, helpful service from Microsoft that updates Windows 10, Windows 11, Microsoft Edge, and Microsoft 365 software according to best practices. The Autopatch service manages all aspects of deployment groups for Windows 10 and Windows 11 quality and feature updates, drivers, firmware, and Microsoft 365 apps for enterprise updates.
The Windows Autopatch service can take over software update management of supported devices as soon as an IT administrator decides to have their tenant managed by the service.
Windows Autopatch Prerequisites
Listed below are the prerequisites for using Windows Autopatch:
- The Windows Autopatch service requires Windows 10/11 Enterprise E3 (or higher) to be assigned to your users.
- You will also require Azure Active Directory Premium. The user accounts must exist in Azure Active Directory or the accounts must be synchronized from on-premises Active Directory to Azure AD using Azure AD connect.
- The corporate network must be connected to a number of Microsoft service endpoints for Autopatch managed devices.
- All the Windows Autopatch devices must be managed by Microsoft Intune. Intune should be set as the Mobile Device Management (MDM) authority or co-management must be turned on and enabled on the target devices.
Refer to the following article for detailed information on Windows Autopatch Prerequisites.
Windows Autopatch Licensing Details
Windows Autopatch is generally available for customers with Windows Enterprise E3 and E5 licenses. The following licenses are supported by Windows Autopatch:
- Microsoft 365 E3
- Microsoft 365 E5
- Windows 10/11 Enterprise E3
- Windows 10/11 Enterprise E5
- Windows 10/11 Enterprise VDA
Note: Windows Autopatch service is available at no extra cost to Windows Enterprise E3 and above license holders. If you own Enterprise E3 licenses for Windows, the Windows Autopatch service is completely free.
Fix Windows Autopatch Missing in Intune Portal
There is a reason why the Windows Autopatch Tenant Enrollment blade is missing in the Intune portal. That’s because either you haven’t assigned proper licenses to devices or the Autopatch Service prerequisites are not met. The below screenshot illustrates the issue where the Autopatch Tenant Enrollment blade is missing in the Intune portal.
If you are setting up Windows Autopatch for the first time, you may encounter this issue. Windows Autopatch will require a license for Windows Enterprise E3 or above. So make sure you have the right licenses, and the Windows Autopatch will show up in the Intune Portal.

Once you have met all the required Windows Autopatch prerequisites and assigned proper licenses to your users, the Windows Autopatch Tenant Enrollment option appears in Endpoint Manager portal (Intune Admin Console).

Supported Operating Systems
The following Windows 64-bit editions are suported for Windows Autopatch:
- Windows 10/11 Pro
- Windows 10/11 Enterprise
- Windows 10/11 Pro for Workstations
Windows servers, Linux, and macOS are not supported by the Autopatch service for patching.
Steps to Enroll your Tenant in Windows Autopatch
There are multiple steps required to enroll your Tenant in Windows Autopatch. While performing each of these steps, ensure you use an account that is Global Administrator.
Step 1. Review All Autopatch Service Prerequisites
Before you enroll your tenant in Windows Autopatch, you must meet all the prerequisites required by the Autopatch Service. For more information, refer to the Windows Autopatch prerequisites documentation.
Step 2. Run the Readiness Assessment Tool
The Readiness assessment tool checks the readiness of your tenant to enroll in Windows Autopatch for the first time. You cannot run this tool once you enroll your tenant for Autopatch service.
This tool should be run before you enroll your tenant in Autopatch. It checks the settings in Microsoft Endpoint Manager (Microsoft Intune) and Azure Active Directory (Azure AD) to ensure they’ll work with Windows Autopatch.
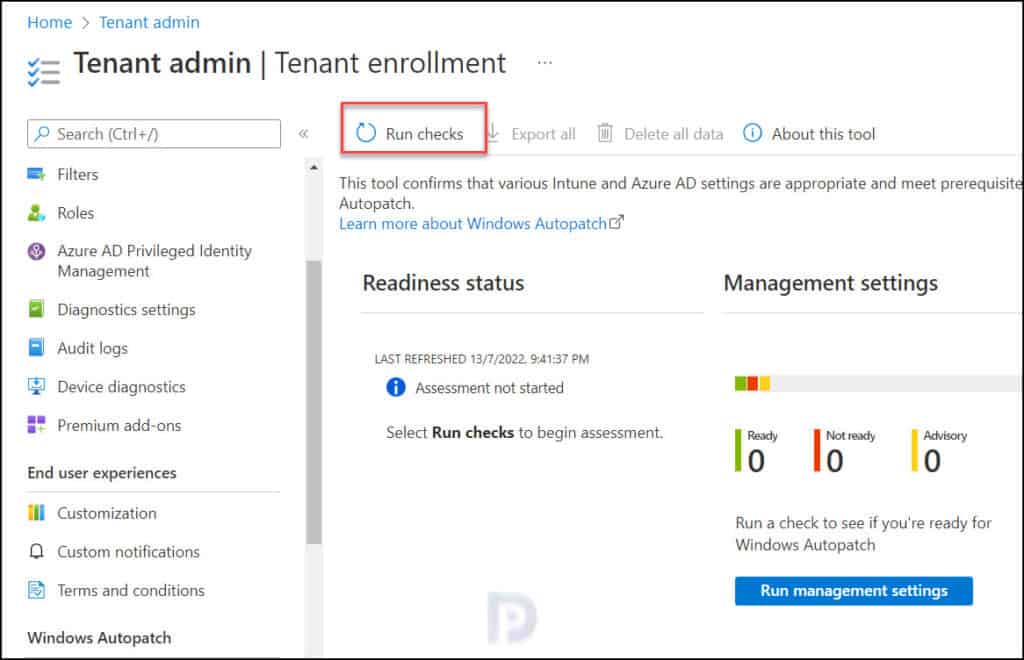
If you have not run the Readiness Assessment tool for Autopatch Service, you will see the message Assessment not started – Select Run checks to begin assessment.
Use the following steps to run the Readiness Assessment Tool for Windows Autopatch Setup:
- Sign in to the Microsoft Endpoint Manager admin center.
- Select Tenant Administration and navigate to Windows Autopatch Tenant enrollment.
- Click on Run Checks to initiate Readiness Assessment Tool.
The Readiness Assessment tool will now run in the background to see if your tenant is ready for Windows Autopatch. Any issues with your tenant will be reported by this tool. If the assessment tool finds a mistake, you can’t sign up your tenant for Autopatch until the mistake is fixed. If you notice advisory warnings, try to fix them before you begin enrollment.
Once all the management settings checks are completed, A notification will appear automatically in the top right-hand corner with a message – “Management Settings Checks are complete“.
The message “You are ready to enroll in Windows Autopatch” confirms that your tenant is ready for Windows Autopatch enrollment. You can now proceed to the next step.

Fix Unlicensed Admin Error in Intune Portal
During the Autopatch Tenant enrollment, you may encounter the unlicensed admin error. The unlicensed admin error appears because the Intune administrator account doesn’t have enough permissions to interact with Azure AD organization. Follow the instructions provided in the following guide to fix Windows Autopatch unlicensed admin error.
List of Readiness Statuses of Windows Autopatch Enrollment
After the Readiness Assessment Tool completes its operation, it shows the status which can have these options:
- Ready: This means your tenant is ready for Autopatch enrollment.
- Advisory: With Advisory status, you can continue enrolling your tenant however it is good to resolve those issues. If you skip them, you cannot run the Readiness Assessment Tool again.
- Not Ready: This means you cannot enroll your tenant for Autopatch. You have to fix these errors that prevent the enrollment. Clicking the error will show the steps to resolve the error.
- Error: This means your tenant hasn’t met prerequisites for Autopatch enrollment. The Azure Active Directory (AD) role you’re using doesn’t have sufficient permissions to run this check.
Step 3: Start Windows Autopatch Enrollment
Once the Readiness Assessment Tool shows the status as Ready, you can begin the Windows Autopatch Enrollment. On the Tenant Enrollment page, click Enroll to proceed with the enrollment of your tenant to the Windows Autopatch service.

You must allow administrator access for Microsoft to perform the following actions:
- Create accounts to manage and license your registered devices.
- Manage devices using Intune.
- Collect and share info on usage, status, and compliance for devices and apps.
- Remove Microsoft administrator accounts from Multifactor authentication and conditional access policies.
Select the checkbox to provide consent to the terms and conditions and allow administrator access for Microsoft and click Agree.

On the Welcome screen of the Windows Autopatch Setup wizard, provide the contact information for your organization’s Windows Autopatch administrator. Phone number, email address, name, and preferred language are among the information that must be provided. Click Complete.
At this point, you can add only one contact for admin. However, after you configure the Autopatch, you can add additional contacts as admins. Read the following guide to know how to add Admin Contact Info in Windows Autopatch.

Now we see the Setting up Windows Autopatch message. It takes a few minutes to set up the Autopatch service. During this step, the accounts, and policies are set up and configured for your tenant.

After a short while, we observe that the Windows Autopatch setup is complete. This verifies that your tenant has been successfully registered for the Windows Autopatch service. You can click Continue to start registering the devices.

Step 4. Register or Add Devices into Windows Autopatch
Once you enroll in Windows Autopatch for your Intune tenant, the first step that you need to take is to register your devices with the Windows Autopatch service. You can try out the Autopatch service by registering a small number of devices in your tenant.
To enroll or register the devices for Windows Autopatch management, the devices must meet a minimum set of required software-based prerequisites:
- Windows 10 (1809+)/11 Enterprise and Professional edition versions (only x64 architecture).
- Either Hybrid Azure AD-Joined or Azure AD-joined only (personal devices aren’t supported).
- Managed by Microsoft Endpoint Manager.
- Microsoft Intune and/or Configuration Manager Co-management.
- Must switch the following Microsoft Endpoint Manager-Configuration Manager Co-management workloads to Microsoft Endpoint Manager-Intune (either set to Pilot Intune or Intune):
- Windows updates policies
- Device configuration
- Office Click-to-run
- Last Intune device check in completed within the last 28 days.
- Devices must have Serial Number, Model, and Manufacturer.
The Autopatch will take over the management of these devices’ software updates once you register them for the Autopatch service. For initial testing, you can register a few test devices, and even Windows 365 Cloud PCs are supported.
You can use one of the following built-in roles in Windows Autopatch to register devices:
- Azure AD Global Administrator
- Intune Service Administrator
- Modern Workplace Intune Administrator
Note: Devices that are intended to be managed by the Windows Autopatch service must be added to the Windows Autopatch Device Registration Azure AD assigned group. You can add devices to the Windows Autopatch Device Registration group either by adding them directly or by nesting them in other Azure Active Directory dynamic or assigned groups.
Windows Autopatch Device Registration Process
The steps to register devices into Windows Autopatch are as follows:
- Sign in to the Microsoft Endpoint Manager admin center.
- Select Windows Autopatch from the left navigation menu and select Devices.
- Select the Ready tab, then select the Windows Autopatch Device Registration hyperlink. The Azure Active Directory group blade opens.
- Add either devices through direct membership, or other Azure Active Directory dynamic or assigned groups as nested groups in the Windows Autopatch Device Registration group.

Once you add members (devices) to Windows Autopatch, a notification appears in the top right-handcorner with a message “Group members successfully added“.
Once you have added the devices or Azure AD groups containing devices to the Windows Autopatch Device Registration group, the Autopatch discovers these devices, and runs software-based prerequisite checks to try to register them with its service.

Missing Devices under Windows Autopatch Device Registration?
After registering the devices with Windows Autopatch service, you may notice that under Windows Autopatch Device Registration, the devices are missing. This happens because the Windows Autopatch automatically runs every hour to discover new devices added to this group. Once new devices are discovered, Windows Autopatch attempts to register these devices, and they will be visible under the device registration section.
So to answer the question on how long does it take Autopatch service to discover devices, it will be up to 1 hour.
Step 5. Manually Discover Devices for Windows Autopatch
Initially, when you register devices with Autopatch, it can take up to an hour for registered devices to appear in the console.
You can manually discover registered devices in Autopatch using following steps : Go to Tenant Administration > Windows Autopatch – Tenant Enrollment > Tenant Admin > Devices. Select Discover Devices.

The following message box appears: Discover devices – Scan Windows Autopatch Device Registration group to register devices for recently added members. This process can up to an hour. Click OK to begin the device discovery process.

In a few seconds, you will see the Windows devices discovered and listed under “Discover Devices.” The status of these devices is active, and by default they are part of the Fast group.

Step 6. Overview of Update Rings in Windows Autopatch
Each of the update rings in Windows Autopatch has a different purpose and assigned a set of policies to control the rollout of updates in each management area.
After you enroll a device into the Windows Autopatch service, you assign an update ring for the device and based on the update ring, update management happens. Each ring has a description, and it is listed below.
There are four rings provided by Windows Autopatch and you can’t create additional rings for managed devices.
- Automatic: Select Automatic when you want Microsoft Managed Desktop to automatically assign devices to one of the other groups.
- Test: Devices in this group are intended for your IT Administrators and testers since changes are released here first.
- First: The First ring is the first group of production users to receive a change. This group is the first set of devices to send data to Windows Autopatch.
- Fast: The Fast ring is the second group of production users to receive changes.
- Broad: The Broad ring is the last group of users to receive changes.
Step 7. Adding Devices to Update Rings in Windows Autopatch
To assign update ring to devices, go to Windows Autopatch – Devices and click Device Actions. Now select Assign device group and select the devices that you want to assign an update ring.
Note: You must use the same steps to change the update ring for device(s).

You must now select a deployment group to assign the device. The available options are Automatic, Test, First, Fast and Broad. Select an option and your devices will be added to that deployment group. You cannot add a device to more than one deployment group.

Now we see the devices have been added to Fast deployment group. You can change the deployment group when you feel a device needs to be added to a different update ring.

During enrollment, Windows Autopatch creates four Azure Active Directory groups that are used to segment devices into update rings:
- Modern Workplace Devices – Test
- Modern Workplace Devices – First
- Modern Workplace Devices – Fast
- Modern Workplace Devices – Broad
You can view these groups in Azure portal or even in Intune Portal. Go to Groups and select All Groups. You can search for “Modern Workplace Devices – Windows Autopatch” to view all the Autopatch Azure AD groups.

Step 8. Verify Autopatch Updates Deployment on Client
Log in to the device that is part of the deployment group and wait for the sync to complete. Once it is complete, you can see new Windows Update rings policies being applied.
The device will download and install the patch based on the update ring settings. You will see the notification generated to restart the device with the grace period specified for one of the deployment rings.
The below screenshot shows an example of what the user sees when a software update deployment by Autopatch is successful. The user has the option to restart the computer at a specific time, tonight, or right away using the Restart now option.

Windows Autopatch Release Settings
The Release Settings under Release Management lets you configure the way Windows Autopatch service deploys updates for devices in your tenant. There are two options under Release Settings: Expedited Quality Updates and Microsoft 365 apps updates.
For a device to be eligible for Microsoft 365 Apps for enterprise updates (both 32-bit and 64-bit versions), as a part of Windows Autopatch, they must meet the following criteria:
- There are no policy conflicts between Microsoft Autopatch policies and customer policies.
- The device must have checked into the Intune service in the last five days.
Allow or Block Microsoft 365 App updates in Autopatch
You can approve or disapprove Microsoft 365 App updates for Windows Autopatch-enrolled devices if your company wants more control. When the Microsoft 365 App update setting is set to Block, Windows Autopatch won’t deliver updates for your organization’s Microsoft 365 Apps; instead, your companies will be in complete control of these upgrades.
To allow or block Microsoft 365 App updates in Windows Autopatch:
- Go to the Microsoft Intune admin center.
- Navigate to the Devices > Release Management > Release settings.
- Go to the Microsoft 365 apps updates section. By default, the Allow/Block toggle is set to Allow.
- Turn off the Allow toggle to opt out of Microsoft 365 App update policies.

Note: Once you make the changes, you’ll see the notification: Update in process. This setting will be unavailable until the update is complete. Once the update is complete, you’ll receive the notification: This setting is updated.
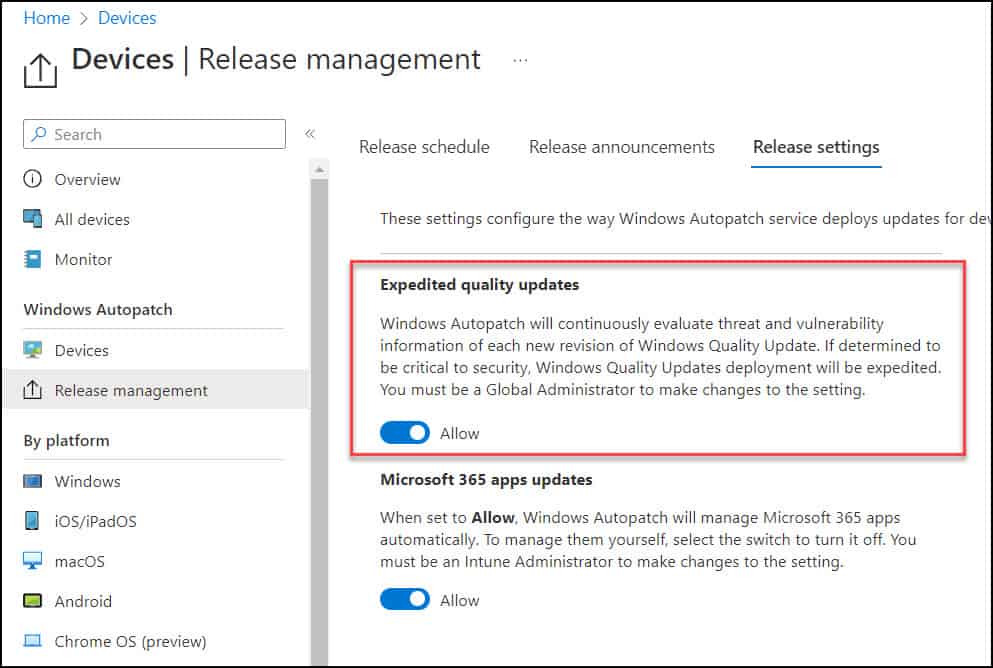
Allow or Block Expedited Quality Updates in Autopatch
Windows Autopatch will continuously evaluate threat and vulnerability information of each new revision of Windows Quality Update. If determined to be critical to security, Windows Quality Updates deployment will be expedited. You must be a Global Administrator to introduce changes to the setting.
To allow or block expedited quality updates in Windows Autopatch:
- Go to the Microsoft Intune admin center.
- Navigate to the Devices > Release Management > Release settings.
- Go to the Expedited Quality updates section. By default, the Allow/Block toggle is set to Allow.
- Turn off the Allow toggle to opt out of expedited quality updates.

Prajwal, Is there any way you could make available the powershell script that autopatch creates named “Modern Workplace – Autopatch Client Setup v1.1” in microsoft endpoint manager. I unintentionally put a different powershell script in there and need the original one. Im trying to get it from Microsoft but they are not being of much help wanting me to wait weeks for them to update it. Any help is greatly appreciated.
Hi there, any good info on how to troubleshoot Autopatch policies (no updates received) and what are the logs for Autopatch? I mean how to check and troubleshoot failed Win Updates through Autopatch? I see some drivers failed to download or install and not sure where to start.
Thanks.
Hello,
How can I add AVD session hosts for windows autopatch?
Good blog.
When i add the devices to the AutoPatch group. I notice that they are going into the “First” ring automatically. Can I change that somewhere to make all devices that get registered go to “Broad” then I can manually move the devices to the other rings?
Thanks
it will be automatically controlled, at the end 1% of the enrolled devices will be devided like: 1% in the first group, 9 % fast group and the rest (90%) in the broad group.
oops small typo,
it will be automatically controlled, the enrolled devices will be devided : 1% in the first group, 9 % fast group and the rest (90%) in the broad group.
How do you disable autopatch? We keep getting login attempts on the Modern Workplace Administrator Account externally.
One way is to deregister devices from Autopatch.
Do you know what the difference between Windows Autopatch is and say Update Management through an Automation Account? My Automation Account would allow me to import Intune devices, I’m just curious if there’s more included with Autopatch.
Hi Prajwal,
Nice explanation about the Autopatch Concept.
Thank you so much.
This is the best and most clear and concise guide.
Hi Prajwal, can you tell us how long does it take to register the device in Autopatch?