


This post covers the steps to uninstall Adobe Flash Player using SCCM (KB4577586) from your Windows devices. When you want to uninstall any update on multiple computers, ConfigMgr is the best tool.
The Adobe Flash Player will go out of support on December 31, 2020. Hence it is important that you transition away from Adobe Flash Player. Applying the update KB4577586 will remove Adobe Flash Player from your Windows device.
Adobe Flash Player was created by Adobe. However due to the diminished usage of the technology and more secure options such as HTML5, WebGL, Adobe decided to end this product.

Update for Removal of Adobe Flash Player – KB4577586
Microsoft recently published an article on removal of Adobe Flash Player: October 27, 2020. An update will be made available via Microsoft Update Catalog, Windows Update and WSUS. The title of this update is Update for Removal of Adobe Flash Player. Installing the update KB 4577586 will permanently remove Adobe Flash Player as a component of the Windows OS devices.
For now the update KB 4577586 will be optional on Windows Update and WSUS. However after few months the update will be termed as recommended update. After this update has been applied, it cannot be uninstalled.
Note – When you install Windows 10 on a device, you also get the Adobe Flash Player installed. The update KB 4577586 uninstalls the flash player. However if you have installed Adobe Flash Player manually from another source, it will not be removed.
Can I use the Adobe Flash Player again ?.
The answer is no because once you install the update KB4577586, it cannot be uninstalled. However if you wish to use the Adobe Flash player again on your windows device, you can try the below methods.
- Method 1 – You can reset your device to an earlier system restore point. Note that system restore feature must be explicitly enabled. Furthermore a system restore point must be created on your Windows device before you apply this update.
- Method 2: Reinstall your Windows operating system and do not apply the update KB 4577586.
Manually Download the KB4577586 Update
You can download the KB 4577586 Update from the Microsoft Update Catalog. Click the following link to download KB4577586 Update.
The update is applicable for multiple products. Ensure you download the update for the right version of Windows OS.
Import the KB 4577586 Update in WSUS
First of all we must import the update in WSUS because it is an optional update. In the past I had published a guide on importing the updates into WSUS. I will use the same steps to import the 4577586 update.
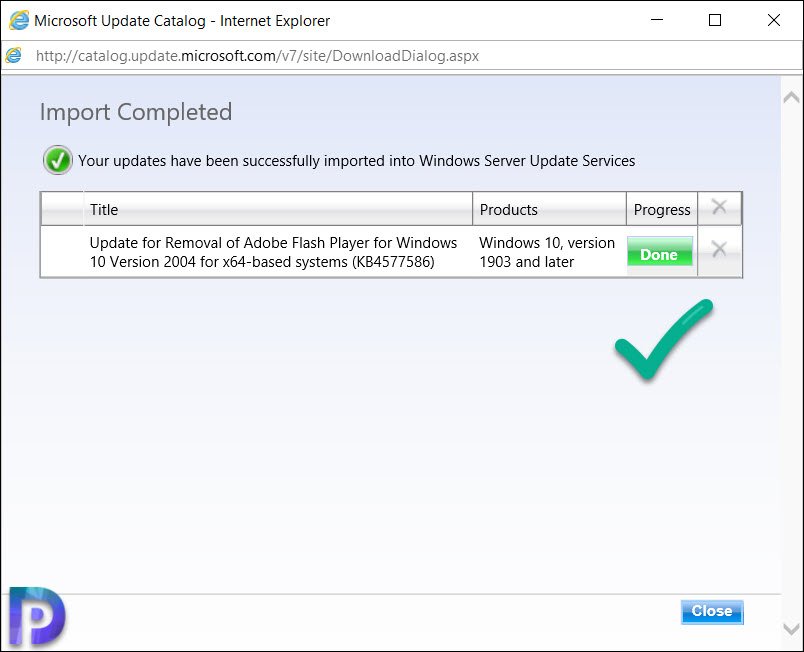
You can either visit Microsoft Update Catalog site and search 4577586 update or directly access the update.
- Launch the WSUS console, expand your server and click Updates. On the right pane, under Actions section, click Import Updates.
- The browser now loads the Microsoft Update Catalog site. In the text box, type the update number which is 4577586 in our case and click Search.
- Select the update that’s applicable for your Windows version and click Add button. When you do that there is one update added to view basket.
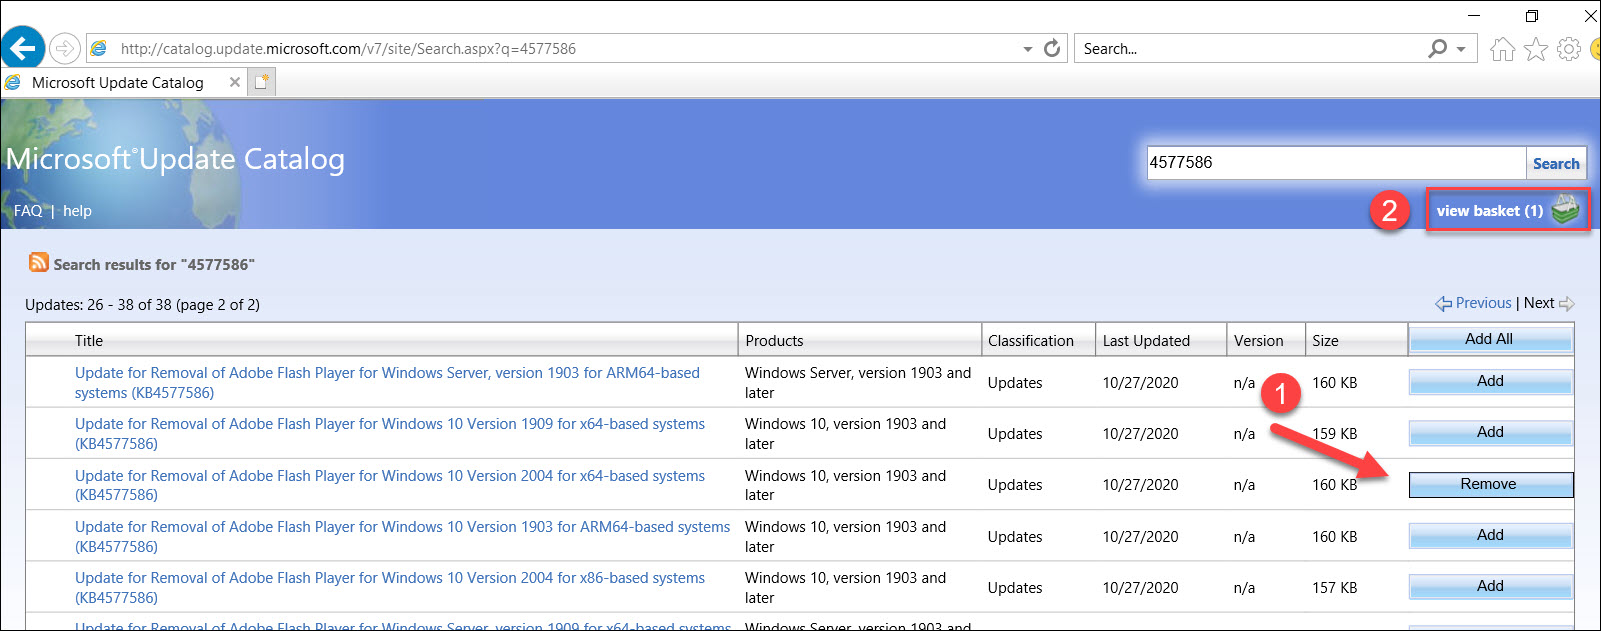
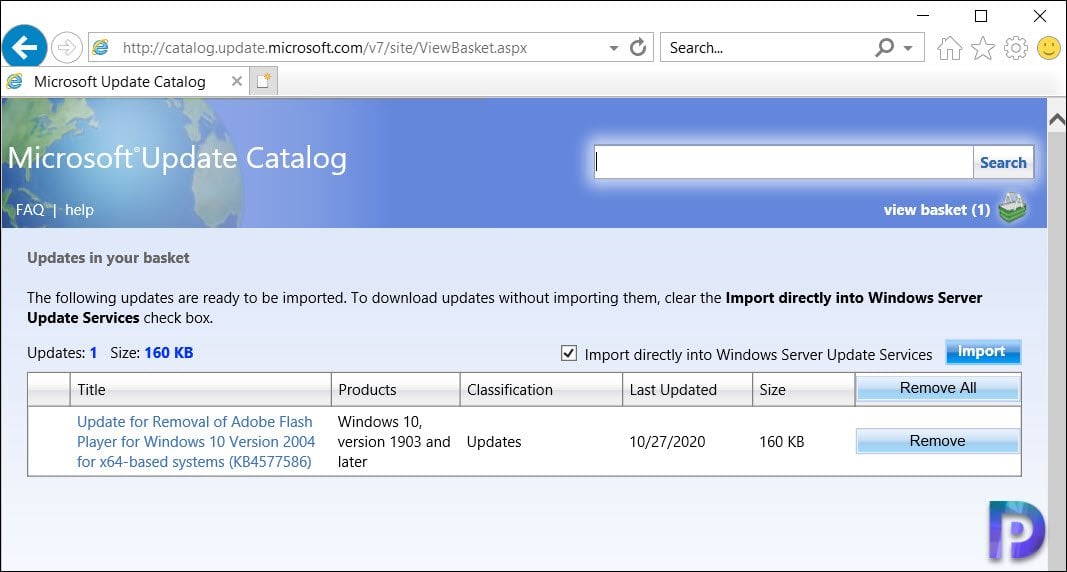
Click View Basket and verify the updates that you have added. Click the Import button.
In the next step, the update should import into WSUS. However I got the below error while downloading the update KB4577586.
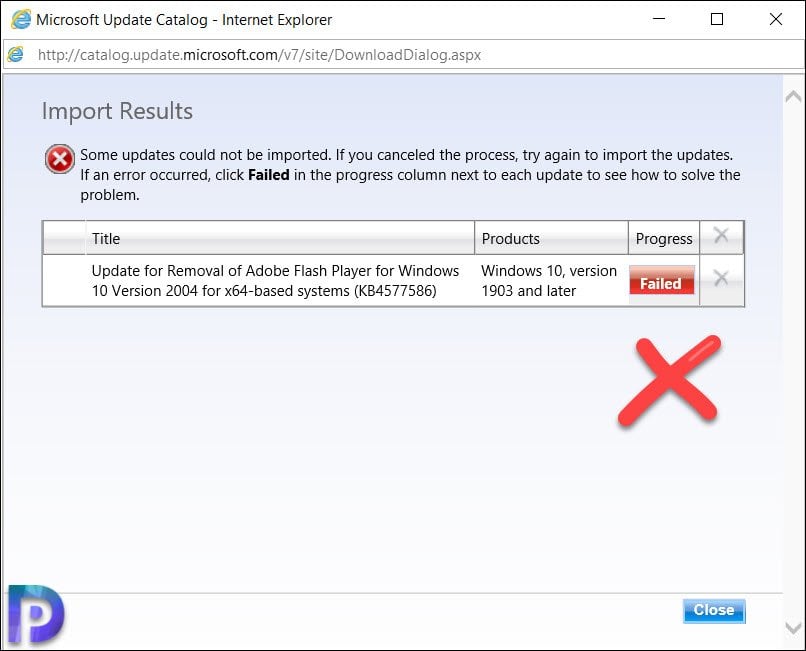
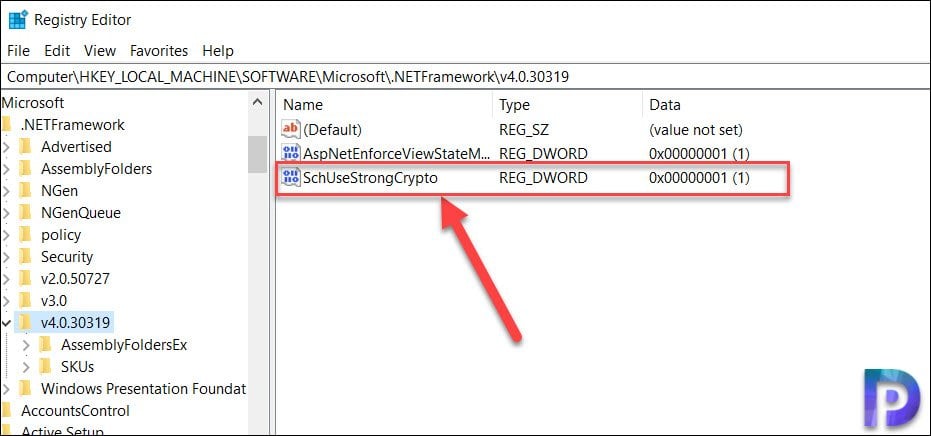
To fix the above error, open the regedit on the server. Navigate to the key – HKEY_LOCAL_MACHINE\SOFTWARE\Microsoft\.NETFramework\v4.0.30319.
Create a new DWORD (32-bit) value. Specify the name as SchUseStrongCrypto and provide the value as 1. Restart the server after you make the changes.
Now import the KB 4577586 update again and this time it should work.
This completes the process of importing KB4577586 into WSUS.
Synchronize the KB4577586 Update in SCCM
Launch the Configuration Manager console and go to Software Library > Software Updates > All Software Updates. On the top ribbon, click Synchronize Software Updates.
Click Yes to initiate site-wide synchronization of software updates.
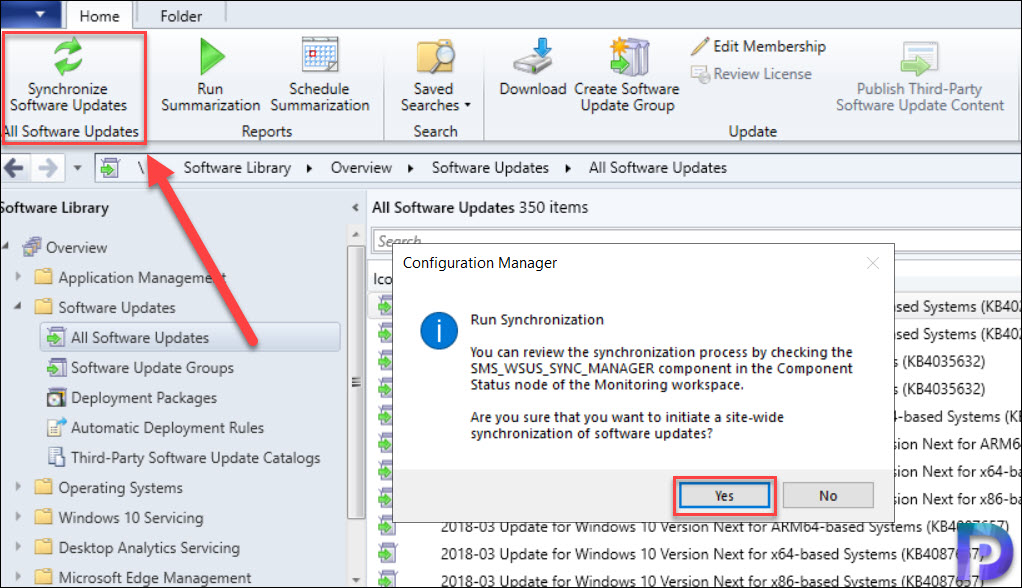
For SUP sync progress, monitor the wsyncmgr.log file.
Download Update for Removal of Adobe Flash Player
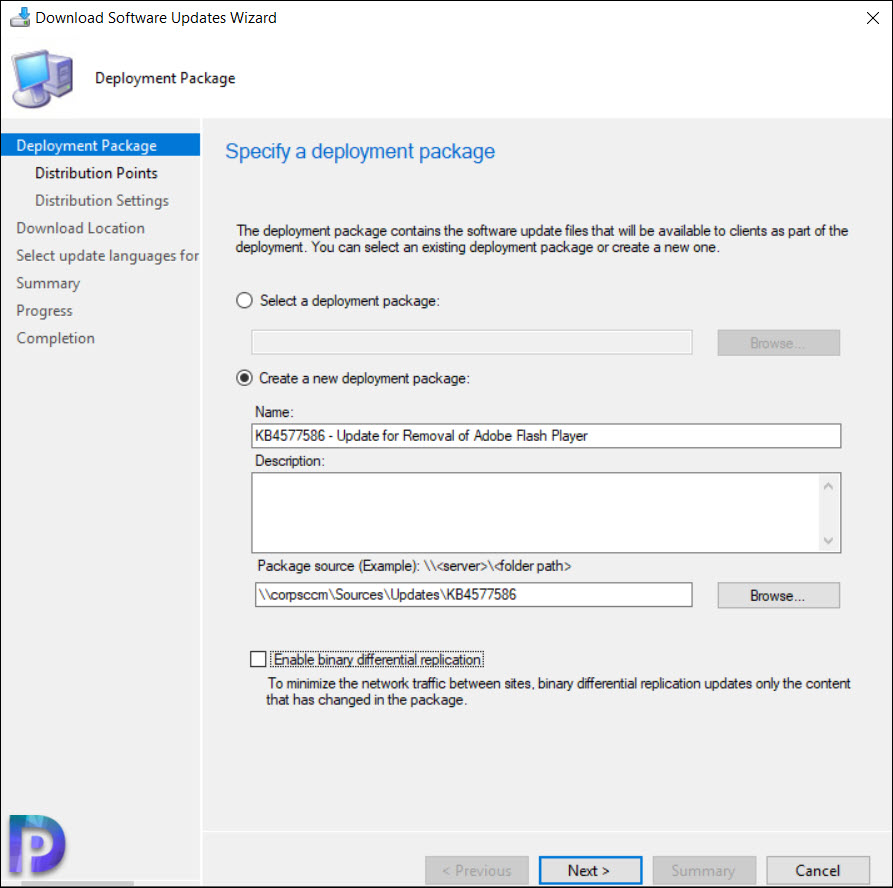
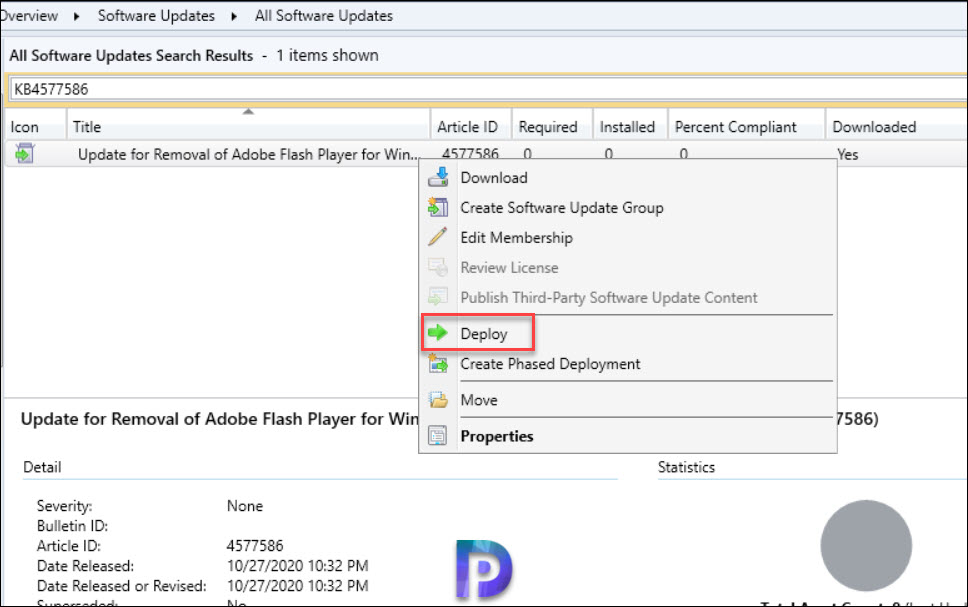
After the SUP sync, the KB4577586 is now available under All Software Updates. Right click Update for Removal of Adobe Flash Player for Windows 10 (KB4577586) and click Download.

Create a new deployment package. Click Next.
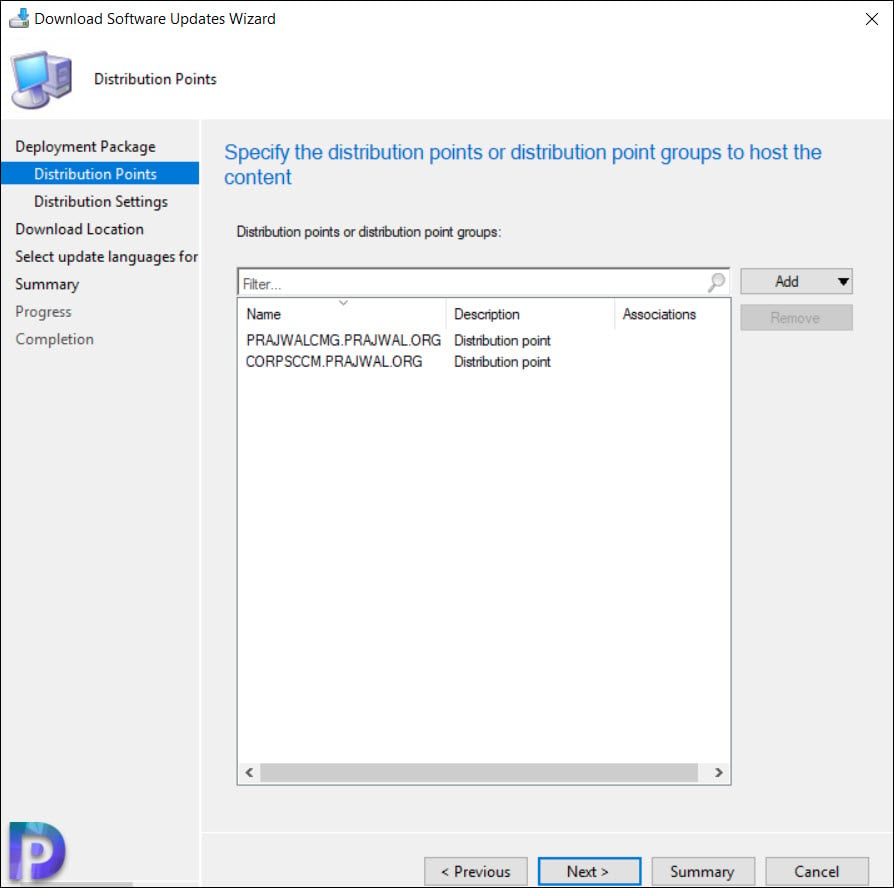
Add your distribution points to host the content. Click Next.
Download the update from internet. Click Next.
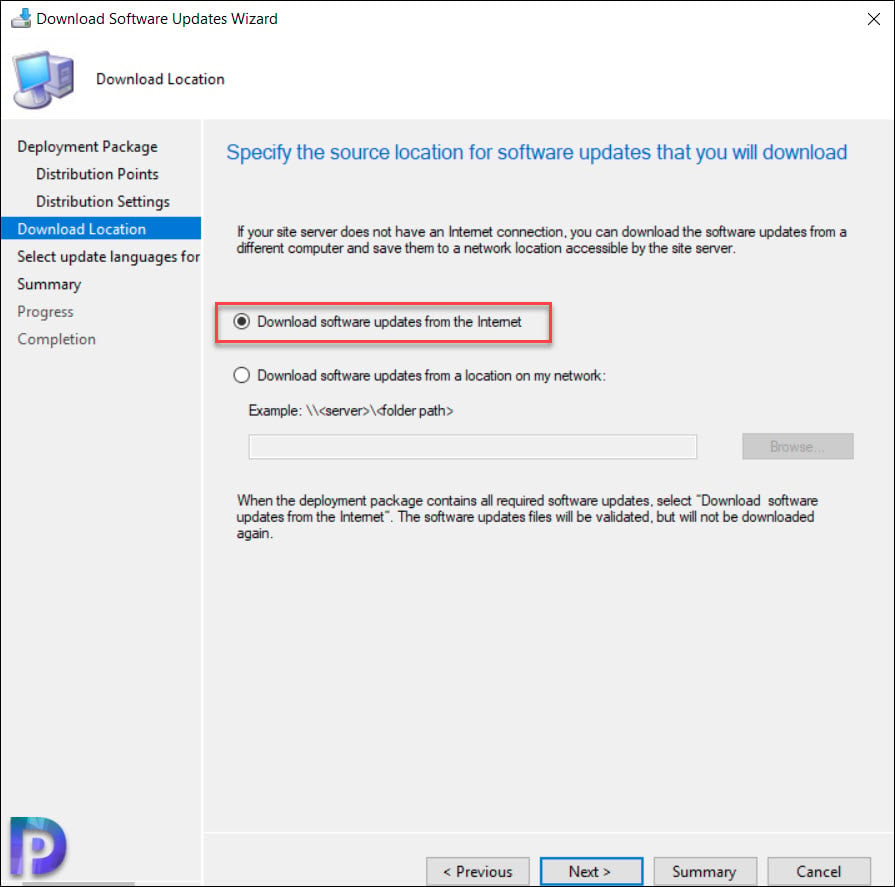
On the remaining pages click Next and on Completion window, click Close.
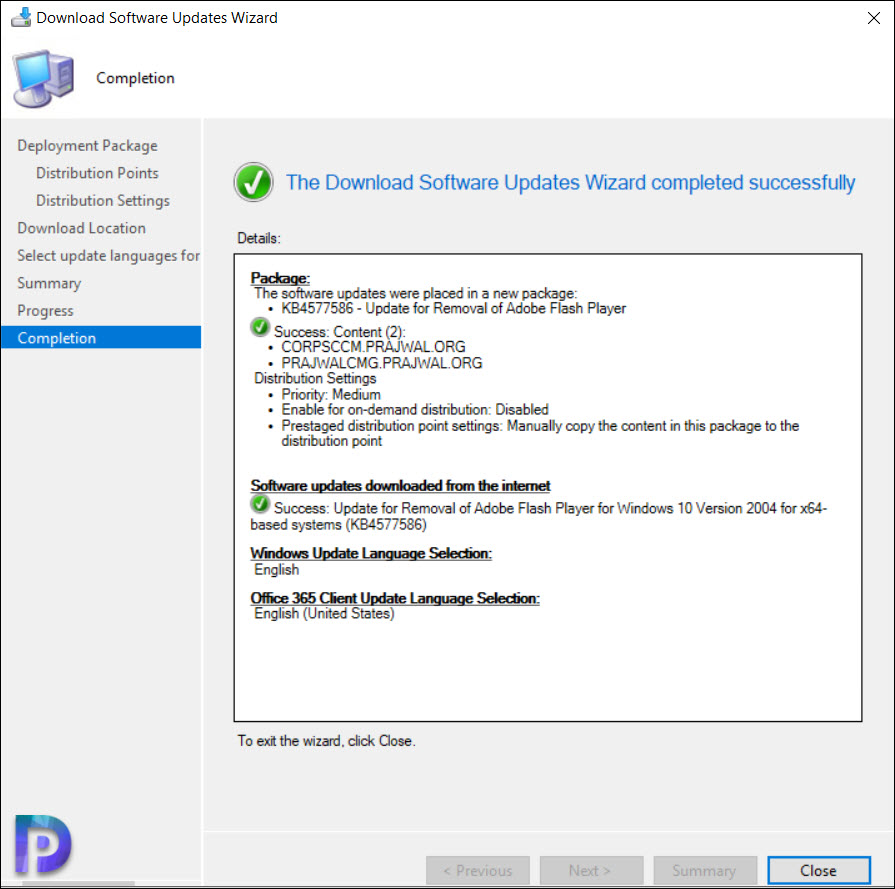
We have successfully downloaded KB4577586. In the next step we will deploy this update to end devices.
Uninstall Adobe Flash Player using SCCM KB4577586
In the SCCM console, right click Update for Removal of Adobe Flash Player for Windows 10 (KB4577586) and click Deploy.
Specify the deployment name and select the target device collection. Click Next.
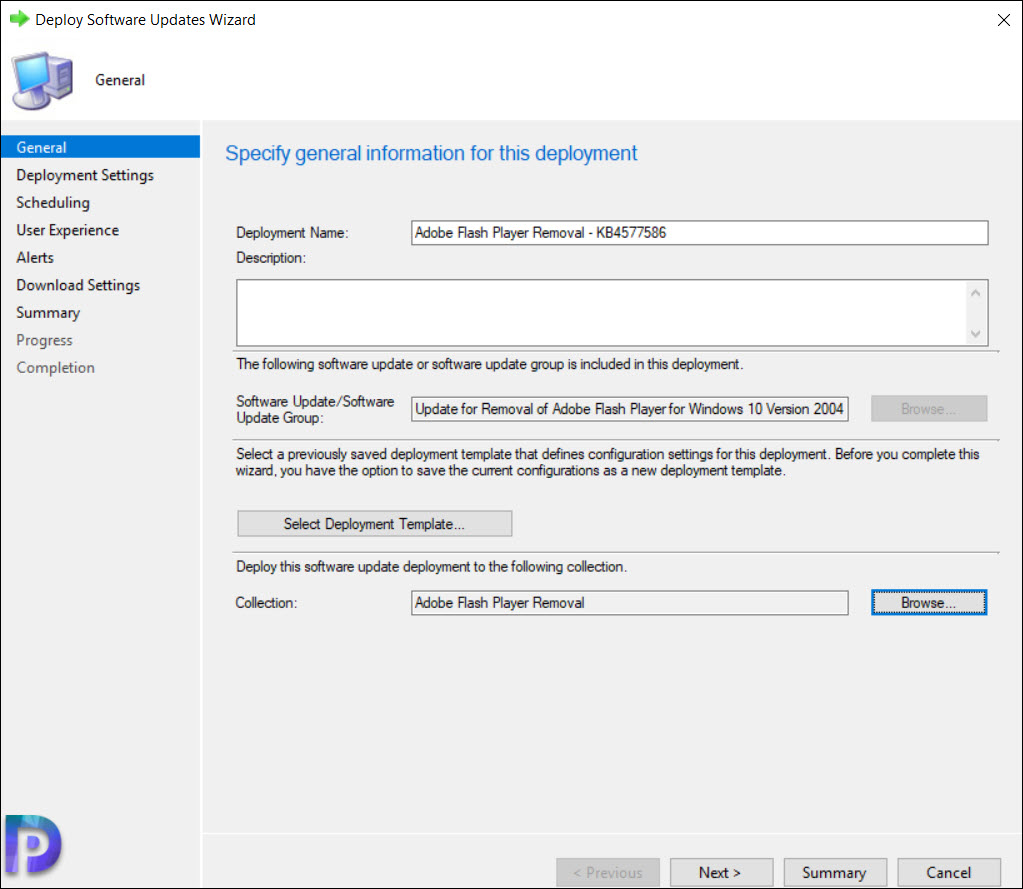
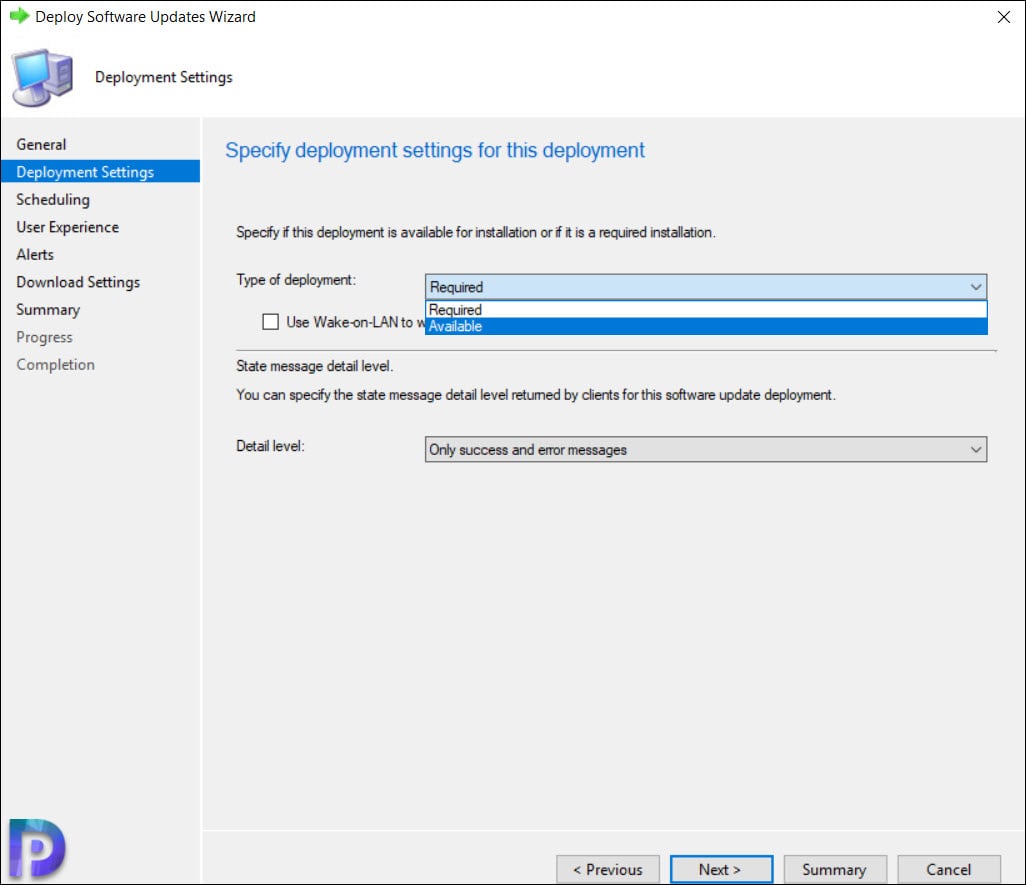
You can make this update available or deploy it as required. Choose this settings based on your requirement. I will be setting the type of deployment as Available. Click Next.
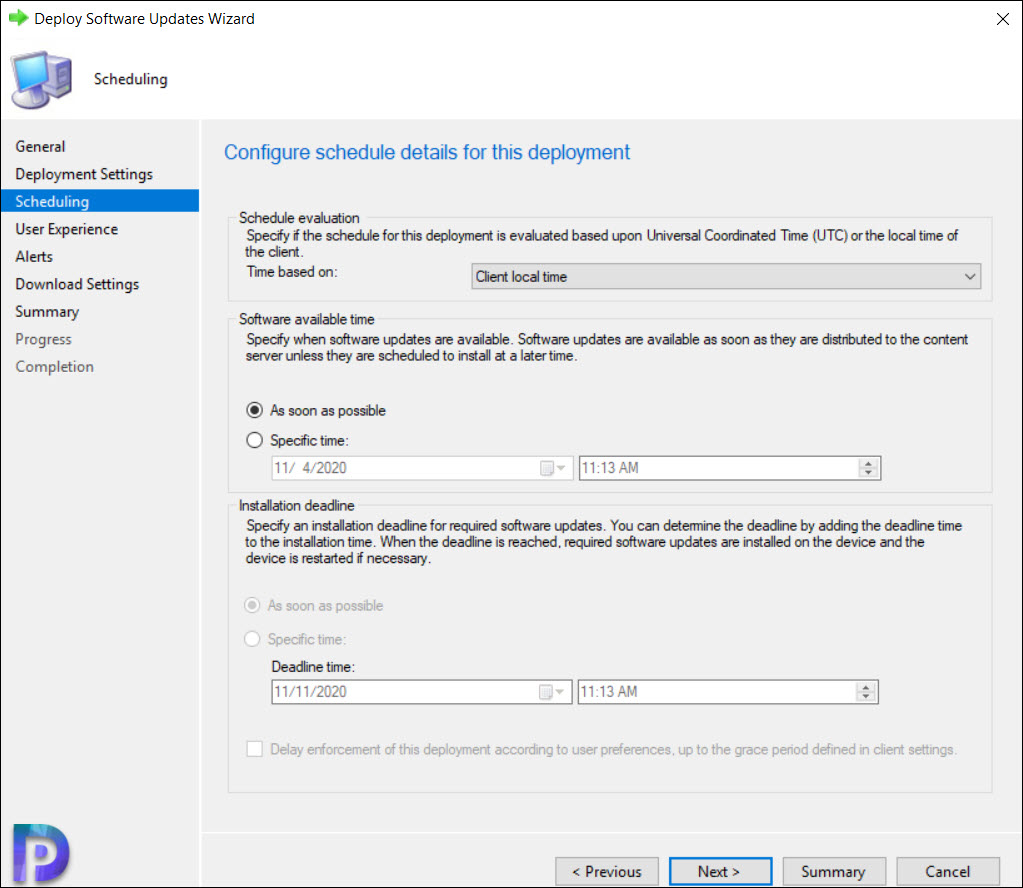
Click Next.
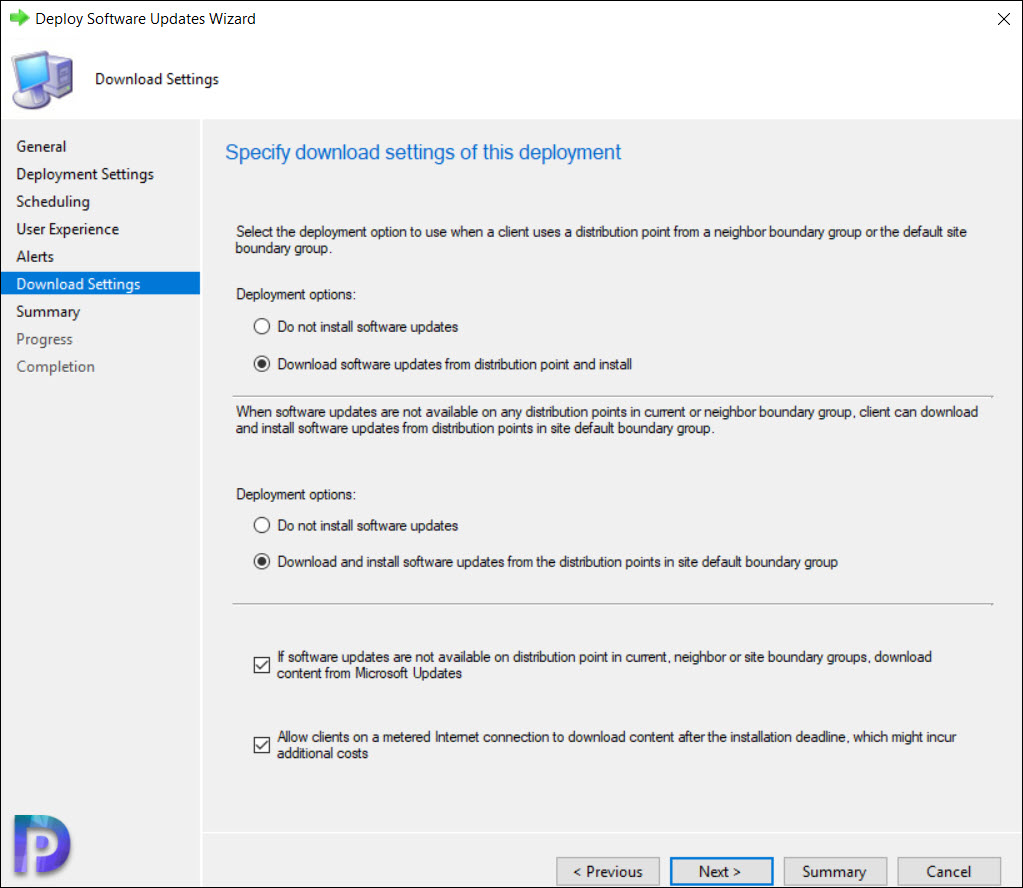
Specify the download settings for the deployment and click Next.
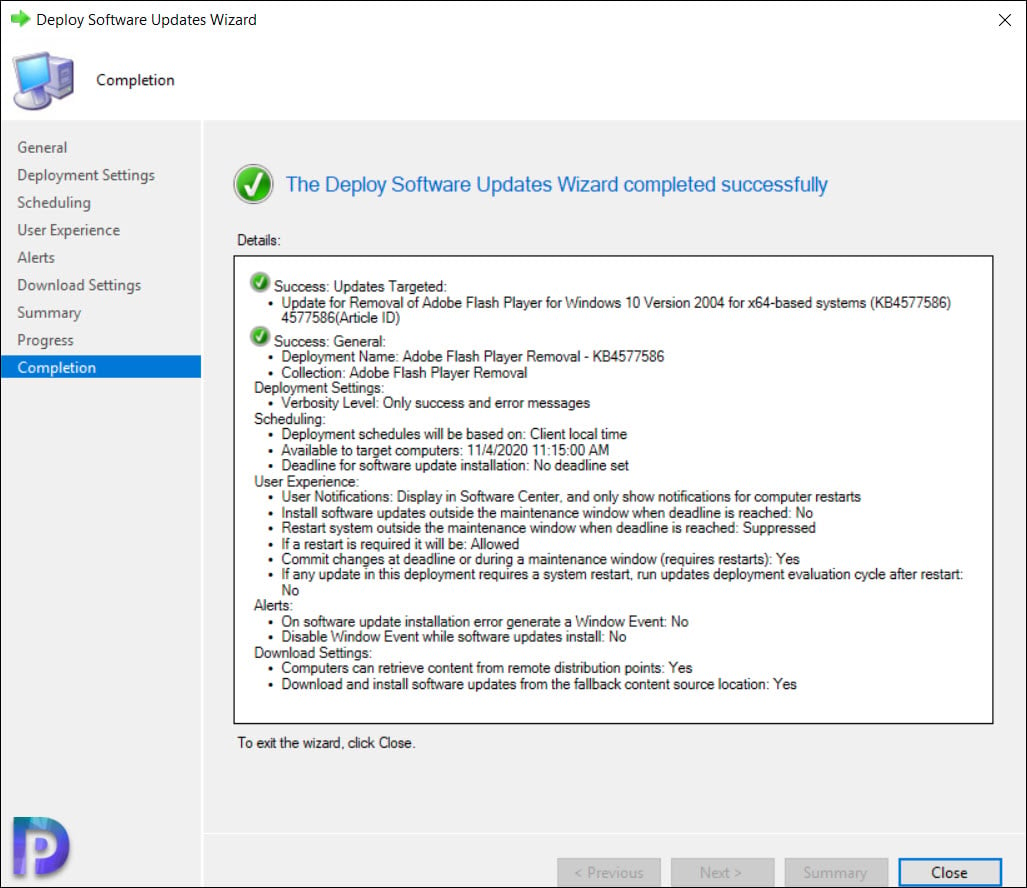
We have successfully deployed the Adobe Flash player removal update. In the next step, let’s install the update on computers.
Confirm the Adobe Flash Player Removal
Since I have deployed the update as Available, the update KB4577586 will be available for installation in software center. On the Windows 10 device, launch Software Center and click Updates tab.
Select the Update for Removal of Adobe Flash Player (KB4577586) and click Install.

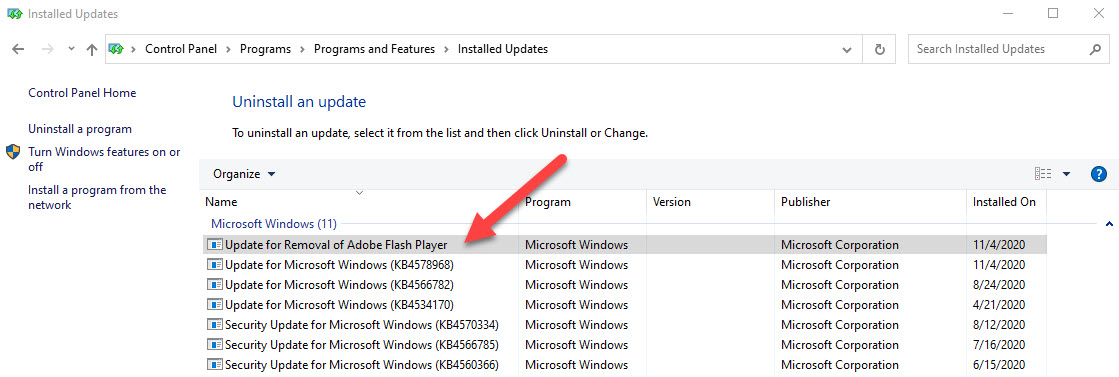
The update instllation is quick and you can confirm the installation by going to Control Panel > Programs and features > Installed Updates. You don’t need to restart your computer after the update installation.
The KB4577586 – Update for Removal of Adobe Flash Player is installed successfully.
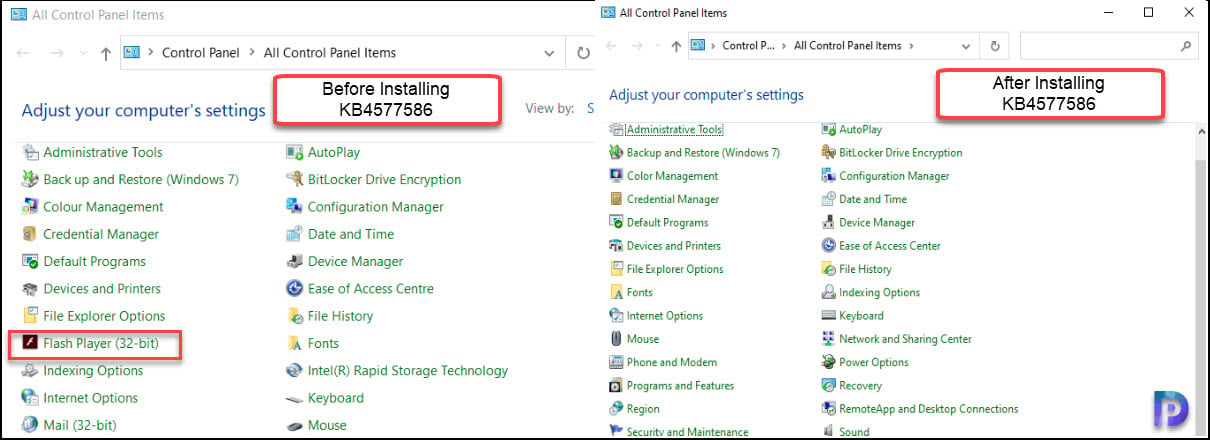
In addition to the above step, you can also confirm the flash player removal by taking a look at control panel items. After installing the KB4577586, the Flash Player (32-bit) item is gone.

Thanks for the registry fix
In the article it is mentioned “This update is currently not available in Windows Server Update Service (WSUS). It will be made available in early 2021.”, so far haven’t seen it yet.
Having said that, when I try to run the update manually on a Windows 10 1909 machine, it returns exit-code -2145124329 which indicates that the update is not applicable. Yet I still see the Flash Control panel and files in c:\windows\system32\macromed\flash and the Flash 32 bit widget in the control panel. (No Flash listed in Programs & Features)
Did something change in 2021 to change the applicability of this update?
When I check https://www.catalog.update.microsoft.com/search.aspx?q=4577586 , I notice that the update had a recent update (Jan. 22nd 2021)
Just a “Head up” !
Your default browser needs to be Internet Explorer : )
I had previously set mine to Edge and the “Add” and View Basket was not available.
Hope that saves someone some time 🙂
Use edge browser as default and open sccm as admin then you will see it
Awesome article, helped me with more than one thing. But now that I have the KB in my SCCM there are no computers showing that the patch is not required anywhere. Is there a way to make it required for my Windows 10 computers?
Hi ! i need kb for win7 but i couldent find the win7 kb version of flash removal Can u help me please.
HI Prajwal,
Good day to you,
I tried to Search for the KB in Software Updates after sync but this KB is not available. Can you assist on this.
HI Prajwal e Robin
Good morning to you,
I also tried to search the knowledge base for software updates after synchronization, but this knowledge base is not available. did Microsoft withdraw it?
Good Morning, did you ensure that the software update point is synchronizing this type of update? I believe it appears as just “update” not security or other.
great post as usual, I’ve just got a query about the browser integration, will installing this KB remove all flash browser plugin bits as well?
No it will not remove the flash player plugins from browser.
Are there ways of disabling it before removing?
I’m not a fan of removing it completely if someone at the company uses it when it can’t be undone.
I haven’t been able to find anything about how to track usage or similar on Google.
Hi Mathias,
Yes, you can simulate the suppression of Flash on workstations to measure the impact.
To do this, you can set a GPO in order to desable Flash on workstation, that’s what i’m currently doing.
Before trying the removal package, I would like to get an idea of the status of Active X Flash installations on my site’s Win 10 PCs: Which are up-to-date, which are behind, which don’t have it. I figure I could use this to track the removals. Tried a query based on KB article number for Microsoft-installed Flash (The QuickFix Engineering/Hotfix ID; 8 KBs apply to Win 10 Flash between 2018 and the present). Ended up with multiple listings for PCs which had various versions installed through the years. Couldn’t figure how to just show the latest version installed for each, so I tried a query based on Software File (%windir%/system32/Macromed/Flash/Flash.ocx). Turns out that file information isn’t currently being captured by my SCCM. Started setting up a Compliance Item/Baseline, then hit the end of my shift. I’m only but so familiar with SCCM, I’m sure there’s an easier way to get a snapshot of MS-installed Active X Flash status. Would anyone out there have suggestions? Thanks.
Hi Prajwal,
I could successfully install the flash player on few machines. But on some machines the KB4577586 is not appearing in software center.
I have that same problem. Adobe Flash Player (32-bit) is no longer in Control Panel>small icons. I do still see Adobe Flash Player in the program & features
Have you installed the Adobe Flash Player manually on the machine ?.