Step by Step Installation Of Lync Server 2013 Standard Edition In Part 1 of this series we saw the installation and configuration of Windows Server 2012, in Part 2 we installed the Lync Prerequisites, In part 3 we saw the installation of Lync Server 2013 standard edition. In this post we will take a look at Lync Control panel, enable Lync access to users.
On the Front End Server FE.PRAJWAL.LOCAL, launch the Lync Control Panel.
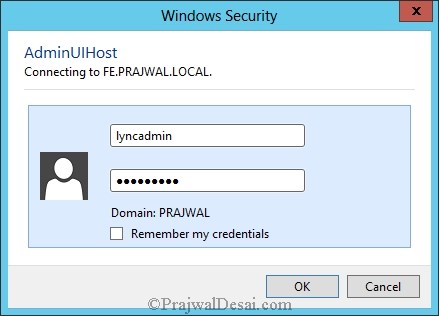
Provide the credentials. We will use Lyncadmin user account to login to Lync Client.
Note : To login to Lync Client the user account must be the member of CSAdministrator Group.
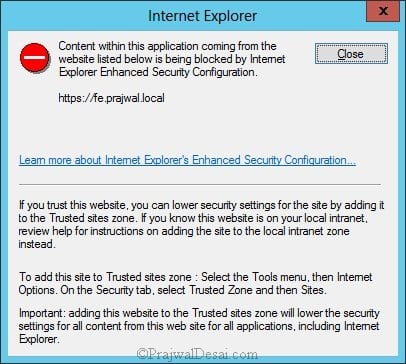
We will turn off the IE ESC to fix this.
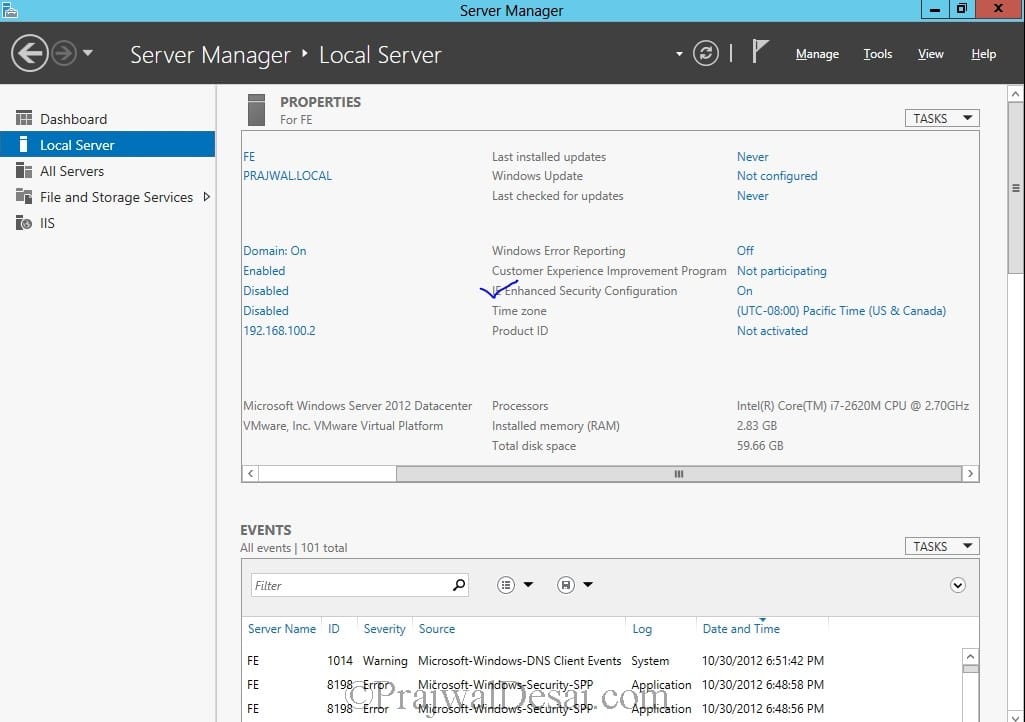
On the Front End Server, Launch the Server Manager, at the left click on Local Server. On the right hand side of the page we see that IE Enhanced Security Configuration is On.
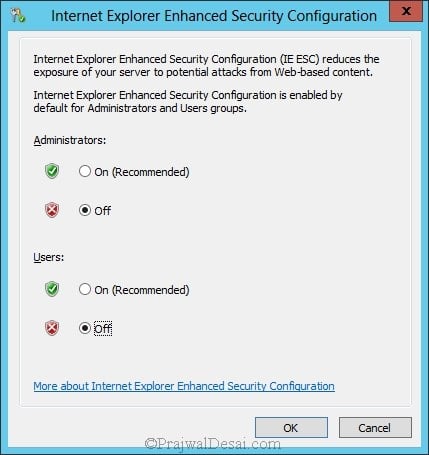
Turn off IE ESC for both users and Administrators. Click OK.
Launch the control panel and login with user account lyncadmin. The control panel looks very similar to that of Lync 2010 control panel.
Under Home, Click on Users. Now click on Enable Users.
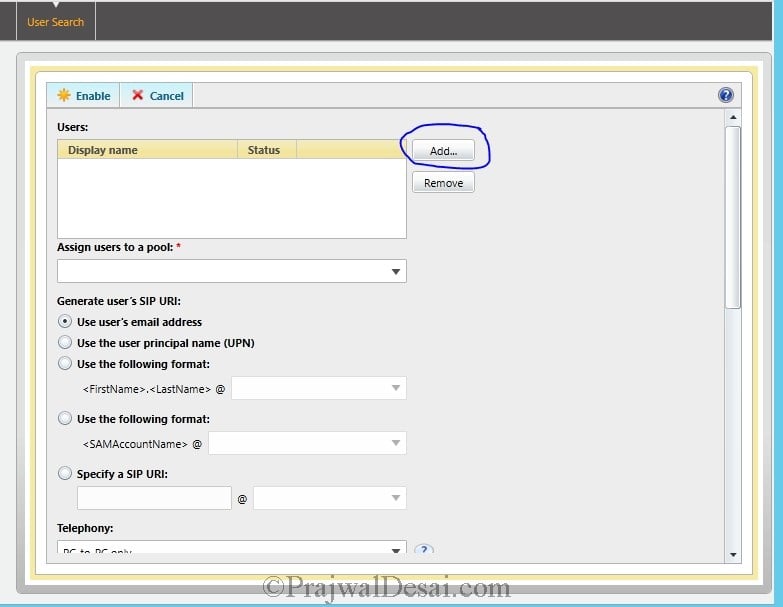
click on Add .
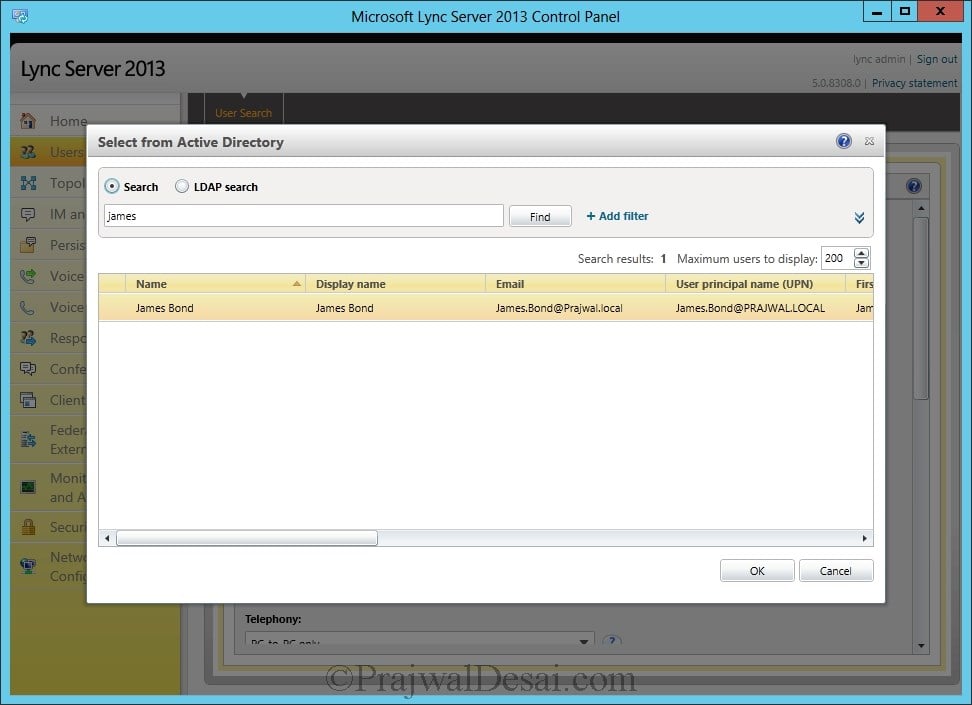
In the text box type the first name of the user for whom Lync is to be enabled. In our case we will enable Lync for user James.Bond@prajwal.local. From the search results select the user. Click OK.
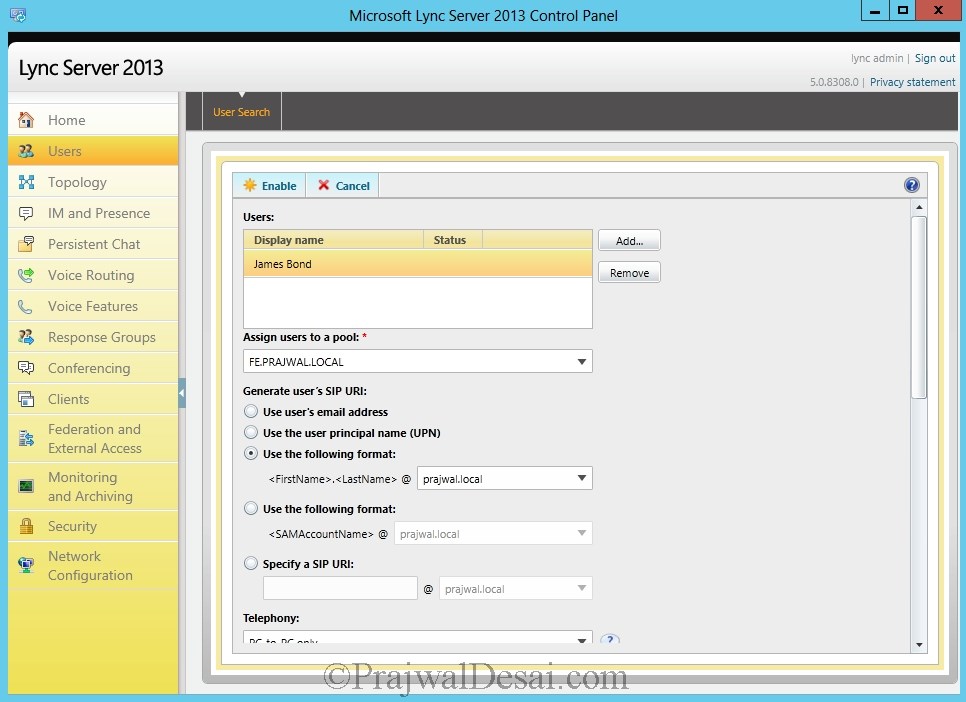
The user that we selected appears under Users panel. We have to assign the user to a Pool. Select Front End Server (FE.PRAJWAL.LOCAL) and choose SIP URI as <firstname>. <lastname>@prajwal.local. Click Enable.
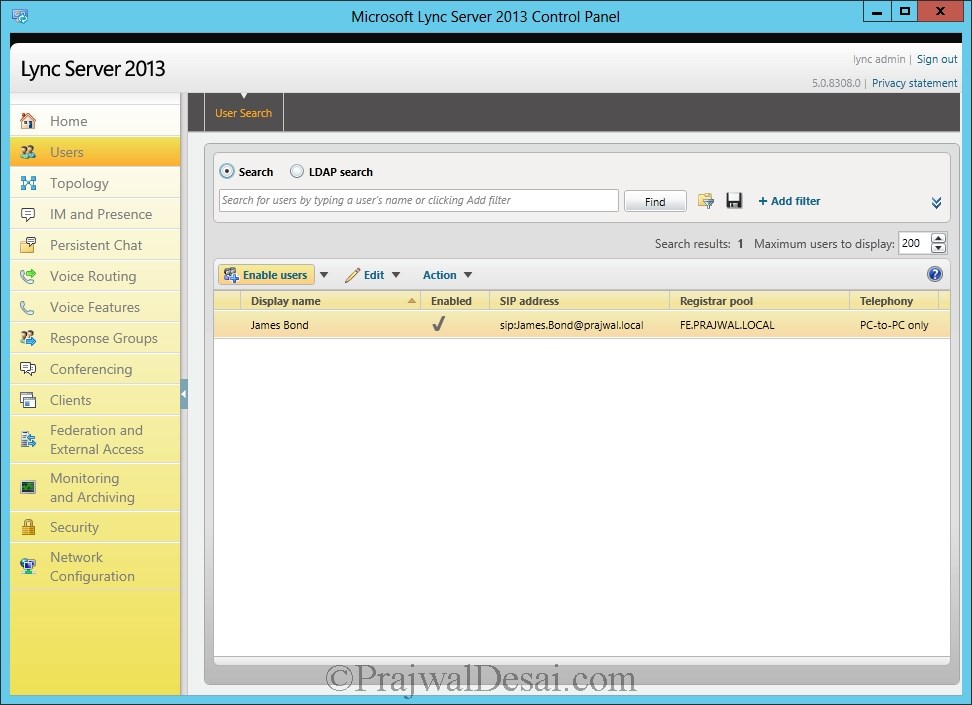
We see the user is now enabled for Lync. Lets try logging in to the Lync client and check.
On the Client machine (CLIENT.PRAJWAL.LOCAL), login with the user James.Bond@prajwal.local. The Lync 2013 client comes with Office 2013 suite. While you install Office 2013 you should
choose customize and select Lync Client for Installation. On the Client machine, launch the Lync Client. Type the sign in address james.bond@prajwal.local and click Sign in.
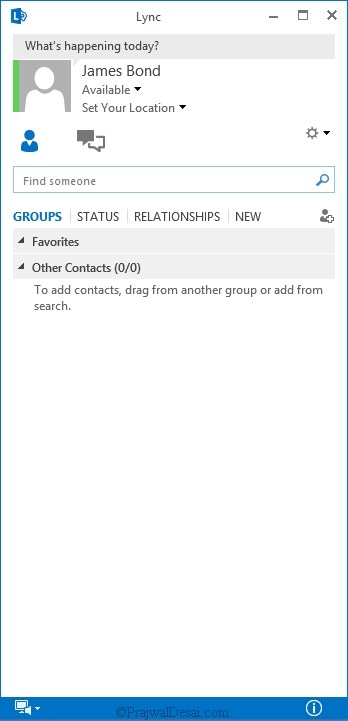
The user is logged in to Lync Client.







Hello and thanks very much for putting these together.
I’m hoping you still check these comments 🙂
I’ve followed the instructions several times in my lab environment and I’m having trouble getting the Lync 2013 client on Windows 10 connect to the Lync server.
The server is behaving as it should — I can use the control panel, powershell, etc. My Win 7 clients connect with no problem.
The Windows 10 clients don’t give me any errors, they just sit trying to connect forever.
Is there a GPO setting or firewall exclusion I need to set?
I added DNS entries for internal clients outlined here
Any other thoughts?
Thanks,
Brian
In the Topology Builder, right click Lync Server and Click Edit properties. What is the admin URL that you have used ?.
Hello Prajwal. Thank you for taking the time to respond. If I launch the Topology Builder I get 3 options which are: 1. New Topology, 2. Open Topology and 3, Download Topology. So looks like its not configured which kind of pairs up with the error I am receiving but I have been over the deploy guide twice and cannot see what I have missed for this situation to be taking place. I assume I chose New Topology – and guidance on what I should do if indeed this is the correct option for me? Thank you.
It’s very difficult to comment as I am not sure if you have configured all steps correctly. Please post the questions in community forums.
OK so I’ll remove the Lync product and re-check the Active Directory results to ensure all appears as the guide explains and then log the fault and advise when done. Thank you. Incidentally, your SCCM step by step is fantastic! I have read a SCCM book and sat through the Train Signal course but have learnt more from your step by step guides than those others put together so thank you.
Why do you want to remove Lync ?. Check the URL’s and see what URL have you specified for admin access.
That’s my problem I don’t have any URL’s configured in the control panel nor when I launch the topology builder, it’s blank asking me to create a new site etc. It’s almost like I have missed a section of your guide because I cannot see anywhere in the guide that informs me when and what URL to enter… Strange.
Have you created any of the URL’s mentioned in this post – https://www.prajwaldesai.com/step-by-step-installation-of-lync-server-2013-standard-edition-part-3-installing-lync-server-2013/
That’s the post I went through twice. All domain and forest checks are confirmed. I have created the 3 dns records but where in the post are you specifying the URL to launch the control panel?
No need of URL, on the start menu do you find Lync Control Panel installed ?. check this screenshot – https://www.prajwaldesai.com/step-by-step-installation-of-lync-server-2013-standard-edition-part-4-lync-control-panel-installing-lync-client/
Yes I do but when I click to open I get this:
@Jason – Have you created topology ?. If yes, when it was published were there any errors. The lync control panel url is the front end server URL, what happens when you open frontendservername in browser ?? I am finding hard to discuss all these via comments.
check this link, I hope this helps you – http://social.technet.microsoft.com/wiki/contents/articles/26976.lync-server-2013-control-panel-issue-where-adminuihost-only-tries-primary-sql-host-cannot-find-appropriate-url-with-diagnosis.aspx
Check this screenshot – https://www.prajwaldesai.com/wp-content/uploads/2012/12/Installation-Of-Lync-Server-2013-Standard-Edition-Part-4-Snap-2.jpg
Hello all. I have done this twice over but get the same error. When I launch the Lync Control Panel I am asked to enter a URL (not covered here?) I Googled and discovered I needed to add. I then get a browser window displayed stating “Navigation to webpage cancelled”. The header on the browser frame reads “Microsoft Lync server 2013 Control Panel”. Can anyone think of what the problem could be? I have checked all domain and forest pre-reqs and they check out. Can’t move forward until I can nail this problem so any help appreciated. Thank you – – great work btw.
Dear Prajwal. great work. u made all this easy for us . Prajwal I want to know how can I map all my organization contacts to everyone’s lync so that they don’t need to add contacts individually by their self.
Dear Prajwal… Excellent work ….i configured ineternally for domain but now lync client users cant find in contact list i mean AD/Domain user …?
could you plz help ?
It would take some time for an user to search other users in Lync. You can type the full email address and get the contacts.
Thank you for the series of blogs Prajwal. I was wondering if you had installation blogs for the back end and proxy servers? Right now with the setup instructions you gave, I can make lync calls between clients that have joined the windows domain but devices like iPads or other phones I am not able to complete the call.
Thank you for an amazing series of blogs Prajwal, I followed all the steps and I am able to make Lync calls between windows domain controlled machines. I need to make calls with mobile devices (phones, tablets) – as they are considered external users, for which I need to add edge and proxy server, can you please point me to a blog that describes that too? Great work here!!!
Any configuration to be completed on the Exchange Server 2013 after completing Lync Server 2013 setup? As of now, I have the Lync client working. There were few issue – like Presence Unknown in outllook – was able to fix. Want to know, if, I can complete Presistent Chat, Edge & Archiving features on the standard edition?
Will FE1 be the Edge Server Deployment? I saw similar post at Justin Gao site that consist of Standard & Edge Server Deployment. Just asking. Take your time. I am in no hurry. Just learning at home.
When can we expect FE1 install notes?
Followed all the labs and completed home lab. Everything is workwing fine. Thanks!
Thanks Ram, I am not sure when I can post FE1 install notes. Currently under very busy schedule I am just making a list of things that needs to be done 🙂
Hi Boss
Now I’ m facing EWS issue in Lync 2013 client
But my login id :123456789
Can u plz give solution
Can you post this question in my forums.
Attach the error screenshot if any.. Also elaborate more on what exactly the issue is..
Lync chatting history cannot saving , please inform the proccess how to get the lync conversation history.
what version of Lync server is installed ?
Hello! This is my first comment here so I just wanted to tell you that I genuinely
enjoy reading your articles.With your post I could complete my POC.. Thanks a ton!|
Great Great Job dear.
Really amazing and impressive.
Regards.
RANA
You made it easy Prajwal…Thanks for sharing Step by Step Installation Of Lync Server 2013.
Awesome bro, you are helping a lot..
Great step by step articles!! I’ve followed and successfully deployed lync frontend server.
Still waiting edge server deployment part. Will you use public IP for edge or private and do NAT? What about DNS records? Do I must to use resolvable domain name?
Agreed, I am yet to post edge server configuration. I have replied to your mail, check your inbox.
Prajwal, can you post an article for Lync Edge Configuration ?
Sure Kelvin, shall do it very soon..
Hey Prajwal,
Any update on posting an raticle for Lync Edge Configuration
Not yet Edward.. Bit tied up with other things.. Will post it soon..
Excellent collection of articles! I second this request.
I do not even know how I ended up here, but I thought this post was good.
I do not know who you are but certainly you’re going to a famous blogger if you are not already 😉 Cheers!
Nice post. I was checking constantly this blog and I’m impressed! Extremely useful information specifically the last part 🙂 I care for such info a lot. I was seeking this particular information for a very long time. Thank you and best of luck.
I really like it when people come together and share opinions.
Great website, stick with it!
Oh my goodness! Amazing article dude! Thanks, However I am going through difficulties with your RSS.
I don’t understand why I can’t join it. Is there anybody else getting similar RSS problems?
Anyone who knows the answer can you kindly respond?
Thanx!!