

Installing Prerequisites on Front End Server In Part 1 We saw the installation of Windows Server 2012, promoting the server to Domain Controller and installation and configuration of Certificate Authority. In this post we will install prerequisites on the Front End Server that must be installed before you deploy Lync Sever 2013 successfully. We will be performing the below steps in the server named FE.PRAJWAL.LOCAL which is the Front End Server and the user account will be LyncAdmin.
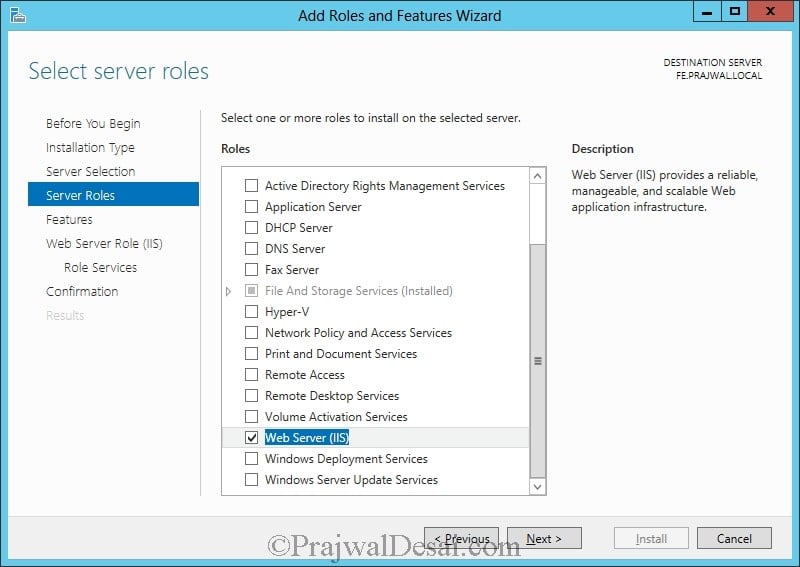
Login to the Front End Server with the user account LyncAdmin. Click on Server Manager, Click Add Roles and Features. Check the role Web Server(IIS). Click Next.

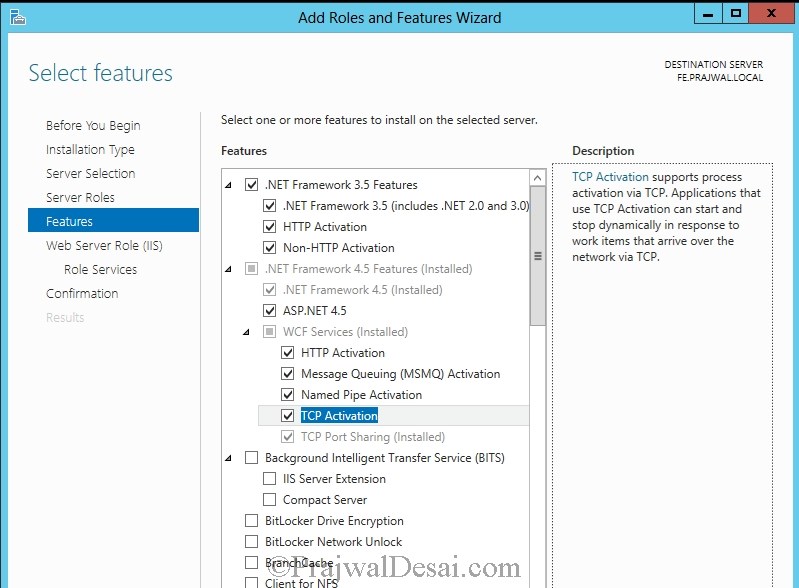
Install the below listed Features.
.Net Framework 3.5 Features – >.Net Framework 3.5, HTTP Activation, Non-HTTP Activation.
.Net Framework 4.5 Features -> .Net Framework 4.5, ASP.NET 4.5
WCF Features ->HTTP Activation, Message Queuing Activation, Named Pipe Activation, TCP Activation, TCP Port Sharing.
User Interfaces and Infrastructure -> Desktop Experience.
Windows Identity Foundation 3.5.
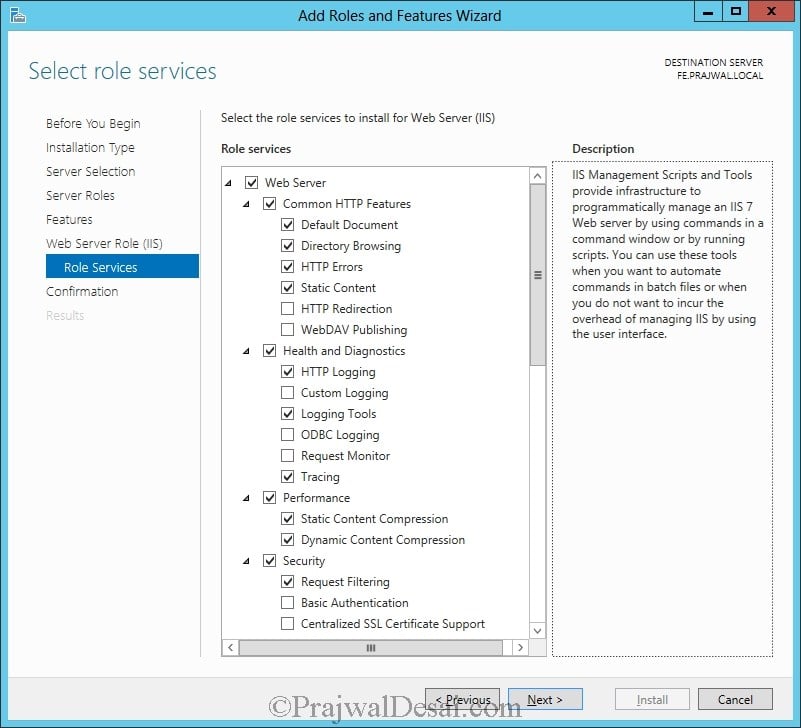
Click Next and Role Services Page install the following.
Common HTTP Features Installed -> Static Content, Default document, HTTP Errors, Directory Browsing.
Health and Diagnostics -> HTTP logging, Logging Tools, Tracing.
Performance -> Static Content Compression, Dynamics Content Compression.
Security -> Request Filtering, Client Cert Mapping Authentication, Windows Authentication
Management Tools -> IIS Management Console, IIS management Scripts and Tools.
Application Development -> ASP.NET 3.5, ASP.NET 4.5, .NET extensibility 3.5, .NET extensibility 4.5, ISAPI extensions.
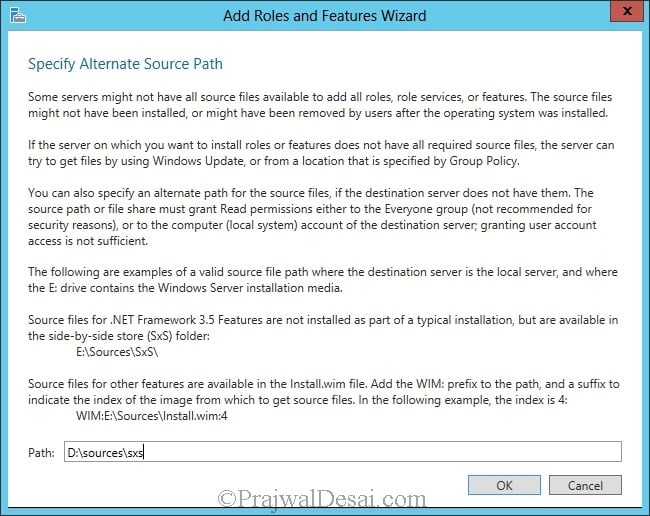
Before you proceed to install we need to specify the alternate source path. At the bottom of the windows, click Specify an Alternate Source Path.
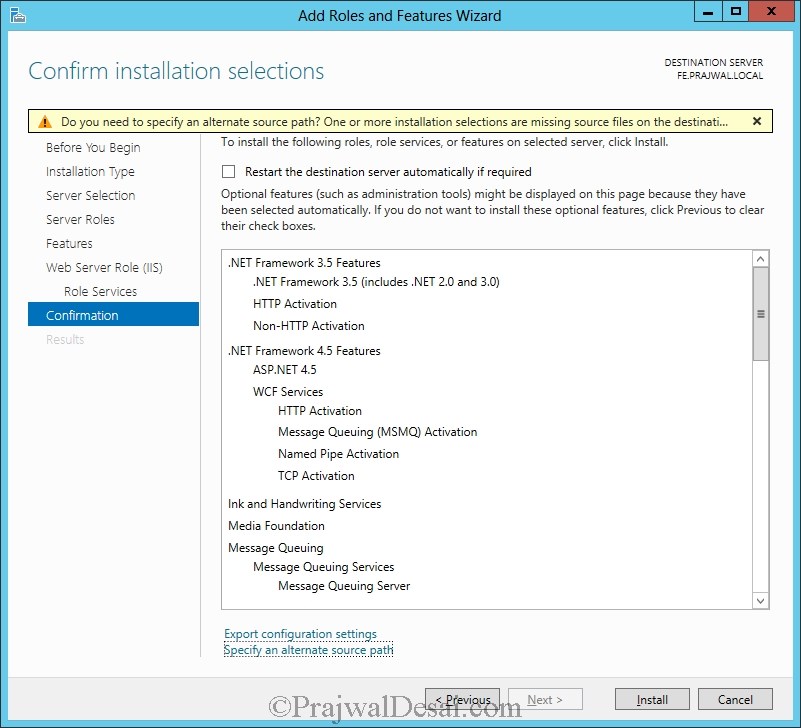
Provide the Alternate Source Path as D:Sourcessxs. If you have copied the source files to a folder or shared folder, provide the relevant path. Click OK.
Note : If you don’t specify the alternate path, the installation of the roles and features selected will fail.
The Server will reboot and you will see all the roles and features that were selected are installed.
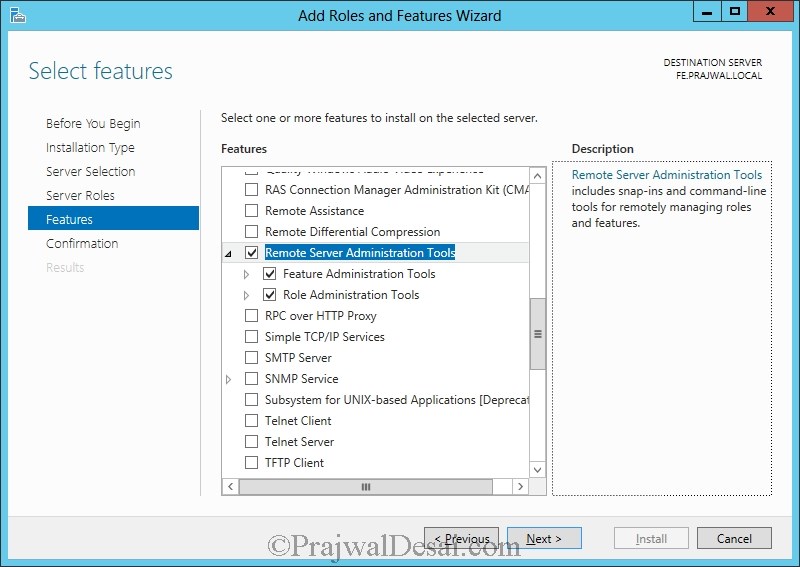
Installing RSAT and Silverlight.
To Install the Remote Server Administration Tools, Click on Server Manager, Add Roles and Features, check Remote Server Administration Tools Feature.
The RSAT Installation is complete. Click Close.

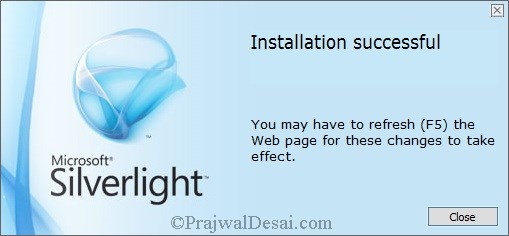
Installing Silverlight.
Download the silverlight from here : http://www.microsoft.com/silverlight. Install the Silverlight.

Press F5 and click on close.

Hi Prajwal,
I am stuck in a new issue in settig up or Remove Lync server Components while deploying Lync. Please look into the issue:
When it executes command: Install-CSDatabase -Confirm:$false -Verbose -LocalDatabases -Report “C:UserslyncadminAppDataLocalTempInstall-CSDatabase-[2015_06_10][15_26_07].html”
I get an error as attached. Please help me out.
Did you check if these two machines are able to communicate ?.
Alternate way – Install the DHCP role on the DC. Power off the VM’s. Open virtual network editor > select the adapter that you have used for VM’s > uncheck the option “Use local DHCP service to distribute IP’s to VM’s”. The second VM should now talk to DHCP to get the IP address.
Thank you for your help Prajwal. It is working for me
Hi Prajwal,
Please figure out what can be issue in my below scenario:
I am preparing a test lab in vmware workstation to install Lync server 2013. Here are my actions till now:
1. Installed a virtual machine(DC00) with windows server 2012 R2 and promoted it to DC. Also, installed DNS server in this machine only. The name of my domain is Anshu.com. Also, I manually entered the IPv4 address to 192.168.10.0
2. Installed another virtual machine(LyncFE00) with windows server 2012 R2 and gave it an IPv4 address 192.168.10.1
3. Now I am not able to join LyncFE00 to domain Anshu.com
In vmware NAT settings for both the machines, I have selected custom:specific virtual network.
As per my troubleshooting, I found that my DNS server service is not getting started becaue it is waiting for ADDS to signal initial synchronisation(4013).
Please help me out if I am missing something.
Thank You
Anshu
If I am correct this remote tool evaluates the fully qualified domain name (FQDN) that was assigned to the certificate. What is the FQDN mentioned in the cert ?
See if this link can help you – http://technet.microsoft.com/en-us/library/gg413010.aspx
Dear Prajwal
Testing remote connectivity to Microsoft Lync server through the Lync Access Edge server mydomain.com on port 5061 to verify user user@mydomain.com can connect remotely.
Specified remote connectivity test(s) to Microsoft Lync server failed. See details below for specific failure reasons.
Additional Details
Elapsed Time: 8745 ms.
Test Steps
Attempting to resolve the host name mydomain.com in DNS.
The host name resolved successfully.
Additional Details
IP addresses returned: 139.1.3.20
Elapsed Time: 165 ms.
Testing TCP port 5061 on host mydomain.com to ensure it’s listening and open.
The port was opened successfully.
Additional Details
Elapsed Time: 1111 ms.
Testing the SSL certificate to make sure it’s valid.
The SSL certificate failed one or more certificate validation checks.
Additional Details
Elapsed Time: 7468 ms.
Test Steps
The Microsoft Connectivity Analyzer is attempting to obtain the SSL certificate from remote server mydomain.com on port 5061.
The Microsoft Connectivity Analyzer successfully obtained the remote SSL certificate.
Additional Details
Remote Certificate Subject: CN=sip.mydomain.com, OU=netlync, O=mgc, L=oman, S=nite, C=OM, Issuer: CN=mydomain-DC-CA, DC=mydomain, DC=com.
Elapsed Time: 7446 ms.
Validating the certificate name.
Certificate name validation failed.
Tell me more about this issue and how to resolve it
Additional Details
Host name mydomain.com doesn’t match any name found on the server certificate CN=sip.mydomain.com, OU=netlync, O=mgc, L=oman, S=nite, C=OM.
Elapsed Time: 0 ms.
Venkat, you will not install anything on domain controller. You can perform Prepare Active Directory step on either domain controller or on Front end server. The account you are using must be member of domain and schema admins. Perform all steps on front end server, do not do it on DC.
When you perform Prepare active directory step it inturn extends the Active Directory schema by adding new classes and attributes that are used by Lync Server.
Hello Prajwal,
Thank you. When I try to install to prepare active directory on FE server then the error comes as “Not available: Active Directory permission must be performed on a domain connected machine”
I am not sure what is that I am missing.
Please note I am trying to install this on cloud network not our local network. I have taken 2 servers from AWS cloud and wanted to install lync on that. so our office in India and UK can connect to the cloud.
Regards
Check if the user account permissions once.. You can attach the screenshots in the comment.
Sure. The attached screenshot is from FE server. Please let me know if this helps.
Also the domain of FE is WORKGROUP and the AD is different. I couldn’t find any documentation on linking these two computers ( as they are two different computers on cloud). If I have to install AD on FE computer then while installing lync it is giving an error as Lync cannot be installed on Domain Controller.
Regards
venkat – you must first join the FE sever to the domain. It should not be in workgroup. First, bring the FE server in same network as AD is and then join it to the domain. You cannot install AD on FE nor FE on AD.
Hello Prajwal,
Thank you. Yes I am looking on how to join those two computers without installing AD. Could you please send me any documentation references for the same?
Regards
If you are doing this in your lab setup check this post for installing a domain controller.
https://www.prajwaldesai.com/step-by-step-installation-of-lync-server-2013-standard-edition-part-1-installation-of-windows-server-2012-and-configuration/
Hello Prajwal,
Sorry no I am doing this cloud network. Hence it is getting difficult for me join two computers without installing AD.
Very sorry to trouble you. Many thanks in advance for your assistance.
Regards
Hello Prajwal,
Hope you are doing well. I have successfully installed Lync server. When I am trying to connect from Lync client it is asking for Internal and External server name. Do you by any chance know how and where I can get them?
Please note I am trying to connect to Lync server from different network.
Regards
Internal server name is the front end server. Have you configured the Edge server ? Ideally it should not ask for internal server / external server if you are connecting lync client internally.
Hello Prajwal,
No I haven’t configured Edge server. When I am trying to connect from local machine which is in our office to Cloud server it says service not available. Then I read few forums that we need to configure internal and external server name.
Do we have to have Edge server to connect Lync server which is in different network?
Regards
Is the client machine able to communicate with front server ? use ping command and check..
Yes when I ping frontend server IP I am getting reply.
Provide internal server name as ip/hostname of front end server. Add the same to external server name and try..
I have just tried that and I got this error ” There was a problem verifying the certificate from the server”
@Venkat – The client machine does not have the root certificate installed. Export the root cert from the CA (installed on Domain controller) and import it to client machine.
You can download the root cert by accessing IPAddress of CA/certsrv and download root cert.
I have added the certificate in client machine and when I am trying to sign in it says “We’re having trouble connecting to the server. if this continues, please contact your system administrator”
@Venkat – Few things you need to check
1) Is the client joined to the domain ?
2) Check the DNS server settings on the client and check if its able to resolve the hostnames.
3) Have you enabled the lync access for the user from lync control panel. Lync server accepts user names with firstname.lastname@domain.com
4) Check whether the lync front end service is started and running on the front end server (check in services.msc). By default the startup mode is Automatic(delayed start), you can change it to Automatic.
Hi Prajwal,
I think it is failing at step 1.
When I am trying domain to add client machine (windows 8) to AD server it says below
The following domain controllers were identified by the query:
adserver.xx.com
However no domain controllers could be contacted.
Common causes of this error include:
– Host (A) or (AAAA) records that map the names of the domain controllers to their IP addresses are missing or contain incorrect addresses.
– Domain controllers registered in DNS are not connected to the network or are not running.
Regards
@venkat – Join the client machine to the domain and then try..
Hi Prajwal,
Yes while joining the client machine I got the above error.
Regards
@Venkat – you need to check the connectivity..I am not not sure what environment are you using and how have you configured the machines. You need to fix this from your end.
Before you go ahead, go through this once :- http://technet.microsoft.com/en-us/library/gg398630.aspx
Venkat – Two things:-
a) Is this Front end server a part of domain and is communicating to DC ?
b) post a screenshot of account permissions that this user account has ?
Dear Prajwal,
Sorry for the dumb question. Is the frontend server a separate server or the same server where AD is installed? If it is separate server do we have to install Active directory again in that new server? I am stuck there…..when I install AD in both ( domain controller and FE server) it is giving error while installing Lync and if I do not install AD then it gives me error while preparing active directory from Lync deployment tool…
Regards
Venkat
@Venkat – Front server must be a dedicated one. You cannot install Front end server on a domain controller. The server on which you run front end services should not be domain controller nor it should run AD DS.
Hello Prajwal,
Thank you for your swift response. it looks like I am getting confused and going no where. Could you please confirm do I have to install
1. Prepare Active Directory
2. Prepare first standard edition server
3. Prepare Topology
All the above 3 tasks in AD server and “Install or update Lync server system” in the front end server? My question is how will FE server know the details of AD server as I couldn’t find any setup between those two servers?
Many thanks in advance.
Regards
Dear Prajwal,
Can you please tell me that where is the source file is located??
regards,
Rehan
Source files should be located in your Source DVD(.iso) \Sources\sxs.