SCCM 2012 R2 SP1 Upgrade Guide In this post you learn how to upgrade an existing ConfigMgr 2012 R2 environment to ConfigMgr 2012 R2 SP1. If you are looking for SCCM 2012 R2 SP1 Upgrade guide then this post will help you. In my previous posts we have seen installing the cumulative update for SCCM. In the mid of May Microsoft announced System Center 2012 R2 Configuration Manager SP1 and System Center 2012 Configuration Manager SP2 which are available for download on Microsoft Evaluation Center. These service packs deliver full compatibility with existing features for Windows 10 deployment, upgrade, and management. Not only this, these service packs include new hybrid features for customers using System Center Configuration Manager integrated with Microsoft Intune to manage devices. Before you upgrade your configuration manager environment check the full list of features on this Technet Article to figure it out.
When the service packs were released there was a bit of confusion regarding which service pack to be installed in what order. The important thing is to understand the upgrade process by identifying your current version and the desired final version. Here is few points that could help you.
- If you’re running SCCM 2012 SP1 (non-R2) the upgrade process will bring your site to SCCM 2012 SP2.
- If you want to upgrade to SCCM 2012 R2 SP1 afterward, you’ll need to run another executable which will enable the R2 features.
- If you’re already running SCCM 2012 R2, the update process will bring your site to SCCM R2 SP1.
To make it easy I have created a table that could help you decide which Service Pack to install. I hope it helps you.
| Current Version | Desired Version | SP2 Required | R2 SP1 Required |
|---|---|---|---|
| SCCM 2012 SP1 | SCCM 2012 SP2 | YES | NO |
| SCCM 2012 SP1 | SCCM 2012 R2 SP1 | YES | YES |
| SCCM 2012 R2 | SCCM 2012 R2 SP1 | YES | NO |
| FRESH INSTALL | SCCM 2012 SP2 | YES | NO |
| FRESH INSTALL | SCCM 2012 R2 SP1 | YES | YES |
Before you Upgrade to SP1
- Run the System Center 2012 R2 Configuration Manager SP1 installation at the top-tier site of a hierarchy. You run this upgrade only once at the top-tier site of your hierarchy. This action then enables System Center 2012 R2 Configuration Manager SP1 features to each site in the hierarchy.
- Before beginning the upgrade, make sure you have a backup of your ConfigMgr 2012 R2 server.
- To run setup for the upgrade, your account must have local administrator permission to the server.
SCCM 2012 R2 SP1 Upgrade Guide
Download the service pack from here. The below screenshot should help you to download the correct file.
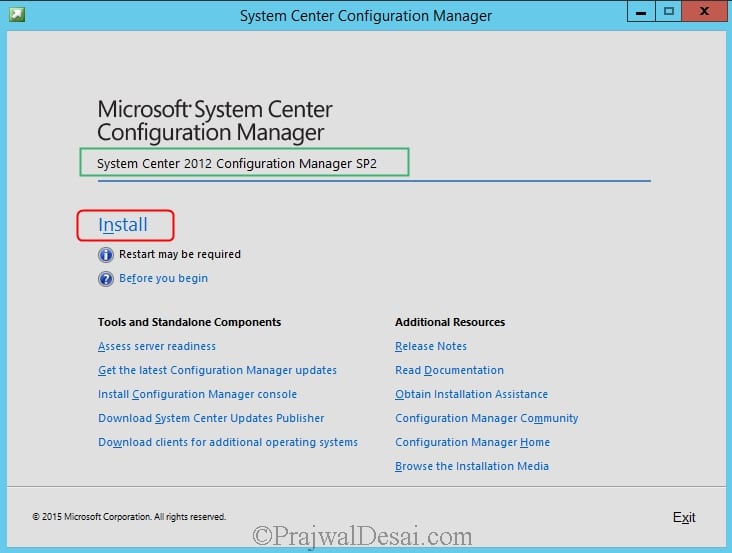
In my case, the site is already R2 so we extract the SC2012_SP2_Configmgr_SCEP to a folder and execute Splash.hta. On the main page click on Install.
Upgrade this Configuration Manager site is selected by default. Click Next.
Click I accept the license terms for MS SQL 2012 Express, MS SQL 2012 Native client and Silverlight 5. Click Next.
Download required files – Select this option to download the prerequisite files.
Use previously downloaded files – If you have already the prerequisite files downloaded with you, choose the path where the files are stored.
Click Next.
Wait for the Prerequisite check to complete, once its complete click Begin Install.
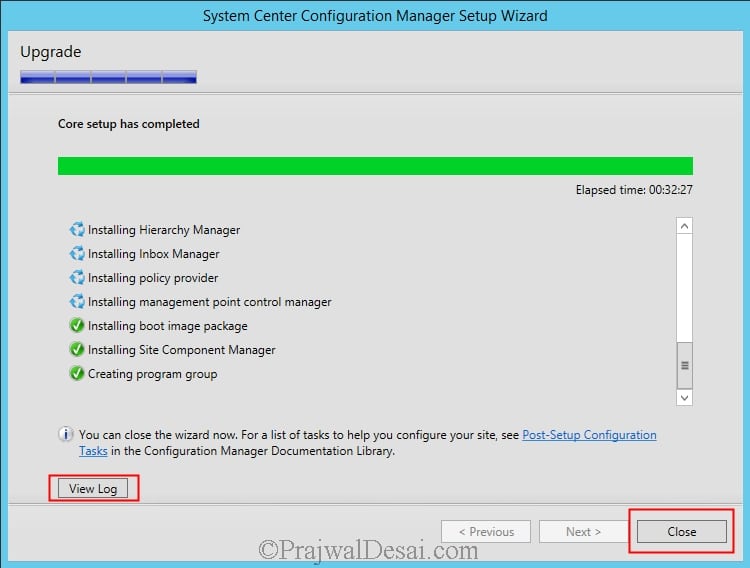
You could view the upgrade process by clicking on View Log, once the upgrade process is complete click Close.
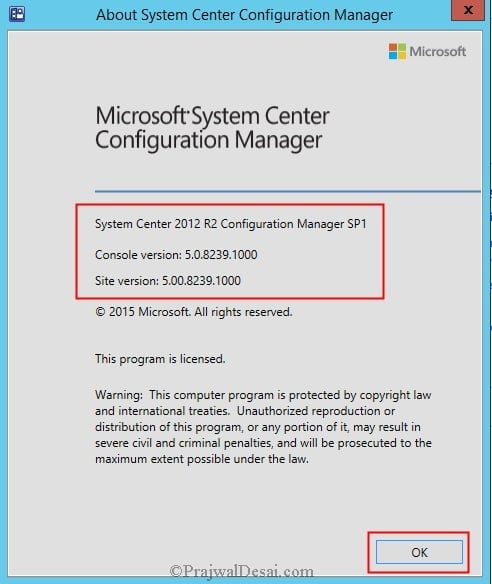
Open the Configuration Manager Console and click on the upper left corner on the blue arrow and click About Configuration Manager. You can see that the Console has been upgraded to SP1. The console version is 5.0.8239.1000 and site version is 5.00.8239.1000.
Upgrading the Clients
Once your site is upgraded to SP1, you need to upgrade the clients to SP1. Upgrading the clients can be done using various ways.
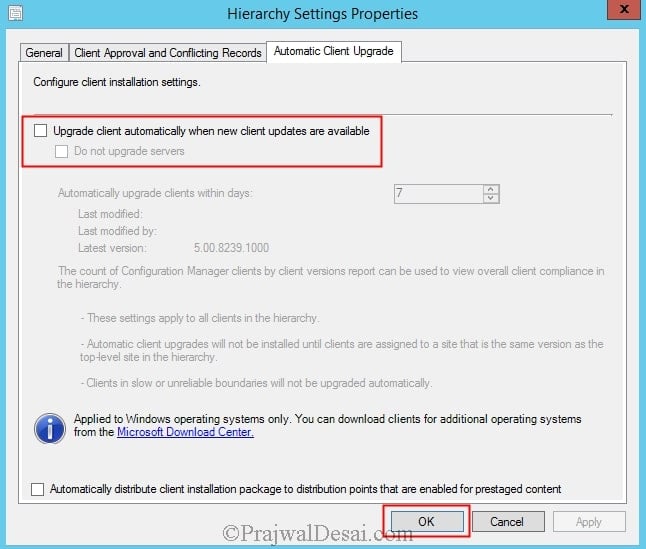
- Automatic Client Upgrade – When you enable the Automatic client upgrade, your client will be upgraded automatically within number of days that you specify. To do this click on Administration > Site Configuration > Sites. Click on the Hierarchy Settings button on the top ribbon. Click Upgrade client automatically when new client updates are available Select the desired number of days you want your upgrade to be run and click OK. A schedule task will be created on the clients and run within the specified number of days.
2) Creating Collection and Using Client Push – You could create a collection to group the clients that need an upgrade and then using client push method you can upgrade the clients. To create a collection right click Device Collection > Create Device Collection. Provide name to the collection and choose limiting collection and click Next.
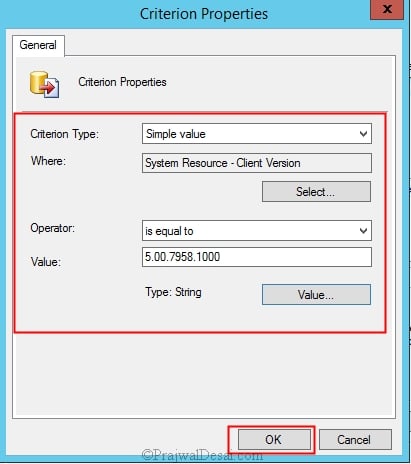
In the next page add a query rule > Provide a name to the query and click Edit Query Statement. Add criteria and Select Attribute Class as System Resource, Attribute as Client Version, Value = 5.00.7958.1000 and click OK.
You could use the below query to create a collection to group non R2 SP1 client agents.
select * from SMS_R_System where SMS_R_System.ClientVersion = "5.00.7958.1000"
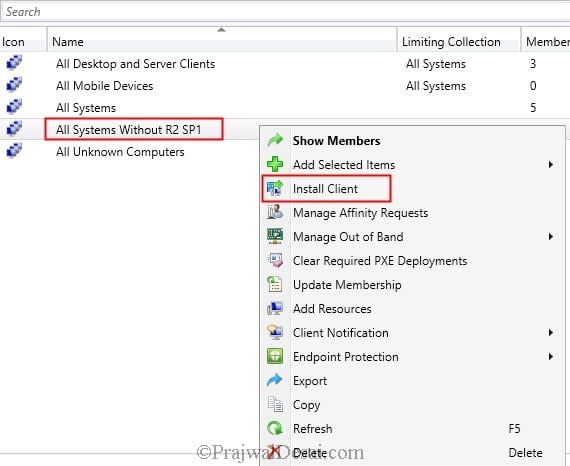
Once the collection is ready, right click on the collection and click Install Client. Complete the remaining steps of push installation wizard. After sometime the client agents are upgraded.
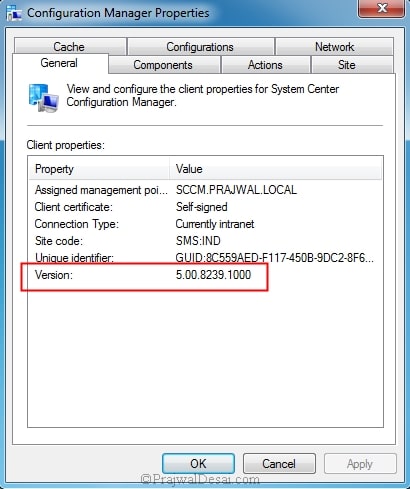
To check the client version, open the control panel > Configuration Manager > General and check the Version. It should show as 5.00.8239.1000.
If you have any questions you could write in the comments.









Good day Mr. Prajwal Desai,
For some unavoidable situation we had to reinstall our SCCM 2012 R2 SP1 from scratch but can’t find our previously downloaded (years ago) copy of CU1 (CM12_SP2R2SP1CU1-KB3074857-X64-ENU.exe) and we are having some issues with Windows 10 clients not reporting needing newly released updates and have been told that the CU1 fixes those issues. I’ve tryed searching for it at Microsoft but it seems that is not available anymore.
Is there any other way to get that cumulative update hotfix?
Thank you for your help and advise
Best regards,
Humberto Lopez
There is no way to download the old hotfixes as the links are expired now. Moreover SCCM 2012 R2 SP1 isn’t supported anymore so it is not possible to get the hotfix links.
When we are trying to install SCCM client in windows server 2016 we are getting the below error.
File ‘C:\Windows\ccmsetup\WindowsUpdateAgent30-x64.exe’ returned failure exit code 775. Fail the installation.
InstallFromManifest failed 0x80070307
CcmSetup failed with error code 0x80070307
What is the SCCM version ?.
Hi Praiwal. Do you have a guide for SCCM 2012 R2 SP1 (1403) to the latest 1902? I know we are far behind, which is why finding a guide for this almost impossible. I finally have approval for upgrading SCCM to the latest version.
A path would be nice, if there’s no direct guide. Like from our current version, which is the next highest we can go, and and same question for that version as well – and so on until we get to 1902.
Thanks.
Hello Prajwal Desai
Having a few issues deploying SCCM client to windows 10
It works for windows 7 when deploying it to windows 10 it doesn’t work.
My sccm 2012 SP1 version 5.0.7804.1600
Hi Prajwal, my site is already installed with R2 so i went ahead with the setup as you said and also on the view log i could see the configuration manager completed…. Then i restarted the server and then i didn’t find the shortcuts created for Config Mgr Console so i went to the c drive SCCM Folder and clicked it and it threw error and didn’t open up… i have currently revert the snapshot i had but i am confused as to why this happened…
Also note on the pre requisite screen of installation there were 2 warnings
1. Verify site permission to publish to Active Directory
2. SQL Server process memory allocation
Hi Prajwal. I have a problem.
I upgraded my principal site and my secundary sites from R2 to R2 SP1, without problem. But I don´t upgrade my clients, because the options of Automatic Client Upgrade tab are disabled.
I try with option “Install Client” from Device Colletion, but nothing.
Could you help me please?
https://uploads.disquscdn.com/images/6d1d5f3ec6d869bfdb16375d7d1676efcff40be8cb466772106c34295d255c7f.jpg
Log in with the account that installed the primary site server. In the Administration workspace, select Security, Administrative Users and open the properties for the ConfigMgr Administrators group. Click Add, Security Scope and select All Security Scopes.Click OK and all users in the ConfigMgr Administrator groups are now capable of enabling the Automatic Client Approval feature.
I am currently on Version 5.00.8239.1000 which is SCCM R2 SP1. I want to upgrade to 1511 but cannot get the files needed for this upgrade. How can get this upgraded?
You can perform an inplace upgrade to 1511. check this post – https://www.prajwaldesai.com/in-place-upgrade-to-configuration-manager-1511/
Prajwal Desai, is it possible to upgrade from SCCM 2012 r2 (5.00.7958.1000) straight to SCCM SCCM 1511
Yes, read this post – https://www.prajwaldesai.com/in-place-upgrade-to-configuration-manager-1511/
i’m planning to upgrade SCCM 2012 R2 to SCCM 2012 R2 SP1. I have started the installation and ended up with the following error. Can you please help me on this
Not a major error though. Try downloading the prereq again and save it to a different folder (not the one you used for first time).
I have SCCM 2012 R2 SP1 installed (I believe). My Console and Primary Site show as v5.00.8239.1000, which should be R2 SP1. Trying to run Splash.hta from SC2012_SP2_Configmgr_SCEP.exe and getting errors such as “Script Error” The Filename, Directory name, or volume label syntax is incorrect. Does anyone know where I have gone wrong, or what this error to pointing to?? I can acknowledge the error and i get Path Not Found error next pointing to the location of the Spash.hta file. The final & fatal error is File cannot be found pointing to the AutoRun.hta in SMSSETUPBinx640000409autorun.hta.
Guidance would be greatly appreciated.
I am upgrading SCCM 2012 SP1 CU5 to SCCM 2012 R2 SP1 CU2. Is it possible to upgrade the SCCM Client agent on workstations using any SCCM Client Patch, as it is not created by default after the upgrade. When I created it manually and tried the deployments for hotfix KB3100144, it throws an error code 1642 that related product is not installed. When I tried client Install for one machine, it successfully upgraded the client version.
Is there any other method for upgrading the client agent instead of FULL client upgrade like using patch (.msp)..
@Ritesh – you can use Automatic Client Upgrade feature. When you enable the Automatic client upgrade, your client will be upgraded automatically within number of days that you specify. To do this click on Administration > Site Configuration > Sites. Click on the Hierarchy Settings button on the top ribbon. Click Upgrade client automatically when new client updates are available Select the desired number of days you want your upgrade to be run and click OK. A schedule task will be created on the clients and run within the specified number of days.
So, means it is not possible to update the client agent using SCCM R2 SP1 CU2 hotfix and we have to push full client agent. I have another query about “Automatic Client Upgrade feature” does it use full client installation (uninstalling old version & install new version) or any particular patch it deploys on the client systems.
Thanks for the suggestion, however I have one query about the feature “Automatic Client Upgrade feature” does it perform full client deployment (remove old version & install new version) or it performs the patch deployment for the upgrade. In case of patch, which patch needs to be deployed?
Have you foud an answer to your first problem? I have to same issue right now …
When I use “Upgrade client automatically when new client updates are available” will it restart my server or workstation. Will it create load on my SCCM server as yotal no of clinets are more than 25K
No it won’t. Since you have got huge number of client machines, i would recommend you to test the upgrade on some test collection and then enable the upgrade for whole site.
Hi friend, in first place, Congratulations for your web, is amazing and help me everyday. I have a question. in my organization, we have installed SCCM 2012 SP1 with a CAS and two primary sites. the boss wants that uninstall the actual infrastructure, and leave only one server that have the roles CAS, Primary Site, Distribution point, Sofware update point, etc… and another server with SQL database Only.
We have 3 servers with 3 SQL server with databases., i need uninstall every servers and instances. What do you recommend? uninstall first the sql and after the sccm roles? i only leave the CAS server, but i uninstall sql, sccm. and wsus and reinstall wsus and sccm 2012 r2 sp1
i am installing SC2012_SP2_Configmgr_SCEP , on server2012R2 as per your instruction pfd file install sccm . i can update kb 2905002 & kb2907591 . it can show fail & error
1) “Server update status: This update applies to product version 5.0.7958. The installed version on this computer is 5.0.8239.1000. This update is not applicable to this computer”
2)”Update setup found an active Configuration Manager console running on the local machine, close all consoles before installing this update.”
3) “Console update status: No serviceable configuration manager role was found on the local system.”
How can i resolve this problem. please help
Thanks for this. Does this replace the previous Step 7 – 07 Configuration Manager 2012 R2 Hotfixes ? With SP1 are these still needed?
Also, what are your thoughts on applying the Cumulative Updates to a production environment?