


In this tutorial, we will cover multiple ways to rename Windows 365 Cloud PC. You can set a computer name for your Cloud PC in Windows 365 and also change the Cloud PC display name.
When you provision a Cloud PC in Windows 365, the computer name is randomly assigned. You can use Cloud PC custom name template, to automate the device naming and use unique names for each one to help you keep them organized. However, you can change the name of the Cloud PC after it has been provisioned.
After you assign Windows 365 licenses to Cloud PC users, users can access their Cloud PCs. You should also provision Windows 365 Cloud PCs that allow users to access them.

A Cloud PC is a highly available, optimized, and scalable virtual machine providing end users with a rich Windows desktop experience. It’s hosted in the Windows 365 service and is accessible from anywhere, on any device.
Cloud PCs are created automatically by the Windows 365 service when an end user in an appropriate Azure AD user group is assigned a Windows 365 license.
Difference between Cloud PC Computer Name and Cloud PC Display Name
There are two important differences between a cloud PC device name and a display name.
- A Cloud PC display name is reflected in Entra ID, Windows 365 web portal, Intune Portal and SCCM (Configuration Manager). Whereas Cloud PC computer name shows up as Device name when you select a Cloud PC in the Intune Portal.
- If you need to change the computer name of the Cloud PC, you will have to log in to the Cloud PC and then change it from Windows Settings. You can utilize other methods such as PowerShell for renaming Cloud PC. Whereas, Cloud PCs display name can be changed through the Windows 365 web client portal.
When you create a new Cloud PC in Windows 365, the computer name and Cloud PC display name are the same. Windows 365 administrators can customize the names for Cloud PC based on the requirements. In this guide, we will show you how to rename the Cloud PC display name and even change the computer name of Cloud PC in Windows Settings and other methods.
Rules for Renaming a Windows 365 Cloud PC
Here are some guidelines for renaming your Cloud PC:
- The Cloud PC name can’t start with a period
- The computer name cannot contain these characters: /:*?”<>&|
- Must have a minimum length of 1 character
- Have a maximum length of 64 characters
- Can contain a period
How to Find Display Name of a Cloud PC
Perform the following steps to find the display name of a Cloud PC:
- Launch the Edge browser and navigate to https://windows365.microsoft.com.
- Sign in with the user account that has access to Cloud PC.
- On the Windows 365 home page, click the three vertical dots and select System Information.
- The Cloud PC system information window pop-up shows the Cloud PC display name.

For more information on accessing a Cloud PC, read this guide that explains how to access Windows 365 Cloud PC.
Method 1: Rename Cloud PC display name from Windows 365 Web Site
From the Windows 365 web site, you can set the Cloud PC display name with the following steps:
- Launch the Edge browser and navigate to https://windows365.microsoft.com.
- Sign in with the user account that has access to Cloud PC.
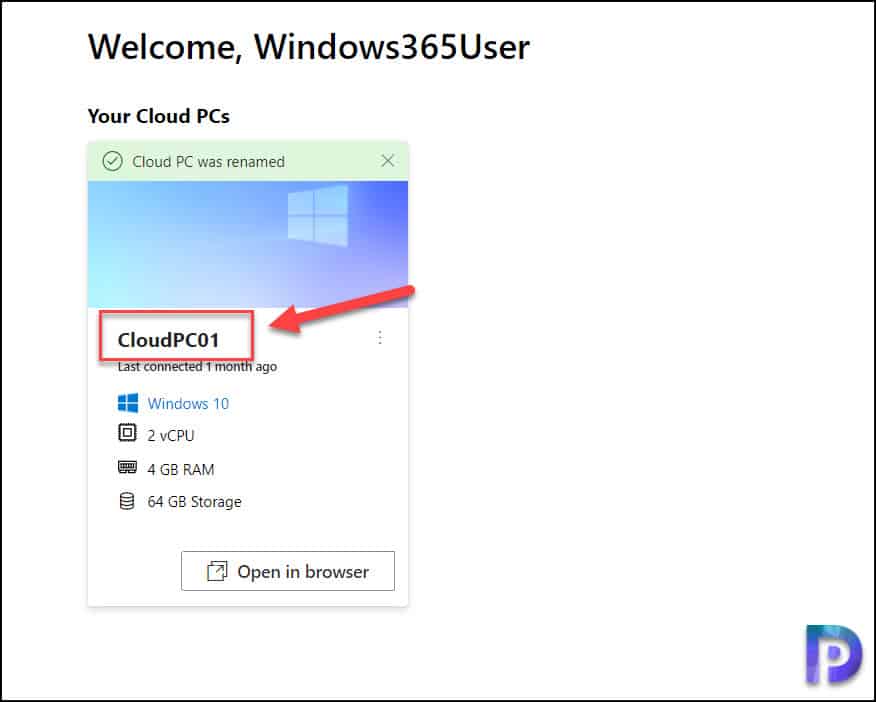
- On the Windows 365 home page, click the three vertical dots and select Rename.

Ensure you read the Cloud PC naming tips listed in the above section. Enter the new Cloud PC name and click Rename.

Now you see the message, “Cloud PC was renamed“. Congratulations! You have successfully changed the Cloud PC display name.
Method 2: Rename Cloud PC Computer name from Windows Settings
If you want to change the computer name of a Cloud PC, you will have to do it from Windows Settings. There are many methods that you can use to rename a Windows computer. The below procedure for renaming Cloud PC will work on both Windows 10 and Windows 11 PCs.
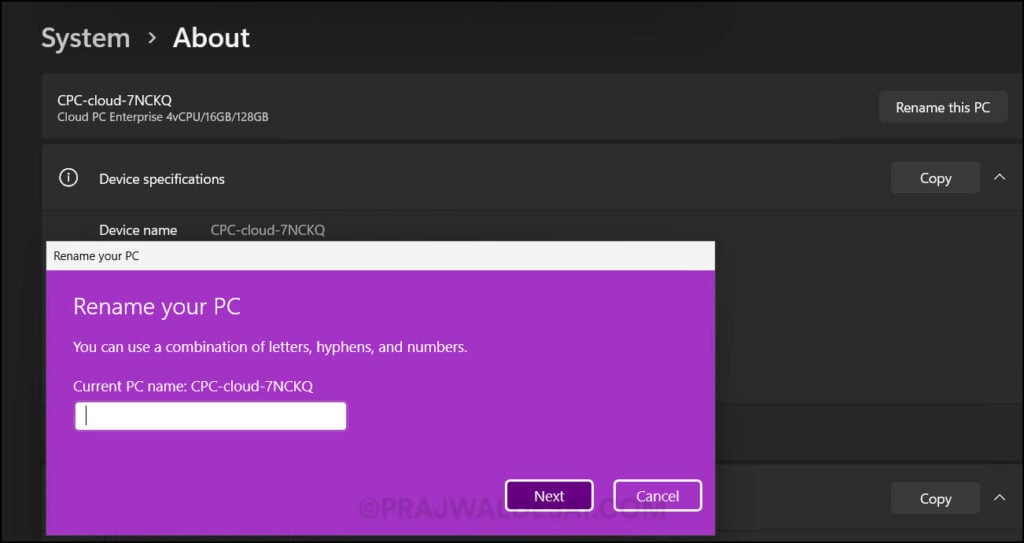
Log in to a Cloud PC, click Start and type About Your PC and launch it. About your PC displays the device specifications and Windows specifications. The device name is seen under the Device Specifications. To change the computer name of this Cloud PC, click Rename this PC.

On the Rename your PC dialog box, enter the new name for this Cloud PC and click Next. In this example, I am going to rename the computer to CLOUDPC01.

When you rename a computer, a system restart is required. Click Restart now.

Now sign in to your Cloud PC and the About your PC shows the new name for the device, which is CLOUDPC01. This completes the steps to change the device name of Cloud PC.

Method 3: Set a Cloud PC device name using System Properties
You can assign a new computer name for your Cloud PC using the System Properties, and this is how.
- Connect to your Cloud PC and sign in with your organization’s credentials.
- Right-click on the “Start” button or press the “Windows key + X” to open the power user menu.
- From the menu, select “System.” This will open the system properties window.
- Select Rename this PC and enter a new computer name for your Cloud PC.
- You must restart the Cloud PC after renaming it.
Method 4: Rename Windows 365 Cloud PC using PowerShell
You can use PowerShell to rename your Windows 365 Cloud PC. You can use the Rename-Computer cmdlet to rename the local computer or a remote computer. It renames one computer for each command.
The below syntax should be used in the PowerShell while renaming the Cloud PC device name.
Rename-Computer -NewName "New Cloud PC Computer Name"
The below PowerShell command sets the computer name of the Cloud PC to PrajwalCloudPC.
Rename-Computer -NewName "PrajwalCloudPC"
The below PowerShell command renames the Cloud PC to PrajwalCloudPC and then restarts it to make the change effective.
Rename-Computer -NewName "PrajwalCloudPC" -Restart
Verify the Cloud PC Device Name in Intune Portal
After you rename the Cloud PC, you can verify the device name in the Intune Portal. Sign in to Microsoft Intune admin center and go to Devices > Windows 365 > All Cloud PCs and click on the Cloud PC. The device details page shows the new Cloud PC device name.

