


In this post, we will see how to prevent Configuration Manager client agent installation from client push. You can exclude SCCM client upgrade to prevent the clients from automatically upgrading.
When you enable automatic site wide client push installation in Configuration Manager client push settings, the client agents are automatically installed on all the computers. In an organization, you may want some computers to not have SCCM client agents installed. You can’t manage a computer using Configuration Manager if an SCCM client agent isn’t installed on it.
For instance, you might want to prevent the installation of client agents on a particular group of Windows Servers. In Configuration Manager, it is possible to prevent clients from upgrading. Using the Windows registry, you can prevent Configuration Manager client agent installation on specific computers when using the site-wide automatic client push installation method.

We’ll use the registry’s list of Windows servers that don’t require the client agent as an illustration. Before you make any modifications to the Windows registry, backup the registry and then proceed. Keep in mind that computers that are excluded from the client installation can still be found by using Configuration Manager discovery methods.
Can you stop the client push installation once it is in progress? The answer is Yes, there is an easy trick with which you can stop SCCM client push installation.
Prevent Configuration Manager Client Agent Installation
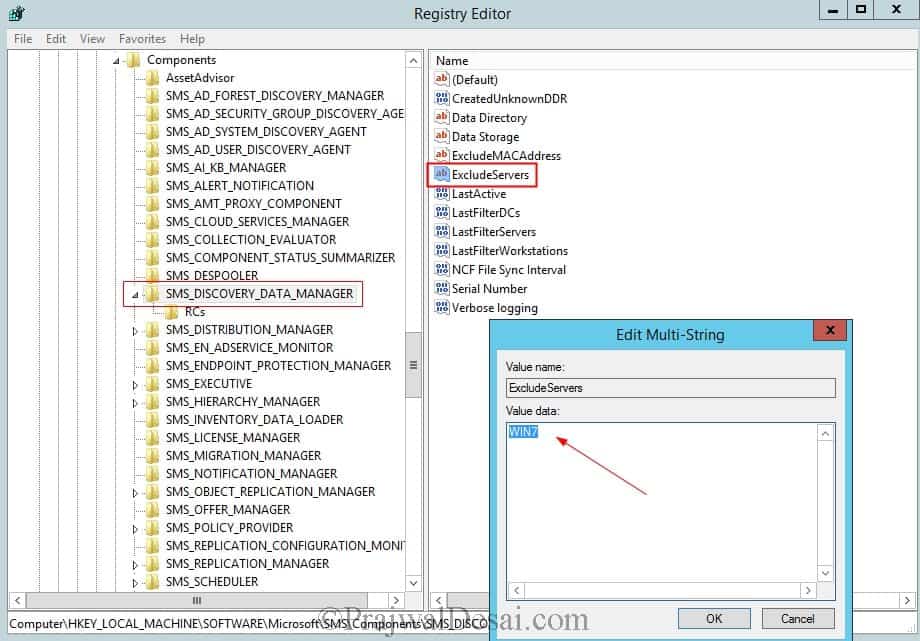
We will now look at the steps to prevent Configuration Manager client agent installation. Launch the Windows Registry Editor on the Configuration Manager site server. Locate the SMS_DISCOVERY_DATA_MANAGER sub-key by browsing to the following path:
HKEY_LOCAL_MACHINE/Software/Microsoft/SMS/Components/SMS_DISCOVERY_DATA_MANAGER.
Double-click the key ExcludeServers to open the Edit Multi-String window. Here you must specify the NetBIOS name of each computer you want to prevent Configuration Manager client agent installation.
Press the Enter key on your keyboard after typing each computer name to ensure that each computer name appears on a separate line. Once you have done, click OK and close the registry editor.
What precisely occurs when the computers are added to the ExcludeServers list? A computer is marked with the status “installed,” thus preventing the client from being reinstalled using the automatic site-wide client push installation method.
At later point of time if you remove the computer from the exclude list, this flag remains. To change this status to uninstalled, you must run the clear install flag task. We will look at this concept in next section.
From the below screenshot, we see that the computer that I added in ExcludeServers list has no client agent installed. This method works flawlessly however the difficult part is you need to add the computers to the exclude list manually.

Clear Install Flag under Site Maintenance
Configuration Manager has got several site maintenance tasks for site. Suppose you want the client agent to be installed on one of the computers which are in ExcludeServers list, just by removing them from ExcludeServers list will not help. You must run the clear install flag task.
Use the following steps to clear install flag task from Site Maintenance in Configuration Manager:
- Launch the Configuration Manager console.
- Go to Administration > Site Configuration > Sites.
- Select the Primary site and on top ribbon click on Site Maintenance.
- Look for the task named Clear Install Flag. Click on the task and select Enable and click OK.

How to Exclude SCCM Client Upgrade
Follow the below steps to exclude the SCCM client agents from upgrading.
- Launch the SCCM console.
- Go to Administration\Overview\Site Configuration\Sites.
- Right-click the site and select Hierarchy Settings.
- Select the client upgrade tab and check the box – Exclude specified clients from upgrade.
- Click Browse and select the device collection to exclude from client upgrade.

When you specify a device to exclude the client upgrade, the clients will not be upgraded via any method such as automatic upgrade or software update-based upgrade. This exclusion applies to the following methods:
- Automatic upgrade
- Software update-based upgrade
- Logon scripts
- Group policy
The next important question is: How can I upgrade the excluded clients? If a device is a member of a collection that you excluded from upgrade, you can still upgrade the client using one of the following methods:
- Client push installation – Ccmsetup allows client push installation because it’s your direct intent. This method lets you upgrade a client without removing it from the collection, or removing the entire collection from exclusion.
- Manual client installation: Manually upgrade an excluded client by using the following Ccmsetup command-line parameter: /IgnoreSkipUpgrade

Hello, adding the netbios name of the server to the ExcludeServers registry key on the SCCM server did not work for me either. Client push is enabled, but my interpretation was that if this was added, the client would not install. Was wondering if there is any further update or recommendation on this. Thank you.
Since 1806 or 1802 there is the option to exclude a Sub-OU from System-Discovery which would be exactly what we need, since we dont want these Computer-Object listed at all in SCCM. But for some reason this does not work and he still rediscovers the excluded objects after deleting them.
It didnt work for me also. Referring to sources, I found one more way which rather unconventional
Just create a ccmsetup and ccm file (without any extension) in the locations( in my case c:windows) where those folders are usually located. That will prevent a folder (with the same name as the already existing file) from being created. But this will be manual and have to do on each machine which needs to excluded.
In case future you need to install client, then you need to delete these files
This doesnt work, are there any other options?
Sorry to hear that but the method has worked fine for me many times.
Even adding in the exclusion list the client is installed! Some help?
What if i want to exclude Linux servers? It seems as if my primary server has been trying to establish SIP connection with some of out Linux boxes. How can I exclude these?
Can I add IPs to the list?