


In this guide, you’ll learn how to connect and access Windows 365 Cloud PC using multiple methods. You can connect to a cloud PC using the Windows 365 home page, the Windows App, LG Web OS, or the Microsoft Remote Desktop client.
After you assign Windows 365 licenses to users, they should be able to access their Cloud PCs. Note that you should also provision Windows 365 Cloud PCs that allow users to access them from any device.
A Cloud PC is a highly available, optimized, and scalable virtual machine that provides end users with a rich Windows desktop experience. It’s hosted on the Windows 365 service and is accessible from anywhere on any device.

Note: Mobile devices (Android and iOS) aren’t currently supported for using a browser to open a cloud PC. In other words, you cannot use your mobile device to connect to your Windows 365 Cloud PC. Only the Remote Desktop app is supported on mobile devices.
Different Methods to Connect to a Cloud PC Remotely
Microsoft offers multiple methods for you to connect to and utilize the Windows 365 Cloud PC:
- Use Windows App to connect to a Cloud PC from Windows 11/10
- Access Windows 365 Cloud PC using a web browser
- Access Cloud PCs using Microsoft Remote Desktop client
- Connect to your cloud PC from LG Web OS
In this article, we will explore different methods that you can use to connect to and access the Cloud PC.
Cloud PC Connection Methods for Windows 365 Editions
This table by Microsoft is very useful in determining which methods can be used to connect Cloud PCs running a specific edition of Windows 365.
| Windows 365 Edition | Windows 365 app | windows365.microsoft.com web client | Microsoft Remote Desktop | LG Web OS |
|---|---|---|---|---|
| Windows 365 Business | Supported | Supported | Supported | Supported |
| Windows 365 Enterprise | Supported | Supported | Supported | Supported |
| Windows 365 Frontline | Supported | Supported | Not Supported | Not Supported |
Method 1: Connect to a Cloud PC using Windows App
The new Windows app can securely connect to Azure Virtual Desktop, Remote Desktop Services, Windows 365 Cloud PCs, Microsoft Dev Box, etc. This app was formerly known as the Windows 365 app, but Microsoft recently renamed it the Windows App.
The Windows app provides a direct path to Windows 365 from the Task Bar or Start menu, providing a personal, customized experience that can be tailored to each individual. You can access Windows 365 Cloud PC directly from your taskbar or start menu.
The new Windows App integrates more closely with Windows 11 and Windows 10, making your Cloud PC desktop available right in the taskbar, as if it were a virtual desktop on your PC. Microsoft will soon ship the Windows app with Windows 11, and there will be no need to manually install it.
The new Windows app is available for both Windows 10 and Windows 11. There are two ways to download the Windows app: through the Microsoft Store or directly via windows365.microsoft.com. In the below section, we will cover both of these methods in detail. For mass deployment of Windows app on devices, refer to the guide on deploying Windows app using Intune.
Get Windows App from Windows365.microsoft.com
You can get the Windows app directly from windows365.microsoft.com. If the Windows 365 app is already installed on the PC, the Windows 365 home page will notify users to launch the Windows app.
To get the Windows 365 app, launch the browser and visit the URL: windows365.microsoft.com. Under Quick Actions, select the option “Install the Windows 365 app.”

Selecting the Go to Microsoft Store button will launch Microsoft Store and take you to the Windows app page for installation.

Download and Install Windows App from Microsoft Store
You can get the latest version of the Windows app from the Microsoft Store. We do not recommend downloading the Windows app from any other source than the Microsoft Store.
Use the following steps to get the Windows app from the Microsoft Store:
- Open the Microsoft Store app.
- Search for “Windows App.”
- Select “Get” to download and install the Windows app.

Launch Windows App
When the Windows app has been installed, it appears under the list of apps and recently added section in the start menu. Click Start and type Windows App. From the list of results, select Windows App to launch it.

Access Cloud PC using Windows App
Once the Windows app is installed on your PC, you can now access your Cloud PC with this app directly from your taskbar or start menu. Launch the Windows app on your PC and sign in with your credentials to connect to the Cloud PC.

Once the credentials are validated, the Welcome Cloud PC window displays the cloud PC’s hardware specifications, connection status, and when it was last connected. The Windows app shows the list of Cloud PCs that have been assigned to the current user. Click on the Connect button to access Windows 365 Cloud PC.

Method 2: Connect to a Cloud PC via Windows 365 web site
The simplest way to access a remote Cloud PC is from the Windows 365 web site using a browser. This method also supports enabling the High DPI for Windows 365 Cloud PC.
Prerequisites
If a user wants to access Cloud PC via the Windows 365 web site, the user’s device must meet the following requirements, as advised by Microsoft:
- Supported operating systems: Windows 10, Windows 11, macOS, ChromeOS, and Linux.
- Supported browsers: Microsoft Edge, Google Chrome, Safari, Mozilla Firefox (v55.0 and later), or LG webOS 23. It is recommended to keep your browser updated to the latest version.
Connect to a Cloud PC
Use the below steps to connect to Cloud PC from the Windows 365 web site via browser:
- Launch the Edge browser or any supported browser on your PC.
- Navigate to https://windows365.microsoft.com to view your Cloud PCs.
- On the Windows 365 home page, locate your Cloud PC.
- Now select Open in browser and a new tab opens letting you access the Cloud PC.

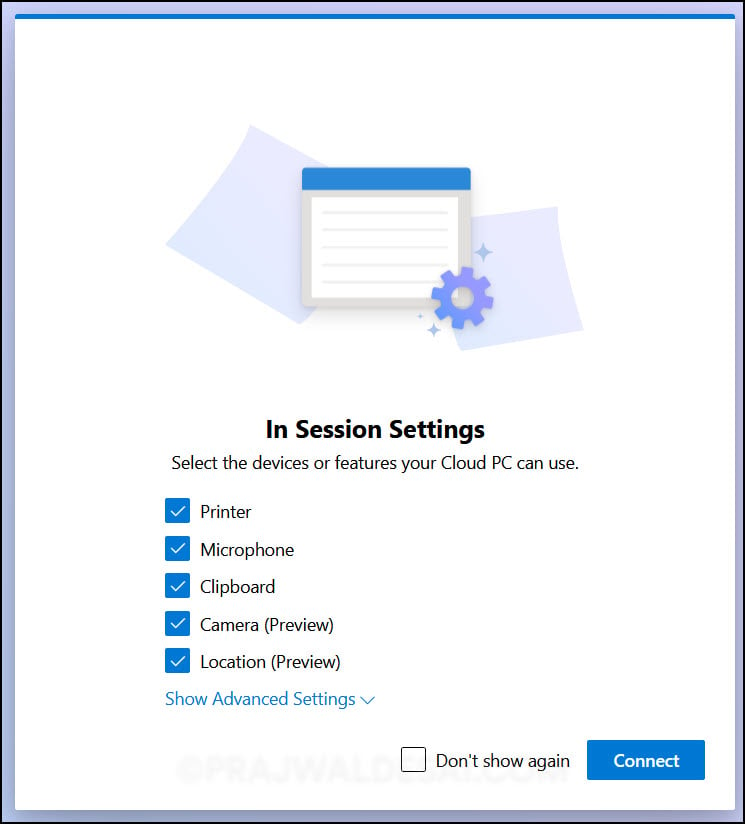
Configure In Session Settings
Before you connect to your Cloud PC, you get an In Session Settings screen where you can select the devices or features your Cloud PC can use.
- Printer: If you have a printer connected to a laptop or a desktop, the same will be mapped to your Cloud PC.
- Microphone: When selected, an external mic connected to your PC can be mapped to the Cloud PC. You can then use the microphone on the Cloud PC during team meetings and group calls.
- Clipboard: If you select this option, any text that you copy on your laptop or PC can be pasted in the Cloud PC session. During our testing, we noticed that sometimes the clipboard feature doesn’t work correctly. To resolve this, we recommend restarting and connecting the Cloud PC.
- Camera: If you have a camera connected to your local computer, you can access it on your Cloud PC as well. This is very useful when you are going to attend video calls on Cloud PC. Learn more about enabling camera access for Cloud PCs.
- Location: Using this option, users can turn on Location redirection so that their Cloud PCs use their correct geographic location.
- Keyboard Shortcuts: Keyboard shortcuts for Windows 365 Cloud PC allow you to quickly perform certain actions on a Cloud PC.
- Alternative Keyboard Layout: Enable this option to use an alternative keyboard layout to enter complex characters. For example, Japanese, German, Italian, French, etc. Select the remote keyboard layout that you want to use in your remote session. The keyboard must be installed in the remote session.
Sign in to Cloud PC
On the Sign in to Cloud PC window, you must sign in with your work credentials before you can access it. Enter the work account and click Sign In.
Note: If you have turned on the multifactor authentication for the user, you’ll need to complete the procedure to access the Cloud PC.

Once the credentials are validated, you’ll see a Windows welcome screen.

The user can now access a Windows 365 PC as the Cloud PC session has been established. This completes the steps to access the cloud PC from a browser using the Windows 365 web site.

Method 3: Access Windows 365 Cloud PC using Remote Desktop Client
You can also use Remote Desktop Client to access Windows 365 Cloud PC. If you do not have access to the Windows app or your company will not let you use a browser to access Cloud PCs, you should use this method.
The Microsoft Remote Desktop app lets users access and control a remote PC, including a Cloud PC. Windows 365 users can download and install the Remote Desktop client from the Windows 365 home page.
Accessing Windows 365 Cloud PC using a remote desktop client requires you to install the remote desktop client on a computer first. When you have multiple Cloud PC users, you can deploy the client using Configuration Manager. Refer to the following guide to deploy remote desktop client using SCCM.
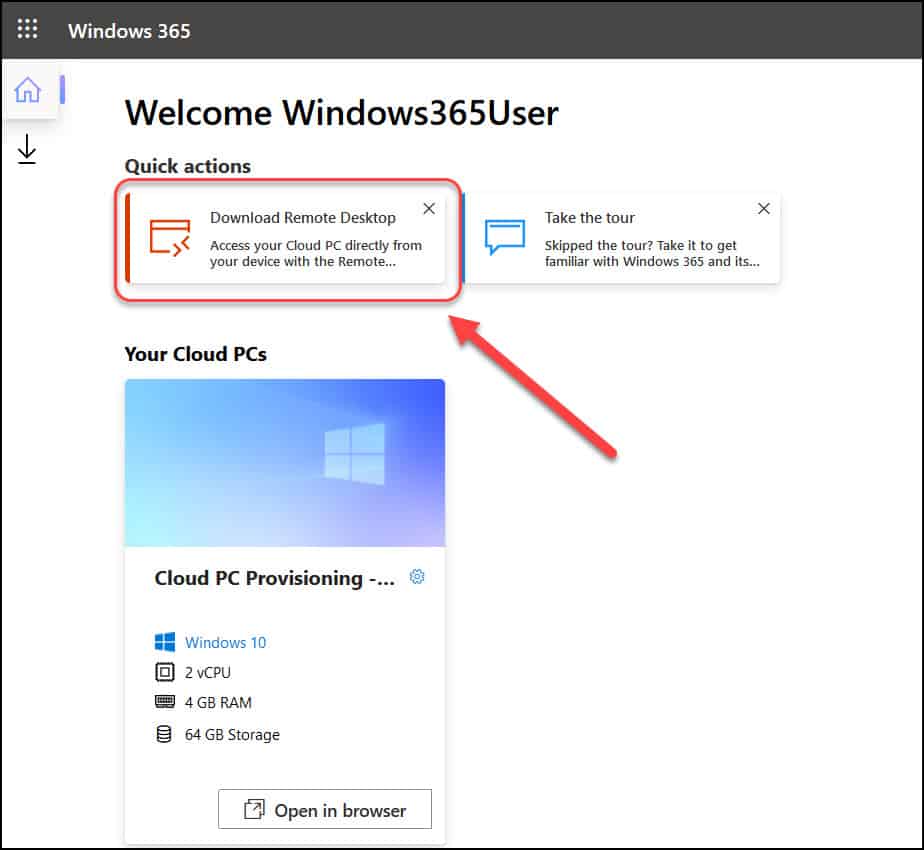
Download Remote Desktop Client for Cloud PC
Let’s begin with downloading the remote desktop app. On the Windows 365 Home page, under Quick actions, select Download Remote Desktop.
The Microsoft Remote Desktop apps are available for Windows, Mac, iOS and Android. Let’s download the Remote Desktop for Windows. On the Microsoft Remote Desktop for Windows box, select Download 64-bit and save the Remote Desktop client installer to your PC.

Installing Remote Desktop app for Cloud PC
The steps listed below will help you install the remote desktop client so you can use your computer to access Cloud PC. Run the Remote Desktop Client installer, and on the welcome screen, click Next.

Select I accept the terms in the License Agreement and click Next.

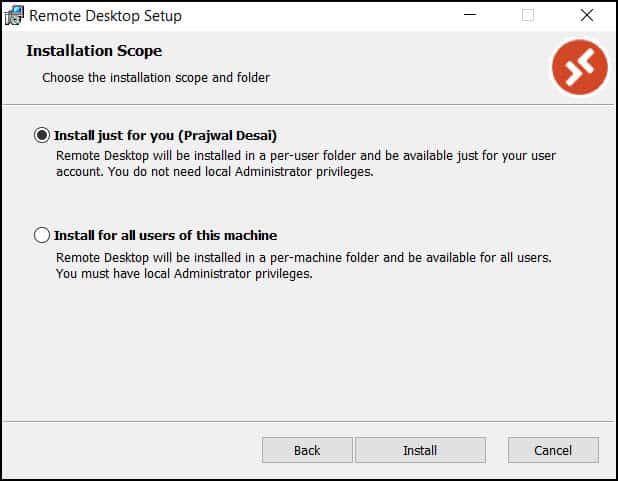
Choose the installation scope, which determines whether you want to install the application for yourself or all users on the machine. Click Next.
The Remote Desktop setup is complete. Close the setup wizard.

Launch the Remote Desktop Client
Upon launching the Microsoft Remote Desktop, you see the Let’s get started screen. Here, there are two options presented before you can access Windows 365 Cloud PC.
- Subscribe: This is the recommended option where you can access the cloud PC with its name.
- Subscribe with URL: You can access the Cloud PC with a unique URL.
In the below example, we are going to select Subscribe to access the Cloud PC.

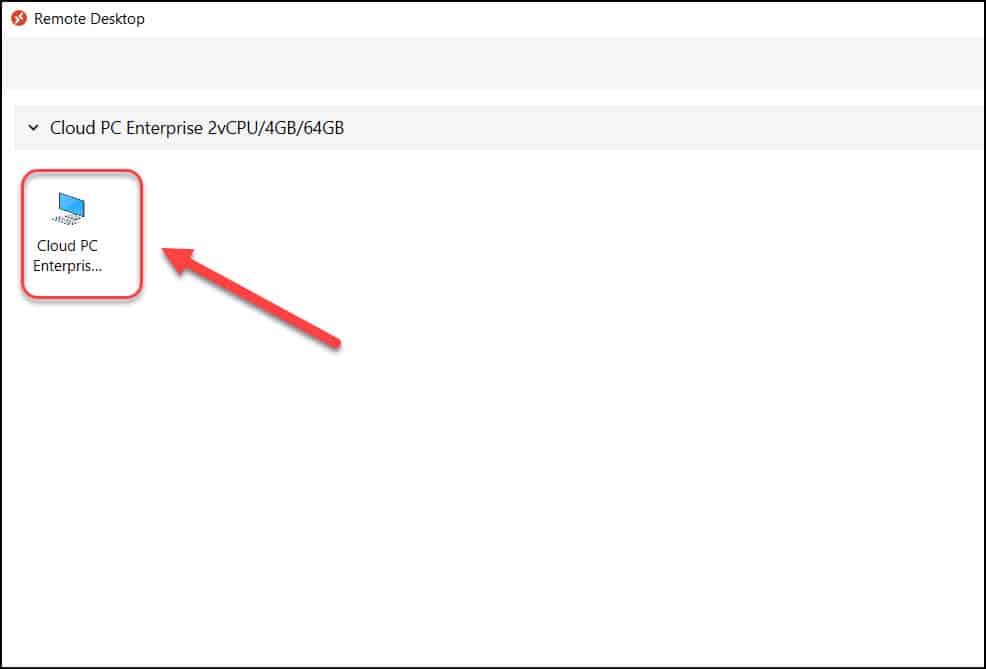
Connect to Cloud PC using Remote Desktop App
You should now see the Cloud PC provisioned for the logged-in user account. Double-click the Cloud PC entry.
To access the Windows 365 Cloud PC, sign in with your work account and click OK.

Using the remote desktop client, you can easily access your Windows 365 Cloud PC. The below screenshot shows the Cloud PC being accessed via a remote desktop client. The experience is very similar to that of accessing your personal PC. You can also turn on the multiple monitor support for Cloud PC.

Method 4: Connect to your Cloud PC using LG Web OS
The Windows 365 cloud PC can be accessed through an LG TV with the latest WebOS 23. If you do not have a laptop or PC to connect to a Cloud PC, an LG TV is a good alternative.
LG WebOS 23 introduces several new features, including support for Cloud PCs. To launch the web client on an LG TV (with LG WebOS 23), navigate to Home Office > Windows 365.
When connected to a Cloud PC on LG TV, the following Windows 365 features aren’t available:
- File Transfer
- Clipboard functionality
- Location redirection
- Collecting error logs from Cloud PC
- Hardware acceleration feature
- Keyboard shortcuts
The Cloud PC keyboard shortcuts won’t work on LG WebOS 23 because they are meant for Windows OS. To work on a Cloud PC, users can connect a compatible Bluetooth mouse and keyboard to the LG TV. In addition, you cannot access Windows 365 Frontline cloud pcs on LG web OS as it is not supported.
Wrapping up
In this article, we have covered different methods to connect to your Windows 365 Cloud PCs. Getting to your Cloud PC for work is the main objective, regardless of the approach you take. When it comes to configuring the display options for Cloud PC, the Remote Desktop app offers more options than using the browser. On the other hand, a fresh method of connecting to a cloud PC is the Windows App and LG WebOS. What is your favorite way to access Cloud PCs?
