


This post covers the steps to install RSAT tools on Windows 10 version 1809 and later. Remote Server Administration Tools for Windows 10 lets IT administrators manage Windows Server from a remote computer running Windows 10. In the past RSAT tools were available for downloads in the form of .msu files. So one could simply download the msu file and install RSAT Tools.
Another way of deploying RSAT tools was using SCCM. Here is my blog post on deploying RSAT tools for windows 10 using SCCM.
Starting with Windows 10 October 2018 Update, RSAT is included as a set of “Features on Demand” in Windows 10. That means you do not need to download an RSAT package now. Instead, on your Windows 10 computer, go to “Manage optional features” in Settings and click “Add a feature”. You will see the list of available RSAT tools. Select and install the specific RSAT tools you need.

Suppose that I require only group policy management tool, I can simply select Group Policy Management Tools and install it. Most of all the advantage of installing it via Features on Demand is that installed features persist across Windows 10 version upgrades.
Before you plan to install RSAT tools on Windows 10 version 1809, ensure you read the below points.
- You cannot install RSAT on computers that are running Home or Standard editions of Windows.
- You can install RSAT only on Windows 10 Professional or Enterprise editions.
Method 1 – Using Add a Feature Install RSAT Tools on Windows 10 version 1809
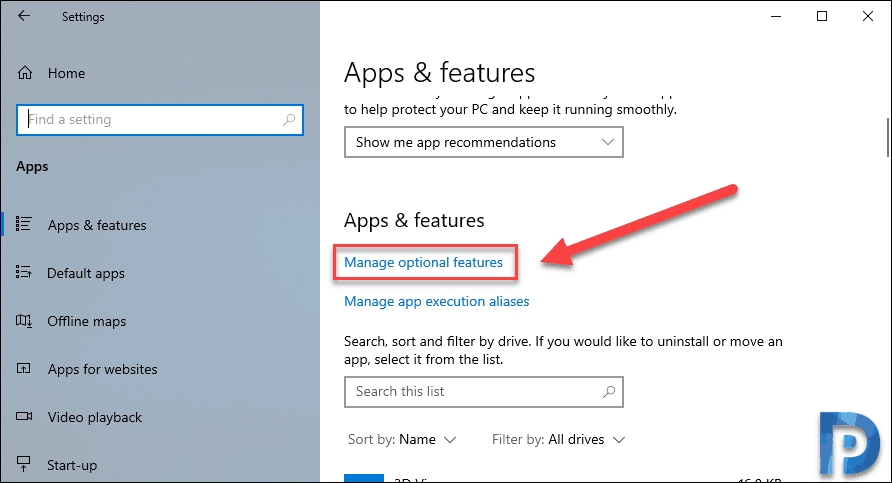
To install RSAT Tools on Windows 10 version 1809, click Start. Click Settings and from the settings page, click Apps.

On the right pane, under Apps & features, click Manage optional features.
Now click + Add a feature.
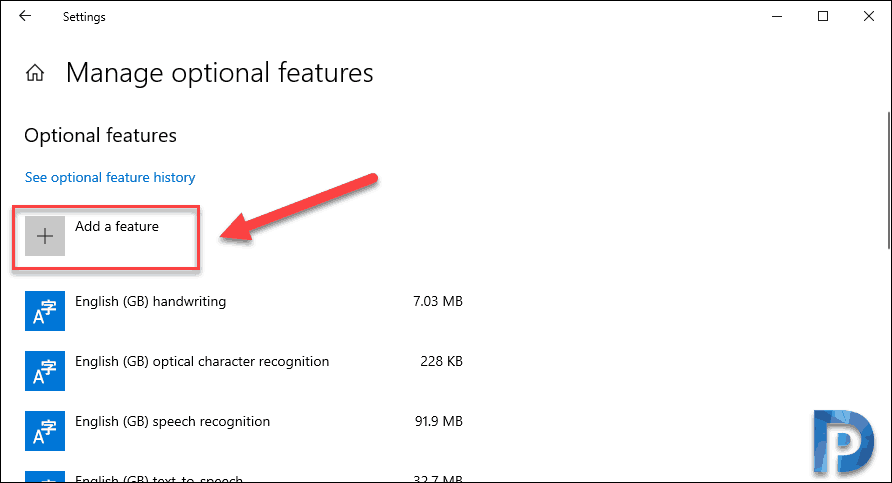
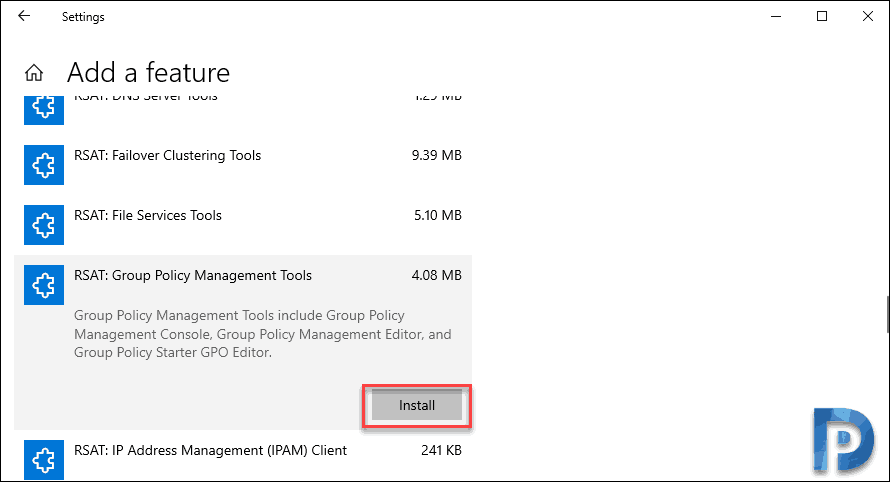
Wait for the list of features to be populated. Scroll down until you see RSAT features. Now select any of the RSAT feature that you wish to install. In this case, I am selecting RSAT: Group Policy Management Tools feature. Click Install.
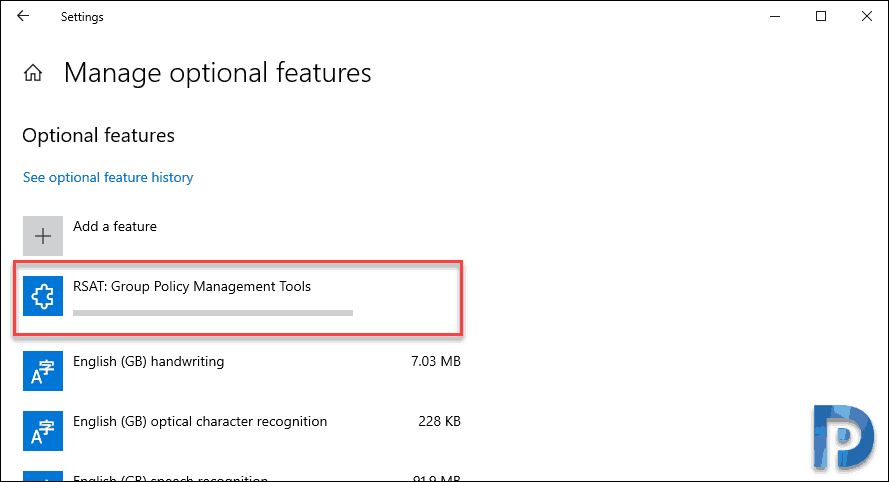
Click the back icon and wait until the feature is installed. Now you should find Group Policy Management Tools under Start > Windows Administrative Tools.
Method 2 – Using DISM to Install RSAT Tools on Windows 10 version 1809
In addition to installing via the graphical Settings app, you can also install specific RSAT tools via command line or automation using DISM /Add-Capability.
On Windows 10 computer, launch the command prompt as administrator. Run the below command.
DISM.exe /Online /Get-Capabilities
This command lists all the capabilities and shows whether the capability is present or not present. In this case, I will be installing the RSAT group policy management tools. Therefore right click and copy the capability identity.

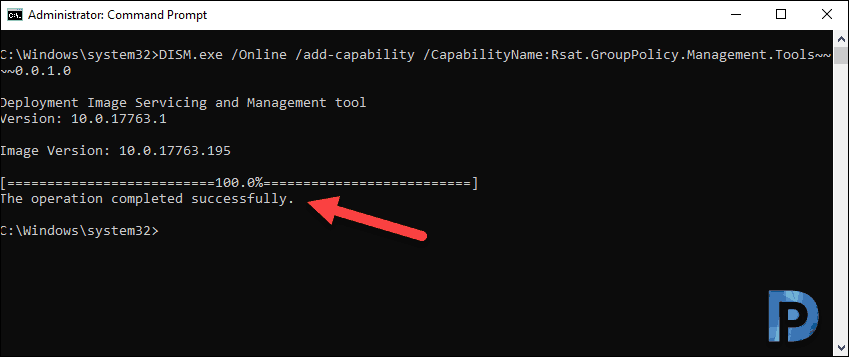
Now in the same command prompt, run the below command to install RSAT Group policy management tools.
DISM.exe /Online /add-capability /CapabilityName:Rsat.GroupPolicy.Management.Tools~~~~0.0.1.0
The tools are installed and you will see the message that the operation is completed successfully.
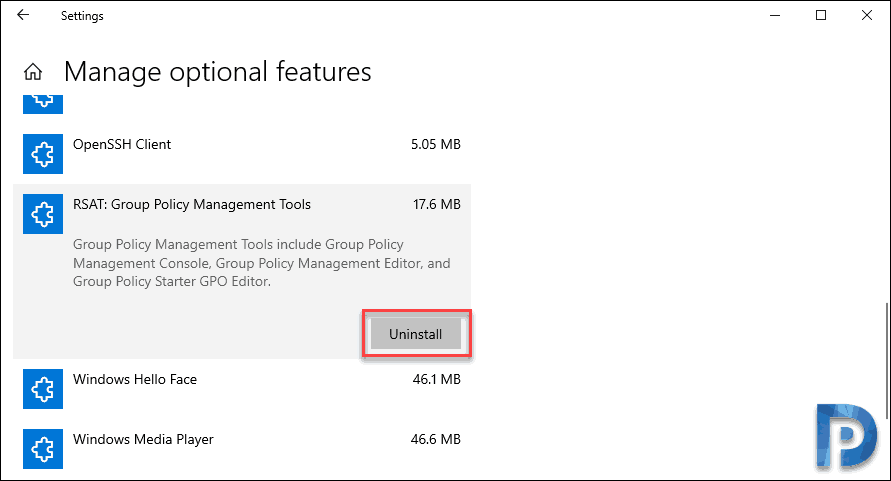
Uninstall RSAT Feature on Windows 10
In the above steps you understood how to install RSAT feature. To uninstall the RSAT feature, go to Manage optional features. Select the RSAT feature that’s currently installed on Windows 10. Click Uninstall and this will uninstall the selected RSAT feature.

Set-ItemProperty “REGISTRY::HKLM\Software\Policies\Microsoft\Windows\WindowsUpdate\AU” UseWUserver -value 0
Get-Service wuauserv | Restart-Service
Add-WindowsCapability -Online -Name Rsat.ActiveDirectory.DS-LDS.Tools~~~~0.0.1.0
Add-WindowsCapability -Online -Name Rsat.GroupPolicy.Management.Tools~~~~0.0.1.0
Add-WindowsCapability -online -name Rsat.ServerManager.Tools~~~~0.0.1.0
DISM.exe /Online /add-capability /CapabilityName:Rsat.CertificateServices.Tools~~~~0.0.1.0
Set-ItemProperty “REGISTRY::HKLM\Software\Policies\Microsoft\Windows\WindowsUpdate\AU” UseWUserver -value 1
Get-Service wuauserv | Restart-Service
Worked for me like a charm , some required dism , others would work add-windowscapability
I am missing AD users and computers in RSAT. do you know why?
I had the same issue, you need to install the tools separately. For AD, go to CMD (as admin) type in:
DISM.exe /Online /add-capability /CapabilityName:Rsat.ActiveDirectory.DS-LDS.Tools~~~~0.0.1.0
It will install the AD users and computers. If you want addtional RSAT tools that are listed you will have to do the same command line but change the capabilityName: to whatever tool you want installed. To see the list of tools type in:
DISM.exe /Online /Get-Capabilities | find “Rsat”
I get the installation completed successfully. But when I check the status its in “staged” and not “installed” status. How to get these in installed status? Since they are in “Staged” I cannot see any tools.
Hi, Did you find any solution for this?
still not. I couldn’t get any solution on this.
I have the same experience and believe it is because of the Windows 10 edition. The install that I performed on was on Windows 10 Home and notice that the Install state is displayed as ‘Staged’.
This is good info, but I have a major issue:
I’m on a disconnected network (no internet at all)
We do not have access to VLSC or VisualStudios (formally MSDN).
We have Windows 10 Pro 1809
Unfortunately, RSAT will not install (especially ADUC)
Do I have any options?
Thank you, this was just what I needed! Well, I needed to install ADUC from the command line because my company locks down feature installs when logged in. And I can’t log in to a workstation from my admin account. The old system worked perfectly fine before, now Microsoft makes us go through extra hoops.
Run this from an Admin command prompt for ADUC:
HI Prajwal,
Thanks for this blog.
Is it me or have you noticed that there is no more an option for RSAT Active Directory users and computers in the feature set? Does it come under server management tools?
Also even though my optional features show that Group policy management tools are installed I can’t find them.
I have come across a new feature called Active Directory administration centre! But as per usual I am not sure what it gives you. It’s an enigma at this stage as I only came across it a few minutes ago.
Any ideas? I am running W10 pro for workstations 1809 , and build 17763.864
Thanks.
We also do not allow our administrative accounts to access the internet. So there is another option – FOD ISOs – which total 9GB, imagine trying to put those in a package… how is this even remotely useful for system administrators? previously I could deploy a small 50MB package of RSAT tools, now I have to dig through 2 4.5GB ISOs to find the tools I need, extract them somehow and install them with DISM? 1 step forward 10 steps back smh
how can i get offline files for the same, so that it is easy to manage
Absolutely zero of the solutions on this page and in the comments have worked for me. I have been trying to get RSAT to install for 6 hours now, including upgrading Win 10 from 1803 to 1903. This was SO MUCH EASIER to do on Win7. Even when I run the command line install, it says “element not found” even though I copied directly from the capabilities list. Seems to work with other packages, just not RSAT. I got a couple of them installed, but there are no shortcuts anywhere, nor are the snap-ins available in mmc. Now a couple of the packages won’t even remove, no errors.
Win 10 = garbage
The GPEdit instructions below also worked for me! thank you!
I do not have access to pull it down from Windows Update because updates are controlled by another group at my company. How can I get RSAT for Windows 10 1903 without going through Windows Update?
try to find offline installer…
……………………………………….. how about be helpful and provide a link.
If your company is blocking access to windows update, you need to download the FoD (Features on Demand) ISO, I don’t know of a public link for it, our software group downloaded it using our company’s account. There are 2 FoD ISOs, you only need the first one for RSAT.
Mount the ISO and either copy it’s contents to a network location (for company wide installs) or you can use the mounted ISO as the source for your own local install and then you can use the commands above, just be sure to include -limitaccess and -source. Limitaccess tells it not to reach out over the internet; here’s a working example:
Get-WindowsCapability -Name “RSAT*” -Online | Add-WindowsCapability –Online -LimitAccess -Source “[Path to extracted or mounted FoD ISO contents]” -verbose
The steps worked perfectly fine. Thanks Prajwal !!!
Thank you all for the info. I could not get it to work through the GUI by adding a feature. Also failed from DISM until I made the GPEDIT change. Now I can install the tools and will put in a GPO to push the change to all Admin workstations!
Thanks for the direction but has Microsoft removed access to files, as I get this in the DISM/CBS logs:
DISM Package Manager: PID=10664 TID=8680 Error in operation: (null) (CBS HRESULT=0x800f0950) – CCbsConUIHandler::Error
DISM Package Manager: PID=10664 TID=10700 Failed finalizing changes. – CDISMPackageManager::Internal_Finalize(hr:0x800f0950)
DISM Package Manager: PID=10664 TID=10700 Failed processing package changes with session options – CDISMPackageManager::ProcessChangesWithOptions(hr:0x800f0950)
DISM Package Manager: PID=10664 TID=10700 Failed to install capability. – CPackageManagerCLIHandler::ProcessCmdLine_AddCapability(hr:0x800f0950)
DISM Package Manager: PID=10664 TID=10700 Failed while processing command add-capability. – CPackageManagerCLIHandler::ExecuteCmdLine(hr:0x800f0950)
DISM Package Manager: PID=10664 TID=10700 Further logs for online package and feature related operations can be found at %WINDIR%\logs\CBS\cbs.log – CPackageManagerCLIHandler::ExecuteCmdLine
DISM.EXE: DISM Package Manager processed the command line but failed. HRESULT=800F0950
WU: Microsoft Update service is the default, URL: https://fe2.update.microsoft.com/v6/, Name: Microsoft Update
Not able to read BranchName [HRESULT = 0x80070002 – ERROR_FILE_NOT_FOUND]
Not able to read ContentType [HRESULT = 0x80070002 – ERROR_FILE_NOT_FOUND]
Not able to read Ring [HRESULT = 0x80070002 – ERROR_FILE_NOT_FOUND]
Not able to read IsBuildFlightingEnabled [HRESULT = 0x80070002 – ERROR_FILE_NOT_FOUND]
Windows Insider Program: Current settings: Content type: (null), Build branch: (null), Ring: (null), Build Flighting Enabled: No
run gpedit
click on computer configuration>administrative templates>system>
click on ‘specify settings for optional component installation and component repair’
click ‘Enabled’
click on ‘Download repair content and optional features directly from windows update instead of windows server update services (wsus)..
click ok
after that you should be able to use GUI or DISM to install RSAT (as listed Prajwal Desai above)
Good luck
No joy. Made the change in gpedit. Afterwards, neither the GUI nor DISM method worked. The GUI list just reloads immediately, with nothing changed. The DISM method shows this error:
“Deployment Image Services and Management tool
Version: 10.0.17762.1
Image Version: 10.0.17763.529
[==============================100%==============================]
Error: 0x8024002e
DISM Failed. No operation was performed”
Hello,
I wasn’t success to do both method solution, please advise.
1. Using Add feature there is any error with error code : 0x80240438
2. Using command prompt there is any error as below:
Error: 740
Elevated permissions are required to run DISM.
Use an elevated command prompt to complete these tasks.
Please Help.
Yusuf AHMADI
run gpedit
click on computer configuration>administrative templates>system>
click on ‘specify settings for optional component installation and component repair’
click ‘Enabled’
click on ‘Download repair content and optional features directly from windows update instead of windows server update services (wsus)..
click ok
after that you should be able to use GUI or DISM to install RSAT
Good luck
Thanks so much for this. It worked 100%.
Thank you for posting this solution. This enabled me to install RSAT utilities using the GUI on Windows 10 21H1 Education.
Microsoft sucks! Does anybody know how to install RSAT, either through GUI or command line, on systems that won’t come up with available optional features, and where the DISM method produces error 87 “No Windows features were specified” (get-features will not show RSAT as an option).
Too bad Microsoft won’t just leave the old downloads around instead of throwing out buggy hacks, then taking away what actually worked!
All I did was download the latest 1803×64 and ran it. All features installed fine.
This worked for me too. All the other commenters must not have GPO’s enabled in their enterprises or they’re not managing patches through SCCM. 1803 tools works fine with Win 10 1909
I’ve tried the GUI method on 3 different windows 10 1809 pc’s and it won’t work…When I click “add a feature” I just get the spinning dots. Command line works fine, which is the way I prefer anyways!
Good Day.
I have tried DISM.exe /Online /Get-Capabilities and it’s not work.Do you have any options?
Hello. A slight correction if I may. The command line for dism is
DISM.exe /Online /Get-Capabilities
Your example is missing the final ‘i’ in Get-Capabilities
Thank you so much. I have corrected it.