

After the release of Exchange server 2013 many of the IT professionals have started testing the Exchange 2013 in their labs and thinking about the upgrade. I would recommend installing the exchange 2013 server in lab first and before you start installing Exchange server 2013 please read about Exchange Server 2013 Prerequisites. The Exchange Server 2013 setup is very simple and Microsoft has released Deployment Assistant for Exchange Server 2013 which is a web-based tool that asks you a few questions about your current environment and then generates a custom step-by-step checklist that will help you deploy Exchange. In this post we will see how to install Exchange server 2013.
The lab setup is simple and the machine info is listed below in the table.
| Virtual Machine | Computer Name | IP Address | Operating System |
| Active Directory | AD.PRAJWAL.LOCAL | 192.168.100.1/24 | Windows Server 2008 R2 SP1 x64 |
| Exchange Server | EXC.PRAJWAL.LOCAL | 192.168.100.2/24 | Windows Server 2008 R2 SP1 x64 |
| Client | CLIENT.PRAJWAL.LOCAL | 192.168.100.3/24 | Windows 7 Professional SP1 x64 |
If you are installing the Exchange server 2013 for the first time then the Active Directory needs to be prepared. There are few things that you need to consider before you install Exchange Server 2013.

- The Schema master is running Windows Server 2003 with SP2, or a later version of Windows Server.
- At least one Global catalog server per site that Exchange will be installed in that is running Windows Server 2003 SP2 or later.
- At least one Domain controller per site that Exchange will be installed in that is running Windows Server 2008 or later.
- The forest functional level of your forest is at least Windows Server 2003 or higher.
- An account with Schema Admins, Domain Admins, and Enterprise Admins permissions to run Exchange setup.
The Active Directory preparation can be done before you start installing Exchange Server or it can be done during first Exchange Server 2013 setup. We will be doing the Active Directory preparation during the setup. In case you plan to prepare the active directory before the installation of exchange server 2013 then follow the steps listed below.
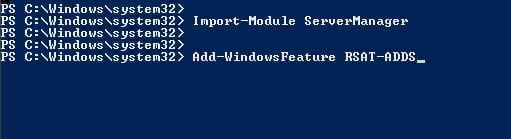
1) On the Windows Server 2008 R2 Sp1, launch the powershell.
Import the server manager module by executing the command Import-Module ServerManager
AD prep requires RSAT tools so to install it execute the command Add-WindowsFeature RSAT-ADDS
2) If this is the first time you are installing exchange server 2013 in your forest type the command
setup /PrepareAD /OrganizationName: “organization name” /IAcceptExchangeServerLicenseTerms

Prerequisites for installing Exchange Server 2013
The prerequisites that are needed to install Exchange 2013 on a Windows Server 2008 R2 SP1 computer depends on which Exchange roles you want to install. In this lab we will be installing Exchange Server 2013 on windows server 2008 R2 Sp1 64 bit Enterprise Edition.we will install both the Mailbox and Client Access server roles on the same computer. Make sure that the functional level of your forest is at least Windows Server 2003, and that the schema master is running Windows Server 2003 with Service Pack 2 or later.Read more about Exchange 2013 prerequisites here.
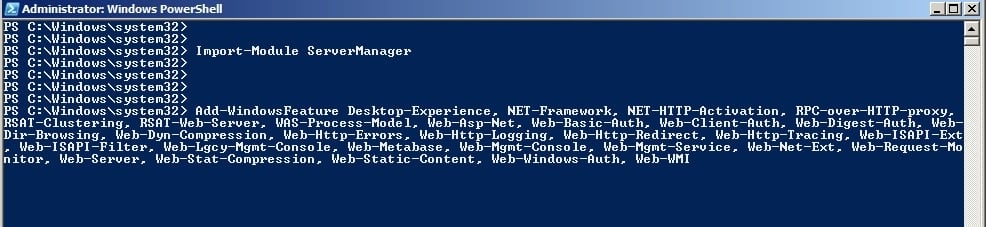
1) Open Windows PowerShell.
2) Run the command Import-Module ServerManager to import server manager module.
3) Run the below command to install windows components.
Add-WindowsFeature Desktop-Experience, NET-Framework, NET-HTTP-Activation, RPC-over-HTTP-proxy, RSAT-Clustering, RSAT-Web-Server, WAS-Process-Model, Web-Asp-Net, Web-Basic-Auth, Web-Client-Auth, Web-Digest-Auth, Web-Dir-Browsing, Web-Dyn-Compression, Web-Http-Errors, Web-Http-Logging, Web-Http-Redirect, Web-Http-Tracing, Web-ISAPI-Ext, Web-ISAPI-Filter, Web-Lgcy-Mgmt-Console, Web-Metabase, Web-Mgmt-Console, Web-Mgmt-Service, Web-Net-Ext, Web-Request-Monitor, Web-Server, Web-Stat-Compression, Web-Static-Content, Web-Windows-Auth, Web-WMI
Now once you have completed the above steps install the following softwares.
4) Download and Install Microsoft .Net Framework 4.5.
5) Download and Install Windows Management Framework 3.0 (Computer must be restarted after installing this update)
6) Download and Install Microsoft Unified Communications Managed API 4.0, Core Runtime 64-bit
7) Download and Install Microsoft Office 2010 Filter Pack 64 bit
8) Download and Install Microsoft Office 2010 Filter Pack SP1 64 bit
9) Download and Install Windows Identity Foundation
10) Download and Install KB2619234(Computer must be restarted after installing this update)
11) Download and Install KB2533623(Computer must be restarted after installing this update)
Note:- The hotfix may already be installed if you’ve configured Windows Update to install security updates on your computer.
Once the prerequisites are installed, we will now start the Exchange Server 2013 setup. The Exchange Server 2013 can be downloaded from Microsoft site. Run the setup.
The first screen asks for checking the latest updates from Microsoft. Click on Don’t check the updates right now and click Next.

On the Intro page click on next.

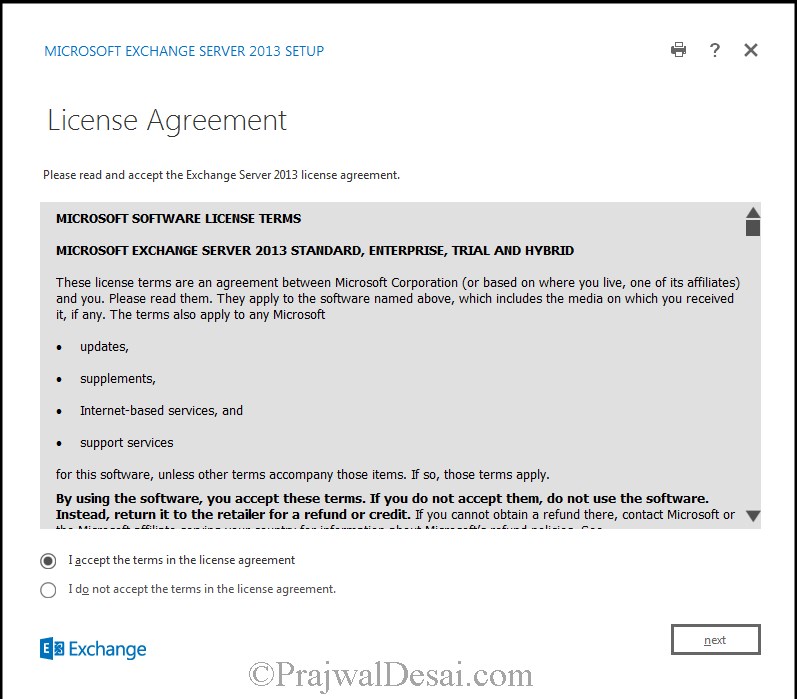
Click on I accept the terms in the license agreement. Click next.
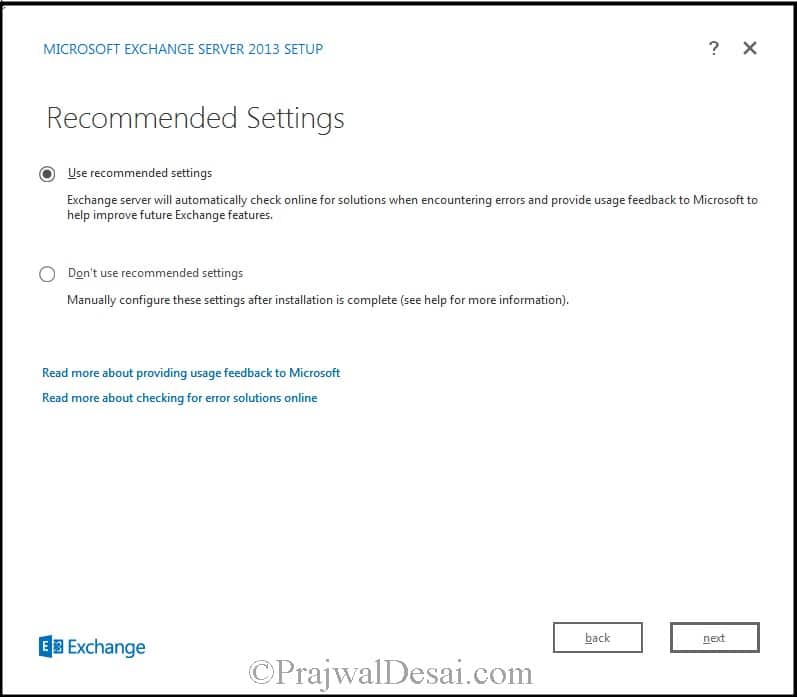
Click on Use recommended settings. Click next.
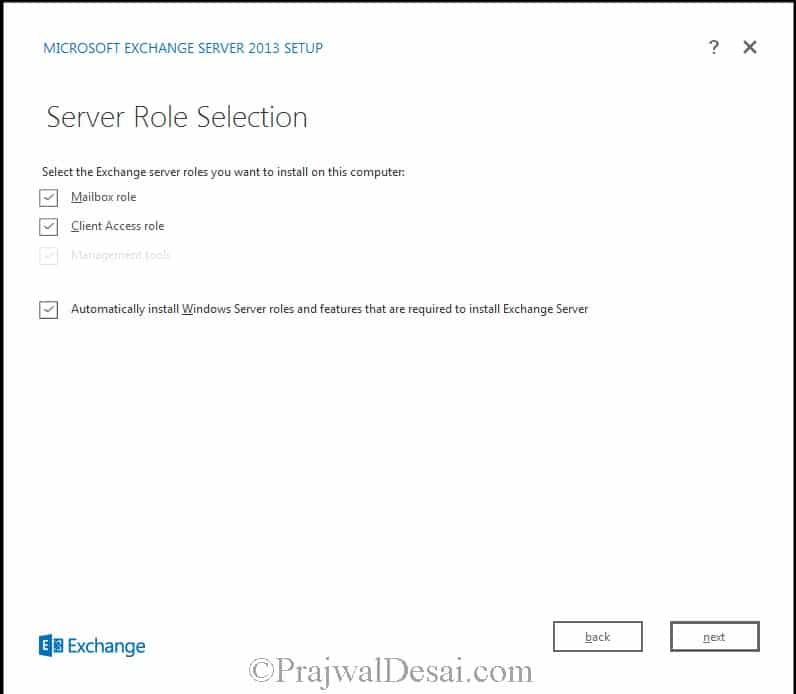
On the server role selection page check the roles that you want to install. We will install Mailbox role and Client access role on the same server. Click next.
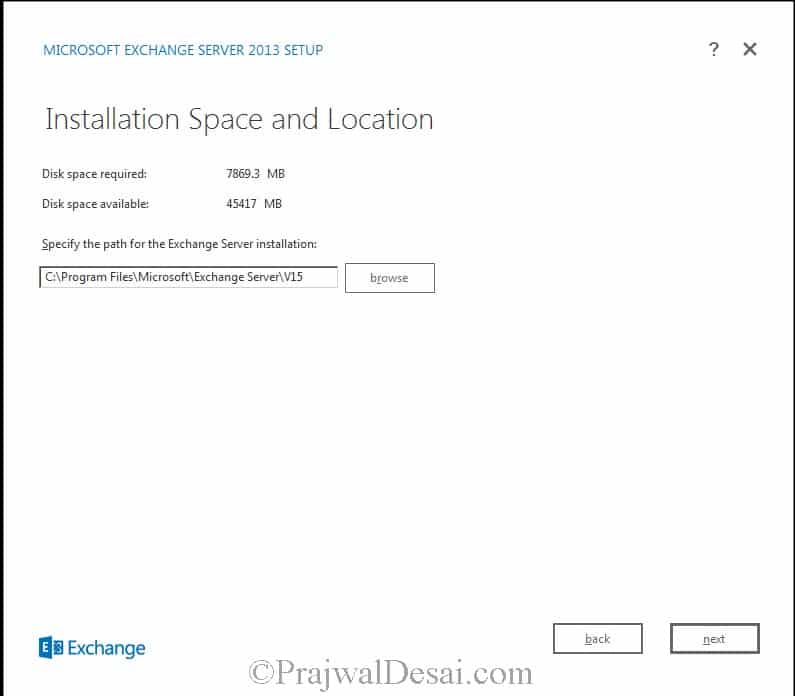
Choose the location on drive where exchange installation files must be stored. Click next.
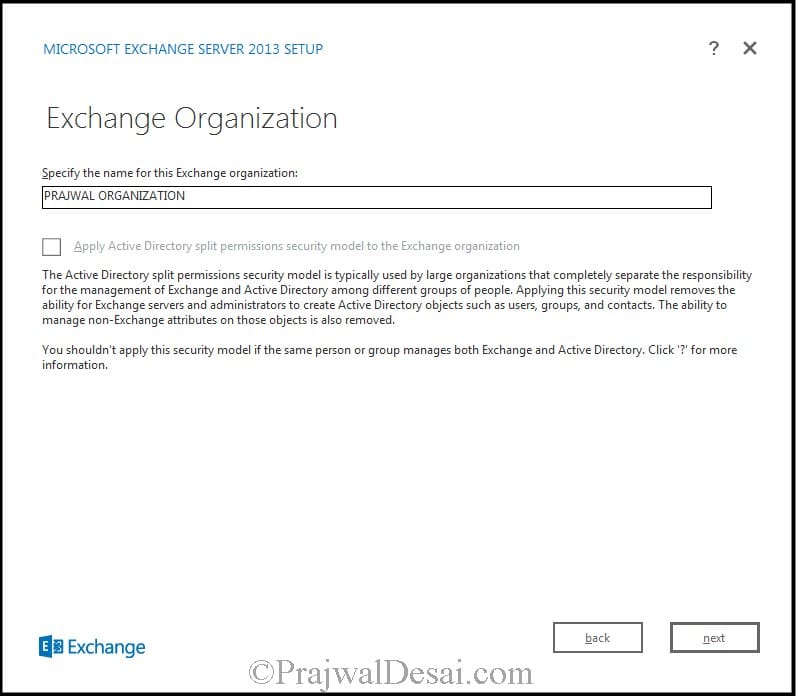
Specify the name of exchange organization and click next.
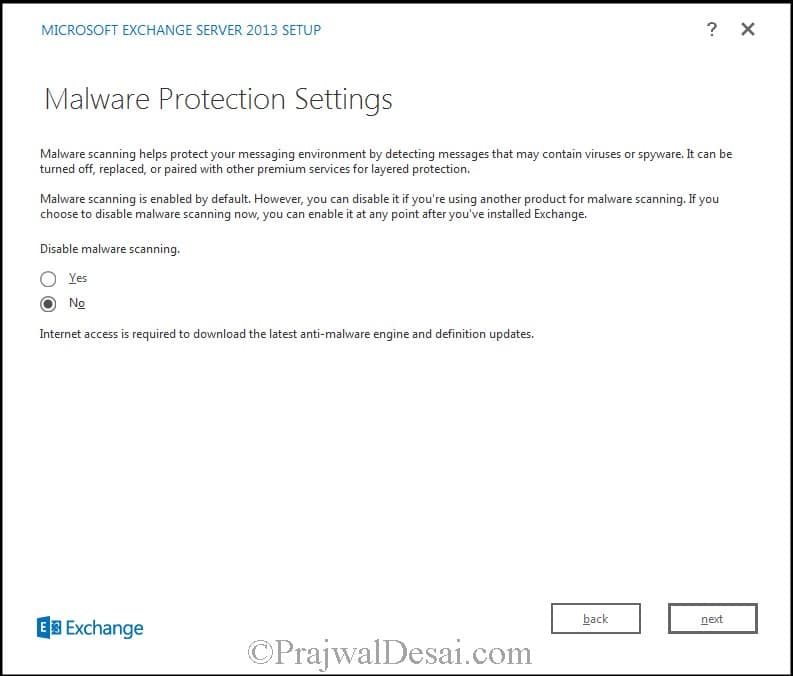
Malware scanning is enabled by default. You can set Diasble malware scanning to Yes if you do not require malware scanning. Click next.
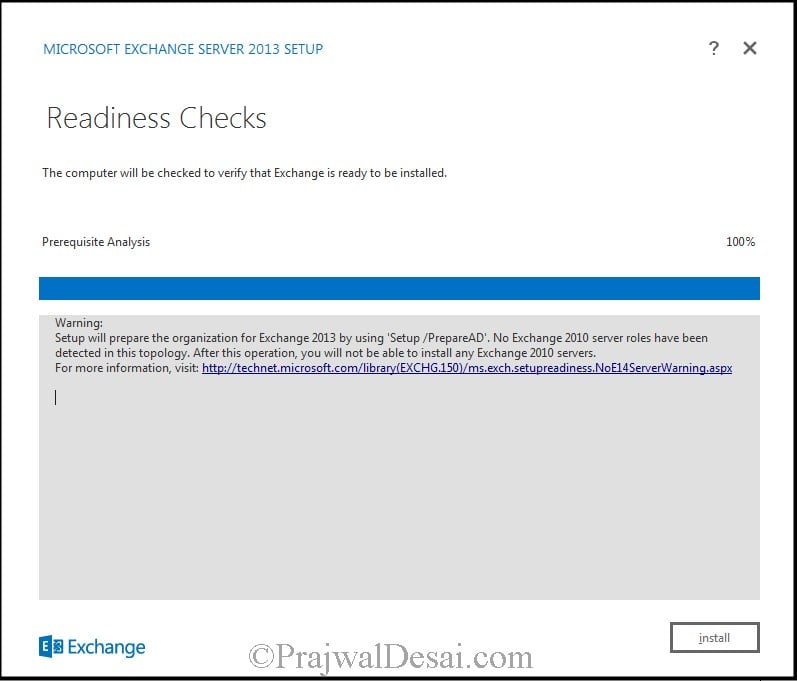
As said earlier in the post the AD prep can be done before exchange setup or as a part of installation. This step will prepare the Active directory for Exchange Server 2013. Click Install.
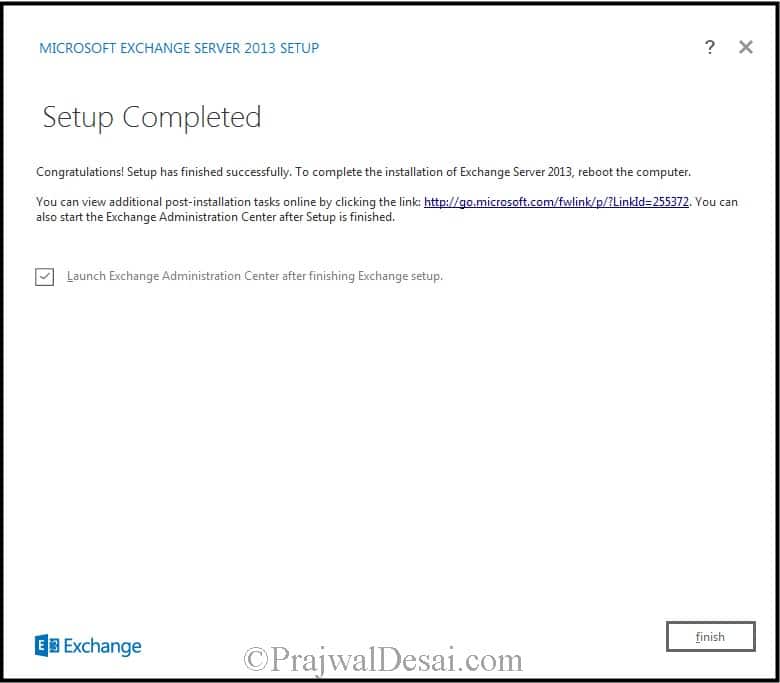
The Exchange Server 2013 setup is completed. Check the box Launch Exchange Administration Center after finishing Exchange setup. Click Finish.
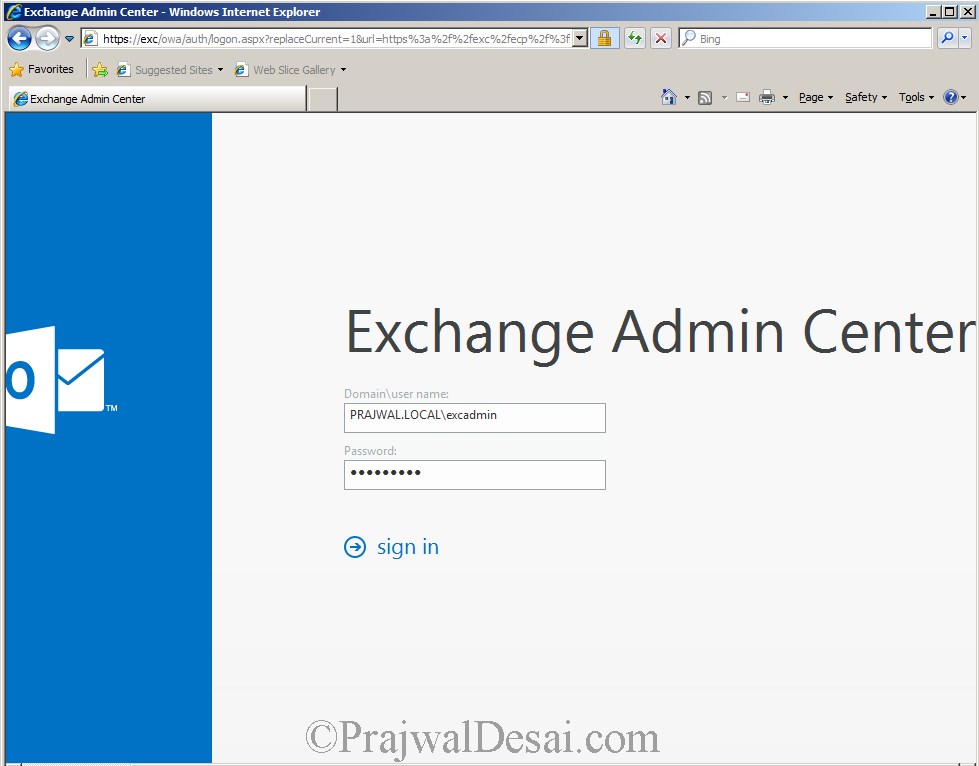
Login to Exchange Admin Center.

Hello Mr.
Please help me with your expertise to resolve this problem. The Microsoft Exchange Active Directory Topology service stopped working/ running. Thus, Most Exchange services cannot function when this service is stopped.
Please assist and advise what to do.
Thank you.
Derren
Hello,
when installing exchange 2013 CU22 on a windows server 2012 R2 machine after all the requirements we proceed to the install. We get all the way to step 10 of 14 and then presented with this error:
Error:
The following error was generated when “$error.Clear();
if (!$RoleIsDatacenter -and !$RoleIsDatacenterDedicated)
{
$createNewOab = $false;
$oabName = $null;
$oabAddressList = $null;
$oabVdirs = $null;
$oabGlobalWebDistribution = $false;
$oabConfiguredAttributes = $null;
Write-ExchangeSetupLog -Info (“Looking for an existing default OAB”);
$defaultOab = Get-OfflineAddressBook -DomainController:$RoleDomainController | where {$_.IsDefault};
if ($defaultOab -ne $null)
{
Write-ExchangeSetupLog -Info (“Found a default OAB: ” + $defaultOab.Name + “; checking its version”);
if ($defaultOab.ExchangeVersion.CompareTo([Microsoft.Exchange.Data.ExchangeObjectVersion]::Exchange2012) -lt 0)
{
$e15Oab = Get-OfflineAddressBook -DomainController:$RoleDomainController | where {$_.ExchangeVersion.CompareTo([Microsoft.Exchange.Data.ExchangeObjectVersion]::Exchange2012) -eq 0};
if ($e15Oab -eq $null)
{
Write-ExchangeSetupLog -Info (“Existing OAB is Exchange 2010 or older; will create a new OAB”);
$createNewOab = $true;
$oabName = $defaultOab.Name + ” (Ex2013)”;
$oabAddressList = $defaultOab.AddressLists;
$oabGlobalWebDistribution = $defaultOab.GlobalWebDistributionEnabled;
$oabConfiguredAttributes = $defaultOab.ConfiguredAttributes;
}
else
{
Write-ExchangeSetupLog -Info (“Already has an existing Exchange 2013 OAB:” + $e15Oab.Name + “; will not create a new OAB”);
}
}
else
{
Write-ExchangeSetupLog -Info (“Existing OAB is Exchange 2013 or newer; will not create a new OAB”);
}
}
else
{
Write-ExchangeSetupLog -Info (“Did not find a default OAB; will create one”);
$createNewOab = $true;
$oabName = [Microsoft.Exchange.Data.Directory.SystemConfiguration.OfflineAddressBook]::DefaultName;
$nonDefaultOabWithDefaultName = Get-OfflineAddressBook $oabName -DomainController:$RoleDomainController -ErrorAction SilentlyContinue | where {$_.IsDefault -eq $false};
if ($nonDefaultOabWithDefaultName -ne $null)
{
$createNewOab = $false;
Write-ExchangeSetupLog -Warning
("Offline address book " +$nonDefaultOabWithDefaultName.Name +
" already exists: " +$nonDefaultOabWithDefaultName.DistinguishedName +
". Use administrative tools to change it to default OAB.");}
$allGals = @(Get-GlobalAddressList -DomainController:$RoleDomainController | where {$_.IsDefaultGlobalAddressList});
if ($allGals -eq $null -or $allGals.Count -eq 0)
{
$createNewOab = $false;
Write-ExchangeSetupLog -Warning
(“Couldn’t find the default global address list. The default offline address book can’t be created.”);
}
elseif ($allGals.Count -gt 1)
{
$createNewOab = $false;
Write-ExchangeSetupLog -Warning
("Found " + $allGals.Count + " default global address lists. You can have only one default global address list in your organization. The default offline address book will not be created.");}
else
{
$oabAddressList = $allGals[0];
Write-ExchangeSetupLog -Info ("OAB will be based on default GAL: " + $oabAddressList.Name);
}
}
if ($createNewOab)
{
if ($oabGlobalWebDistribution -eq $false)
{
$currentAdSiteDn = (Get-ExchangeServer $RoleFqdnOrName -DomainController:$RoleDomainController).Site.DistinguishedName;
$allOabVdirs = @(Get-OabVirtualDirectory -ADPropertiesOnly -DomainController:$RoleDomainController);
$e15MinimumServerVersion = New-Object Microsoft.Exchange.Data.ServerVersion([Microsoft.Exchange.Data.Directory.SystemConfiguration.Server]::E15MinVersion);
if ($allOabVdirs -ne $null -and $allOabVdirs.Count -gt 0)
{
foreach ($oabVdir in $allOabVdirs)
{
if ([Microsoft.Exchange.Data.ServerVersion]::Compare($oabVdir.AdminDisplayVersion, $e15MinimumServerVersion) -gt 0)
{
$oabVdirSiteDn = (Get-ExchangeServer $oabVdir.Server -DomainController:$RoleDomainController).Site.DistinguishedName;
if ($oabVdirSiteDn -eq $currentAdSiteDn)
{
$oabVdirs = $oabVdir;
break;
}
elseif ($oabVdirs -eq $null)
{
$oabVdirs = $oabVdir;
}
}
}
}
if ($oabVdirs -ne $null)
{
Write-ExchangeSetupLog -Info ("OAB will be distributed to OAB virtual directory " + $oabVdirs.Name);
}
else
{
Write-ExchangeSetupLog -Info ("Could not find any OAB virtual directories; OAB will be configured without distribution.");
}
}
try
{
Write-ExchangeSetupLog -Info ("Creating new default OAB.");
$newOab = New-OfflineAddressBook
-Name $oabName
-AddressLists $oabAddressList-VirtualDirectories $oabVdirs
-GlobalWebDistributionEnabled $oabGlobalWebDistribution-IsDefault $true
-DomainController:$RoleDomainController;}
catch [Microsoft.Exchange.Data.Directory.ADObjectAlreadyExistsException]
{
Write-ExchangeSetupLog -Warning ("Tried to create new default OAB but the object already exists; it may have been created by another instance of setup.");
}
if ($oabConfiguredAttributes -ne $null)
{
Write-ExchangeSetupLog -Info ("Setting OAB ConfiguredAttributes to: " + $oabConfiguredAttributes);
Set-OfflineAddressBook $newOab -ConfiguredAttributes $oabConfiguredAttributes -DomainController:$RoleDomainController;
}
}
}
" was run: "Microsoft.Exchange.Data.DataValidationException: Database is mandatory on UserMailbox.
at Microsoft.Exchange.Data.Directory.ADDataSession.ObjectsFromEntries[TResult](SearchResultEntryCollection entries, String originatingServerName, IEnumerable1 properties, ADRawEntry dummyInstance)
at Microsoft.Exchange.Data.Directory.ADGenericPagedReader
1.GetNextPage()1.d__0.MoveNext()at Microsoft.Exchange.Data.Directory.ADGenericPagedReader
at Microsoft.Exchange.Data.Storage.OrganizationMailbox.InternalGetOrganizationMailboxesByCapability(IRecipientSession session, OrganizationCapability capability, QueryFilter optionalFilter)
at Microsoft.Exchange.ProvisioningAgent.NewOfflineAddressbookProvisioningHandler.FindGeneratingMailbox(String domainController, OrganizationId orgId)
at Microsoft.Exchange.ProvisioningAgent.NewOfflineAddressbookProvisioningHandler.ProvisionDefaultProperties(IConfigurable readOnlyIConfigurable)
at Microsoft.Exchange.Provisioning.ProvisioningLayer.ProvisionDefaultPropertiesImpl(Task task, IConfigurable temporaryObject, IConfigurable dataObject, Boolean checkProvisioningLayerAvailability)
at Microsoft.Exchange.Provisioning.ProvisioningLayer.ProvisionDefaultProperties(Task task, IConfigurable temporaryObject, IConfigurable dataObject, Boolean checkProvisioningLayerAvailability)
at Microsoft.Exchange.Configuration.Tasks.NewTaskBase`1.InternalStateReset()
at Microsoft.Exchange.Configuration.Tasks.Task.b__b()
at Microsoft.Exchange.Configuration.Tasks.Task.InvokeRetryableFunc(String funcName, Action func, Boolean terminatePipelineIfFailed)”.
Please can you help me find a solution to this?
this happens only whn u repeating the previous incomplete installation on the server. Arbitration and federation (which are default mailboxes in Exchge server) gets corrupted. dont beat around the bush rather go for fresh installation from scratch on a new server and this time avoid doing any Schema extension since it is already done whn u initiated the Exchnge installation for the first time.
Hi Prajwal, Need your Help… i am little confused.. u have not mentioned clearly on which server, which things you are installing as above? like earlier in your pages, it was so clear steps… it was like
1)Process to create a AD DC server, then its roles. after that next
2)Steps to go to Exchange server then its steps to follow to install exchange server 2013….
And also please can you help me out how to find out exchange server 2013 / 2013 sp1 setup differences..
i am following your blogs to practice corporate environment in Vmware workstation…
please help me……. awaiting for your help…
@anirban – What user account are you using to install exchange 2013 ? Does it have enough permissions to install the exchange server ?
Hello Prajwal Desai,
Do you know if it is now supported to install Exchange 2013 in Windows Server 2012R2?
@Markus – Windows Server 2012 R2 is supported only with Exchange 2013 SP1 or later. It is not supported for Exchange 2013 alone.
Hello Sir,
Please help me to configure exchange 2013 mail account in outlook , its cannot connect exchange server 2013
Hi Prajwal Desai,
Thanks for yours posting its really helpful for me.
I need the details of Lync 2013.
Regards,
SASI
Hello Sir,
Thanks verry much , but there is a problem that mails can be send received from owa, but when configuring outlook , showing outlook cannot connect to exchange server (outlook2013). Please help me to solv this.
Thank you Thomas and Moorthy
Thanks for the nice article with step by step tutorial on How to install exchange server 2013.
thanks and very useful