


In this blog post, we’ll explore different methods to disable Early Launch Anti-Malware Protection in Windows 10/11. Early Launch Anti-Malware Protection (ELAM) is a security feature in Windows operating systems designed to protect your system during the boot process.
ELAM ensures that only trusted drivers and software components are loaded when your computer starts up, helping to prevent malware from infiltrating your system at an early stage. This feature basically enables the evaluation of other drivers and helps the Windows kernel decide whether those drivers should be initialized.
However, there may be situations where you need to disable ELAM. For example, when troubleshooting driver issues, experiencing boot loop issues, or testing software compatibility, you may want to temporarily turn off the early launch antimalware protection feature using any of the methods discussed in this guide.

Important Considerations
If you are planning to temporarily disable the ELAM feature on your Windows devices, these are some of the points to consider.
- Security Risks: You should know that disabling ELAM can leave your system vulnerable to malware attacks during the boot process. We recommend you only disable it if absolutely necessary and re-enable it once your troubleshooting is complete.
- Backup Your System: Before making any changes, create a backup of your system to avoid data loss or corruption.
- Re-enable ELAM: Once your task is complete, don’t forget to re-enable ELAM to maintain system security. The methods covered in this guide also provide instructions for re-enabling ELAM drivers.
Method 1: Disable Early Launch Anti-Malware Protection via Group Policy
If you need to disable the Early Launch Anti-Malware Protection feature on multiple Windows computers within an Active Directory environment, using Group Policy is the recommended method.
To create a new GPO, you can either log in to a domain controller or a member server installed with GPMC. You can also install the GPMC on Windows 11 and configure the group policies.
Open the Group Policy Management console and expand the domain, right-click Group Policy Objects and select New. Enter the GPO name as ‘Disable ELAM Drivers‘ and click OK. Edit the GPO.

In the Group Policy Management Editor, navigate to Computer Configuration > Administrative Templates > System > Early Launch Anti-Malware. Locate the policy named “Boot-Start Driver Initialization Policy“. Double-click it and set it to Disabled. This setting disables Early Launch Anti-Malware Protection completely. Click Apply and OK.
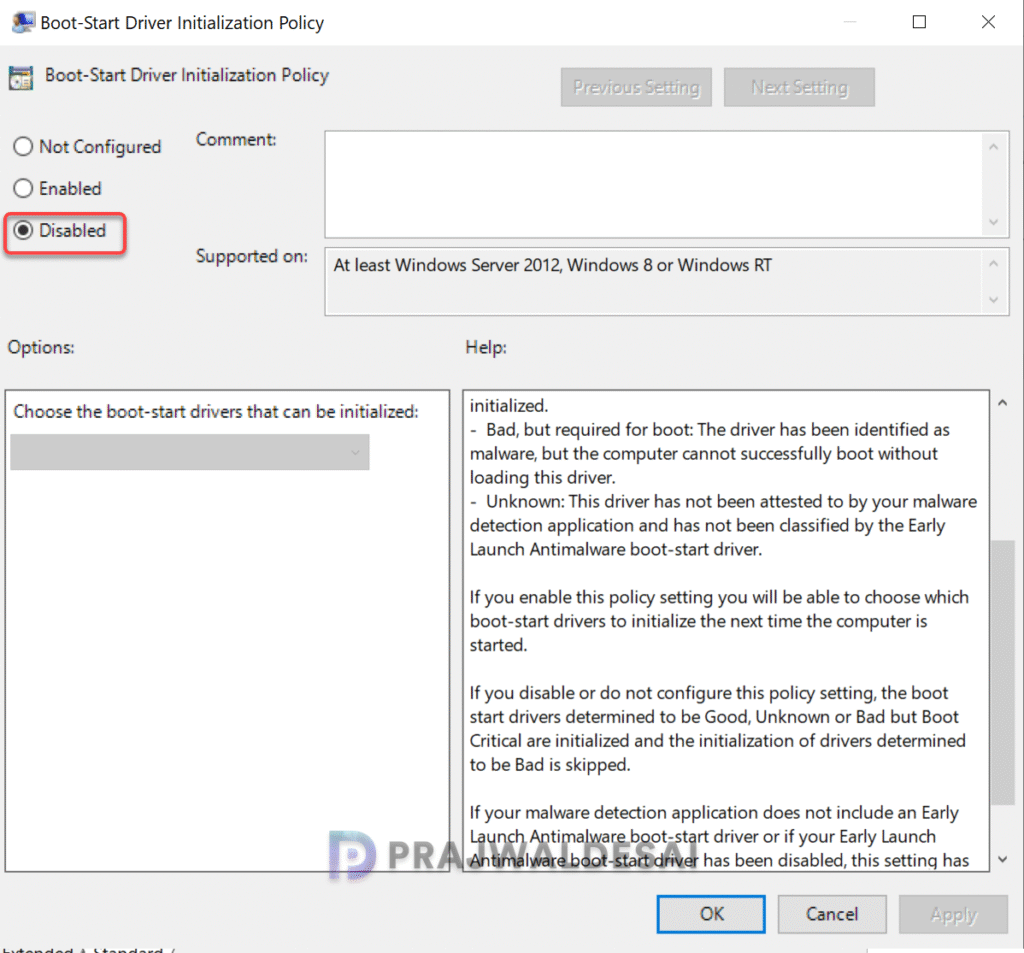
The following is the Boot-Start Driver Initialization Policy description:
- Enabled: If you enable this policy setting, you will be able to choose which boot-start drivers to initialize the next time the computer is started.
- Disabled: If you disable or do not configure this policy setting, the boot start drivers determined to be Good, Unknown or Bad but Boot Critical are initialized and the initialization of drivers determined to be Bad is skipped.
As the policy description, the Early Launch Antimalware boot-start driver can return the following classifications for each boot-start driver:
- Good: The driver has been signed and has not been tampered with.
- Bad: The driver has been identified as malware. It is recommended that you do not allow known bad drivers to be initialized.
- Bad, but required for boot: The driver has been identified as malware, but the computer cannot successfully boot without loading this driver.
- Unknown: This driver has not been attested to by your malware detection application and has not been classified by the Early Launch Antimalware boot-start driver.
Next, link the GPO to an OU containing Windows devices if you haven’t already. Update the group policy on the client computers. On a test client machine, you can manually perform the group policy update by running the gpupdate /force command.
For the changes to take effect, restart your computer. Early Launch Anti-Malware Protection is now disabled via GPO.
To re-enable the ELAM drivers using group policy, edit the ‘Disable ELAM drivers GPO‘ and set Boot-Start Driver Initialization Policy to Not Configured.
Method 2: Disable ELAM using Intune Policy
Using the Intune settings catalog policy, you can quickly disable Early Launch Anti-Malware Protection for Windows 10/11 devices. In the Intune admin center, go to Devices > Windows > Configuration. Create a new policy and choose Windows 10 and later as Platform and Settings Catalog as Profile Type. Click Create.
Enter the profile name and description. In the Configuration Settings tab, click +Add Settings. In the Settings Picker window, type “Boot-Start Driver Initialization Policy” and from the results select Boot-Start Driver Initialization Policy.
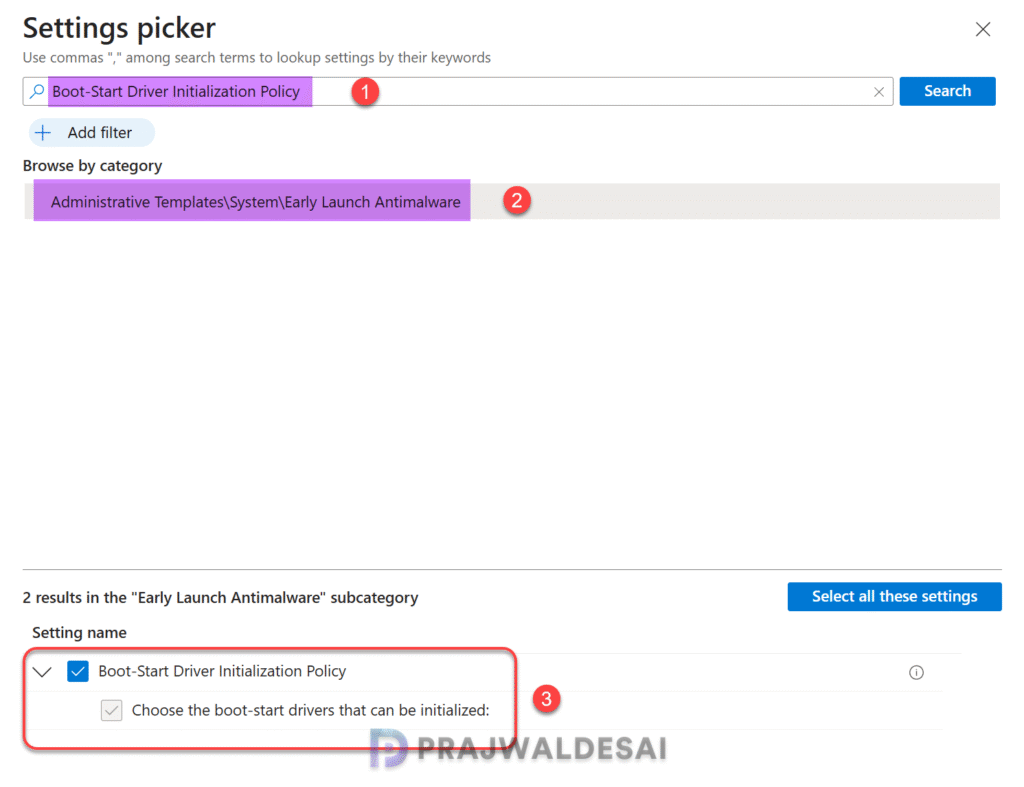
To turn off the ELAM feature, set Boot-Start Driver Initialization Policy to Disabled. Click Next.

In the scope tags section, you specify scope tags. Specifying Intune scope tags is optional, and you may skip this step. Click Next.
In the Assignments tab, select the Entra ID security device groups to which you want to assign the disable ELAM Intune policy. Click Next. On the Review + Create tab, verify the policy settings and click Create.
When the Windows 10/11 devices check-in with Intune, they receive the ELAM policy settings and accordingly, the early launch anti-malware protection feature is disabled.
Method 3: Disable ELAM using Local Group Policy Editor
The Local Group Policy Editor provides a straightforward way to disable ELAM on Windows 10/11 Pro and Enterprise editions.
Press Win + R, type gpedit.msc, and hit Enter. In the Local Group Policy Editor, go to Computer Configuration > Administrative Templates > System > Early Launch Anti-Malware. Locate the policy named “Boot-Start Driver Initialization Policy“. Double-click it and set it to Disabled. Click Apply and OK.
Close the Local Group Policy Editor window. Restart your computer for the changes to take effect. The ELAM is now disabled on the computer.

Remember to re-enable the feature in the Local GP editor once your troubleshooting is done to ensure your system remains protected against malware threats.
Method 4: Turn off Early Launch Anti-Malware Protection via Advanced Startup
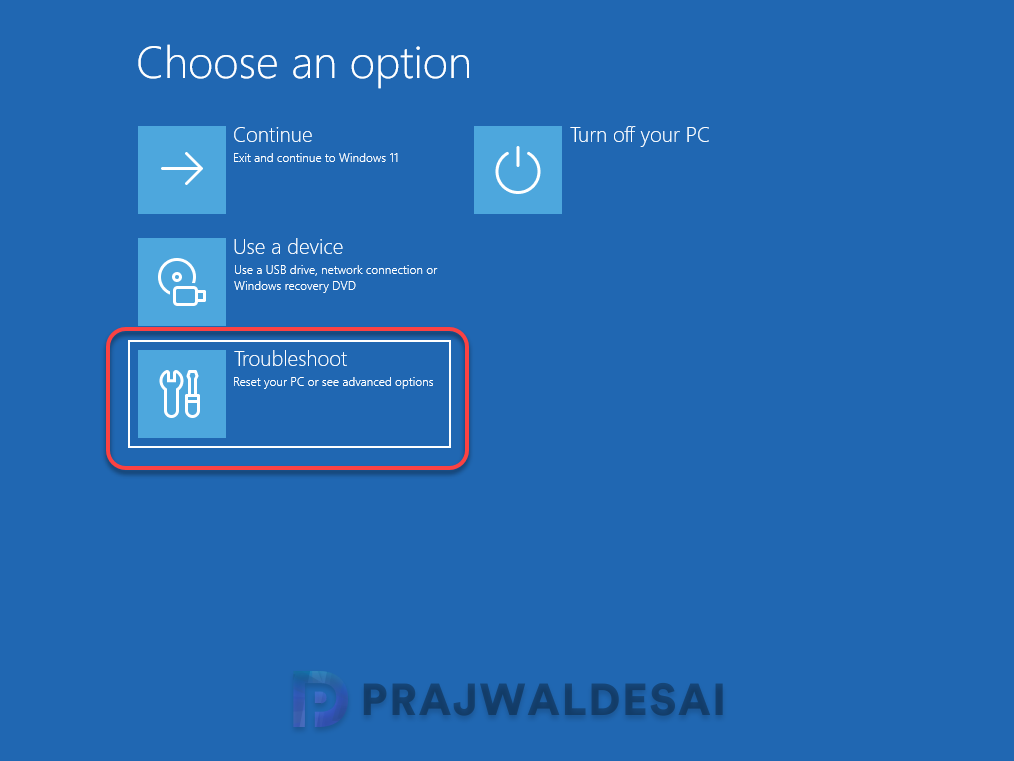
You can temporarily disable Early Launch Anti-Malware Protection from Advanced Startup options on Windows 11 and Windows 10. To access advanced boot options, hold the Shift key and click Restart from the power menu, or go to Settings > System > Recovery > Advanced Startup and click Restart now.
In the recovery mode, from the list of options, select Troubleshoot.
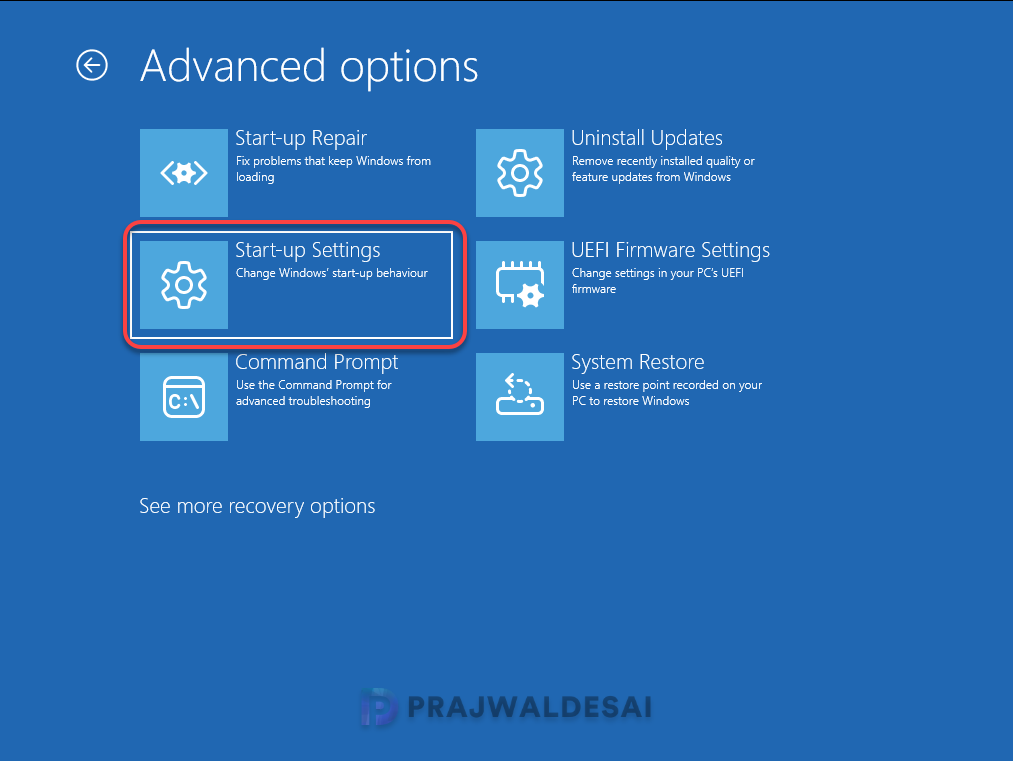
Now select Advanced options.

In the Advanced options menu, select Start-up Settings.
In the Startup Settings menu, select Disable Early Launch Anti-Malware Protection using the arrow keys and hit Enter. You may also type ‘8‘ to select the disable ELAM option.

Select Restart. Your system will boot with Early Launch Anti-Malware Protection disabled temporarily.

Method 5: Disable ELAM drivers using bcdedit
You can use the BCDEdit tool, a command-line utility built into Windows, to permanently disable Early Launch Anti-Malware Protection drivers and re-enable them.
Disable ELAM using bcdedit
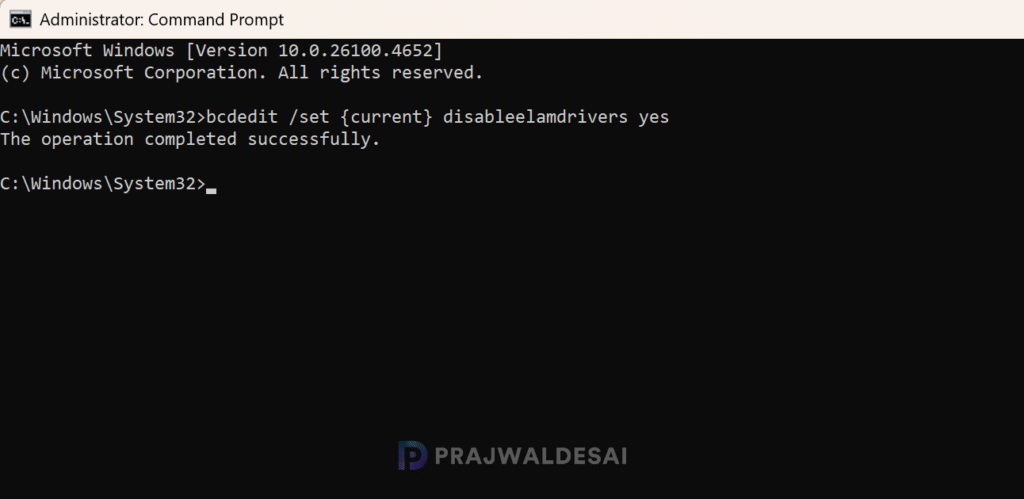
Press Win + S, type cmd, right-click on Command Prompt, and select Run as Administrator. Run the following command to disable the ELAM permanently on the Windows device.
bcdedit /set {current} disableelamdrivers yes- {current}: Refers to the current boot configuration.
- disableelamdrivers: This flag disables Early Launch Anti-Malware drivers.
- yes: Disables the ELAM drivers
You must reboot your system for the changes to take effect. ELAM drivers will now be disabled during the boot process.
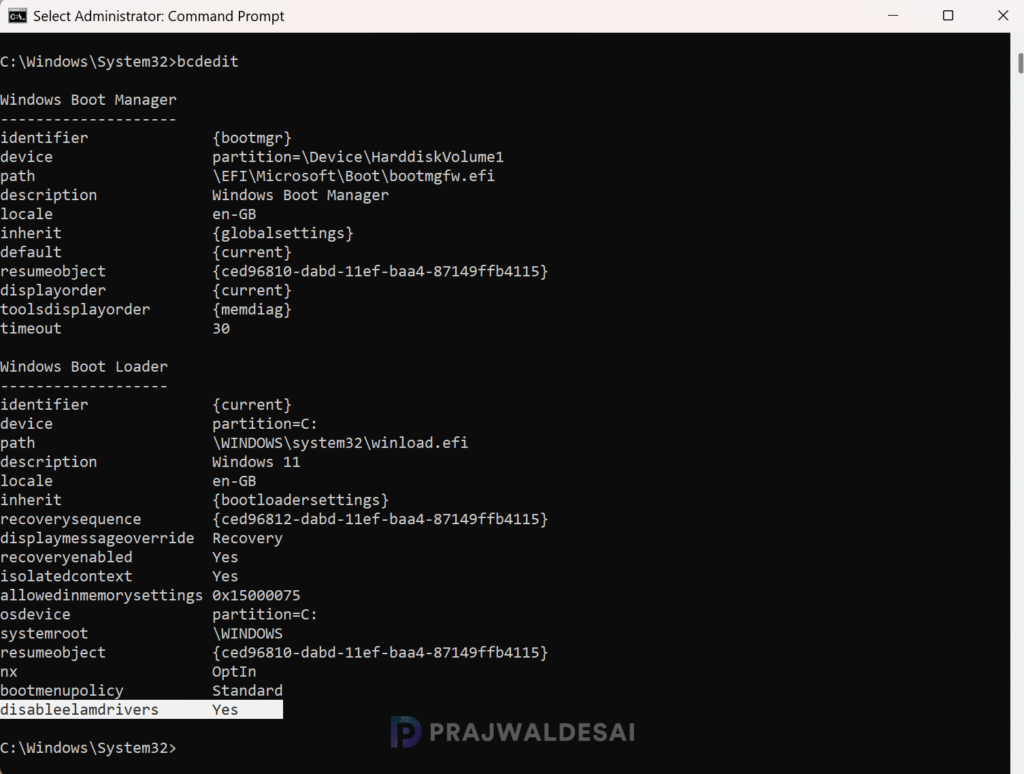
Verify if ELAM Drivers are disabled
Run the below command to verify if the ELAM drivers are disabled on the Windows device.
bcdeditIn the output, under the Windows Boot Loader options, if you see disableelamdrivers=Yes, it means the ELAM drivers are disabled on the computer.
Re-Enabling ELAM Drivers
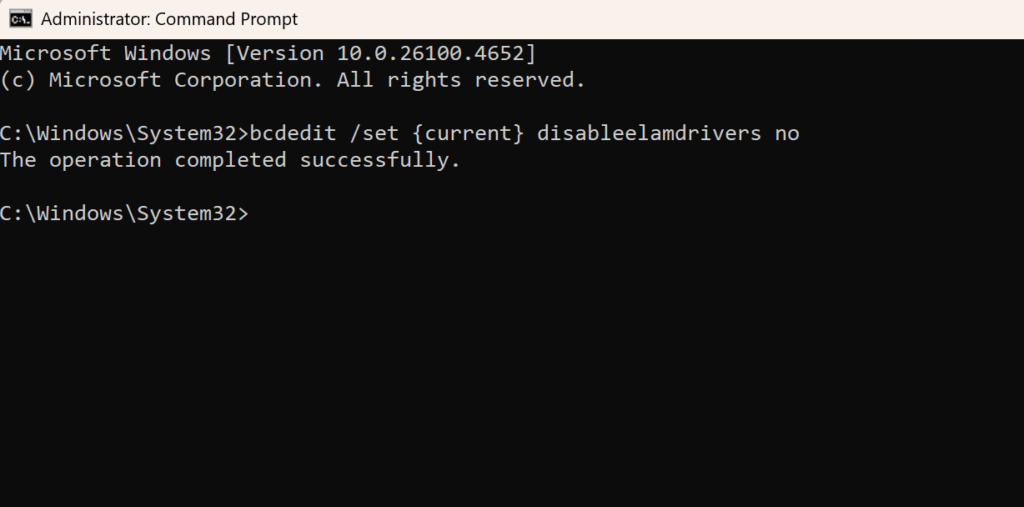
Once you are done with your troubleshooting, if you want to re-enable ELAM drivers with bcdedit, open the command prompt as administrator and run the below command.
bcdedit /set {current} disableelamdrivers noRestart your computer after running the command to restore ELAM functionality.
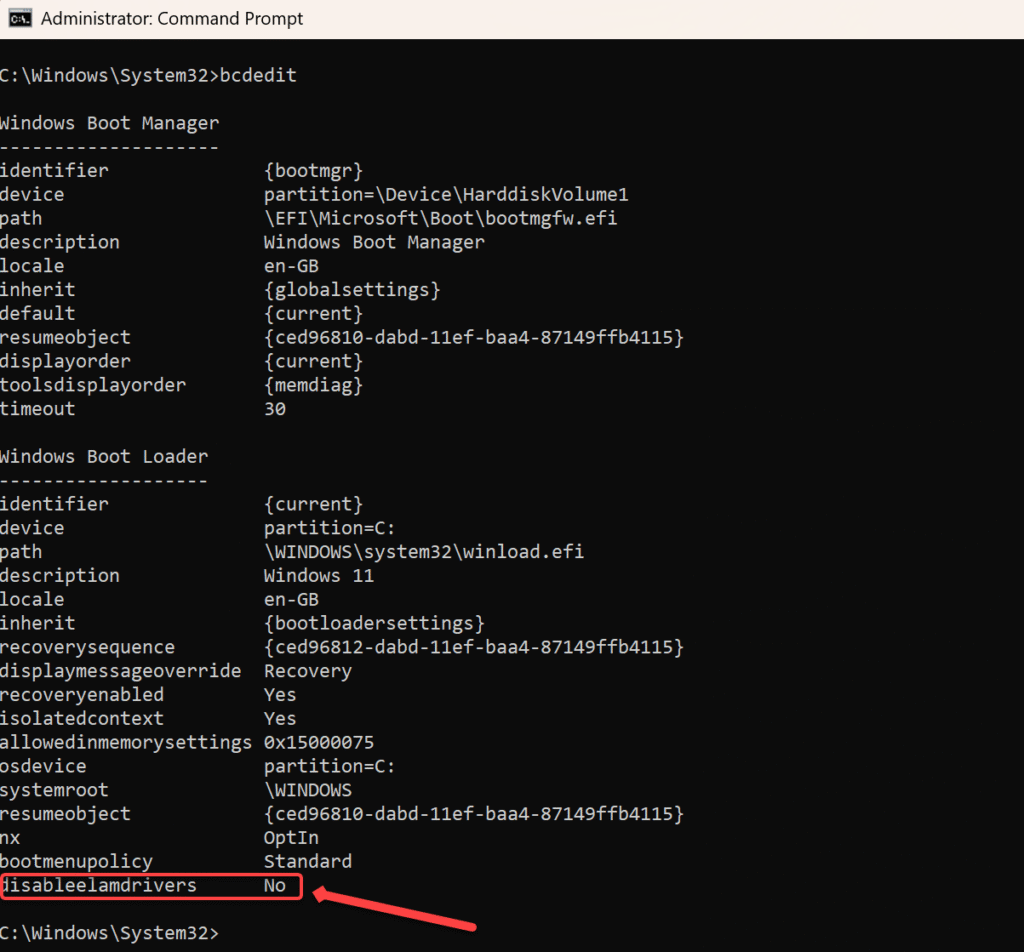
Verify if ELAM Drivers are re-enabled
In the command prompt, run the bcdedit command. In the output, if you see disableelamdrivers=No, it means the ELAM drivers are enabled.
Conclusion
In this guide, I covered different ways to disable Early Launch Anti-Malware (ELAM) drivers and re-enable them back. Disabling ELAM drivers can be necessary for troubleshooting or testing purposes, especially if certain drivers or software are causing compatibility issues. However, it’s crucial to understand the security implications and I recommend re-enabling ELAM once your work is done. By following the method discussed above, you can safely manage ELAM settings on your Windows 10/11 system.
