

In this post I will cover the steps to deploy Visual Studio 2019 using SCCM. Using Configuration Manager, we will package Visual Studio 2019 and deploy it our endpoints.
The Visual Studio 2019 is a creative launching pad that you can use to edit, debug, and build code, and then publish an app. An integrated development environment (IDE) is a feature-rich program that can be used for many aspects of software development.
The Visual Studio includes compilers, code completion tools, graphical designers, and many more features to ease the software development process.

Visual Studio 2019 Editions
The Visual Studio 2019 editions include :-
- Visual Studio Enterprise 2019
- Visual Studio Professional 2019
- Visual Studio Community 2019
- Visual Studio Team Foundation Server Office Integration 2019
Visual Studio is available for Windows and Mac. In one of my posts, I covered the Visual Studio 2015 deployment using SCCM. However when you deploy Visual Studio 2019 using SCCM, few things change. This includes the install command, components that you download etc.
In this post, we will deploy Visual Studio 2019 Professional using SCCM. The steps will remain same when you deploy enterprise edition.
Visual Studio 2019 System Requirements
Before you deploy Visual Studio 2019 using SCCM, you must know the system requirements. This is important because the endpoints must meet these requirements.
Read Microsoft Visual Studio 2019 requirements and make sure the minimum requirements are met.

Download Visual Studio 2019 Professional / Enterprise
Microsoft doesn’t provide you an offline installer for Visual Studio 2019. That’s because Visual Studio 2019 has got lot of components and an end user may not need all components. So what you get is an Visual Studio Installer (executable file) which is approx. 1.32 MB in size.
Using the Visual Studio installer, you download what’s required for your work. But when it comes to deploying Visual Studio 2019 on multiple computers, you definitely need an installer along with installation files. Makes no sense in each computer downloading GB’s of data from Microsoft.
Microsoft also allows you to download only the components that are required. A complete layout for a single language locale requires about 35 GB of disk space for Visual Studio Community. The same download weighs 42 GB for Visual Studio Enterprise. Additional language locales require about half a GB each.
Download the latest version of Studio 2019 from Visual Studio downloads section. We will use the executable file to download the components.
I have got the VS Professional executable file in my downloads folder. Launch the Command Prompt as administrator and enter the below command.
The below command downloads visual studio professional 2019 complete local layout with en-US as default language.
Destination – Folder path where you want to download the files
vs_professional.exe --layout Destination --lang en-US
The below command downloads visual studio enterprise 2019 complete local layout with en-US as default language.
vs_enterprise.exe --layout Destination --lang en-US
I will be downloading the entire local layout with all features which will require lot of disk space and time as well. If you wish to download individual components, refer the local install cache options.

The download takes good amount of time. Wait until you see the setup completed successfully message. That confirms we have successfully downloaded the Visual Studio 2019 Professional. Close the command prompt.

Let’s take a look at total download size of Visual Studio 2019 and it is 28.7 GB in size. That is because we downloaded the complete local layout. We will use this folder to package and deploy Visual studio 2019 using SCCM.

Create Visual Studio 2019 Application in SCCM
In this step, we will create a new application for Visual Studio 2019 in SCCM. At the end we will have the VS 2019 application ready for deployment.
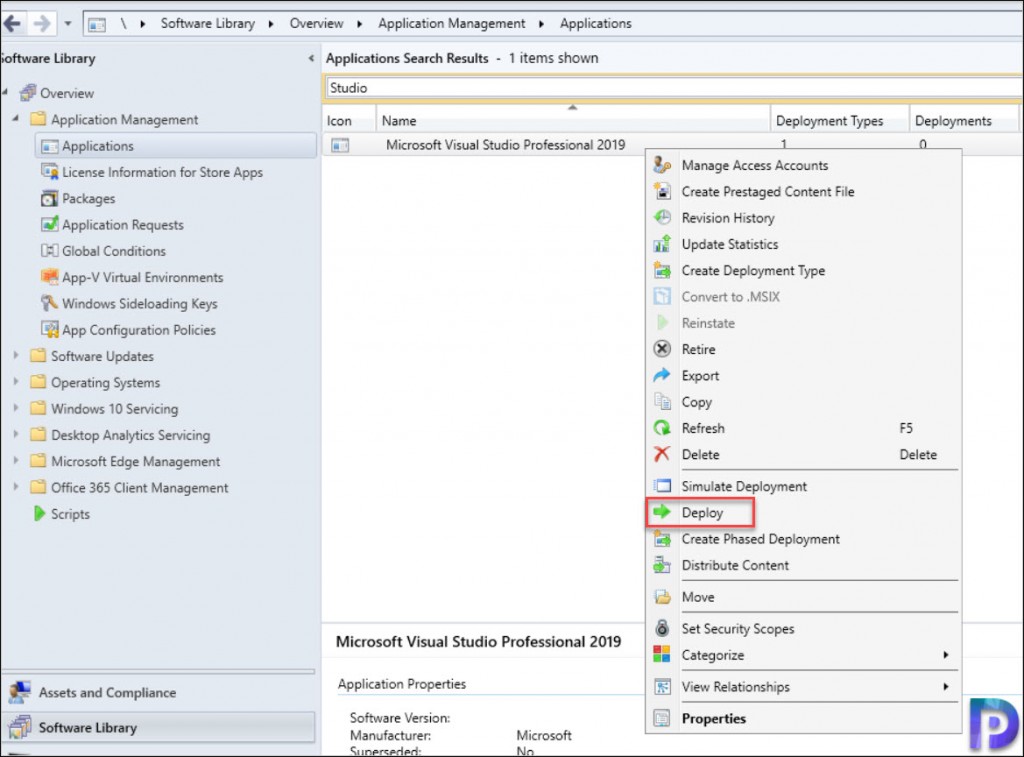
Launch the Configuration Manager console and navigate to Software Library\Overview\Application Management\Applications.
Right click Applications and click Create Application.

On the General window, select Manually specify the application information. Click Next.

Specify the general information about the Visual Studio 2019 application. This includes name of the application, publisher info, software version etc. Click Next.

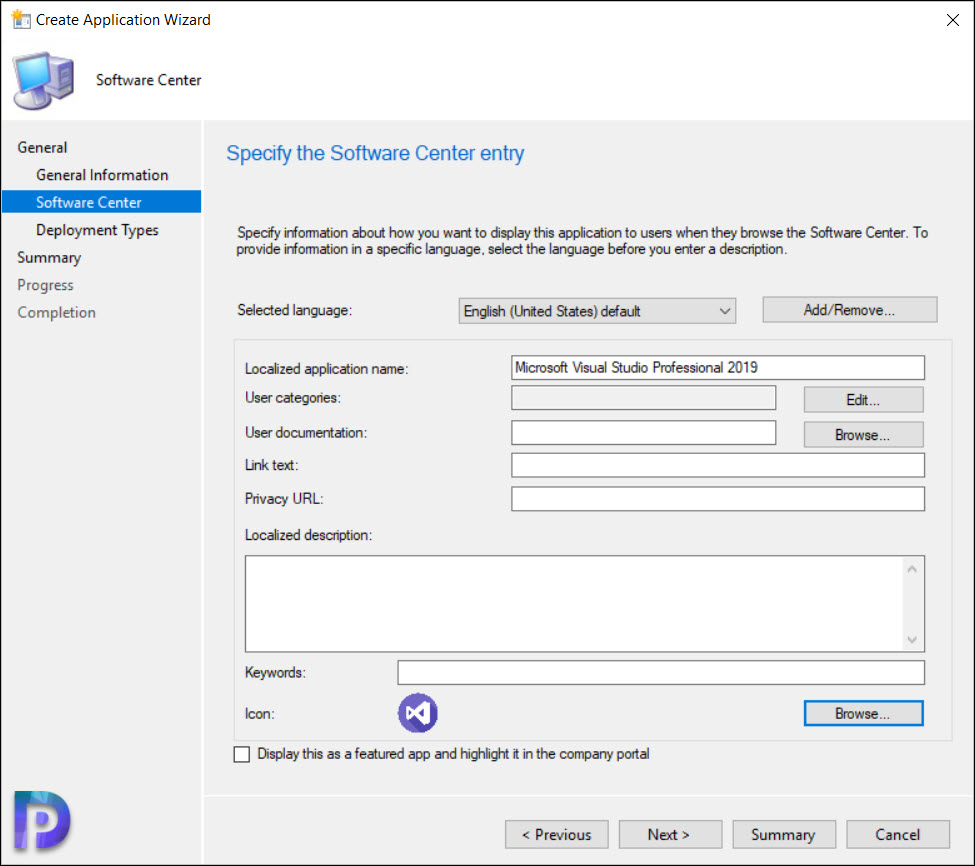
On the Software Center window, you can specify Visual Studio 2019 icon. It looks good to see an application in Software Center with an icon. Click Next.
On the Deployment Types window, click Add button.

On the Create Deployment wizard, select Manually specify the deployment type information. Click Next.

On the content window, specify the content location. Speciy the folder that contains all the files including the VS 2019 install file.
Specify the install and uninstall program as listed below. Note that it is a double hyphen(–) before quiet, wait and norestart switches.
- Visual Studio 2019 Install Program – vs_professional.exe –quiet –wait –norestart
- Visual Studio 2019 Uninstall Program – vs_professional.exe /uninstall /force /quiet /norestart /log “C:\Windows\Temp\VS_Uninstall.log”
Click Next.

You must add a detection method to detect the presence of Visual Studio 2019. Specify the following as detection method.
- Setting Type – File System
- Type – File
- Path – %ProgramFiles(x86)%\Microsoft Visual Studio\2019\Professional\Common7\IDE
- File or Folder Name – devenv.exe
- Select “The file system setting must satisfy the following rule to indicate the presence of this application”.
- Property – Version
- Operator – Greater than or equal to
- Version – 16.4.30802.185
Click OK.

You may add additional detection methods if you wish to. Click Next.

Specify the user experience settings for VS 2019 deployment. Click Next.

Click Next on Requirements and Dependencies window. On the Summary window, verify the settings. Click Next.

Close the Create Deployment type wizard.

Close the Create Application wizard. Finally we are ready to deploy Visual Studio 2019 using SCCM.

Deploy Visual Studio 2019 Using SCCM
In this step we will deploy the Visual Studio 2019 SCCM application to computers.
- Launch the Configuration Manager console.
- Navigate to \Software Library\Overview\Application Management\Applications.
- Right click Visual Studio 2019 application and click Deploy.
On the General window, specify the target device collection. Click Next.

If you haven’t distributed the content to distribution points, you can do it in this step. Click Add button and select the distribution points. Click Next.

On the Deployment Settings window, select the action as Install and purpose as Available. Click Next.

You may schedule the application deployment or simply click Next to deploy the application as soon as possible. Click Next.

Specify the User Experience settings. Click Next.

Finally on the Completion window, click Close.

SCCM Software Center – Install Visual Studio 2019
Login to the client machine and launch the Software Center. If this machine is part of target device collection, the Visual Studio 2019 application should appear in Software Center.
Select the Visual Studio 2019 application and click Install. The moment I clicked Install, it immediately failed. There is not enough temporary space reserved to download the software. You can use the Configuration Manager control panel applet to adjust the available temporary space.

The above error is expected because the application download size is huge and you might need to increase the ccmcache size.
There are two ways to increase the client cache size in SCCM. To change the ccmcache size on multiple machines, Go to Administration\Overview\Client Settings. Edit the client settings and click Client Cache Settings. Under Device Settings, set Configure client cache size to Yes. Configure the Maximum cache size (MB).
For now I am going to modify the client cache size just on this machine. I am setting it as 35GB.

After increasing the cache size, the download is working.

The Visual Studio 2019 application installation is successful. You can monitor the application installation progress using the AppEnforce.log file.
 Context: Machine
Command line: vs_professional.exe --quiet --wait --norestart
Content path: C:\Windows\ccmcache\f
Working directory:  AppEnforce
Prepared working directory: C:\Windows\ccmcache\f
Prepared command line: "C:\Windows\ccmcache\f\vs_Professional.exe" --quiet --wait --norestart
Executing Command line: "C:\Windows\ccmcache\f\vs_Professional.exe" --quiet --wait --norestart with user context
Working directory C:\Windows\ccmcache\f
Post install behavior is BasedOnExitCode
Waiting for process 376 to finish.  Timeout = 120 minutes.
Process 376 terminated with exitcode: 0
Looking for exit code 0 in exit codes table...
Matched exit code 0 to a Success entry in exit codes table.

I hope this guide helps you to deploy Visual Studio 2019 using SCCM in your setup. Refer to the following guide to deploy Visual Studio Updates using SCCM.

Thanks for this, Could you please provide the Deploy Guide for Visual Studio 2022 using SCCM
Mr. Desai,
Thank you for this. Very helpful in getting Visual Studio Professional 2019 installed using MECM. I just have a question.
I successfully installed from the Software Center as your instructions were very thorough. But I want to verify that all the components were successfully installed as well, particularly the C++ libraries. (At least this is the request I am getting from the instructor for and engineering class he is teaching.) I hope this makes sense and that you might be able to provide some insight that I am looking for.
Thanks again! Your tutorial was highly beneficial.
Zach L