


In this article, you’ll learn how to configure Microsoft Defender SmartScreen using Intune. Microsoft Defender SmartScreen protects against phishing or malware websites and applications, and the downloading of potentially malicious files.
By configuring the Microsoft Defender SmartScreen in Intune (MEM), you can protect against potentially malicious files and websites on computers.
When you enable the Microsoft Defender SmartScreen, it blocks the downloads of the low-reputation apps that might cause unexpected behaviors and even malicious sites for users.

Microsoft Defender SmartScreen works well with Intune, Group Policy, and mobile device management (MDM) settings to help you manage your organization’s computer settings.
Based on how you set up Microsoft Defender SmartScreen, you can show employees a warning page and let them continue to the site, or you can block the site entirely.
To configure the Microsoft Defender SmartScreen settings, we will use the Intune Settings Catalog. The profile can be applied to both Windows 10 and Windows 11 computers.
What is Microsoft Defender SmartScreen?
When you turn on Microsoft Defender SmartScreen, it helps to protect users if they try to visit sites previously reported as phishing or malware websites, or if a user tries to download potentially malicious files.
There are two important functions that Microsoft Defender SmartScreen does:
- It determines if the sites visited by user is potentially malicious or safe.
- It also determines whether a downloaded app from Internet is potentially malicious or safe.
How does Microsoft Defender SmartScreen work?
The Microsoft Defender SmartScreen determines whether a site is potentially malicious by:
- Analyzing visited webpages looking for indications of suspicious behavior. If Microsoft Defender SmartScreen determines that a page is suspicious, it will show a warning page to advise caution.
- Checking the visited sites against a dynamic list of reported phishing sites and malicious software sites. If it finds a match, Microsoft Defender SmartScreen shows a warning to let the user know that the site might be malicious.
Microsoft Defender SmartScreen determines whether a downloaded app or app installer is potentially malicious by:
- Checking downloaded files against a list of reported malicious software sites and programs known to be unsafe. If it finds a match, Microsoft Defender SmartScreen shows a warning to let the user know that the site might be malicious.
- Checking downloaded files against a list of files that are well known and downloaded by many Windows users. If the file isn’t on that list, Microsoft Defender SmartScreen shows a warning, advising caution.
A similar feature is also available in Microsoft Edge. Learn how you can configure PUA Protection in Edge using Intune.
Read: Set up and use Microsoft Defender SmartScreen on individual devices
How to Configure Microsoft Defender SmartScreen using Intune
Let’s look at the steps to configure Microsoft Defender SmartScreen using Intune:
First sign-in to the Intune Portal (Microsoft Endpoint Manager admin center). Go to Devices > Windows > Configuration Profiles. Select Create Profile.

Select Platform as Windows 10 and later and Profile Type as Settings catalog. Click Create.

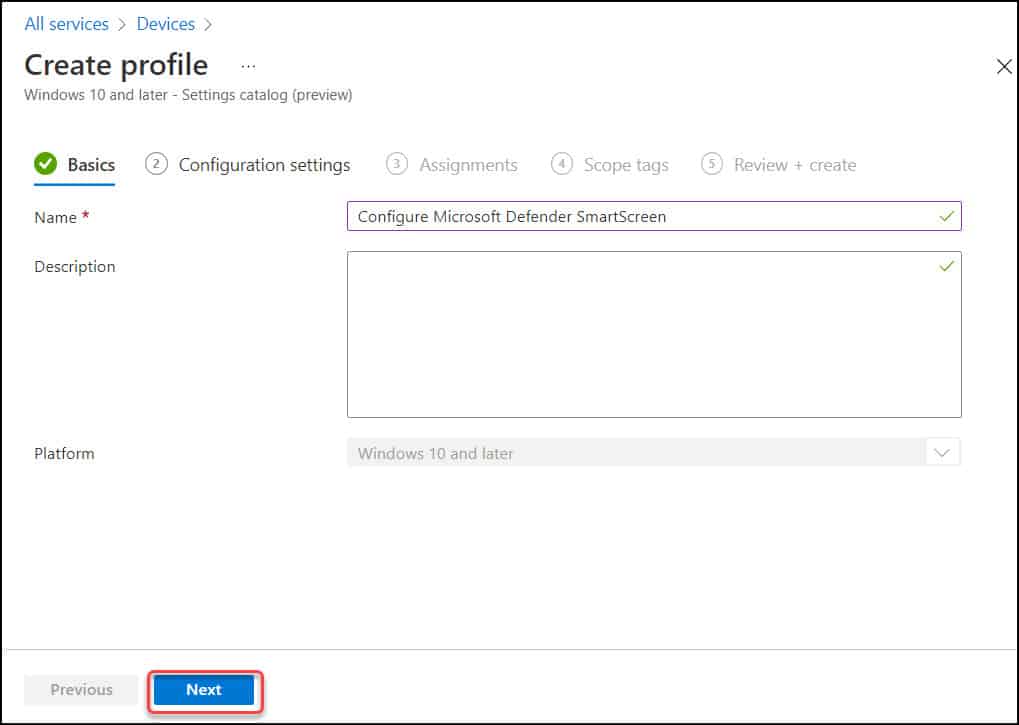
On the Basics tab of Create Profile window, specify the name of the profile. You can specify the profile name as Configure Microsoft Defender SmartScreen or Enable Microsoft Defender SmartScreen.
Add a description about this profile and click Next.
The Intune settings catalog allows you to choose to enable the Microsoft Defender SmartScreen. On the Configuration Settings window, select Add Settings.
On the Settings Picker window, type Defender SmartScreen in the search box and click Search. The results include all the settings related to Microsoft Defender SmartScreen. Select Administrative Templates\Windows Components\File Explorer.
Now under the Setting name, select the setting Configure Windows Defender SmartScreen. Close the window.

On the Configuration Settings tab, choose the following settings:
- Configure Windows Defender SmartScreen – Enable this setting by moving the slider to Enabled.
- Pick one of the following settings (device) – Warn and Prevent bypass or Warn.
What is the difference between “Warn and Prevent bypass” and “Warn” in Microsoft Defender SmartScreen?
- Warn and prevent bypass – If you select “Warn and prevent bypass” option, Defender SmartScreen’s dialogs will not present the user with the option to disregard the warning and run the app. SmartScreen will continue to show the warning on subsequent attempts to run the app.
- Warn – If you enable this policy with the “Warn” option, SmartScreen’s dialogs will warn the user that the app appears suspicious, but will permit the user to disregard the warning and run the app anyway. SmartScreen will not warn the user again for that app if the user tells SmartScreen to run the app.
Based on how you want to configure the SmartScreen for users, select the appropriate option. Here let’s select Warn option.
Click Next to continue.

On the Assignments tab, under Included groups, select Add groups and then choose groups to include one or more groups. Select Next to continue.

Selecting scope tags are optional. However, you may include or add scope tags. Click Next.

On the Review+Create window, review the Defender SmartScreen settings and click Create.

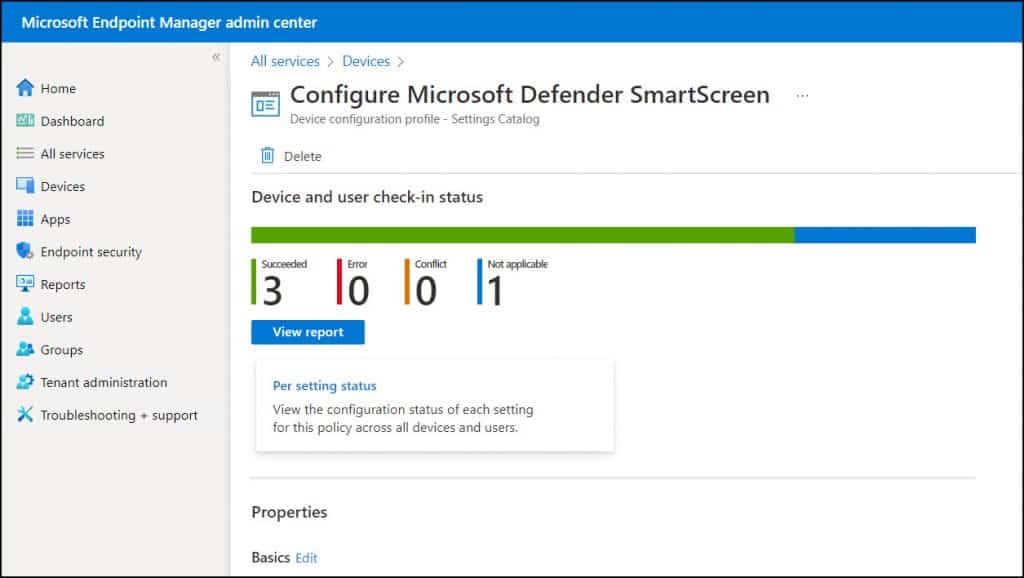
After you create the policy, a notification will appear automatically in the top right-hand corner with a message. Policy Created – “Configure Microsoft Defender SmartScreen” created successfully. The policy is also shown in the Configuration profiles list.

After you deploy the policy, the assigned groups will receive the profile settings once the devices check-in with the Intune service.
To monitor the policy assignment, from the list of Configuration Profiles, select the policy and here you can check the device and user check in status.
If you click View Report, additional details are displayed.
End User Experience with Microsoft Defender SmartScreen
After you deployed the Defender SmartScreen settings in Intune, let’s see few examples of how the Microsoft Defender SmartScreen acts when it detects malicious page and application.
Note: When Microsoft Defender SmartScreen warns or blocks a user from a website, it’s logged as Event 1035 – Anti-Phishing.
Suppose the user opens the Edge browser and visits a malicious or phishing site, the SmartScreen immediately cautions the user about the site. It reports that the site is unsafe, and allows user to go back to previous site.
The user can report the site doesn’t contain phishing threats and the information will be sent to Microsoft.
If the site is not malicious or safe as per the user, the user can select Continue to the unsafe site (not recommended).

The below example shows how the Microsoft Defender SmartScreen blocks a file downloaded from internet which it believes is malicious.


Hi Prajwal
Will this work for Chrome too, if not how to enable it in chrome ?
Hi Prajwal,
The blog was very good. I tested today itself almost 4-5 policy very nice guide. Thank you for sharing. I have question after setting up of catalog how to view and edit. I tried to click on the profile and scroll down and selected edit, but not able to see the full policy like when we created. Please let me know how to see the configured polices.
Thanks
Narayanan
There should be an edit option available for each policy which allows you to edit the assignments, policy settings etc.
Thank you Prajwal. I’m able to view settings.
Thanks
Narayanan