In this post, we will see how to configure client side targeting in WSUS. In the previous posts we have seen Installation, Configuration, Managing and troubleshooting the WSUS server.
When you configure the Group Policy settings for WSUS, use a Group Policy object (GPO) linked to an Active Directory container. The container contains the computers for which the updates are to be deployed.
In Client side targeting you use Group Policy objects (GPOs) to add computers to computer groups. Most of all client side targeting in WSUS is required when you might have multiple GPOs linked to several organizational units (OUs). This enables you to have different WSUS policy settings applied to different types of computers.
You can enable client-side targeting through Group Policy or by editing registry entries for the client computers. When the client computers connect to the WSUS server, they will add themselves into the correct computer group.
If you have already have an OU to which you want to apply the policy, you can use that OU. First of all on the Domain Controller, we will create a OU called Workstations. We will then move a client computer called CLIENT into the OU.
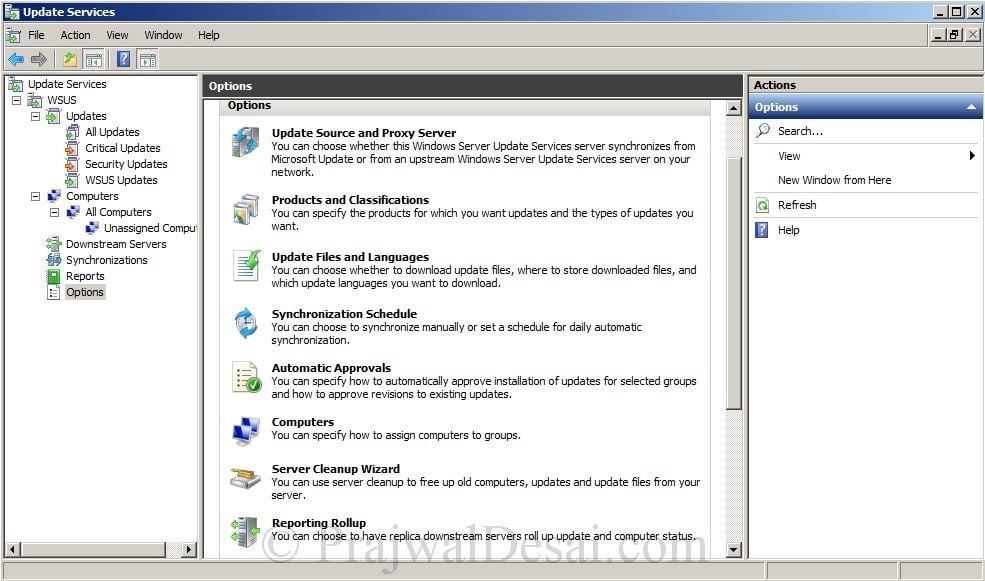
Login to the WSUS server. Launch the WSUS Console.
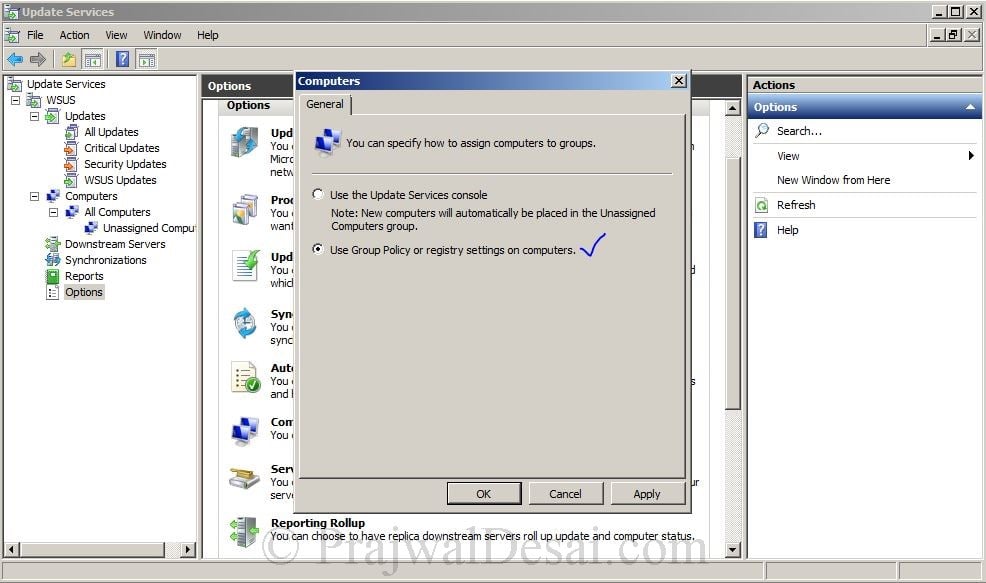
Click on Computers. A new windows pops up, under General Tab choose “Use Group Policy or registry settings on computers“. Click Apply and OK.
How to Configure Client Side Targeting in WSUS
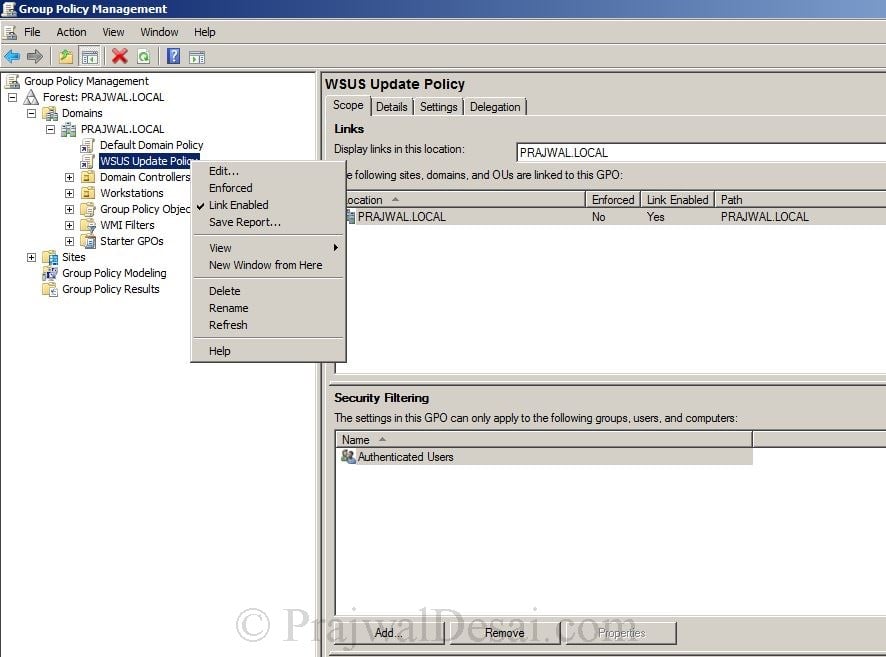
Now we will configure client side targeting in WSUS through the group policy. Right-click the domain and create a policy called WSUS Update Policy. Right-click the WSUS Update Policy, click Edit.
Note – You can create multiple GPO’s if required. In case you have several OU’s and you want to apply different WSUS settings, you will need to create separate GPO’s for each, define the windows update settings and apply the policies on desired OU’s.
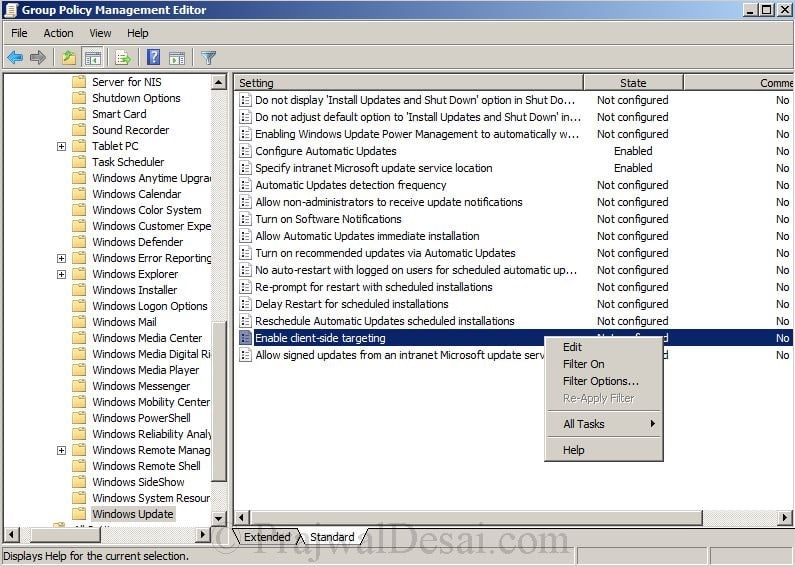
On the Group policy management editor, click on Computer Configuration > Policies > Administrative templates > Windows Component > Windows Update.
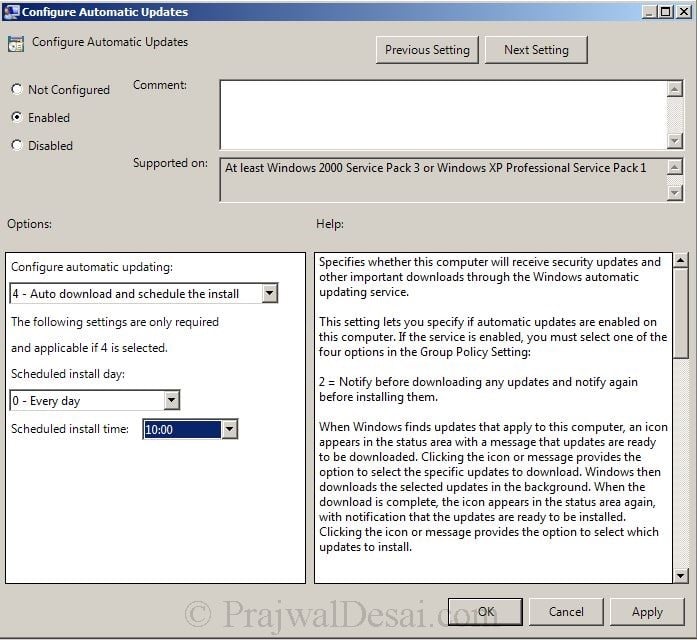
Double Click Configure Automatic Updates. Click Enabled to enable the policy. Under Options, for Configure automatic updating – select option 4 – Auto download and schedule the install. Set Schedule install day as Everyday and Schedule install time as 10:00. Click Apply and OK.
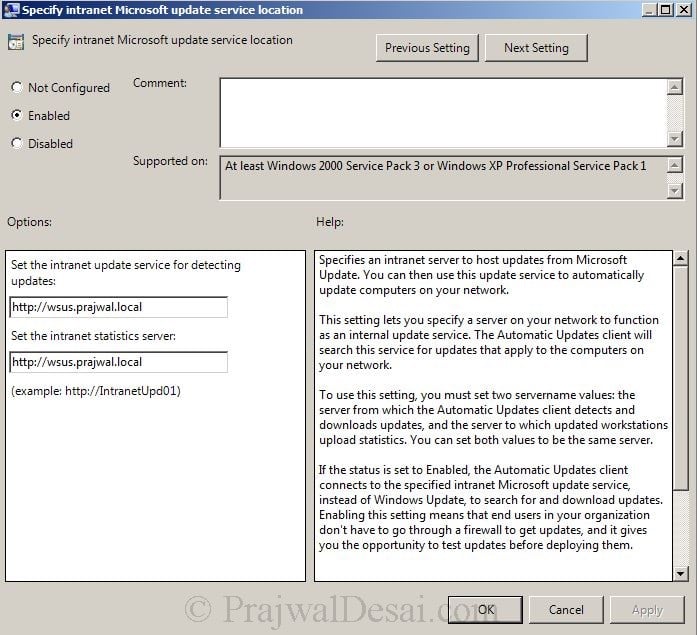
Double the policy Specify intranet Microsoft Update service location and specify the name of WSUS server (http://wsus.prajwal.local) for both intranet update service for detecting updates and intranet statistics server. click Apply and OK.
Right click Enable Client-side targeting and click Edit.
On the Enable Client-side targeting page, Click on Enabled to enable the policy. For the Target group name for this computer, type the name of the OU that you have created in Active Directory. click Apply and OK.
By default, Group Policy refreshes in the background every 90 minutes, with a random offset of 0 to 30 minutes. However, if you want to refresh Group Policy sooner, you can go to a command prompt on the client computer and type: gpupdate /force.





I cannot find the same policy in Intune to configure it.
Enable client-side targeting doesn’t exist, is there an alternative policy I can use?
Thanks
Hi!
I’ve read your guide and it’s great.
However, after configuring a GPO that works perfectly for all clients and servers but, I am unable to insert the new Win Server 2016 targets in the server group related to “Client Targeting” -> “Server”, where instead I see all the others correctly (up to Win Sever 2012 version).
The WSUS is installed on a Win 2012 dedicated server, is there a BUG or an update so it doesn’t show me the new Win Server 2016 servers?
How can I show them listed?
Thanks
Hi we have migrated client OS from Windows 2012 to Windws 2016 OS .. we have deleted old objects from WSUS console and added required reg keys but server objects are not reporting back to WSUS console and some of them are not appearing on WSUS console.
Thanks in advance for help
Prajwal reply this pls. I am facing same issue. I cannot see the GPMC , so I have logged on to client systems and updated their group policy. But I am still not able to see the clients in my WSUS console computer groups
Hi,
I have enabled to match servers to the console by registry settings on the computer itself.
Is there any way to force the wsus console to discover the machine instantly after changing the target group in its registry?
Hi Prajwal,
Love your posts. They are easy to understand as you provide step by step instructions with the pictures.
Keep up the great work.
Atul
How to set up gpo to have client machines to report wsus server if I set to store update files remotely on Microsoft servers? Just gpo about client-side targeting does not help.
Hello, It’s not necessary that the “target group name” matches the the OU name! I have a system working without this requirement. What i think it’s necessary is that teh “target group name” matches the Wsus Computer Group
Yes, you are correct.
Yes, I agreed.
Hi
But i am not able to get comupers in my target group
Hi Prajwal, Nice blog….but I have a question…Are you sure that the name we give in ‘Enable Client-side targeting page’ is the OU name. Or is it the Computer group name that we give in WSUS ?
the target group name must match the OU name …
I have did same but i am getting below error
Error :- windows update encountered an unknown error
Error code :- 80244004
Hi Prajwal
I suspect that you might be mistaken,According to your article you just have to Specify the OU group name and it will add it to the Target group which is not true. You have to manually create Target groups In WSUS , AD OU’s and Target Group’s are completely independent.
Love your site! Great work.
Agreed Vivek. May be i have to add the note saying the target group must be manually created in WSUS console. Thanks for the info..
Hi! Nice article you have here. But I have a question though. How do I configure my Windows client to download updates from WSUS instead of from the internet?
Hi kelvin, the windows client will download the updates by default from internet. If you have installed WSUS in your organization, then you need to tell the client that get the updates from WSUS server and not from internet. To do so you must configure the windows update group policy. This post will help you for sure :- https://www.prajwaldesai.com/configuring-wsus-3-0-sp2-on-windows-server/
Thanks,
Prajwal Desai