


In this post, I will show you how to resolve the Obsolete SMB1 protocol error that occurs while connecting to a remote file share. If you need temporary access to the file share and cannot upgrade the server or share configuration, you can enable SMB1 on your system. However, enabling SMB1 is risky and should only be done as a last resort.
The SMB1 is an outdated protocol for file and printer sharing, accessing resources and other data on a network. It has known security flaws and is no longer recommended for use. Modern systems use SMBv2 or SMBv3 protocols, which are faster and more secure.
Modern operating systems, such as Windows 10, Windows 11, and recent versions of Linux, disable SMB1 by default to protect against vulnerabilities like WannaCry and other ransomware attacks. In addition, Microsoft provides a PowerShell script to detect and disable SMBv1 protocol on windows devices.

Why do you encounter Obsolete SMB1 Protocol Error?
The following are some reasons why you encounter the obsolete SMB1 protocol error in your setup.
- Legacy Systems or Devices: You got older servers that are out of support, NAS devices, or printers that still use SMB1 for file sharing because they were designed before SMB2 or SMB3 became standard.
- Security Settings in Modern Operating Systems: Modern operating systems disable SMB1 by default as part of their security hardening measures. If the server or connecting device still requires SMB1, the connection will fail.
- Misconfigured Server or Network: The server hosting the file share may not have been updated or configured to use newer protocols.
Error messages when connecting to SMBv1 devices
If you try to connect to devices that support only SMBv1, or if these devices try to connect to your device, you might receive one of the following error messages:
- The specified network name is no longer available.
- Unspecified error 0x80004005
- System Error 64
- The specified server cannot perform the requested operation.
- Error 58
Fix This Share requires the obsolete SMB1 protocol error
If you encounter an obsolete SMB1 protocol error while connecting to a file share, you can resolve it by temporarily enabling SMBv1 or upgrading the server or device to use SMB2 or SMB3.
You can enable the SMBv1 on a Windows device using two methods: Windows Features and PowerShell. Other methods to enable SMBv1, such as using Group Policy or modifying the Windows Registry, are overly complex and should only be performed after thorough testing.
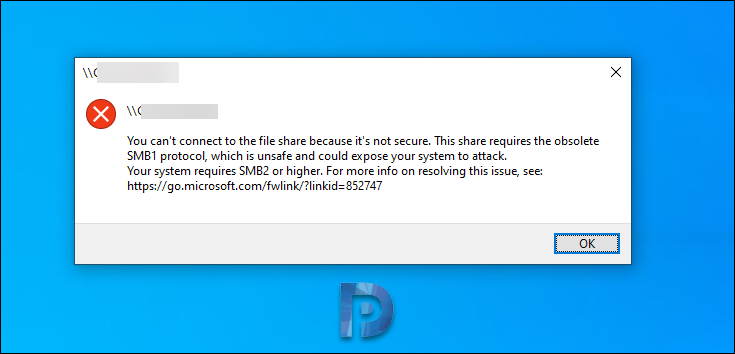
Before I show you how to resolve obsolete SMB1 protocol error, here is a screenshot of the error. You can’t connect to the file share because it’s not secure. This share requires the obsolete SMB1 protocol, which is unsafe and could expose your system to attack. Your system requires SMB2 or higher.
Method 1: Enable SMBv1 on Windows 10/11 via Control Panel
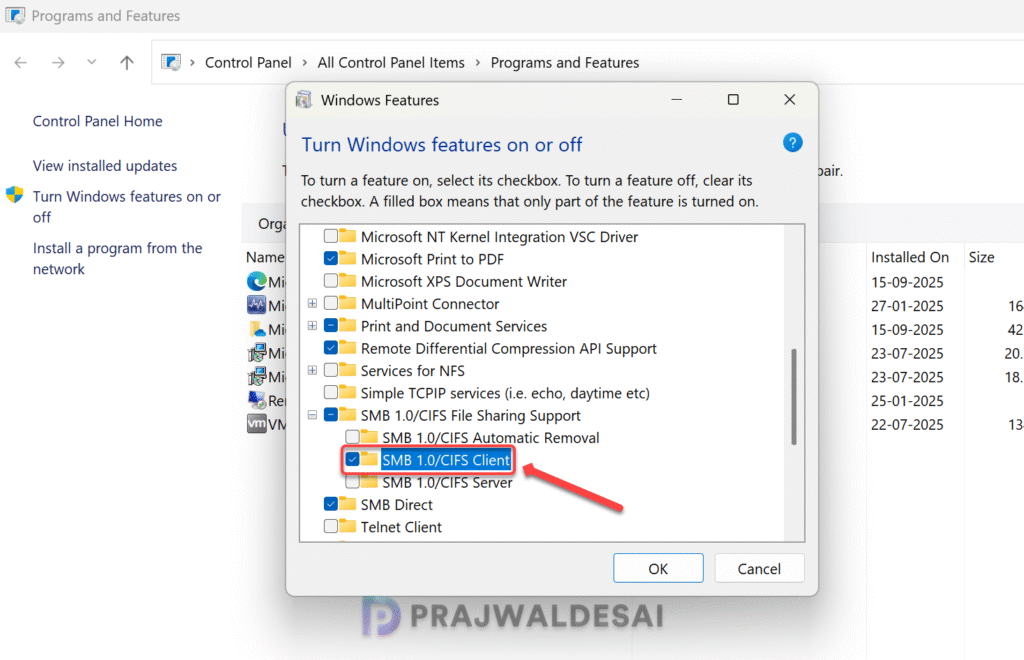
On a Windows 10/11 device, Press Win + R to open the Run dialog box. Type ‘control‘ and press the enter key to launch the Control Panel. In the Control Panel, select the Programs and Features menu. Now select ‘Turn Windows features on or off‘.

Scroll down the list of features until you find SMB 1.0/CIFS File Sharing Support. To enable SMB1, check the box next to SMB 1.0/CIFS Client. For enabling SMB1 on Windows servers, check the box next to SMB 1.0/CIFS Server. Click OK.
Windows will install the SMB1 feature. Wait for the process to complete. After the installation is complete, restart your computer to ensure the changes take effect.

Sign in back to the computer and access the file share and you will notice that the Obsolete SMB1 Protocol problem doesn’t occur again. In future, if you wish to disable SMB1, repeat the steps above and uncheck SMB 1.0/CIFS File Sharing Support and reboot your PC.
Method 2: Enable SMBv1 using PowerShell on Windows 10/11
An alternative method to enable SMBv1 on Windows 10 or 11 is through PowerShell. Using PowerShell, you can also verify the current status of the SMBv1 protocol before deciding to enable or disable it.
Check the status of SMBv1 Protocol
Press Win + S to open the search bar. Type PowerShell, right-click on Windows PowerShell, and select Run as Administrator. To check if the SMBV1 protocol is enabled or disabled, run the below PowerShell command.
Get-WindowsOptionalFeature –Online –FeatureName SMB1ProtocolIn the below screenshot, we see that the current state of SMBv1 protocol is Disabled.

Enable SMBv1 Protocol
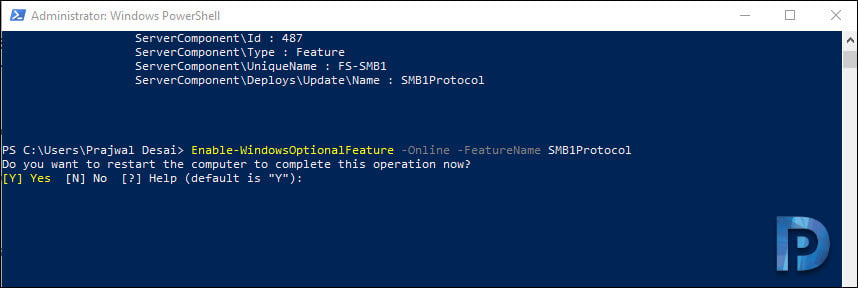
Run the following PowerShell command to enable SMBv1 on the computer.
Enable-WindowsOptionalFeature -Online -FeatureName SMB1ProtocolOnce the command completes successfully, type “Y” to restart your computer to apply the changes.
Verify SMBv1 Protocol is Enabled
After restarting, you can check if SMBv1 is enabled by running the following PowerShell command:
Get-WindowsOptionalFeature -Online -FeatureName SMB1ProtocolThe output should show that the State is set to Enabled.

Disable SMB1 Protocol using PowerShell
As I mentioned earlier SMBv1 is outdated and insecure. If you don’t use it anymore, you can disable SMBv1 by running the following PowerShell command.
Disable-WindowsOptionalFeature -Online -FeatureName SMB1Protocol

Hello,
Great article!
However, even after enabling the SMB1 protocol with the
“Enable-WindowsOptionalFeature -Online -FeatureName SMB1Protocol” command, which seems to work,
when I check the status of SMB protocols using the
“Get-SmbServerConfiguration | Select *protocol*” command
the result is :
EnableSMB1Protocol EnableSMB2Protocol
—————— ——————
False True
indicating that SMB1 is not enabled.
When I try to open a SMB1 connection, the Microsoft Network Monitor shows that this is the 445 SMB2 port which is used instead of 139 SMB1 port, resulting in a failed connection as my SMB1 NAS is waiting on 139
port.
Is there a way to enable effectively the SMB1 ?
Thank you
thank you so much for this!! worked perfectly! I knew it has to be a windows update that killed my connection.
I follow the instructions, which appear in many posts, to use power shell to install SMB1. Below is what I get. Where can I download the SMB1 code?
PS C:\WINDOWS\system32> Set-SmbServerConfiguration -EnableSMB1Protocol $true
Confirm
Are you sure you want to perform this action?
Performing operation ‘Modify’ on Target ‘SMB Server Configuration’.
[Y] Yes [A] Yes to All [N] No [L] No to All [S] Suspend [?] Help (default is “Y”): y
Set-SmbServerConfiguration : The specified service does not exist.
At line:1 char:1+ Set-SmbServerConfiguration -EnableSMB1Protocol $true
+ ~~~~~~~~~~~~~~~~~~~~~~~~~~~~~~~~~~~~~~~~~~~~~~~~~~~~
+ CategoryInfo : NotSpecified: (MSFT_SmbServerConfiguration:ROOT/Microsoft/…erConfiguration) [Set-SmbServerConfiguration], CimException
+ FullyQualifiedErrorId : Windows System Error 1243,Set-SmbServerConfiguration
PS C:\WINDOWS\system32>
Thank you ….
Thank you , Thank you, Thank you! couldn’t have figured that out in a hundred years!
Many thanks, worked perfectly. So frustrating to have to do this after so long with no fix from Synology.
Thanks, worked perfectly.
Kudos!
Hello,
I wanted to let you know how much I appreciated the solution you posted. It saved my day! I have been trying to gain file access net ReadyNAS Duo for a few days without success.
Simply turning on the SMB1 resolved the issue.
Thanks again.
thnx it worked like a charm.
SMB1 is not even a feature anymore in the latest versions i can’t enable this.
Thanks very much for this solution! I realize SMB 1 is less secure than the newer version, but this lets my Win10 PC see the older XP systems on my home network. This will do until I can find a better way.
Thank you for this solution!
Great tip, it worked for me, allowing me to access an old NAS drive.
Found that I had to reapply this fix after Window 10 Update 2004
Adding SMB 1.0 to Server 2019 cleared the error joining the server to the domain. After migration I will remove SMB 1.0.
This worked on Win10 Pro after overnight Win update on the bosses machine. Thank you so much!
gotta restart next Monday, thanks for the info
It’s worked
Thank you very much
Install the SMBv1 already, still not working only in 1903
For me in 1903 still not working
Can this issue be corrected on the server side so you don’t need to install SMBv1 on the client computer?
My thoughts exactly!
How can we configure the share to be “secure” so that SMBv2 will be negotiated/used.
The consensus of “implement old insecure protocols on all of your workstations” isn’t really a realistic or viable approach.