


In this step-by-step guide, I’ll show you how to install Exchange Online PowerShell module. The EXO V3 module includes a set of commands using which you can efficiently manage the Exchange Online component of your Microsoft 365 organization directly through the command line.
The Exchange online PowerShell module is also known as the Exchange Online PowerShell V3 module or EXO V3 module. It’s basically faster and more secure because it uses the modern authentication and works with or without multifactor authentication (MFA) for connecting to all Exchange cloud-related PowerShell environments.
Key Benefits of EXO V3 Module
The Exchange Online PowerShell Module (EXO V3) brings several benefits, particularly for managing Exchange Online environments in Microsoft 365. Here are the key advantages of using the EXO V3 PS module:

- Enhanced Performance: When compared to previous versions, the EXO V3 module is designed for optimal performance, ensuring faster processing and reduced latency in operations.
- Secure Authentication: Supports modern authentication, including multi-factor authentication (MFA), providing enhanced security for administrators.
- Support for REST APIs: EXO V3 commands uses REST APIs for communication with Exchange Online, ensuring better reliability and scalability. Since 2023, Exchange Online PowerShell and Security & Compliance PowerShell have utilized REST API connections for all cmdlets.
- Backward Compatibility: EXO V3 PowerShell module supports many cmdlets from earlier versions of the Exchange Online PowerShell module, ensuring a smooth transition for administrators.
- Exclusive Cmdlets: The EXO version 3 module contains nine exclusive Get-EXO* cmdlets that are optimized for speed in bulk data retrieval scenarios in Exchange Online PowerShell.
Prerequisites
- Make sure you are running PowerShell 5.1 or later on Windows.
- Enabling EXO V3 module requires the PS execution policy configured to RemoteSigned.
- Ensure that .NET Framework 4.7.2 or later is installed.
- Update or install the latest version of PowerShellGet to manage PowerShell modules.
Steps to Install Exchange Online PowerShell Module
Let’s me cover the steps required for installation of the Exchange Online PowerShell module (EXO V3 Module).
Step 1: Set the PowerShell Execution Policy to RemoteSigned
To install the EXO V3 module and run scripts, the PowerShell execution policy must be set to RemoteSigned. On Windows devices, Microsoft configures PowerShell to execute in the most secure mode by default, which is the ‘Restricted‘ execution policy. You can also set PowerShell execution policy using Intune or Group Policy.
If you don’t set the PS execution policy to RemoteSigned, while enabling the EXO V3 module you will encounter the following error: Files cannot be loaded because running scripts is disabled on this system. Provide a valid certificate with which to sign the files.
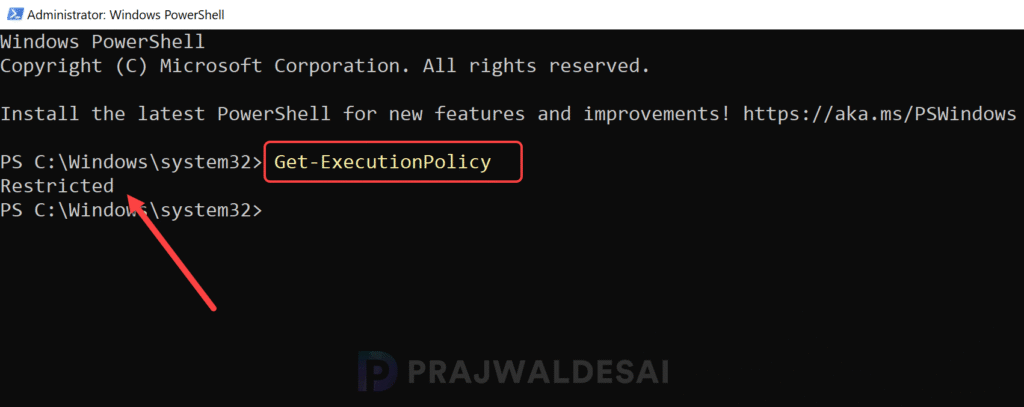
To begin with, open the PowerShell as administrator and run the Get-ExecutionPolicy cmdlet to find the current script execution policy on the device.
Get-ExecutionPolicyThe command output shows the current execution policy as Restricted.
To require a trusted publisher signing for all PowerShell scripts downloaded from the internet, run the following command in an elevated PowerShell window.
Set-ExecutionPolicy -ExecutionPolicy RemoteSignedThe above command sets the PowerShell execution policy from Restricted to RemoteSigned. The first prerequisite for installing EXO v3 module is completed.

Step 2: Install PowerShellGet and PackageManagement Modules
REST API connections on Windows rely on the PowerShellGet module, which in turn depends on the PackageManagement module. So, the stable version of these modules must be installed before you install the Exchange Online PowerShell Module. For more information on module installation, refer Installing PowerShellGet and PSResourceGet.
First, open the PowerShell as administrator and run the below command to check the installed versions of PowerShellGet and PSResourceGet.
Get-Module PowerShellGet, PackageManagement -ListAvailableThe output shows that version of PowerShellGet and PSResourceGet as 1.0.0.1.

To install or update these modules to the stable release, run the following command:
Install-Module PowerShellGet -Force -AllowClobberOnce the modules are updated, let’s re-check the version of modules again. In the output, we see the PowerShell Get module version updated to 2.2.5 and the Package Management module version updated to version 1.4.8.1.

This is an optional step where you install the Microsoft.PowerShell.PSResourceGet which is the new package management solution for PowerShell. With this module, you no longer need to use PowerShellGet and PackageManagement.
However, it can be installed side-by-side with the existing PowerShellGet module. To install Microsoft.PowerShell.PSResourceGet side-by-side with your existing PowerShellGet version, open any PowerShell console and run the following command:
Install-Module Microsoft.PowerShell.PSResourceGet -Repository PSGalleryStep 3: Install Exchange Online PowerShell V3 Module (EXO V3)
After all the prerequisites are in-place, let’s look at the PowerShell commands for installing the Exchange Online PowerShell V3 module. The EXO V3 module is released in Stable and Preview versions. I recommend installing the stable version of Exchange online V3 module.
All the below PowerShell commands that I have demonstrated are provided by Microsoft to make the EXO V3 installation easier for administrators.
Install ExchangeOnlineManagement
Open the PowerShell as administrator and run the below command to install the stable release of Exchange online PowerShell V3 module.
Install-Module -Name ExchangeOnlineManagement
Install ExchangeOnlineManagement for Current User Account
To install the PowerShell V3 Module for exchange online for current user account, run the below command.
Install-Module -Name ExchangeOnlineManagement -Scope CurrentUserInstall Preview version of EXO V3 Module
If you wish to install the latest available Preview version of the EXO V3 module, run the following command in an elevated PowerShell window.
Install-Module -Name ExchangeOnlineManagement -AllowPrereleaseInstall Preview version of EXO V3 Module for Current User
If you wish to install the latest available Preview version of the EXO V3 module for current user account, run the following command in PowerShell window.
Install-Module -Name ExchangeOnlineManagement -Scope CurrentUser -AllowPrereleaseStep 4: Get Installed Exchange Online PowerShell Module Version
Run the following command to determine the installed version and installation location of the EXO V3 PowerShell module.
Get-InstalledModule ExchangeOnlineManagement | Format-List Name,Version,InstalledLocationThe command output shows the current version of ExchangeOnlineManagement as 3.9.0. The module install location is C:\Program Files\WindowsPowerShell\Modules\ExchangeOnlineManagement\3.9.0.

Step 5: Connect to Exchange Online PowerShell
To connect to Exchange Online PowerShell using the EXO V3 module, open a PowerShell window and load the module by running the following command:
Import-Module ExchangeOnlineManagementAccording to Microsoft, you can connect to Exchange Online by using the following command with this syntax:
Connect-ExchangeOnline [-UserPrincipalName <UPN>] [-ExchangeEnvironmentName <Value>] [-ShowBanner:$false] [-LoadCmdletHelp] [-DelegatedOrganization <String>] [-SkipLoadingFormatData] [-DisableWAM]I have used the following command for establishing an Exchange Online session with my work credentials. When you enter the command, you must sign in with your specified account. If MFA is enabled, enter the verification code and complete the authentication.
Connect-ExchangeOnline -UserPrincipalName admin@domainname.onmicrosoft.com
The below screenshot confirms that connection to Exchange Online PowerShell is successful.

Step 6: Disconnect Exchange Online Session
This is the final step where I will show you how to disconnect the established session with Exchange online. After completing your tasks in the Exchange Online session, you must disconnect the established session properly. Closing the PowerShell window without disconnecting may consume all available sessions, forcing you to wait until they expire.
Microsoft provides Disconnect-ExchangeOnline cmdlet in the Exchange Online PowerShell module to disconnect the connections that you created using the Connect-ExchangeOnline or Connect-IPPSSession cmdlets.
To end the session with exchange online, use the below command.
Disconnect-ExchangeOnlinePress Y on the keyboard to end the session. The cmdlet disconnects any connections and clears the cache.

The below command silently disconnects from Exchange Online PowerShell or Security & Compliance PowerShell without a confirmation prompt or any notification text.
Disconnect-ExchangeOnline -Confirm:$falseUninstall Exchange Online PowerShell Module
If you have installed the Exchange Online PowerShell Module on a server that is scheduled for decommissioning or if you don’t intend to use this server anymore, you can remove the module by executing the appropriate command.
Get-InstalledModule -Name ExchangeOnlineManagement | Uninstall-ModuleAlternatively, the Uninstall-Module cmdlet can also be used all the installed version of exchange online PowerShell modules from the device.
