

In this post I will show you how to deploy custom start menu with MDT. We will use MDT task sequence to deploy custom start menu in our setup.
Few organizations prefer to deploy Windows 10 with custom start menu. Also they expect to lock the custom start layout for users, in order to group together the most used tools in the organization. For example, you have a specific application that you want to appear on start menu for all users. This is where you can deploy custom start menu with MDT.
MDT stands for Microsoft Deployment Toolkit. Microsoft Deployment Toolkit (MDT) is a solution accelerator for operating system and application deployment. You can integrate Microsoft Deployment toolkit with Configuration Manager to get additional benefits.

How to Deploy Custom Start Menu with MDT
Let’s look at the steps to deploy custom start menu with MDT. I will be splitting the topic into several steps so that it will be easy to follow and implement it.
The start menu on windows 10 uses a two column design, the right side (Start-Layout) is populated by tiles. Applications can be pinned to the right half, and their respective tiles can be resized and grouped into user-specified categories.
Step 1 – Customize Your Windows 10 Start menu
On your Windows 10 computer click Start and open the menu. Select the application to add to column, and right click and select Pin to Start.

Now hover over the application and click two horizontal lines. Inside the text box, enter the category name, you can resize and reposition tiles.

When you are done with editing the menu, export it in the next step.

Step 2 – Export the Custom Start Layout file
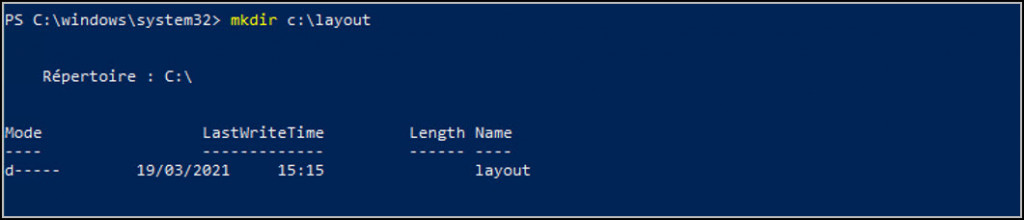
Create a new folder on C: drive and name it as Layout. You can also do it with a PowerShell command as shown below.
Launch the PowerShell as administrator. Enter the below command to export the custom start layout file.
Export-StartLayout -Path C:\Layout\Custommenu.xml
Note – After you run the above command, there is a new Custom Start Layout file created. You can edit this file with notepad in case you wish to customize anything further.

Step 3 – Copy Custom Start Menu XML to MDT
In above step, we exported the custom start layout file to a folder. Now we will copy the start menu XML file to MDT folder. In my case I have a folder named mes_scriptes under Scripts folder. This folder is located in local path of folder deployment share. Copy the XML file to the destination folder.

Step 4 – Import Custom Start Menu with PowerShell Script
In order to import custom start menu XML file, we will create a new PowerShell. Create a new file called import_layout.ps1 in mes_scriptes folder.

Next edit the PowerShell script and enter the below info in the file.
Import-startlayout -layoutpath "%scriproot%\mes_scriptes\custommenu.xml" -Mountpath $env:SystemDrive
Note – You must ensure the folder path is correct. For example, replace mes_scriptes folder name with your folder name.

This is important. You must ensure the .NET Framework and Windows PowerShell are enabled under the WinPE Features.

Step 5 – Deploy Custom Start Menu
This is the last step where we edit the task sequence and deploy custom start menu. Right click the Windows 10 MDT task sequence and click Edit. I will applying the script to deploy custom start menu in separate group called Custom Tasks. Right click and select Add > General > Run PowerShell. Enter the script as shown in the below screenshot.

After you make the changes to the task sequence, click Apply and OK. Now deploy the task sequence and after the imaging is complete, the Windows 10 computer will have the custom start menu applied.
Note – When you deploy custom start menu with MDT, it will be applied only for the new user. If you deploy the script to a user with administrator account, the user will see only when he logs in next.
