

In this post, I will show you how to enable and configure BitLocker using Intune. You can use Microsoft Intune to configure BitLocker drive encryption on devices that run Windows 10 or 11. The manual explains how to deploy BitLocker using Intune for Windows devices.
BitLocker Drive Encryption In Intune is a data protection feature that integrates with the operating system and addresses the threats of data theft or exposure from lost, stolen, or inappropriately decommissioned computers.
Encryption helps protect the data on your device, so it can only be accessed by people who have authorization. The BitLocker is available on devices that run Windows 10 and Windows 11. You can also enable Bitlocker without TPM.

Bitlocker encryption can be enabled on Windows 10 and Windows 11 devices using multiple methods, such as Group Policy, Configuration Manager and Microsoft Intune. On standalone computers, you can manually turn on the Bitlocker encryption.
Note: You can configure a BitLocker policy to automatically and silently enable BitLocker on a device. That means that BitLocker enables successfully without presenting any UI to the end user, even when that user isn’t a local Administrator on the device. You can use either the BitLocker profile from an endpoint security disk encryption policy, or the endpoint protection template from a device configuration policy.
BitLocker Intune Prerequisites
The BitLocker for Intune is available on devices that run Windows 10 and Windows 11. Enabling Bitlocker using Intune requires the following prerequisites in place:
- You’ll need a valid Microsoft Endpoint Manager (Intune) license.
- The devices must be Azure AD or Hybrid Azure AD joined.
- Devices must not be encrypted with third-party disk encryption tools such as McAfee Disk Encryption. If the devices are already encrypted with other solutions, you will need to fully decrypt those first before you deploy BitLocker using Intune.
- The end devices must have a TPM chip at version 1.2 or higher (TPM 2.0 strongly recommended).
- BIOS must be set to UEFI.
- To manage BitLocker in Intune, your account must have the applicable Intune role-based access control (RBAC) permissions.
Methods to Configure and Deploy Bitlocker using Intune
Intune allows you to configure and deploy BitLocker policy using two methods:
- Create a device configuration profile for BitLocker and deploy it to devices.
- Create an endpoint security policy for BitLocker, configure it and deploy it to devices.
You can use any of the above procedures to create the policy type you prefer. The recommended approach is to create an endpoint security policy and configure BitLocker using Intune for Windows devices.
Required settings to silently Enable BitLocker using Intune
Depending on the type of policy that you use, you can silently enable BitLocker using Intune:
- Endpoint security disk encryption policy: Configure the following settings in the BitLocker profile:
- Hide prompt about third-party encryption = Yes.
- Allow standard users to enable encryption during Autopilot = Yes.
- Require Key File Creation = Blocked or Allowed.
- BitLocker Device configuration policy: Configure the following settings in the Endpoint protection template or a custom settings profile:
- Warning for other disk encryption = Block.
- Allow standard users to enable encryption during Azure AD Join = Allow.
Enable and Configure Bitlocker using Intune
We will now look at how to use Intune to turn on, set up, and deploy Bitlocker. This will configure BitLocker drive encryption on devices that run Windows 10 or 11. The high-level steps to enable and configure Bitlocker using Intune are as follows:
- Enable Bitlocker using Intune
- Create configuration profile for Bitlocker in Intune
- Configure Bitlocker Policy using Intune
- Monitor Bitlocker Encryption Status
Step 1: Create BitLocker Policy in Intune
In this step, we will create a new endpoint security policy for Bitlocker in Intune with the following steps:
- Sign in to the Microsoft Endpoint Manager admin center (Intune Admin Center).
- Navigate to Endpoint Security node and under Manage, select Disk Encryption.
- To create a new policy, select Create Policy.

On Create a profile window, select the following options:
- Platform: Windows 10 and later
- Profile: BitLocker
Click Create.

On the Basics tab of Create Profile page, enter the name for the Bitlocker policy and a brief description. For example, you can specify the following details:
- Name: Enable and Configure Bitlocker using Intune.
- Description: Create an endpoint security policy for BitLocker.
Click Next.

Step 2: Configure Bitlocker using Intune
In this step, I will show you how to configure Bitlocker policy settings in Intune. There are several settings that you can configure once you arrive at the BitLocker Configuration Settings. I would like to point out that you don’t have to enable and configure every BitLocker setting. According to the needs of the business, the settings must be configured. However, I will cover the best practices that you can follow when you enable and configure BitLocker using Intune.
Configure BitLocker Base Settings in Intune
The first set of settings that you see on the configuration settings tab for Bitlocker are the base settings. These allow you to configure silent enablement and enforcement of BitLocker. We’ll review every setting and I will explain purpose of each setting and should you enable it or not.
- Enable full-disk encryption for OS and fixed data drives: Select Yes. This will enforce use of BitLocker.
- Require storage cards to be encrypted (mobile only): Select Not Configured. When this setting is set to Yes, encryption on storage cards will be required for mobile devices. When set to not configured, the setting will return to OS default which is to not require storage card encryption. This setting is only applicable to Windows Mobile and Mobile Enterprise SKU devices.
- Hide prompt about third-party encryption: Select Yes. If you are enabling BitLocker using Intune on a system that has already been encrypted by a third-party encryption product, it may render the device unusable. It is highly suggested to never enable BitLocker on a device that has third-party encryption installed or enabled such as McAfee Disk Encryption. When this setting is set to Yes, this warning prompt will be suppressed. When set to NOT CONFIGURED, the setting will return to default which is to warn users about third-party encryption.
- Allow standard users to enable encryption during Autopilot: Select Yes. When set to Yes, during Azure Active Directory Join (AADJ) silent enable scenarios, users do not need to be local administrators to enable BitLocker using Intune. When set to not configured, the setting will be left as client default which is to require local admin access to enable BitLocker.
- Configure client-driven recovery password rotation: Select the option “Enable rotation on Azure AD and Hybrid-joined devices.” If you set this as Not configured, it means the client will not rotate BitLocker recovery keys when disclosed on the client. Setting it to Key rotation enabled for Azure AD-joined devices will allow key rotation for AADJ devices. Setting it to Key rotation enabled for Azure AD-joined devices and Hybrid-joined devices will allow key rotation for AADJ or Hybrid-joined devices.

Configure BitLocker Fixed Drive Settings in Intune
The BitLocker fixed driver settings apply to additional internal disks that devices may have. An example of this can be separate partitions on the main disk or a separate second disk installed on a desktop or laptop.
Let’s go through each Fixed Driver Settings in order:
- BitLocker fixed drive policy: This policy setting is used to control the encryption method and cipher strength. The values of this policy determine the strength of the cipher that BitLocker uses for encryption.
- Fixed drive recovery: This setting controls how BitLocker-protected fixed data-drives are recovered in the absence of the required startup key information.
- Recovery key file creation: Setting this to Require will generate a 48-digit recovery password during BitLocker initialization and send it to Azure AD if policy Save BitLocker recovery information to Azure Active Directory is set to enable.
- Configure BitLocker recovery package: Setting this to Require will generate a 48-digit recovery password during BitLocker initialization and send it to Azure AD if policy Save BitLocker recovery information to Azure Active Directory is set to enable.
- Require device to back up recovery information to Azure AD: Setting this to Require will generate a 48-digit recovery password during BitLocker initialization and send it to Azure AD if policy Save BitLocker recovery information to Azure Active Directory is set to enable.
- Recovery password creation: Setting this to Allow will generate a 48-digit recovery password during BitLocker initialization and send it to Azure AD if policy to Save BitLocker recovery information to Azure Active Directory is set to enable. Setting this to Require will generate a 48-digit recovery password during BitLocker initialization and send it to Azure AD if policy Save BitLocker recovery information to Azure Active Directory is set to enable.
- Hide recovery options during BitLocker setup: Setting this to Yes will block the end user from being able to choose extra recovery options such as printing recovery keys during the BitLocker setup wizard. Setting this to not configured will allow the user to access extra recovery options.
- Enable BitLocker after recovery information to store: By setting this to Yes, BitLocker recovery information will be saved to Active Directory Domain Services.
- Block the use of certificate-based data recovery agent (DRA): Setting this to Yes will Block the ability to use Data Recovery Agent (DRA) to recover BitLocker enabled drives. Setting this to “Not Configured” will allow the use of DRA to be set up. Setting up DRA requires an enterprise PKI and Group Policy Objects to deploy the DRA agent and certificates.
- Block write access to fixed data-drives not protected by BitLocker: When set to Yes, Windows will not allow any data to be written to fixed drives that are not BitLocker protected. If a fixed drive is not encrypted, the user will need to complete the BitLocker setup wizard for the drive before write access is granted. Setting this to “Not Configured” will allow data to be written to non-encrypted fixed drives.
- Configure encryption method for fixed data-drives: Select AES 256bit XTS encryption method. This setting allows you to select desired encryption method for fixed data-drives disks. XTS- AES 128-bit is the Windows default encryption method and the recommended value.

Configure BitLocker OS Drive Settings
In this section, we will go through the BitLocker OS drive settings that are available in Intune.
- BitLocker system drive policy: Select Configure.
- Startup authentication required: Select Yes.
- Compatible TPM startup: Select Required. It is recommended to require a TPM for BitLocker.
- Compatible TPM startup PIN: Select Blocked. It is recommended that PIN is disabled if you want to silently enable BitLocker using Intune.
- Compatible TPM startup key: Select Blocked.
- Compatible TPM startup key and PIN: Select Blocked.
- Disable BitLocker on devices where TPM is incompatible: Select Not Configured.
- Enable preboot recovery message and url: Use this option to declare if a custom recovery message or URL is desired.
- Preboot recovery URL: Optional, use this option to declare if a custom recovery message or URL is desired.

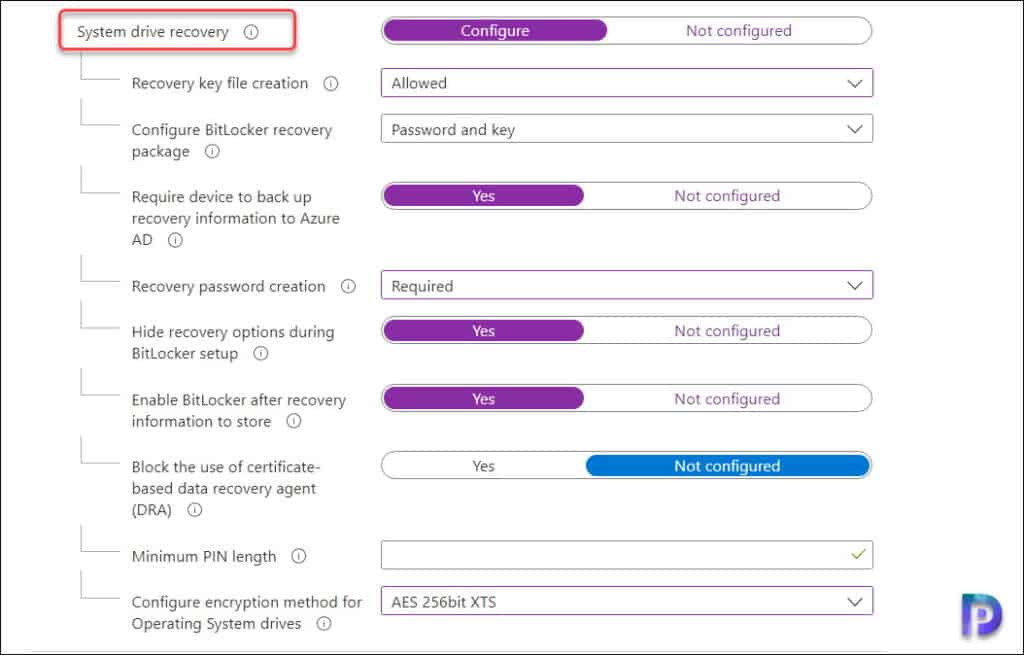
- System drive recovery: Control how BitLocker-protected OS drives are recovered in the absence of the required startup key information.
- User creation of recovery key: Select Allowed, which allows an admin user to create a 256-bit recovery key file manually.
- Configure BitLocker recovery package: Select Password and Key.
- Require device to back up recovery information to Azure AD: Select Yes. BitLocker will not complete enablement until recovery keys have been successfully saved to Azure Active Directory.
- Recovery password creation: Select Required.
- Hide recovery options during BitLocker setup: Select Yes. Setting this to Yes will block the end user from being able to choose extra recovery options such as printing recovery keys during the BitLocker setup wizard.
- Enable BitLocker after recovery information to store: Select Yes. By setting this to Yes, BitLocker recovery information will be saved to Active Directory Domain Services.
- Block the use of certificate-based data recovery agent (DRA): Select Not Configured. Setting this to “Not Configured” will allow the use of DRA to be set up.
- Minimum PIN length: Allows you to configure the minimum startup PIN length when TPM + PIN is required when you enable Bitlocker using Intune.
- Configure encryption method for Operating System drives: Select AES 256bit XTS.
Configure BitLocker Removable Drive Settings
When you enable and configure Bitlocker using Intune, you may need to consider removable drives as well. In my previous post, I showed you how to block removable storage using Intune. If the usage of removable devices are permitted, you can configure the following BitLocker settings.
- BitLocker removable drive policy: Select Configure.
- Configure encryption method for removable data-drives: Select AES 256bit XTS.
- Block write access to removable data-drives not protected by BitLocker: Select Not configured.
- Block write access to devices configured in another organization: Select Not configured.

Step 3: Deploy BitLocker using Intune
In Step 1, we created BitLocker policy in Intune and in Step 2, we configured the BitLocker policy settings. In this step, we will deploy BitLocker policy by assigning it to devices.
If your organization is setting up BitLocker with Intune for the first time, you can test it with a pilot group. You can extend the BitLocker policy to a larger group of devices if the implementation is successful.
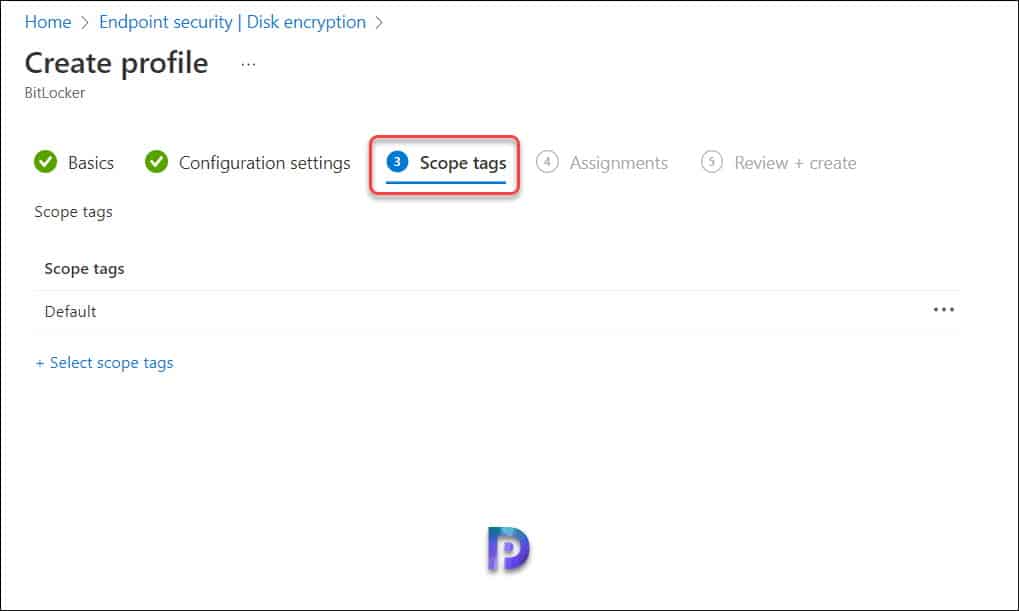
On the Scope (Tags) page, choose Select scope tags to open the Select tags pane to assign scope tags to the profile. Select Next to continue.
On the Assignments page, select the groups that will receive this profile. Under the section Included groups, click Add groups and choose the Azure AD groups to which you want to deploy BitLocker policy. Select Next.

On the Review + create page, you’ll find all the BitLocker settings that you have configured. When you’re done, select Create.

After creating the BitLocker policy in Intune, the policy now appears under Disk Encryption. The new profile is displayed in the list when you select the policy type for the profile you created. You can have multiple disk encryption policies for different device groups in Intune.

Step 4: Monitor Bitlocker Encryption Status in Intune
After you deploy Bitlocker using Intune, the next step is to monitor the BitLocker encryption status on devices. You can do from that Intune Admin center. In addition to that, there is a Microsoft Intune encryption report to view details about a device’s encryption status and find options to manage device recovery keys.
From the screenshot below, we see that Bitlocker profile assignment has succeeded on almost all the devices that we targeted. Do note that this is a profile assignment status and not the disk encryption status.

The Microsoft Intune encryption report is a central place to find out about a device’s encryption status and find ways to manage recovery keys. The recovery key options that are available depend on the type of device you’re viewing. To find the report, sign in to the Microsoft Endpoint Manager admin center. Select Devices > Monitor, and then under Configuration, select Encryption Report.


Can you make a blog on TPM + PIN , basically PIN should be asked at stratup.
I struggling about it.
Hello,
We are moving to intune and currently are enrolling our devices. We have bitlocker enabled via on prem gpo. What would the best method be to move to intune management without having to decrypt the devices and still be able to see keys and rotate them via intune
What would be your suggestion to have users select their own bitlocker password on system startup? In the old days, I configured bitlocker manually form TPM+PIN, and assigned a password. I’d like users to be able to select their own passwords now that I am migrating to Azure AD (not hybrid). I will still be provisioning systems, so I don’t know if I need/want autopilot.
Does this apply for hybrid joined machines too?
Thanks for the Guide!
All options are clear.
For your Info , the current Version of MEM ( Intune) has Changed the options of the encryption policy and the configuration options looks diferent.
Best regards
Hi,
Thanks for your work, as you probably already know there is a new Bitlocker policy that replaces this one.
Not everything that was covered in the old policy is covered in this new policy, do you plan to write something about this new policy?
Hi
Thanks for sharing guide. Just would like to confirm what will be the behavior of devices that are encrypted via Configuration Profile initially but now have plan to re-configured disk encryption via Endpoint Security. Any challenge?