


You can disable Windows 10 lock screen using 2 methods – Group Policy and Registry. When you login to Windows 10 computer, before you sign in you see a lock screen. You can disable this lock screen on your Windows 10 so that you can directly login.
Every time when you unlock your Windows 10 computer you must press CTRL + ALT + DEL before signing. Some Windows 10 users don’t like the lock screen and they want to disable the lock screen. Unfortunately Windows 10 doesn’t have an built-in option to disable the Windows 10 lock screen but you can disable the lock screen using Registry or Group Policy.
There could be other ways of disabling the lock screen on Windows 10. However I am covering the steps that works with all Windows 10 versions.

Disable Windows 10 lock screen using Group Policy
In this method we will disable Windows 10 lock screen using group policy. Login to Windows 10 computer with an account that has administrative privileges.
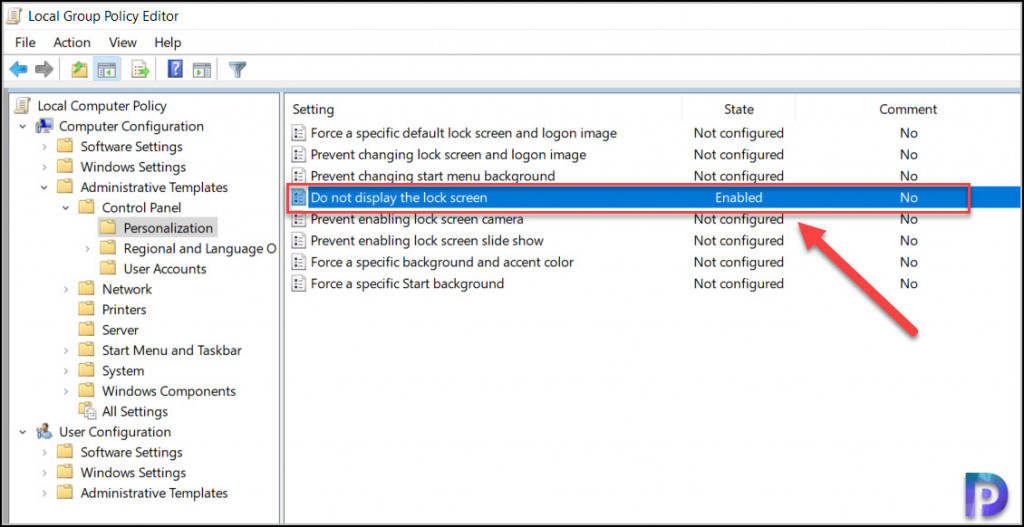
Click Start and run the command gpedit.msc. This launches the Local group policy editor. Navigate to Computer Configuration > Administrative Templates > Control Panel > Personalization.
Here we will enable the policy called Do not display the lock screen. By default this policy is not configured. This policy setting controls whether the lock screen appears for users. If you enable this policy setting, users that are not required to press CTRL + ALT + DEL before signing in will see their selected tile after locking their PC.

Right click the policy setting Do not display the lock screen and click Edit. Click Enabled to enable this policy setting. Click Apply and OK.

The Do not display the lock screen policy is enabled. Restart your Windows 10 computer and you will not see lock screen appearing. You can directly login to your Windows 10 computer.
Disable Windows 10 lock screen using Registry
In this method we will disable Windows 10 lock screen using Registry. This method involves editing the registry key. So I would recommend taking a backup of your registry before performing any changes. If the changes you made don’t work well, you can restore the registry backup.
On your Windows 10 computer, click Start and run the command regedit. Browse the following registry path :-
HKEY_LOCAL_MACHINE\SOFTWARE\Policies\Microsoft\Windows
Right-click the Windows key (folder), select the New submenu and choose the Key option.

Name the key as Personalization and press Enter.

Right-click the Personalization folder, select the New submenu, and choose the DWORD (32-bit) value option.

Enter the name as NoLockScreen and set the value to 1. After you make these changes, close the registry editor. Reboot the Windows 10 computer. On the Windows 10 start up you will notice that lock screen doesn’t appear any more, you can straight away login to your Windows 10 computer.

You can watch the following video to learn how to disable Windows 10 lock screen.

I have performed all of the above but the laptop still shows lock screen sad to say. maybe because I have it set as a local, not microsoft?
I just got the new edition of Windows 10 on a system reset. I tried both ways with the 32 bit first with no luck. Lock screen is still there. So I tried the 64 bit which is the operating system that I have and still no luck. There is no way in the control panel to do this and group policy I don’t have. Without complete instructions on how to download it and use it for this purpose I won’t use it. In my settings there is only two ways to log in One with p/w and the other a pin number. This new edition of Win 10 says I must log in every time but I would like to remove the lock screen.
Hello Prajwal,
Thanks for the article. How can we disable lock screen image and logon screen image, without disabling lock screen. That means, we need the prompt for CTRL+ALT+DEL but with default color background and no image.
Thanks in advance.
Thank you for the help!
Thank you for showing both methods.