


In this blog post, I’ll demonstrate how to disable Security Defaults in Microsoft Entra ID. I will also explain when you should you consider disabling the security default policy for your tenant and highlight best practices for maintaining security after disabling them.
According to Microsoft, security defaults make it easier to help protect your organization from identity-related attacks like password spray, replay, and phishing common in today’s environments. They are great for small-to-medium tenants or those without the capacity to manage granular policies.
If your tenant was created on or after October 22, 2019, security defaults might be already enabled in your tenant. Microsoft has announced that security defaults will be automatically applied to all newly created tenants to ensure user protection. However, if your organization has complex security requirements, you can disable them and go with conditional access.

What are Security Defaults?
In simple words, the Security Defaults are preconfigured security settings provided by Microsoft to ensure basic protection for your tenant in Entra ID. Some of these security baselines include:
- Enforcing multi-factor authentication (MFA) for administrators.
- Protecting against common identity-related attacks.
- Requiring users to register for MFA.
- Blocking legacy authentication protocols that are vulnerable to attacks.
Tip: Microsoft’s security teams see a drop of 80% in compromise rate when security defaults are enabled.
When to disable Security Defaults?
Disabling Security Defaults might be necessary for the following reasons:
- Custom Security Policies: Security defaults don’t support customization that many organizations require. Conditional Access policies provide a full range of customization that more complex organizations require.
- Legacy Application Support: Certain legacy applications may require authentication methods that are blocked by Security Defaults.
- Flexibility: You need finer control over how security measures are applied across your tenant. When it comes down to complex scenarios, Conditional Access is undoubtedly the better option.
- Exempting Service Accounts: Security defaults should be disabled when you want better control and applicability over MFA.
- For Dev environments: You may temporarily disable security defaults in a test environment to avoid frequent MFA prompts that can be disruptive to development activities.
Prerequisites
Ensure the following prerequisites are in place before you turn on the security defaults for your tenant.
- Global Administrator or Privileged Role Administrator (for Entra portal).
- Appropriate Graph permissions (Policy.ReadWrite.SecurityDefaults) for Graph-based methods in case you are doing it via PowerShell.
- Disabling Security Defaults does not need premium licensing; however, using Conditional Access requires at least Entra ID P1.
- I recommend having at least one emergency access account and a break glass account excluded from Conditional Access with strong, monitored controls.
Caution: I would like to highlight an important point here. You should only disable Security Defaults when you are ready to replace them with equivalent or stronger security measures, such as implementing Conditional Access policies in Microsoft Entra ID. Disabling it without a plan to immediately implement alternatives will leave your organization vulnerable to common attacks, so it is recommended to keep it enabled unless you have a specific need.
Method 1: Disable Security Defaults using Entra Admin Center
Sign in to the Microsoft Entra Admin Center using your Global Administrator account. Navigate to Entra ID > Overview > Properties and, at the bottom, click on Manage security defaults. Click the drop-down for Security Defaults and select Disabled. Choose a valid reason for disabling the security defaults and then click Save.

You will be asked to confirm whether to disable security defaults for your organization, select Disable.

A notification appears in the top-right corner of the Entra portal, confirming “Successfully disabled security defaults policy.” That’s it!!

In the Microsoft Entra Portal, navigate to Entra ID > Overview > Properties. Scroll down and under Security defaults section, the following warning message is shown “Your organization is not protected by security defaults“. This confirms that you’ve successfully disabled the security defaults for your tenant.

Method 2: Disable Security Defaults using Microsoft Graph PowerShell
Microsoft Graph PowerShell is another useful method that can be used for disabling your tenant’s security defaults. However, it requires you to install the graph module for PowerShell as a prerequisite. But not to worry, I have published a guide on installing the Microsoft Graph PowerShell module for beginners that you can follow.
Step 1: Install the Graph Module
To begin with, open the PowerShell and run the following command to install the Graph module.
Install-Module Microsoft.Graph -Scope CurrentUser -Repository PSGallery -ForceStep 2: Connect to Microsoft Graph
Next, connect to the graph with the following command.
Connect-MgGraph -Scopes "Policy.ReadWrite.SecurityDefaults", "Policy.Read.All"Upon running the above command, you must sign in with your work credentials and complete the authentication. After successful authentication, Microsoft Graph Command Line Tools will prompt you to grant consent on behalf of your organization. Review the required app permissions carefully and click “Accept.”

Step 3: Disable Security Defaults
Once you’ve connected to MS Graph, run the below command to permanently disable the security defaults for your tenant.
Update-MgPolicyIdentitySecurityDefaultEnforcementPolicy -IsEnabled:$false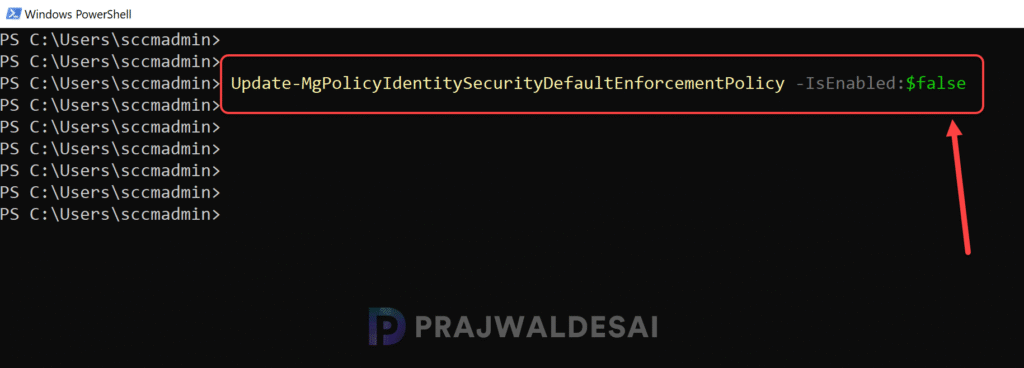
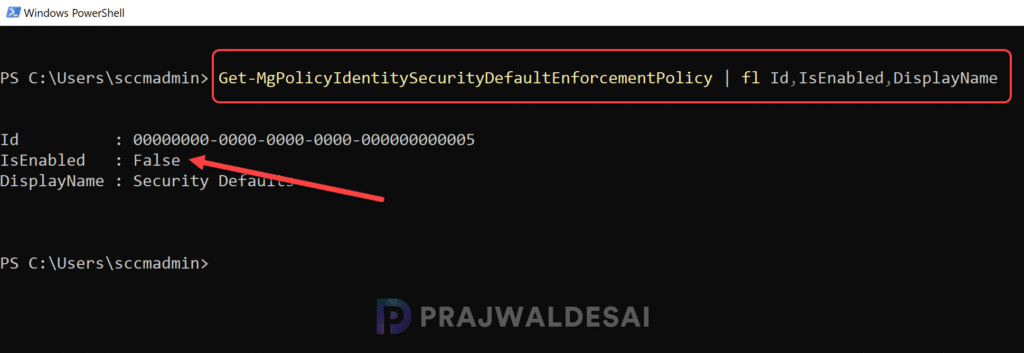
Step 4: Verify if Security Defaults are disabled
Finally, to confirm if the security defaults are disabled, use the below command.
Get-MgPolicyIdentitySecurityDefaultEnforcementPolicy | fl Id,IsEnabled,DisplayNameIn the command output, if the IsEnabled = False, it means the security defaults are turned off. If the IsEnabled = True, it means security defaults are active.
Best Practices After Disabling Security Defaults
Lets address the main topic here. Now that you’ve disabled the security defaults for your tenant, what’s next?. Do you think disabling Security Defaults means you should leave your tenant unprotected? Absolutely Not. I have put down some best practices that must be followed after turning off the security defaults.
- Implement Conditional Access Policies: This is very important. After administrators disable security defaults, organizations need to immediately enable Conditional Access policies to protect their organization.
- Monitor User Activity: You should regularly review sign-in logs and audit logs for suspicious activity.
- Enable MFA for All Users: While Security Defaults enforce MFA for admins, it’s a good idea to require MFA for all users in your organization. Confirm MFA prompts are still enforced by Conditional Access. Ensure admin roles require MFA for every sign-in or sensitive action.
Conclusion
Disabling Security Defaults in Microsoft Entra ID gives you the flexibility to implement custom security policies that better align with your organization’s needs. However, it’s essential to replace these defaults with proper conditional access policies as soon as possible. By following best practices and leveraging tools like Conditional Access, you can maintain a strong security posture while tailoring protections to your unique requirements.
Let me know your thoughts or share your experiences with managing security settings in Microsoft Entra ID!
