

In this post, I will show you how to create system management container for SCCM and extend the Active Directory schema (AD schema) for SCCM. We will also go through the steps to delegate permissions on the system management container and prepare Active Directory for site publishing.
After you install the active directory for SCCM, the first step is to extend the active directory schema. The next step is to create a system management container for SCCM and assign full control permissions to the container.
Getting Active Directory ready for site publishing is one of the things you need to do before you can install SCCM. There are several steps involved, which I will outline in this post. For every domain with a primary or secondary site, you must create a system management container only once. This container will be used to publish data to Active Directory.

What is System Management Container in SCCM?
The System Management is a container located in the System folder of the Active Directory which is used by the site server and the management points to store published data like boundaries and certificates.
If the Active Directory schema was already extended for SCCM 2007 or Configuration Manager 2012, then you don’t need to extend the schema again. The schema extensions are unchanged and will already be in place in AD. In other words, extending the AD schema for SCCM is a one-time action for any forest.
Prepare Active Directory for site publishing
Before you create system management container for SCCM and extend the Active Directory schema for ConfigMgr, here are some important prerequisites.
- There are no new Active Directory schema extensions for Configuration Manager current branch. If you previously extended the schema during the SCCM installation, you don’t have to extend the schema again.
- When you extend the active directory schema for Configuration Manager, it is a forest-wide, one-time, irreversible action.
- To extend AD schema for SCCM, you must use an account that is a member of the Schema Admins group.
- You can extend the schema before or after you install a Configuration Manager site. However, I recommend you extend AD schema for SCCM before you start to configure your sites and hierarchy settings.
- After you extend AD schema for SCCM, the Active Directory global catalog replicates throughout the forest.
Create System Management Container for SCCM
Let’s look at the steps to create system management container for SCCM.
Step 1: Login to Active Directory domain controller with an account that’s a member of the Schema Admins security group. Sign in with that account to the schema master domain controller. Launch the Server Manager and from the top menu, click Tools and select ADSI Edit. Right-click ADSI Edit and select Connect to.

Step 2: On the ADSI Connection Settings, the naming context should be Default naming context. Do not change the LDAP path, click OK.

Step 3: In the ADSI edit Console, expand the Default Naming Context. Right click CN=System and select New > Object.
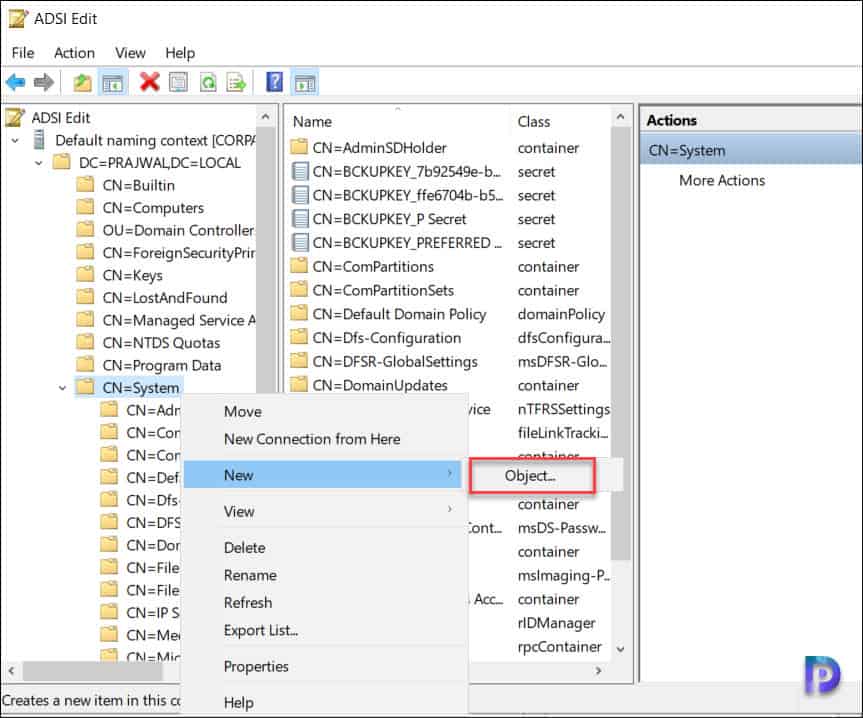
Step 4: You must select a class for the system management container object that you are creating. In the Create Object window, select Container, and then select Next.

Step 5: Enter the container value as System Management and click Next.

Step 6: Click Finish to close the Create Object wizard. Refresh the ADSI edit and the system management container should be now visible under CN=System directory.

Assign Permissions to System Management Container
After you create System Management Container for SCCM, the next step is to assign permissions to the System Management Container. For each container, you must give permissions to each site server’s computer account that will publish data to that domain. To delegate permissions on the system management container in SCCM, follow the steps below.
Step 1: Launch the Active Directory Users and Computers console. Click View and select Advanced Features. Right click System Management container and select Delegate Control.

Step 2: On the Delegation Control Wizard, click Add button.

Step 3: In the Object Types window, check box the Computers and click OK. If you don’t perform this step, the SCCM computer account will not be visible in the ADUC console.

Step 4: In the Select Users, Computers, or Groups window, type the SCCM Server name and click Check Names, the computer name should be resolved now. Click OK.

Step 5: We have added the computer account of the Configuration Manager site server in this domain. Click Next.

Step 6: On Tasks to Delegate window, select Create a custom task to delegate. Click Next.

Step 7: In this step, you indicate the scope of the task you want to delegate. Select the default option This folder, existing objects in this folder, and creation of new objects in this folder. Click Next.

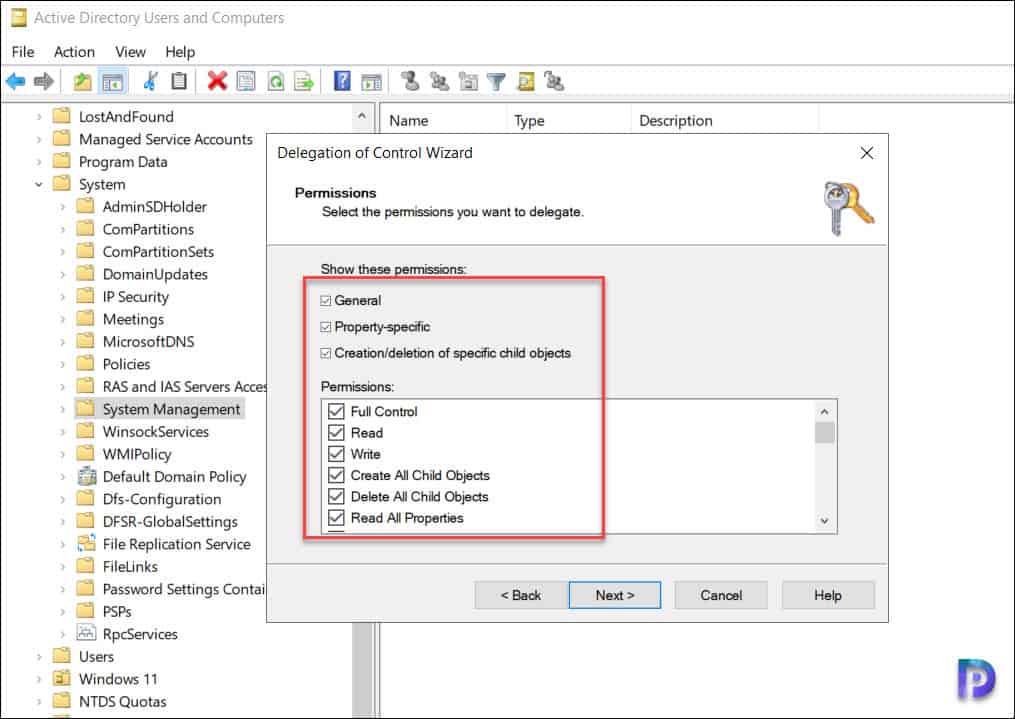
Step 8: On the Permissions window, select the permissions you would like to delegate. Select all the checkboxes: General, Property-specific, Creation/Delegation of specific child objects. Under Permissions, enable Full Control. This will assign the SCCM computer account full permissions over the system management container including the descendent objects. Click Next.
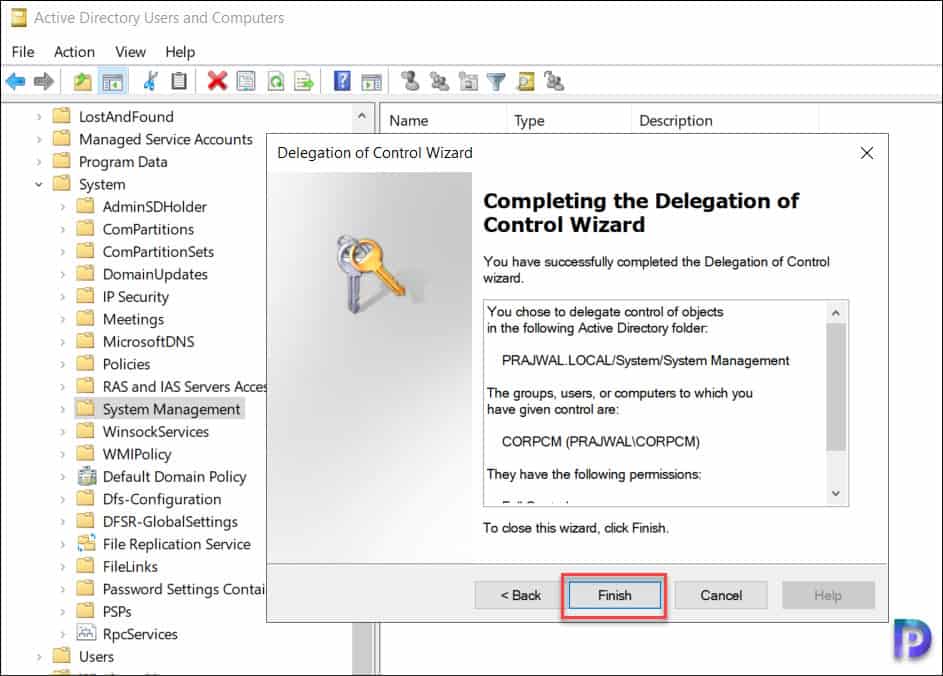
Step 9: We have successfully assigned permissions to the system management container. Close the Delegation of Control Wizard.
The following video tutorial explains the creation of system management container for SCCM.
How to Extend Active Directory Schema for SCCM
When you manage on-premises clients, you should extend the Active Directory schema for Configuration Manager. An extended schema can simplify the process of deploying and setting up clients. An extended schema also lets clients efficiently locate resources like content servers. Extending the schema is a one-time action for any forest.
You can perform the below steps either on Active Directory or any member server. To extend AD schema, always use an account that is a member of the Schema Admins security group.
The steps to extend the active directory schema for SCCM are as follows:
- Mount the SCCM setup media. Locate the folder: SMSSETUP\BIN\X64
- Right-click file named “extadsch.exe”. Hold the shift key on the keyboard and right-click on the extadsch file and select copy as path.
- Open the command prompt and paste the copied data and press Enter key.
- This will extend Active Directory schema for SCCM.
The output “Successfully extended the Active Directory schema” confirms that the AD schema has been extended successfully for SCCM.
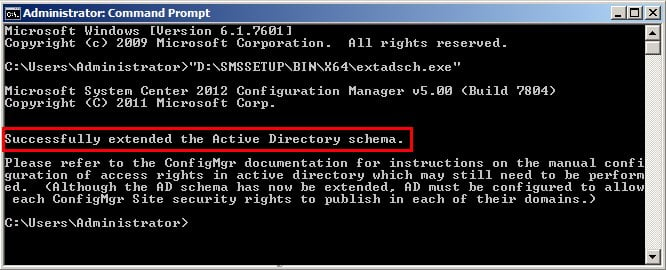
The AD Schema log file extadsch.log can be found in the root drive, C:\extadsch.log. Open it with a CMTrace log viewer or Notepad. The highlighted text shows that the Active Directory schema has been extended successfully.
Modifying Active Directory Schema - with SMS extensions.
DS Root:CN=Schema,CN=Configuration,DC=PRAJWAL,DC=LOCAL
Defined attribute cn=MS-SMS-Site-Code.
Defined attribute cn=mS-SMS-Assignment-Site-Code.
Defined attribute cn=MS-SMS-Site-Boundaries.
Defined attribute cn=MS-SMS-Roaming-Boundaries.
Defined attribute cn=MS-SMS-Default-MP.
Defined attribute cn=mS-SMS-Device-Management-Point.
Defined attribute cn=MS-SMS-MP-Name.
Defined attribute cn=MS-SMS-MP-Address.
Defined attribute cn=mS-SMS-Health-State.
Defined attribute cn=mS-SMS-Source-Forest.
Defined attribute cn=MS-SMS-Ranged-IP-Low.
Defined attribute cn=MS-SMS-Ranged-IP-High.
Defined attribute cn=mS-SMS-Version.
Defined attribute cn=mS-SMS-Capabilities.
Defined class cn=MS-SMS-Management-Point.
Defined class cn=MS-SMS-Server-Locator-Point.
Defined class cn=MS-SMS-Site.
Defined class cn=MS-SMS-Roaming-Boundary-Range.
Successfully extended the Active Directory schema.
Please refer to the ConfigMgr documentation for instructions on the manual
configuration of access rights in active directory which may still
need to be performed.  (Although the AD schema has now be extended,
AD must be configured to allow each ConfigMgr Site security rights to
publish in each of their domains.)
Failed to Extend AD Schema for SCCM
In certain environments, you may encounter errors while extending the Active Directory schema for SCCM. Listed below are some common AD schema errors and their associated solutions.
- While extending the AD schema for SCCM, you may encounter error 8202. The Active Directory schema error 8202 is logged in ExtADSch.log in the root of the system drive. Read the following guide to fix SCCM Active Directory Schema Error 8202.
- While extending the Active Directory schema for SCCM, you may encounter Schema error code 1355. Read the following guide to fix failed to extend the Active Directory Schema Error Code = 1355.
SCCM: List of Active Directory Attributes and Classes
After you extend the AD schema for Configuration Manager, the following classes and attributes are added to the schema. These are available to all SCCM sites in that Active Directory forest.
| SCCM Active Directory Attributes | Active Directory Classes for SCCM |
| cn=mS-SMS-Assignment-Site-Code cn=mS-SMS-Capabilities cn=MS-SMS-Default-MP cn=mS-SMS-Device-Management-Point cn=mS-SMS-Health-State cn=MS-SMS-MP-Address cn=MS-SMS-MP-Name cn=MS-SMS-Ranged-IP-High cn=MS-SMS-Ranged-IP-Low cn=MS-SMS-Roaming-Boundaries cn=MS-SMS-Site-Boundaries cn=MS-SMS-Site-Code cn=mS-SMS-Source-Forest cn=mS-SMS-Version | cn=MS-SMS-Management-Point cn=MS-SMS-Roaming-Boundary-Range cn=MS-SMS-Server-Locator-Point cn=MS-SMS-Site |


If you are going to use SCCM as an MDT replacement (Only for OSD) do you need to create a Management Container for SCCM and Extend AD Schema?
Since MDT support is ending OCT 2025 it would be nice is there was a guide to switch from stand alone MDT to a minimum install of SCCM for operating system deployment
what is location or path to find SCCM Active Directory Attributes in AD
Hi,
If you have a broken MECM Server and need to deploy a second Server to replace the existing what would be the plan for this ?
Any ideas appreciated
Thanks,
where we can find the Microsoft Schema for Third-party Catalog creation????
Hi Prajwal
I have added a windows system to the same domain of sscm server and trying to search it in devices inside sccm, however I have run the Active Directory discovery method but still unable to find that windows system into devices.
Could you please suggest the potential fixes?
Hi Prajwal,
If I need to change the FSMO role of the schema master from one domain controller to another, What do I need to pay attention on the SCCM part ?
Thanks
Before I proceed further, I accidentally ran extadch before creating the system management in adsi edit would that be an issue ?
No don’t worry about that. You can create system management container and proceed with ConfigMgr installation.
Afternoon,
I am planning to Migrate Exchange Server 2013 to Exchange Server 2016. The Exchange 2013 is running from 2 servers and now I have a new server running Sever 2016 STD. Can I migrate using only 1 server ? I dont have virtual machine running, do I need 2 servers to successfully migrate to Exchange 2016.
Thanks Praj, was very helpful.Hope all’s well 🙂
Hello Prajal,
is it possible to configure the container in another Active Directory folder, other than the System folder? Is it supported by SCCM?
In my understanding, the system management container should be created under System folder.
Hello,
Thank you for the above guidance. My question centers around changing the System Container Object. We currently have a test bed for SCCM, but we are looking to deploy into production. This will be a new server build, with proper (best practice) physical resources provided. What is the recommended practice for point our current extended AD infrastructure to this server?
why do we extend schema in sccm?
What is the uses of Extending AD_Schema?
why do we extend schema in sccm?
what is the uses of Extending AD _Schema?
An extended schema can simplify the process of deploying and setting up clients. An extended schema also lets clients efficiently locate resources like content servers and additional services that the different Configuration Manager site system roles provide.
Hello Prajwal
Our company has recently acquired another company. We have a two way
trust established between our forests. I plan to deploy a Distribution
point to the new forest for software deployments and imaging, but
maintain only one Management Point in the original forest.
How can I tell if the schema in our forest was extended when SCCM 2012 was deployed (before my time?)
Does the schema need to be extended in the new forest? If so how would
that be done without disrupting our current forest, as there is an
active two way trust?
Hello Prajwal,
You only need to put the Site Server inside the container right?
If you have Site System Server (like Distribution Points) you don’t have to add them inside the container right?
I have been handed the reigns of the SCCM project at a school district. We currently have SCCM 2012 SP1 being utilized to the best of its ability from people prior to me. We have had Microsoft Premier out assisting us with a side by side install of SCCM 2012 R2 on a completely different VLAN from the existing. My question is am I able to have 2 site servers with full permissions to the Systems Management Container? The only errors we have in the R2 upgrade are in regards to creating objects in AD which of course isn’t going to work if it doesn’t have permissions. Can I have 2 servers with permissions to the container? They are both in the same Domain.
Yes that should be possible. I haven’t tried that anytime but it can be done.
thank you
i want to ask if i extend the schema before with sccm 2007
what happen to extend the schema with 2012 and if i can remove the effect of 2007
If you had extended the schema during installation of sccm 2007 you need not extend it while you install or upgrade 2012.
Hi Prajwal,
I have face this situation : When I ran the extadsch.exe in order to extend the AD, I had the following errors :
Error Code = 8202, at the Class MS-SMS-Managament-Point creation step and further…
I just reran the command, and it went through without any problems.. Just wanted to share it with people that may have the same issue..
I have to mention that I have two DCs in my forests, so I am presuming that is a matter of replication time here.. isn’t it?
Yes its a replication issue. I am glad to know that you found the solution. You can also see this error when the user account is not a part of schema admins group.
Why we are extending the schema before starting the SCCM installation?
You can extend the schema before or after the SCCM installation. It is recommended by microsoft to extend the schema before you begin SCCM installation.
Hi there,
These articles are fantastic. Excellent documentation.
One quick question though, If I have SCCM 2007 running already. For instance, from the System Management container, I see SMS-SITE-ABC (mSSMSSite) and other containers for ManagementPoint and ServerLocatorPoint exist. Should it cause any issue if I deploy SCCM2012 using a differnet site name?
Can both system run in Paralle?
Thanks
AL
Yes i think if the site name is different it shouldn’t cause any issue..