This post covers the steps to Deploy Dell Command Monitor (DCM) using SCCM. This is a continuation of my previous post Install Dell Command Integration Suite for ConfigMgr.
After integrating the Dell Command Suite with SCCM, you can perform Dell Command Monitor deployment to your clients to get more details about Dell hardware inventory.
The Dell Command | Monitor is designed for Dell Enterprise Client systems, Dell IoT Gateway systems, as well as for Dell Embedded PCs. Furthermore with Dell Command Monitor, system administrators can remotely manage assets, monitor system health, and inventory deployed systems in an enterprise.
Step 1 – Create Dell Device Collection
First of all let’s start with creating a device collection for Dell clients. To be able to determine Dell computers in your environment, we need to create a device collection that contains only Dell computers, we can do it with the following query.
select SMS_R_SYSTEM.ResourceID,SMS_R_SYSTEM.ResourceType, SMS_R_SYSTEM.Name, SMS_R_SYSTEM.SMSUniqueIdentifier, SMS_R_SYSTEM.ResourceDomainORWorkgroup, SMS_R_SYSTEM.Client from SMS_R_System inner join SMS_G_System_SYSTEM_ENCLOSURE on SMS_G_System_SYSTEM_ENCLOSURE.ResourceId = SMS_R_System.ResourceId where SMS_G_System_SYSTEM_ENCLOSURE.Manufacturer like "Dell%"Step 2 – Download Dell Command Monitor
You can download the latest version of Dell Command Monitor from this link. Both 64-bit and 32-bit downloads are available. While writing this post, the latest version of Dell Command Monitor available is 10.2.1. In addition, the DCM is also available for Linux OS.
After you download the file, save it to a folder such as sources folder.

Step 3 – Deploy Dell Command Monitor Using SCCM
Next we will deploy the DCM using SCCM. You can either deploy it as a package or create an application. I will cover both the methods in this post.
Step 3.1 – Create and Deploy DCM as SCCM Package
- Launch the Configuration Manager console as administrator.
- Go to Software Library > Application Management > Packages.
- In the top ribbon, click Packages Tab and click to Import Dell Command Monitor Package.
Click Browse to select the Dell Command Monitor setup. Select the distribution to which you want to distribute the package content. Click OK.
The Dell Command Monitor package has been successfully created. Click Close.
You can locate the DCM package under Software Library > Application Management > Packages > Dell Client Packages.
 Tip – If you don’t see the Dell Client Packages folder, close the console and check again.
To deploy the Dell Command Monitor package to clients, right click to the DCM-Package_x64_A00 and click to Deploy.
On the General page, click Browse and select the Dell device collection which we created in Step 1. Click Next.

On the Content page, select additional distribution points (if any) and click Next.
On the Deployment Settings page, select the purpose as Required. To know the difference between Available and Required in SCCM, read this post. Click Next.
On the Scheduling page, click New.
Select the assignment schedule to As soon as possible. Click Next.
Ensure you set the deployment options right. Click Next.
On the Summary page, click Next and finally click Close.
Step 3.2 – Deploy Dell Command Monitor as SCCM Application
To deploy DCM as an application using SCCM, you must first extract the setup file to a folder. Run the Dell Command Monitor executable and click Extract.
Extract the contents to a folder and click Close. When you extract the executable, what you get is a Dell Command Monitor .msi file.
In the SCCM Console, go to Application Management > Application. Click Create Application.
Since we have .msi file with us, select Type as Windows Installer (*.msi file) and specify the location of Command Monitor. Click Next.
Wait until the application information is imported from Windows Installer file. Click Next.
On the General Information page, specify the application name, publisher and additional info. You can probably add more info if you want to. The installation program will be picked up automatically. Set the install behavior to Install for system. Click Next.
On the Completion page, click Close.
In the next step, select the Dell Command Monitor application and deploy it to the device collection. The steps to deploy an application remain same.
Step 4 – Importing the MOF File
After deploying Dell Command Monitor to Dell clients, you need to import the related MOF file to SCCM Hardware Inventory classes to get more details.
To get the OMCI_SMS_DEF.mof file, either browse in a Dell client in:
C:\Program Files\Dell\Command_Monitor\ssa\omacim\OMCI_SMS_DEF.mof
Or
Extract the Dell Command Monitor setup and you find it here.
 In the SCCM console, go to Administration > Client Settings. Right click Default Client Settings and click Properties.
Select Hardware Inventory and click Set Classes.
Now at the bottom click Import option.
On the Import Summary page, select Import both hardware inventory classes and hardware inventory class settings. Click Import.
Check that all DCIM classes and click OK.
Back to default settings properties, click OK.
Step 5 – Dell Command Monitor
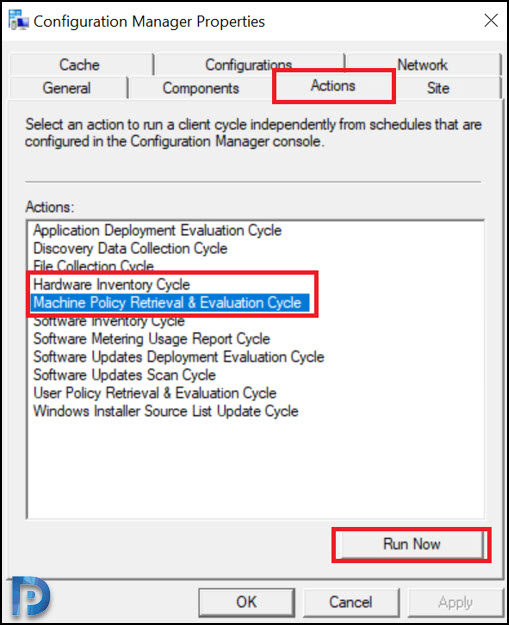
Login to one of the dell client machine. Open Control Panel > System and Security > Configuration Manager. Go to Actions tab, run Machine Policy Retrieval & Evaluation Cycle and Hardware Inventory Cycle in order.
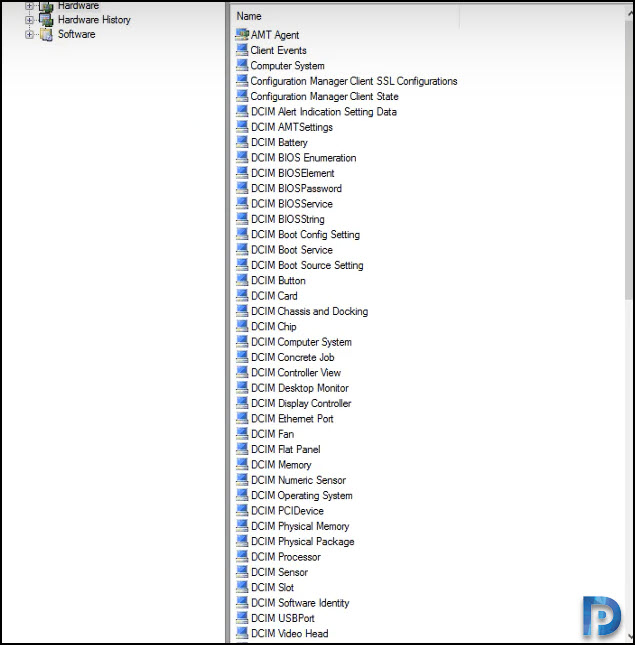
After few minutes, under Assets and Compliance, right click a Dell client and click Start > Resource Explorer.
Notice that you can see additional DCIM info now.
 In conclusion, Using Dell Command Monitor, SCCM administrators can remotely manage assets, monitor system health, and inventory deployed systems in an enterprise.


How does this agent compare to Dell OpenManage Inventory Agent?
Do you have any guides on how to get reports on the monitor models once this is all set up?
according to dell docs if you install dell command monitor 10.8 you should be able to read modelname serialnumber etc for the dockingstation with this command in powershell Get-CimInstance -Namespace root\dcim\sysman -ClassName DCIM_Chassis but it does not work. Anyone know how to get this information?
Hello, is possible to use only DCM without DCIS? For DCM I need to install DCM app on every Dell computer and import .mof file into sccm? Is it all? Thank you for your answer.
Hello,
Has anyone else had this brick certain latitude models? We have a fleet of 5400 i5 laptops in warranty still which were temporary bricked by this software. We discovered that the devices affected had out of date BIOS’ installed, but I can’t for the life of me find anywhere on Dells website that would explain this behaviour.
The Pre-reqs for the BIOS aren’t particularly detailed:
“All Commercial platforms shipped in 2016 or later have WMI-ACPI support in all BIOS versions. Older platforms than what is listed in the table below, should use an earlier version of Dell Command | Configure.”
Which the 5400s fall under. Also it says SMBIOS version 2.3 and above is required, which is also correct on the laptops, so there is clearly something else triggering it that requires a later BIOS update.
Did you check this issue with Dell support?.
I have, but they appear to be behind a pay wall. Basically every time I’ve tried to explain the problem I get passed to software support and told I have to pay before they can help.
I was rather hoping someone else had encountered this issue 🙂
FYI: Though my test environment machines never forced a reboot of the devices after install, we did have forced reboots in our Prod environment, even when we had NO reboots outside of maintenance window set. This didn’t make our users happy!!
hey do you ever have an answer to your question ? i have the same Issue
WATCH OUT, folks! We had this issue too today. Build your apps with a reboot included regardless of testing results.
Apologies, this is no longer an issue. I originally tried to import the settings on a custom client policy but once I tried the default it imported without issue. It also now appears within my custom client policy. Thanks
When I get to the import “OMCI_SMS_DEF.mof” step I receive an error that states…
“The following classes for which you are trying to import settings do not exist. Import the required class definitions and then try to import the settings again”
Can you please assist?
Make sure you import from the Default Client Settings, not any custom ones.
I had the same issue. The error actually says that, as in my case the .MOF can only be imported from the CAS if you have one. I did all my config from PRI
Worked 100% after importing from the CAS