


In this blog post, I will explore various methods to show or hide empty drives in Windows 11. Whether you’re troubleshooting storage issues or simply prefer to see all drives regardless of their status, this tutorial will help you.
By default, Windows 11 hides empty drives (such as unused card readers or removable drives with no media inserted) in File Explorer to keep the interface uncluttered. Showing the empty drives can be useful for troubleshooting or when you need to ensure all drives are visible for configuration.
In Windows 11, you can use multiple methods to customize the visibility of empty drives for users based on your preference. I will discuss several methods, and you can choose the one you find easiest. Let’s get started.

Method 1: Show or Hide Empty Drives using Settings
Sign in to Windows 11 PC. Press Win + I to open the Settings app. Go to System > For developers. Under File Explorer, find the Show empty drives toggle. Toggle it ‘On‘ to display empty drives on your PC, and toggle it ‘Off‘ to hide them.

Method 2: Show or Hide Empty Drives in Folder Options
To show or hide empty drives in Folder Options on Windows 11, press Windows + E to open File Explorer. Click on the three dots in the toolbar and select Options. Alternatively, you can go to Control Panel > File Explorer Options.

In the Folder Options window, click on the View tab. Scroll down to find the option “Hide empty drives” under Advanced settings.
- To hide empty drives: Check the box next to “Hide empty drives”.
- To show empty drives: Uncheck the box next to “Hide empty drives”.
Click Apply and then OK to save the changes.

Method 3: Show or Hide Empty Drives using Registry
You can show or hide empty drives using the Windows Registry. Be cautious when editing the registry, as incorrect changes can cause system issues. Before making any changes, it’s a good idea to back up the registry by selecting File > Export.
To open the registry editor, press Windows + R to open the Run dialog box. Type regedit and press Enter. In the Registry Editor, navigate to the following path:
HKEY_CURRENT_USER\Software\Microsoft\Windows\CurrentVersion\Explorer\AdvancedLook for the value named HideDrivesWithNoMedia in the right pane.

Double-click on HideDrivesWithNoMedia to modify its value:
- To hide empty drives: Set the value to 1.
- To show empty drives: Set the value to 0.

Method 4: Show or Hide Empty Drives using PowerShell
If you know PowerShell, this method is very easy to configure the visibility of empty drives on your computer. On your Windows 11 PC, click Start and type “PowerShell“. Select Windows PowerShell and choose Run as Administrator. Use the following commands based on whether you want to show or hide empty drives.
To hide empty drives, run the below PowerShell command. This command basically configures the registry key ‘HideDrivesWithNoMedia‘ with a value 1.
Set-ItemProperty -Path "HKCU:\Software\Microsoft\Windows\CurrentVersion\Explorer\Advanced" -Name HideDrivesWithNoMedia -Value 1
To show empty drives, run the below PowerShell command. This command basically sets the registry key ‘HideDrivesWithNoMedia‘ with a value 0.
Set-ItemProperty -Path "HKCU:\Software\Microsoft\Windows\CurrentVersion\Explorer\Advanced" -Name HideDrivesWithNoMedia -Value 0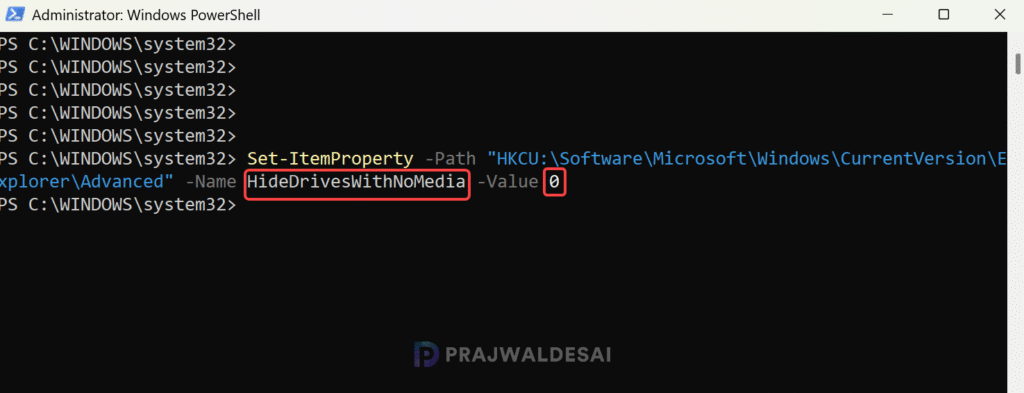
Tip: If the changes don’t take effect after running the commands, try logging out and logging back in to apply them.
