


The Windows 11 image is available in Microsoft Azure and you can create a Windows 11 VM in Azure. Windows 11 is also available on Azure Virtual Desktop.
The Windows 11 is the latest client operating system by Microsoft. It delivers a more personal computing experience that is streamlined and doesn’t compromise on manageability, security, and performance.
The steps to create a Windows 11 VM in Azure are easy and similar to that of Windows 10. You can also create Azure Virtual Machine using the Cloud Shell in Azure portal. However, I prefer creating a new VM from the Azure portal over the cloud shell method.

If you want to deploy Windows 11 VM in Azure, it is possible and the Windows 11 image is available in Azure. I would recommend testing the Windows 11 along with your apps thoroughly. You have a 10-day time period to roll-back from Windows 11 to Windows 10 if you don’t like it.
Before I show you how to create a Windows 11 VM in Azure, let’s look at the supported Windows 11 versions by Azure.
Supported Windows 11 Versions by Microsoft Azure
The Microsoft Azure platform will support all the following versions of Windows 11 listed below.
- Windows 11 Pro
- Windows 11 Pro N
- Windows 11 Enterprise
- Windows 11 Enterprise N
- Windows 11 Enterprise multi-session
- Windows 11 Enterprise multi-session + Microsoft 365 Apps
Supported Windows 11 Preview Versions by Microsoft Azure
The Microsoft Azure platform will support the following Windows 11 preview versions.
- Windows 11 Pro (Preview)
- Windows 11 Enterprise (Preview)
- Windows 11 Enterprise Cloud PC + Microsoft 365 Apps (Preview)
- Windows 11 Enterprise multi-session (Preview)
- Windows 11 Enterprise multi-session + Microsoft 365 Apps (Preview)

Caution– Windows 11 Preview is for registered Windows Insider to create and use virtual machine images from this preview. You should not use the Windows 11 preview in production environments. This is pre-release software and may not operate correctly.
Create a Windows 11 VM in Azure Portal
You can try the following steps to create a Windows 11 VM in Azure
- Sign in to the Azure portal at https://portal.azure.com.
- From the list of Azure Services, select Virtual Machines.
- In the Virtual machines page, select Create then select Virtual machine.

On the Create a virtual machine window, under Project details, select the following.
- Subscription – Select your Azure subscription.
- Resource Group – Select the Azure resource group for Windows 11 VM.
- Virtual Machine Name – Specify the VM name. This will be the computer name after you image VM with Windows 11.
- Region – Select the region.
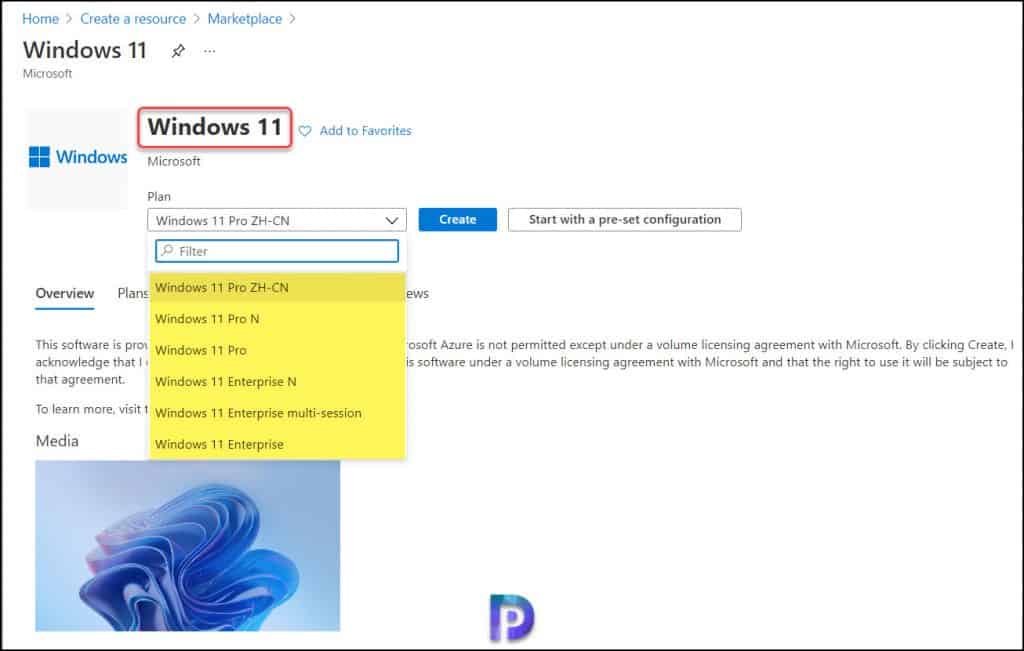
- Image – Select the drop-down and select Windows 11 as image. If you don’t see the Windows 11 option, then select See all images.

On the Marketplace window, type Windows 11 as the search term and press Enter key. From the results, select Windows 11 and now select Windows 11 edition. I am going to select Windows 11 Enterprise – Gen2 here.

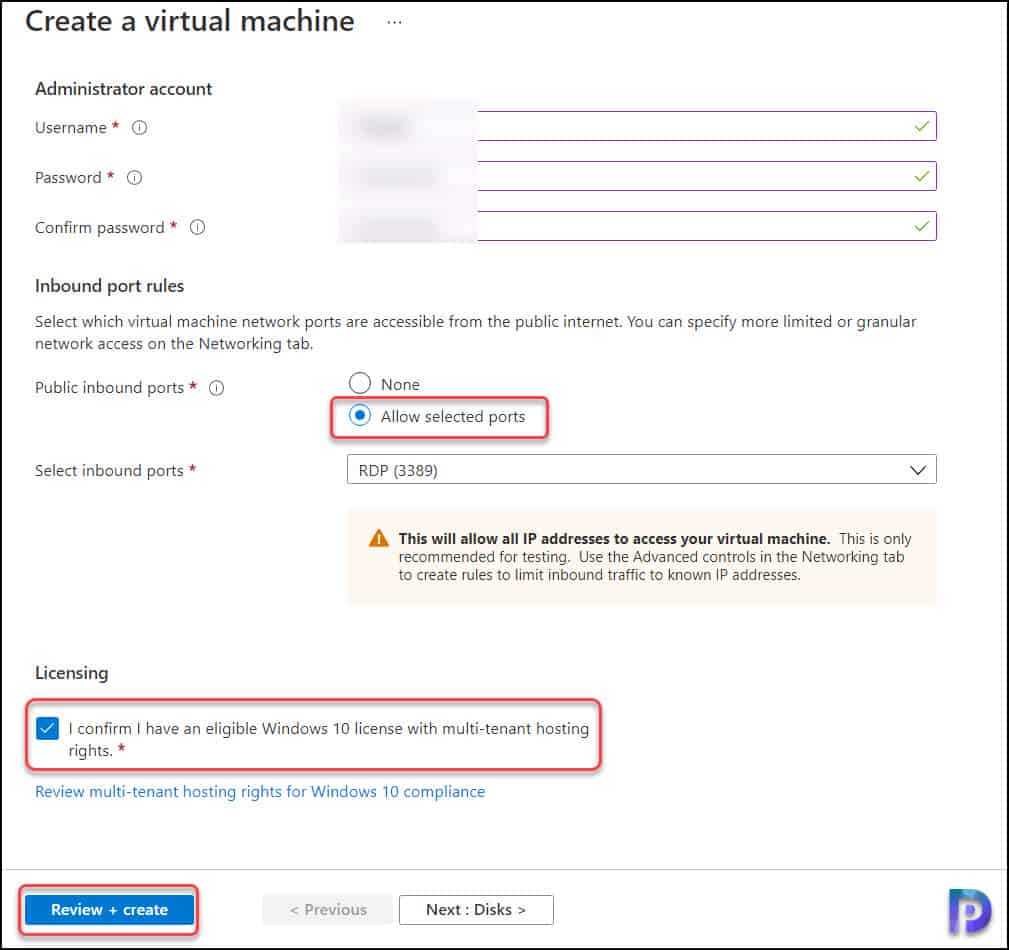
After you select Windows 11 edition, you should specify the Administrator account details. You cannot use Administrator as username, so specify another name for Administrator. Next, enter a complex password twice. If you see a green tick, it means you have entered a correct complex password.
For inbound rules, you can specify the network ports using which you can connect and access the VM from public internet. For testing purpose, I am going to select Allow Selected ports and select inbound ports to RDP (3389).
Since you’re going to use this Windows 11 VM for your work, you have to confirm if you have an eligible Windows 11 license with multi-tenant hosting. Check that box to confirm the license and click Review+Create.
Note – You can also configure additional Windows 11 VM settings such as Disks, Networking, Management etc. Some of these settings can also be modified after you create the Windows 11 Virtual Machine.
Once you see Validation passed, create the Windows 11 virtual machine by selecting Create.

The Windows 11 Virtual Machine is now being created. You see the status as deployment is in progress. Wait for a few minutes while the VM is created.

Your Deployment is complete – If you see this, Congratulations, you have successfully created Windows 11 VM in Azure. That was pretty easy isn’t it.
From the same screen, you can download deployment details. You can also enable auto-shutdown for Windows VM that will save your credits. You can also run a script inside the virtual machine and create another VM. But for now, select Go to Resource.

Connect to Windows 11 VM in Azure using RDP
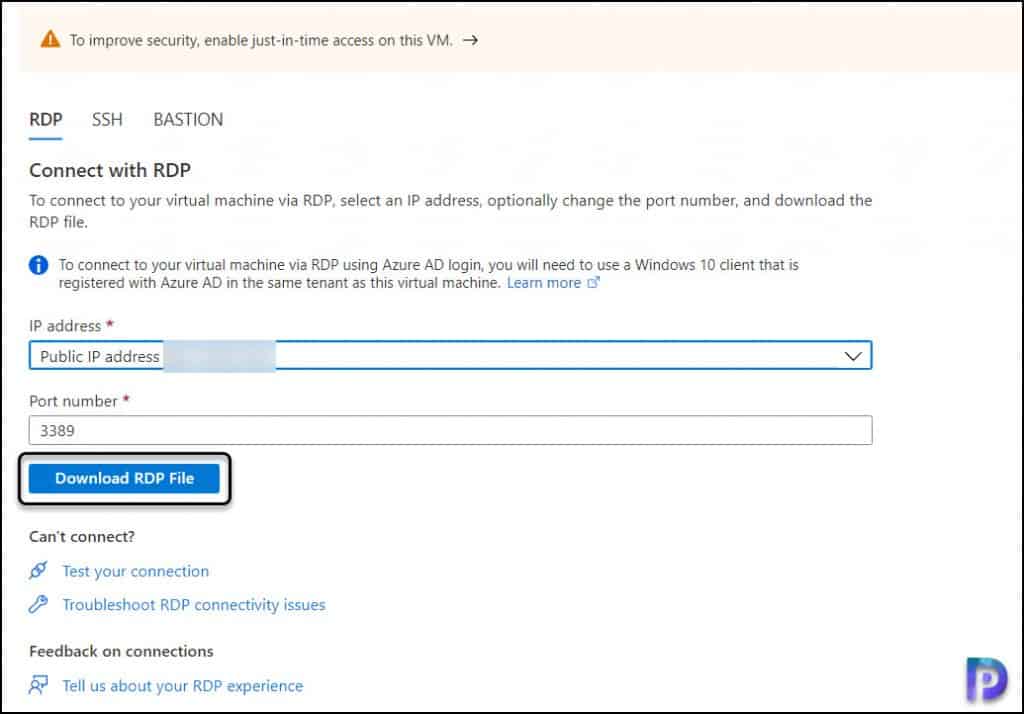
Once you create a Windows 11 VM in Azure, you can connect to the virtual machine and access it via RDP (3389).
On the Windows 11 resource window, select Connect.

You can connect to these Windows 11 Virtual machine using RDP, SSH and Bastion. While creating the VM, we had enabled port 3389, hence select RDP.

You should now see the public IP address of your Windows 11 VM and port number (by default 3389). To connect to your virtual machine via RDP, select an IP address, optionally change the port number, and select Download RDP File.
To connect to your virtual machine via RDP using Azure AD login, you will need to use a Windows 11 client that is registered with Azure AD in the same tenant as this virtual machine.
I hope this post helps you to create a Windows 11 VM in Azure. For more such posts on Azure, visit the Azure category and if you have any questions, let me know in the comments section.

Thanks Prajwal. This helpmed a lot! Thanks for your efforts.