


Welcome to the guide to Inkscape deployment using SCCM. I’ll show you how to download the most recent version of the Inkscape MSI installer, package it, and deploy it to Windows devices via Configuration Manager.
Inkscape is a free, open-source vector graphics editor that works on Linux, Mac OS X, and Windows desktop computers. It is widely used for creating and editing scalable vector graphics (SVG) files. It allows you to create a variety of graphics such as logos, business cards, fliers, badges, letterheads, and more.
In my previous guide, I demonstrated how to deploy Inkscape using Microsoft Intune and covered various approaches. For Windows devices that are on-premises and domain-joined, the Inkscape application can be installed using either Configuration Manager or Group Policy.

Steps for Inkscape Deployment using SCCM
I have split the Inkscape deployment procedure into steps to make it easier to follow. MSI application deployment with SCCM is simple because it does not require you to enter any install or uninstall commands or define any detection rules because it is automatically populated by the MSI installer.
Another important note: always download the latest installer from the Inkscape main site and avoid any other sites that claim to offer the installers. A fake installer can halt the deployment and cause more security issues.
Step 1: Download the Inkscape MSI installer for Windows
Inkscape software is available for multiple platforms that include Windows, macOS, and Linux. For Windows OS, both MSI and EXE installers are available for enterprise deployments. I recommend downloading the MSI installer as it makes the deployment easier when compared to using the Inkscape EXE installer.
To download the latest version of Inkscape, visit the website and navigate to the Windows downloads. The website will present you with various options to download the installer. Select the Inkscape Windows installer package (.msi package) and save the installer to your computer. Place this installer in the Sources folder or a shared folder for packaging.
In addition to downloading the installer, you may download an icon for the Inkscape application. This icon will be linked to the application during the creation of the app.

Step 2: Create Inkscape application in SCCM
Let’s get started with creating a new application for Inkscape in SCCM. First, launch the Configuration Manager console. Navigate to Software Library > Overview > Application Management > Applications. Right-click Applications and select Create Application.

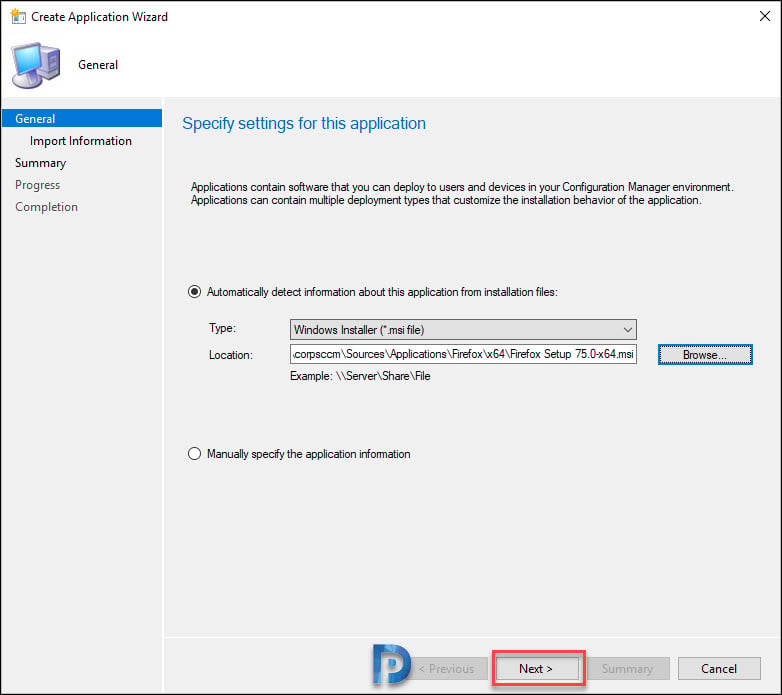
On the General page, choose the installer type as Windows Installer (*.msi file). Specify the path to the location where you’ve placed the Inkscape MSI installer and click Next.

The Configuration Manager reads the application information from the Inkscape installer file. On the General Information step, you can specify additional details for the application. This includes publisher information, software version, etc.
The installation program and uninstallation command are generated by the MSI installer and are provided below.
Inkscape installation command: msiexec /i "inkscape-1.4_2024-10-11_86a8ad7-x64.msi"
Inkscape installation command: msiexec /x {4E9A1766-6BA4-4015-BA8D-05A268638587} 
Verify the application information in the summary step and click Next. On the Completion tab, click Close. That completes the procedure for adding the Inkscape application to SCCM.

Step 3: Deploy Inkscape application using SCCM
To deploy the Inkscape application in the SCCM console, go to Software Library > Application Management > Application. Right-click the Inkscape application and select Deploy.

On the General page, click Browse and select a device collection for which you want to deploy the Inkscape application. Click Next.

On the Content page, click the Add button and select the distribution point servers where you would like to host the content. Click Next.

On the Deployment Settings, select Action as Install and Purpose as Available. If you’re not sure what to select here, refer to the following article to understand the differences between SCCM applications available vs. required.
In my case, I have chosen the deployment purpose as required, which means the Inkscape application will be installed on the end devices silently without requiring any user inputs.
Click Next.

You can schedule this deployment on the Scheduling tab by selecting a date and time. If you wish to deploy the application as soon as possible, don’t configure anything. Click Next.

On the User Experience page, click Next.

The Summary page shows the overall deployment configuration. If no changes are required, click Next. On the Completion page, click Close.

Step 4: Verify the Inkscape installation
In this step, we’ll verify if the Inkscape application is successful on our targeted Windows devices. Configuration Manager administrators monitor the application deployment from the Monitoring workspace node in the console.
However, another method is to manually check the application installation and review the logs. Sign in to the Windows device and launch the Software Center. Select the Inkscape application and look at the application status.
In the below screenshot, we see the Inkscape application is installed on the device, and the status shows as installed. Although a system restart may be required, it is not mandatory.
End users can verify the installation of the app by clicking on the Start button and typing ‘Inkscape‘ in the search box. The app appears in the search results if it is installed. To launch the app, click Open. On Windows 11, the Inkscape app also appears in the Apps > Apps & Features > Apps list.

