


In this guide, I will demonstrate different methods to enable or disable Telnet on Windows 11. The Telnet client is disabled by default on Windows 11 for security purposes; however, it can be enabled if needed by following the methods outlined in this guide.
While Telnet is not commonly used today due to its lack of encryption and security concerns, it is still useful for testing connectivity or accessing legacy systems. When the Telnet client is enabled, you can run commands on a remote server and the output of these will be returned to the Telnet client.
When troubleshooting firewall and network issues at work, I used Telnet primarily on Windows servers. The procedures for installing Telnet in Windows 11 are the same as for other versions of Windows. Telnet is a great feature for managing and testing network access for developers and administrators.

Before you Begin
- You will need an account with Administrative privileges to install or uninstall Telnet on a local Windows 11 PC.
- Avoid modifying the Windows Registry to add or remove the Telnet client, as it is both complicated and potentially hazardous.
- Telnet must be disabled after using it because it’s not secure.
- When enabling the Telnet client feature on a Windows 11 PC within an Active Directory domain, ensure no Group Policy Object (GPO) is set to restrict the installation or removal of Windows features.
Security Considerations
Although the telnet client can be useful, it is highly insecure because it does not encrypt data. If you need secure remote access, consider using SSH (Secure Shell) instead. Only enable Telnet temporarily if absolutely necessary and disable it when you’re done using it.
Let’s now go through different methods to enable or disable Telnet on Windows 11.
Method 1: Enable or Disable Telnet via Settings
On Windows 11, you can enable or disable Telnet client via Windows features using the Settings app. Sign in to a Windows 11 PC. Open the Settings app and go to System > Optional Features. Scroll down and under Related settings, select More Windows features.

In the Windows Features dialog box, scroll down to find Telnet Client. Check the box next to Telnet Client to enable it. Click OK to apply the changes. Windows will take a few moments to enable Telnet.

If you wish to disable the Telnet client via the Settings app, navigate to System > Optional Features. Scroll down and under Related settings, select More Windows features. In the Windows Features dialog box, locate Telnet Client. Uncheck the box next to Telnet Client. Click OK to disable Telnet.
Method 2: Enable or Disable Telnet via Control Panel
The easiest way to enable or disable Telnet is through the Control Panel. On your Windows 11 PC, press Win + R keys to open the Run window. Type ‘control‘ in the run box and press the Enter key.
Navigate to Programs > Programs and Features. Click on Turn Windows features on or off in the left sidebar. Scroll down and locate Telnet Client. Check the box next to Telnet Client to activate it. Click OK and wait for Windows to enable Telnet. Once the process is complete, Telnet will be enabled on your system.
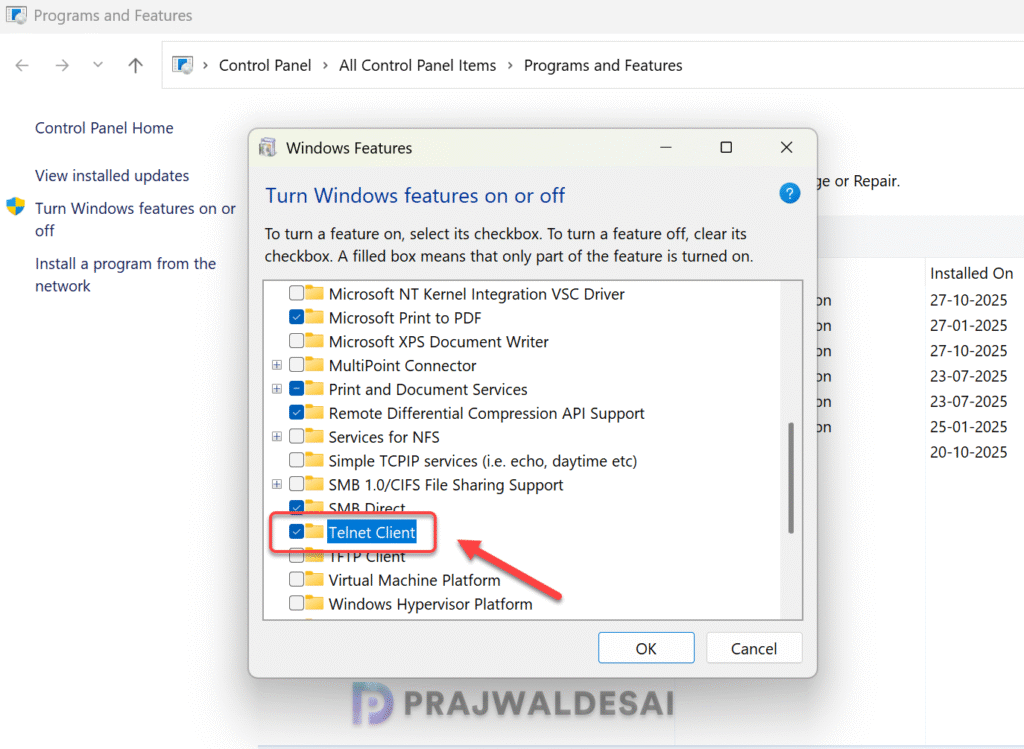
To disable or uninstall the telnet client, open the control panel and go to Programs > Programs and Features. Click on Turn Windows features on or off in the left sidebar. Scroll down and locate Telnet Client. Uncheck the box next to Telnet Client and click OK. After a few seconds, the telnet client is disabled on Windows 11.
Method 3: Enable or Disable Telnet using PowerShell
You can easily install or uninstall the Telnet client on Windows 11 using PowerShell. To enable the Telnet, click Start and type PowerShell in the search box. Right-click Windows PowerShell and select Run as administrator. Run the below command to enable the Telnet client.
Enable-WindowsOptionalFeature -Online -FeatureName TelnetClientIn the below image, the output clearly shows that Telnet Client is enabled and there is no system restart required.

Suppose that you want to remove the Telnet client feature via PowerShell, you can use the below command.
Disable-WindowsOptionalFeature -Online -FeatureName TelnetClient
To check if the Telnet Client is enabled or disabled on the Windows 11 computer, run the below PowerShell command.
Get-WindowsOptionalFeature -Online -FeatureName TelnetClientIn the image below, refer to the State column in the output. If the State is listed as Enabled, Telnet is active. If the State is listed as Disabled, Telnet is inactive.

Method 4: Enable or Disable Telnet using Command Prompt
You can enable or disable the Telnet client using the Command Prompt or the Terminal application. Click the Start button and search for “cmd“. Right-click on “Command Prompt” and select “Run as administrator.”
In the CMD Prompt, run the below command to enable the Telnet client.
dism /online /Enable-Feature /FeatureName:TelnetClient
To disable the Telnet client via CMD Prompt, you can use the below command.
dism /online /Disable-Feature /FeatureName:TelnetClient
Method 5: Enable or Disable Telnet Client using Registry
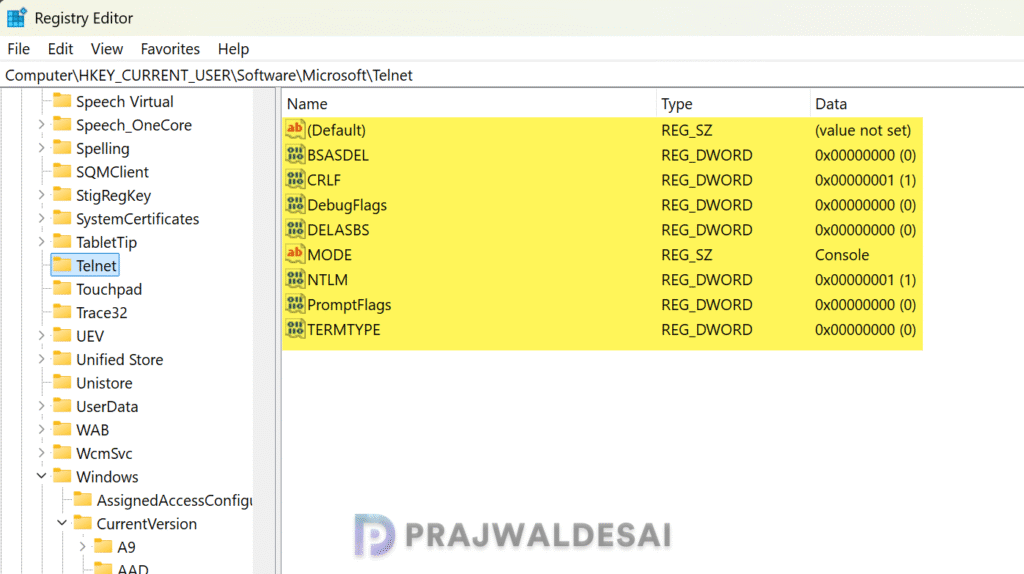
Windows registry method is something that I don’t recommend for users to enable or disable the Telnet client. That’s because it involves a certain set of keys which are easy to delete but hard to recreate. If you still prefer this method, backup your entire registry to a file before making any changes.
Type Win + R keys to open the run box and type regedit and press the Enter key to open the registry editor. Navigate to the below registry path and delete all the keys located within the Telnet folder to disable the Telnet client feature.
Computer\HKEY_CURRENT_USER\Software\Microsoft\TelnetTo re-enable Telnet through the Registry, you need to recreate the same set of keys to restore the feature’s functionality.
Verify Telnet Installation
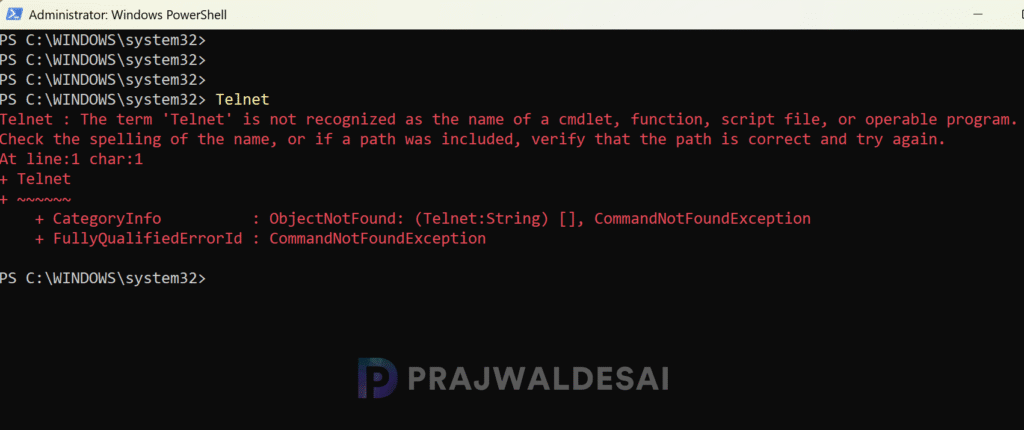
After enabling Telnet, you can verify its installation by running the Telnet command. Open Command Prompt and type telnet and press Enter. If Telnet is enabled, you’ll see a Telnet prompt like Microsoft Telnet>. To exit Telnet and get back to the command prompt, type q and press Enter.

If Telnet is disabled, you’ll see an error message indicating that The term ‘Telnet’ is not recognized as the name of a cmdlet, function, script file, or operable program.
Conclusion
Enabling or disabling Telnet on Windows 11 is straightforward and can be done using different methods such as PowerShell, Control Panel, Command Prompt, or Settings app. While Telnet may serve specific purposes, it’s essential to understand the security risks associated with it and use it cautiously.
I recommend you follow the steps outlined above to enable or disable Telnet based on your requirements. If you have any questions or need further assistance, leave a comment below!
