

Deploying SCCM 2012 Part 14 – Enabling PXE, Adding OS Installer, Creating Task Sequence – In this post we will see the initial steps to build and capture windows 7 x64 using SCCM 2012.We will first enable the PXE support for the clients, add an windows 7 64 bit OS installer and lastly create a task sequence.
Ways to deploy operating systems – There are several methods that you can use to deploy operating systems to Configuration Manager client computers.

- PXE initiated deployments: PXE-initiated deployments let client computers request a deployment over the network. The operating system image and a Windows PE boot image are sent to a distribution point that is configured to accept PXE boot requests.
- Multicast deployments: In this method the operating system image is sent to a distribution point, which in turn simultaneously deploys the image when client computers request the deployment.
- Bootable Media Deployments: Bootable media deployments let you deploy the operating system when the destination computer starts. When the destination computer starts, it retrieves the task sequence, the operating system image, and any other required content from the network. Because that content is not on the media, you can update the content without having to recreate the media.
- Stand-alone Media Deployments: Stand-alone media deployments let you deploy operating systems in environments where it is not practical to copy an operating system image or other large packages over the network and in environments without network connectivity or low bandwidth network connectivity.
- Prestaged Media deployments: Prestaged media deployments let you deploy an operating system to a computer that is not fully provisioned. The prestaged media is a Windows Imaging Format (WIM) file that can be installed on a bare-metal computer by the manufacturer or at an enterprise staging center that is not connected to the Configuration Manager environment.
For more information on Operating System Deployment in Configuration Manager please go through this link :- http://technet.microsoft.com/en-us/library/gg682108.aspx.
We will first enable the PXE support for the clients, we will be performing the below steps with the user account “sccmadmin”
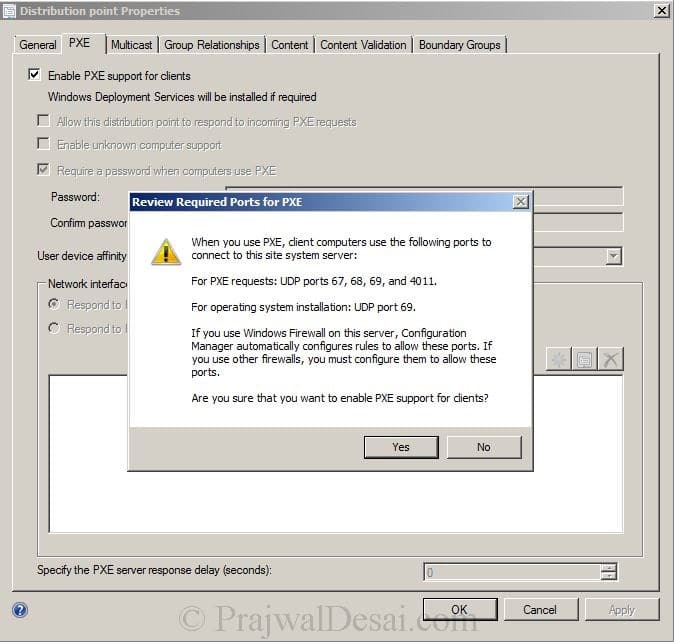
Launch the configuration manager 2012 console, click on Administration, Servers and Site system roles, right click Distribution point and click properties. Click on PXE tab, check the box “Enable PXE support for clients“. There is warning box that appears, click on Yes. This will enable the PXE support for clients.
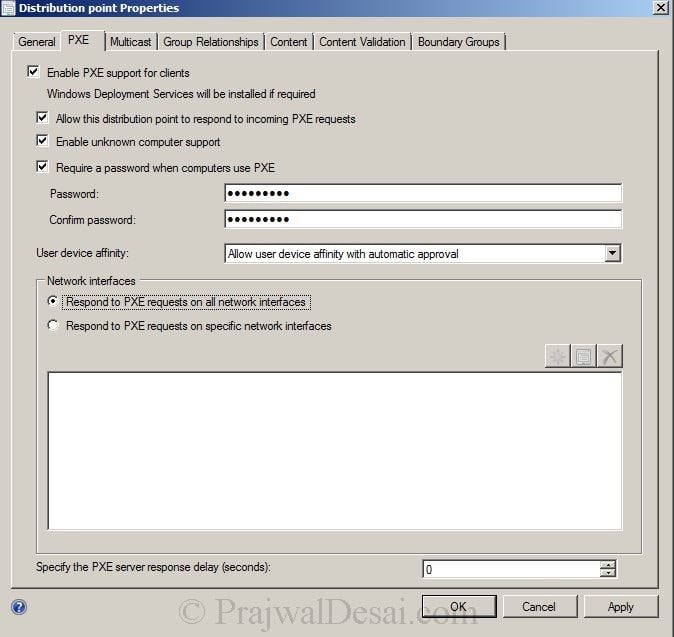
After you do the above step, check the box for “Allow this distribution point to respond to incoming PXE requests“, “Enable unknown computer support“, “Require a password when computers use PXE“. Provide a password, for User device affinity choose “Allow user device affinity with automatic approval“. Click on Apply and OK.
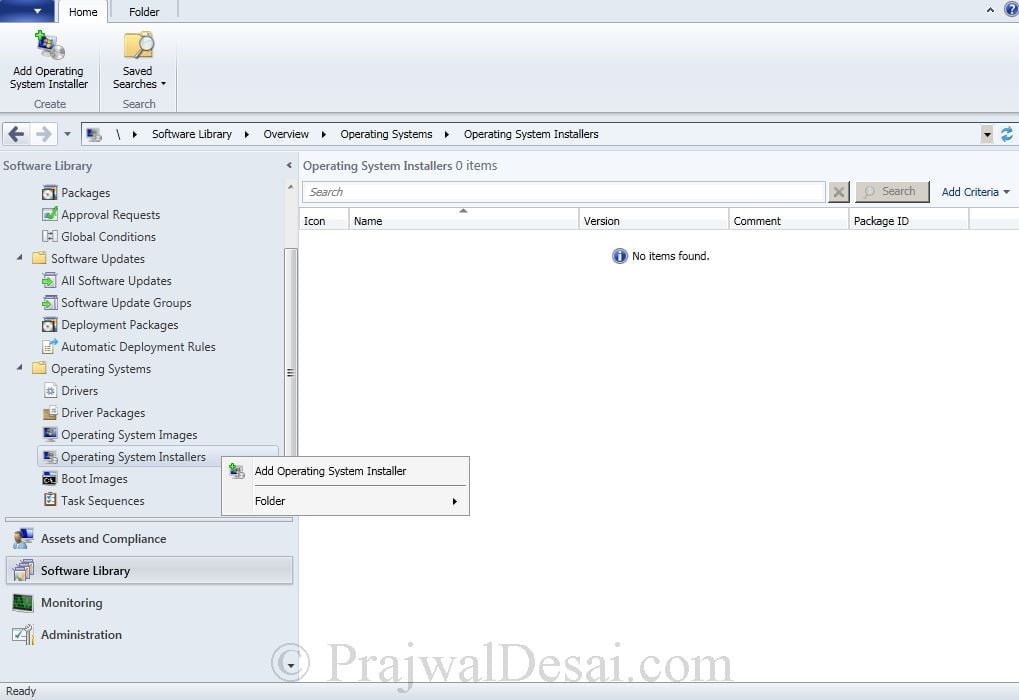
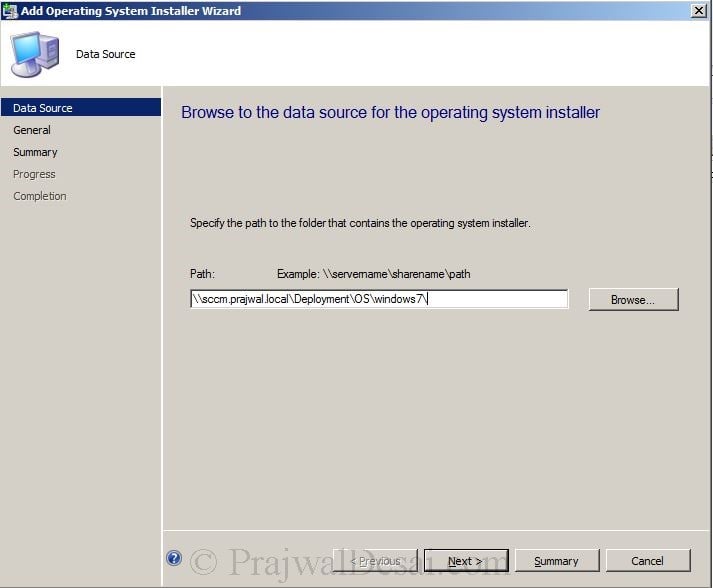
Now after enabling the PXE, we will add Operating system installer. In the CM console, click on Software Library, under Operating Systems right click Operating System Installers and select Add Operating System Installer. We will be adding Windows 7 Professional 64 bit OS. The Operating system files have been copied on to the other drive, we will provide the path in the next step.
Provide the folder path where you have copied the Operating system, in our case its sccm.prajwal.localDeploymentOSWindows7. Click Next.
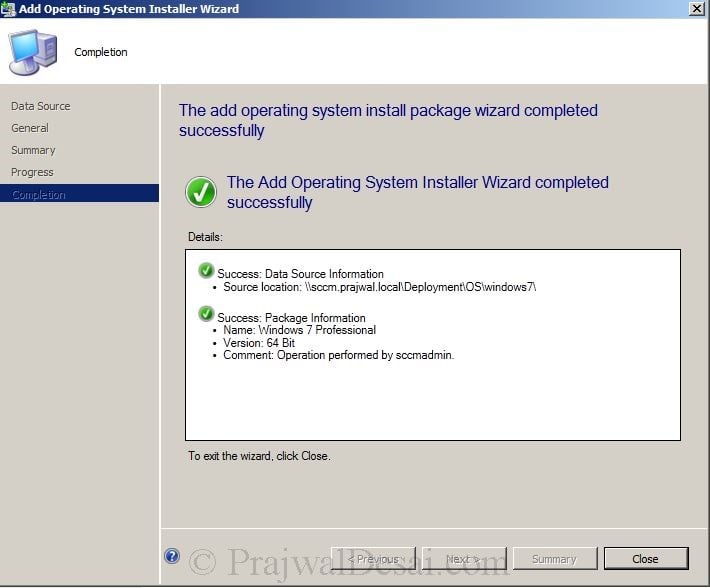
Lets name the OS image as Windows 7 Professional. Click Next.

Click Next and Click Close. We have successfully added the Operating System Installer.
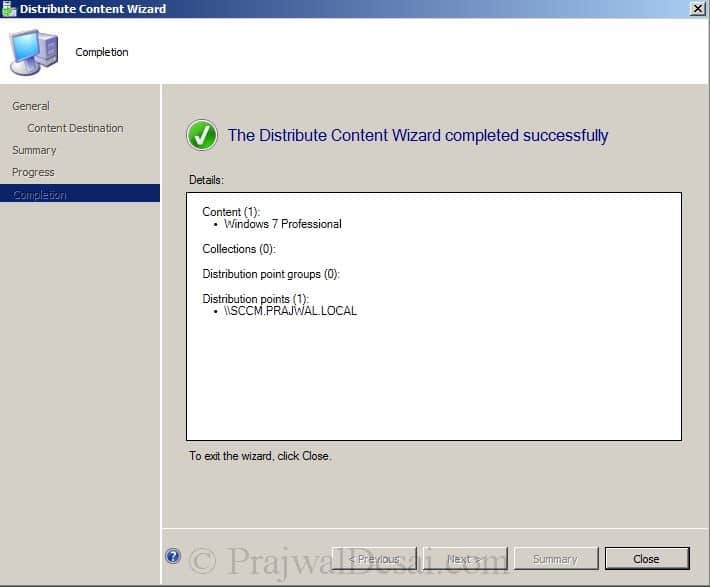
We will now distribute the OS to the distribution point. To do so right click on the Windows 7 Professional, click Distribute Content.

Click on Add, Select Distribution Point, in the Add Distribution Points box select the Distribution Point and click OK. Click Next.

Click Close.
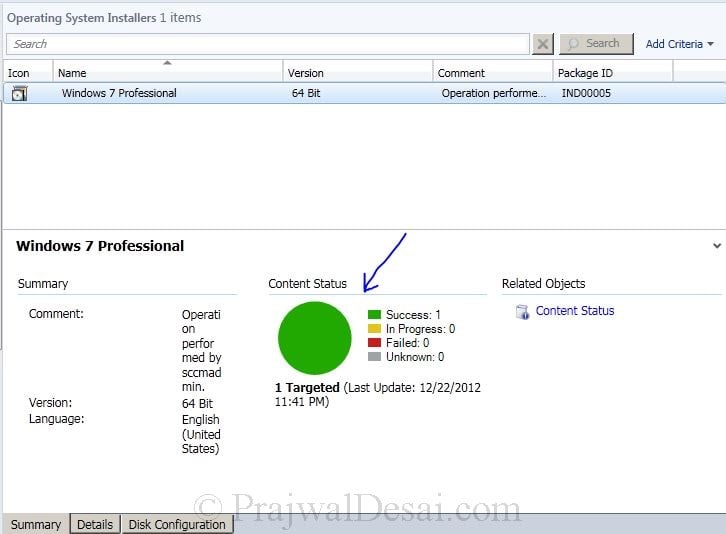
Wait for few minutes until you see the Content Status as Green color which means the content has been distributed.
Now we will make some changes in the Boot Images (64 bit and 32 bit). In the CM console, click Software Library, Operating system, Click Boot Images. Right click Boot Image (X64) and click on Properties. Click on Customization tab and check the box Enable Command Support (testing only).
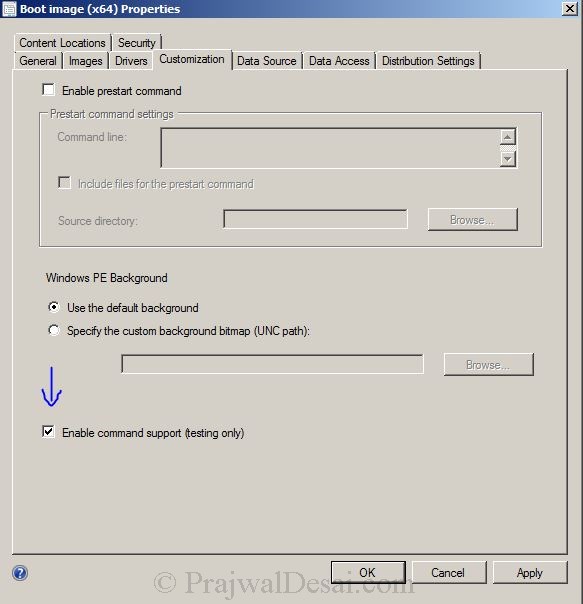
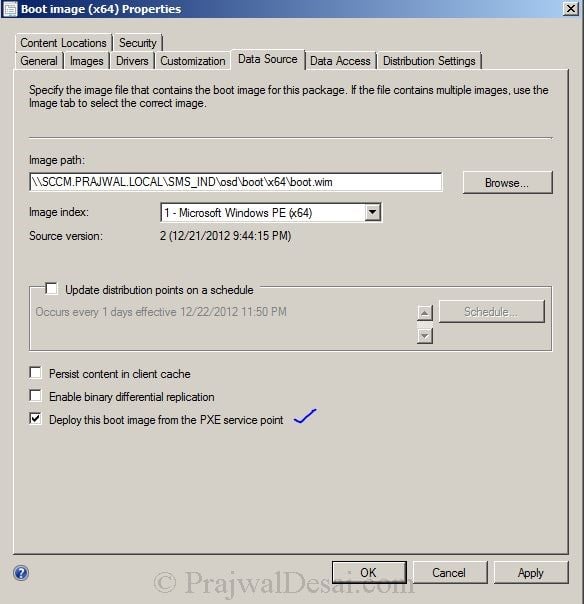
On the same window click on Data Source tab, check the box Deploy this boot image from the PXE service point.
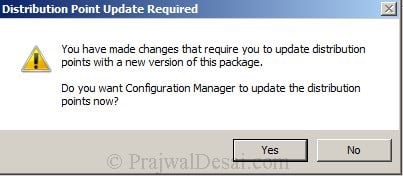
Click on Apply, a box pops up which asks you to update distribution points, click NO.
Now we will distribute our Boot Image to the distribution point. Right Click Boot Image (x64) and click Distribute Content. Click on Add and Select Distribution Point. Click OK. Click Next and close the wizard.

Repeat the same step for Boot Image (x86).
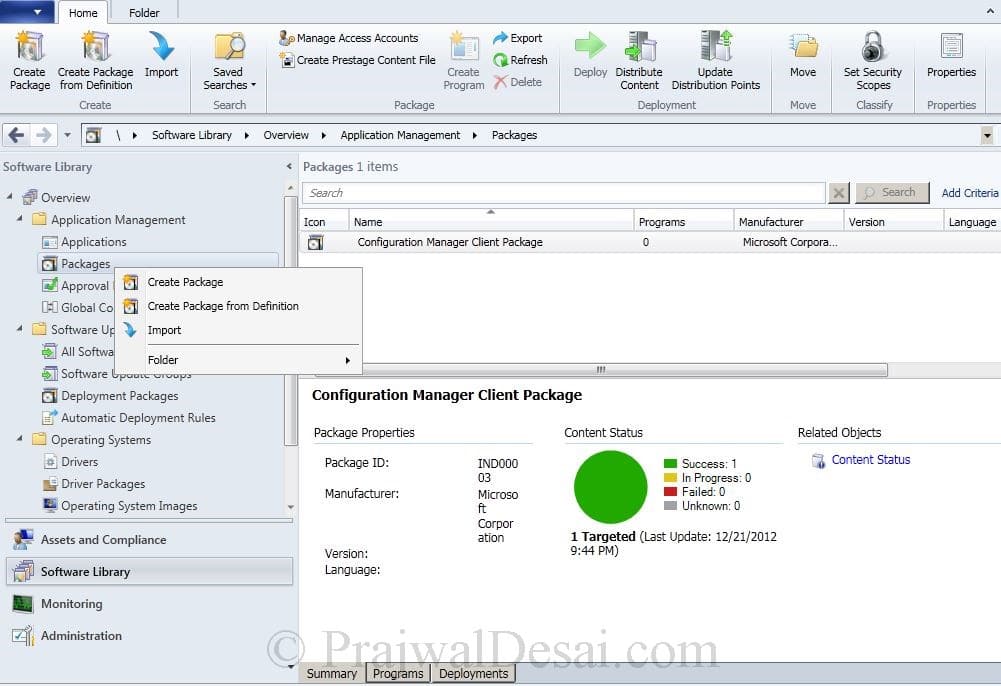
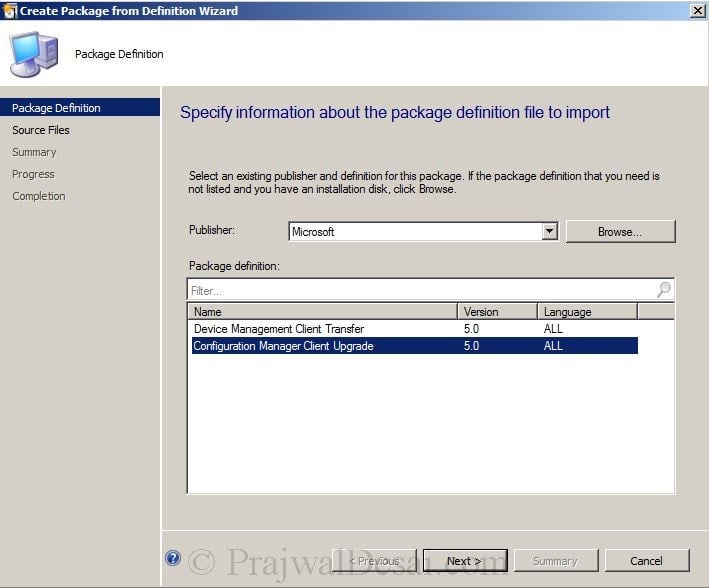
Now we will create a Package and set up as task sequence. There are 2 default packages provided by Microsoft, we will make use of one of them and create a new package. In the CM console, Click on Software Library, under Applications, right click Packages, select Create Package from Definition.
Select Configuration Manager Client Upgrade. Click Next.
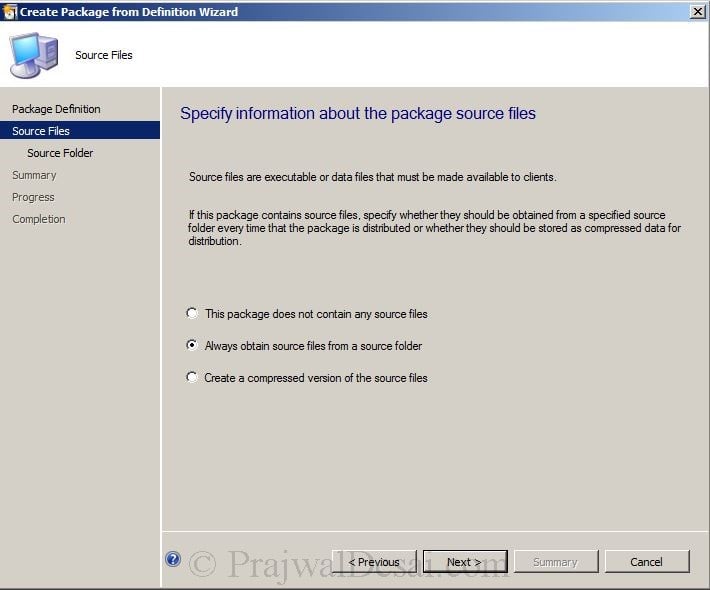
Select Always obtain source files from a source folder. Click Next.
Specify the package source folder. Its SCCM SERVERSMS_SitecodeClient, in our case its SMS_IND (where IND is the site code). Click Next.

Click on next and Click Close. We have successfully created the Package from the definition.

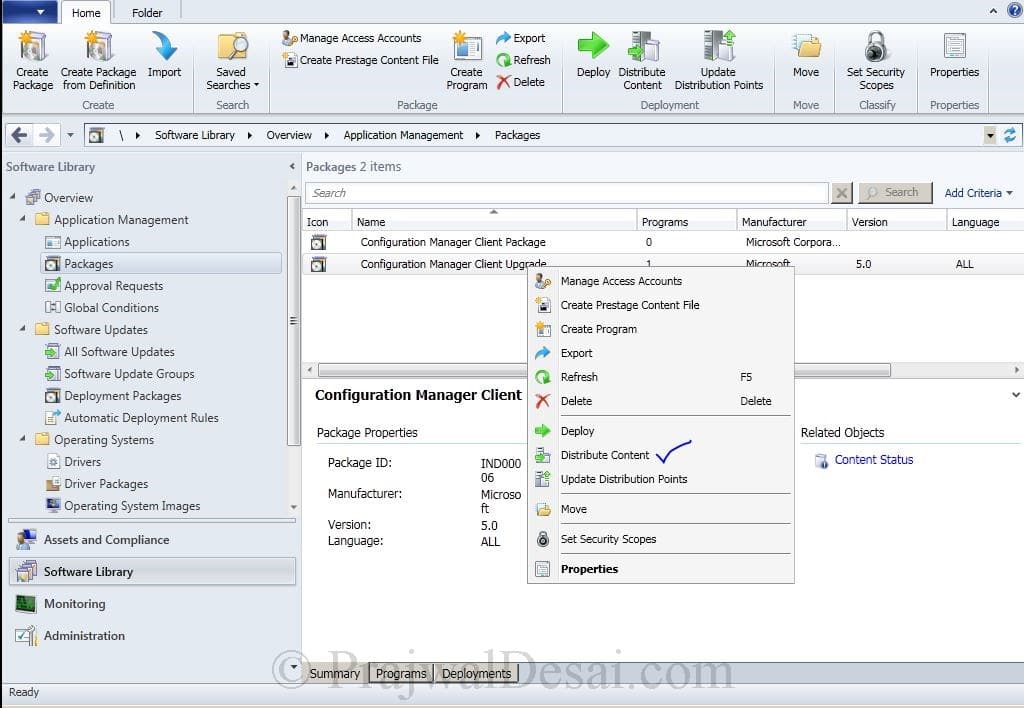
Right click the package that we created just now, Click on Distribute Content. On the next page click on Add and select Distribution Point. Click Next.
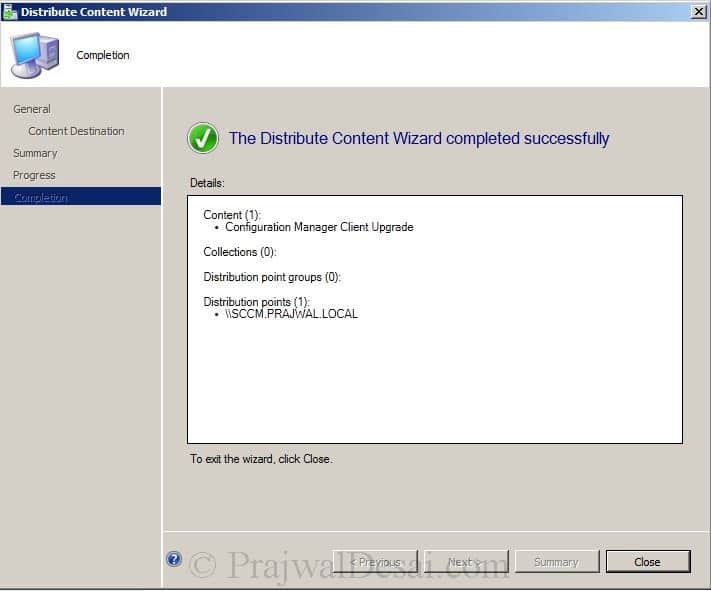
Click Close. We have distributed the package definition to the Distribution Point.
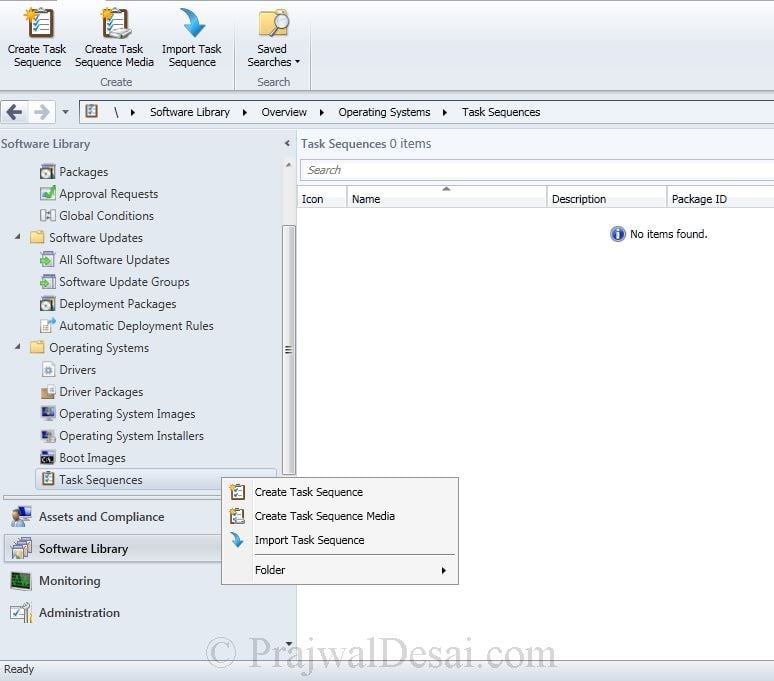
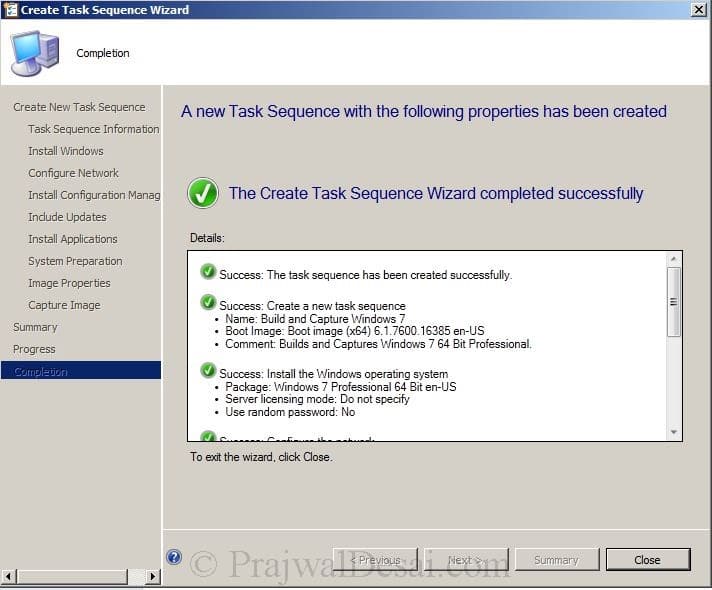
Now we will create a Task Sequence. In the CM console, click on Software Library, Operating Systems, right click Task Sequence and click Create Task Sequence.
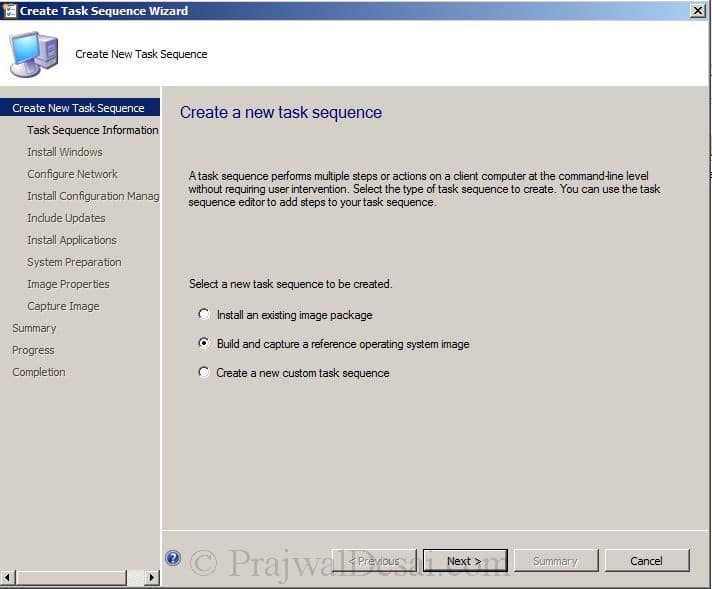
Choose Build and capture a reference operating system image. Click Next.
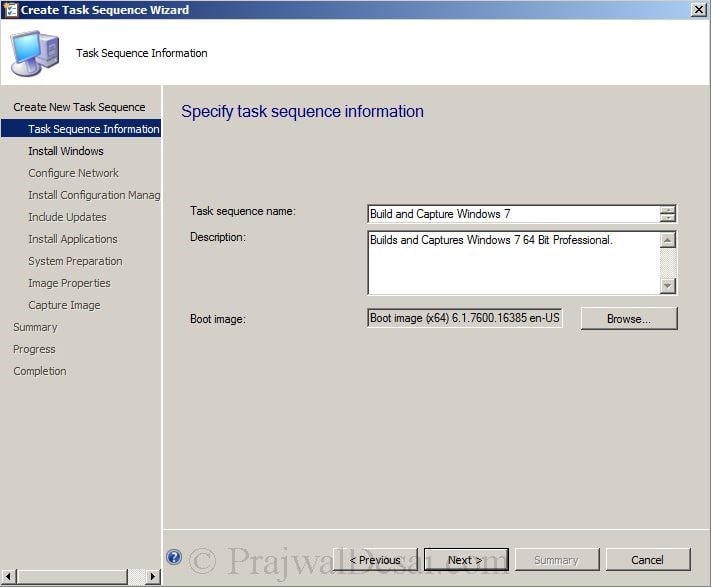
Provide a Task Sequence name, description. For Boot Image select Boot Image (x64).
Note : If you are deploying 32 bit OS, select Boot Image (x86).
For the Package, click on Browse and select Windows 7 Professional 64 bit en-us, Edition as Windows 7 Professional, click on Always use the same administrator password. Provide a valid password and click Next.

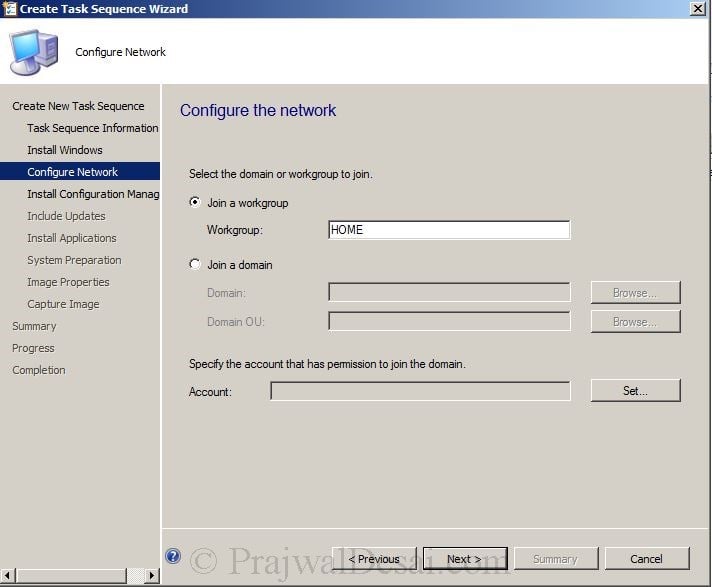
We will not join the machine to the domain, so click on Join a workgroup and provide a workgroup name. Click Next.
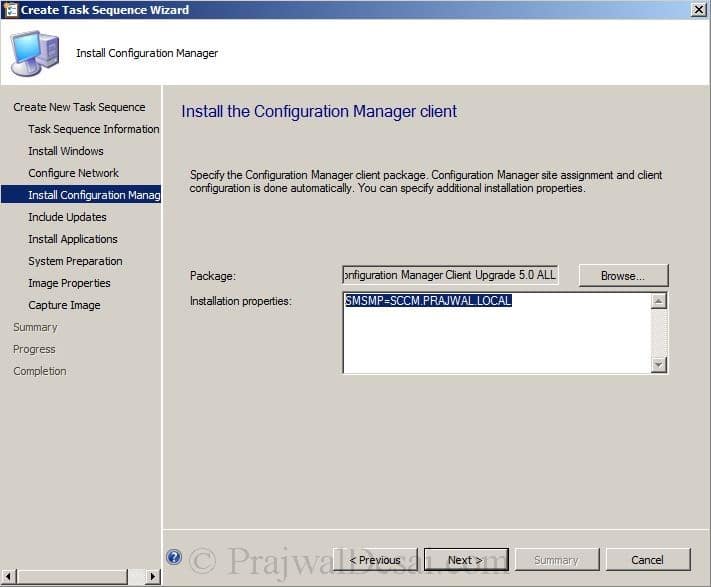
On Install CM client page, Click on Browse and select Configuration Manager Client Upgrade 5.0 All. In the Installation Properties, specify SMSMP=SCCM.PRAJWAL.LOCAL Click Next.
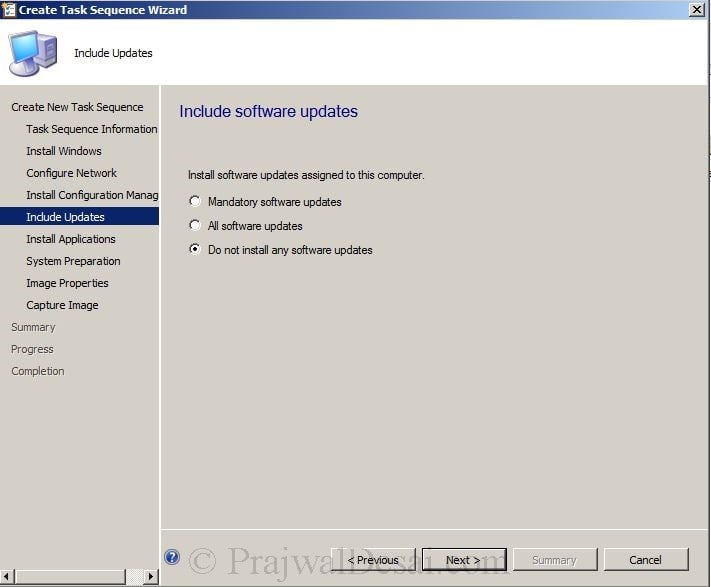
Choose Do not install any software updates. Click Next.
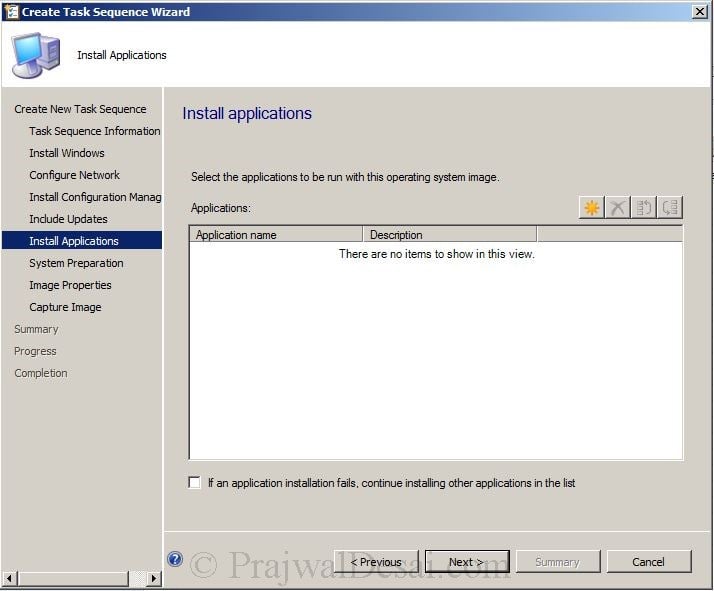
Click Next.
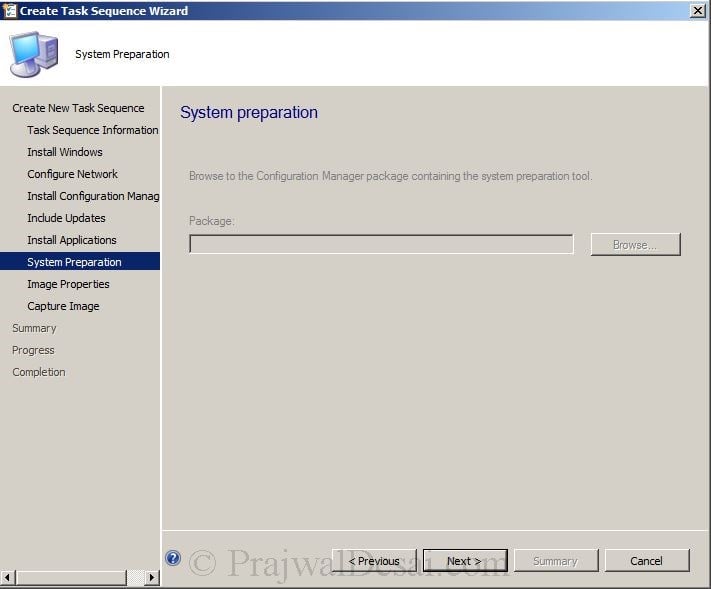
Click Next.
Specify where the captured image file should be saved. Make sure that you provide a valid folder path and the image name should have .wim as extension. click on Set and choose sccmadmin as the account, which will have access to the folder path. Click Next.

Alright, we have created a new task sequence. Click close.

How can i add a device automaticaly to a device collection after installation the os?
Hi Prajwal
Is there any option DeployAnywhere for hardware independent imaging
Hi Prajwal, have you ever run into PXE booting a new machine only to have the Task Sequence Wizard not appear?
Hi Prajwal
The .wmi file that we need to import while creating TS, thet we need to iport from reference computer, is it right ?
Hi Guys!
i have SCCM 1710 installed and im not seeing the “operating system installers tab. any hints on how to get this accomplished?
Hi,
Please, tell me, is there some possibility to make SCCM for only boot via PXE – just BOOT, no install after booting? I have image with rescue system made by McAfee and I need just boot from it 😉
Thank you very much for some reply 😉
Hi Prajwal,
I need your help to know how to create bootable media in SCCM 2012, I am getting error at the end of the task i am getting error.
Please help me.
Thanks,
Menka
Hi,
you should create a ‘Operating System Image’
and then choose for the ‘install.wim’ File,
Then you will have the options for choose ‘Operating System Installer’.
should be in sources folder inside your OS DVD.
how do I go about created operating system installers?
how do I go about creating a operating system installer?
Hi Prajwal,
Same for me (SCCM2016) no Operating System Installers option.
Any idea?
Cheers.
Hi Prajwal,
We also don’t have Operating System Installers option. We’re using SCCM 2012 R2 SP1. (screenshot attached)
Thanks for responding.
Best regards,
RC
Prajwal,
We recently got SCCM 2012 R2 up and running in our environment. However, I don’t have the Operating System Installers option. Instead I have Operating System Upgrade Packages in its place. Have you seen this and if so, do you know how to resolve? I’ve been unable to find any helpful information in regards to this issue.
That’s strange, could you update it to the latest service pack and CU ?.
We’re on SP2, but haven’t applied CU1 that was released last August. We’re going to move forward with applying CU1, but honestly don’t think this will resolve the issue.
Hi Prajwal, thanks for the article it was really helpful. Please tell me how to disable the first Network setting dialog during a Bootable media type OS install. I’d like to get the task sequence choosing dialog at first instead of the network settings. Thanks in advance.
Hello Prajwal
hope you keeping well . i buildup sccm 2012 i facing some problem .when i try to Distribution Point add showing sccm.server.com but dose not show \sccm.server.com i think i was mistake previous any configure pls suggest me
Hi Prajwal,
Is it possible to run SSCM Task sequence steps after loading in to the installed windows using a auto-login account. I need to run some scripts, that need user to login using a particular account and then the task sequence is required to carry few script install. please advice
Hi. the task s works perfectly up until windows starts up for the first time. It is stuck on preparing windows for the first time. Any advice please?
Prajwal,
Great post, very helpful. I’ve recently deployed a SCCM 2012 R2 (version 5.0.7958.1000) environment and when I attempt to create a build and capture TS through the wizard I have a problem. When I get to the Create Task Sequence Wizard – Install the operating system window, my first field option is titled Image package as opposed to Package (illustrated in your screen shot above). When I click the Browse button there are no installation packages listed? I suspect the wizard is accessing the default location for images (.wim) and not installer packages? Is there something I’m missing?
Thank you!
Chad
@Chad – I believe I have missed adding a screenshot where in I had imported .wim file. Please import the .wim file and proceed with the rest of the steps.
where is the .wim file… is that something I need to build?
I am facing the same issue, can you please guide how to import, if possible with the screenshot or related URL or vdo asap. will be very helpful.
@Chad if you have any info please advice?
Thanks,
Kashif ALi
Prajwal thanks a lot for nice posts. ….. you are very helpful hand to me.
As mentioned by Dial-in either we need to add Install.wim to display on images or as workaround need to edit the TS and change the selection from images to source files
Hi Prajwal,
Can you share a step by step guide to deploy MS Lync 2013 using SCCM 2012 .
I suppose you want to deploy the Lync 2013 client using SCCM 2012 ? If yes, I will create a post on that soon.
Hi
Can you give me the detail step by step for deployment for win 7 via SCCM 2007?
Nope I don’t have the guide or post for deploying windows 7 using sccm 2007.
Hi,
I believe there is a step missing, the build and capture task sequence requires an OS image (install.wim), however the steps only included the OS installer (source files), so the task seqeunce step cant be completed.
Otherwise, a very helpful tutorial.
where do you find the .wim file?
you get that file for(windows 7 ,source file,install.wim
you get that file in windows 7 image inside , source file ,install.wim