In this article, I will show you how to install SCCM SMS Provider role. The same steps are applicable when you want to install an additional SMS provider role on a remote SCCM server.
The SCCM site server function known as SMS Provider serves as a link between SCCM and the database server. You use the SMS Provider to access and modify Configuration Manager data.
By definition, the SMS Provider in SCCM is a WMI provider that assigns read and write access to the SCCM database at a site. The SMS Provider is a Windows Management Instrumentation (WMI) provider that can be accessed through either WMI or managed classes.
You can install multiple SMS Providers in your Configuration Manager hierarchy, and it is completely supported. This article explains how to install an SMS provider in SCCM and goes over some fundamentals of the SCCM SMS provider.
Recommended Article: Plan for SMS Provider in Configuration Manager
When do you need an additional SMS provider?
Having an additional SMS provider in your setup always provides a lot of advantages. Here are some scenarios that explain when it would be necessary to add more SMS providers to your setup.
- You have a large number of administrative users who connect to the SCCM console often, or probably at the same time.
- You have a business requirement for high availability of SMS providers.
- When you have products within your organization and those products make calls frequently to the SMS provider.
When you install SCCM for the first time, by default, an SMS provider role is installed on the site server. Each CAS and primary site requires at least one SMS provider. Furthermore, you can add another SMS provider to your setup if you’d like to. Do note that Configuration Manager secondary sites don’t support the SMS Provider role.
Also Read: How to Uninstall SMS Provider Role from SCCM
SMS Provider Prerequisites
The requirements for installing SCCM SMS Provider are listed below.
- SMS Provider installation should be done on a supported Windows Server version. The computer must run an operating system that is supported for a site server.
- Starting in SCCM version 2107, the SMS Provider requires .NET version 4.6.2, and version 4.8 is recommended.
- The computer needs to be a member of a domain with a two-way trust relationship with the site server and the site database systems.
- A computer cannot have a site system role from a different site. The computer cannot have an SMS provider from any other site.
- Windows ADK is one of the prerequisites for installing the SMS Provider role. Ensure the computer has a minimum of 650 MB of free disk space to support the Windows ADK components that are installed with the SMS Provider.
- For Configuration Manager 2006 and earlier, you must enable the Windows server role Web Server (IIS). Starting in version 2010 and later, this role is no longer required.
Related Article: How to locate SMS Provider in Configuration Manager
Install Windows ADK for SMS Provider Role
One of the prerequisites for installing the SMS provider role is Windows ADK. Before installing the SMS Provide role, you must first install Windows ADK on the server. You must install the same ADK version to match the one installed on the site server.
If the ADK version installed on Configuration Manager server is an older version, ensure you first update the Windows ADK on SCCM Server. I recommend installing the latest version of Windows ADK on Configuration Manager server.
For information on the most recent Windows ADK downloads and versions, see the guidelines below.
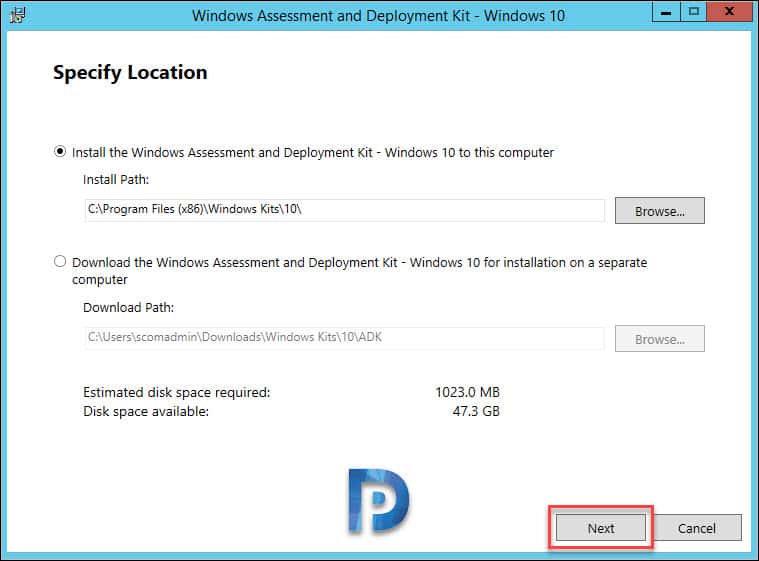
To install Windows ADK, first run adksetup.exe. Click Next.
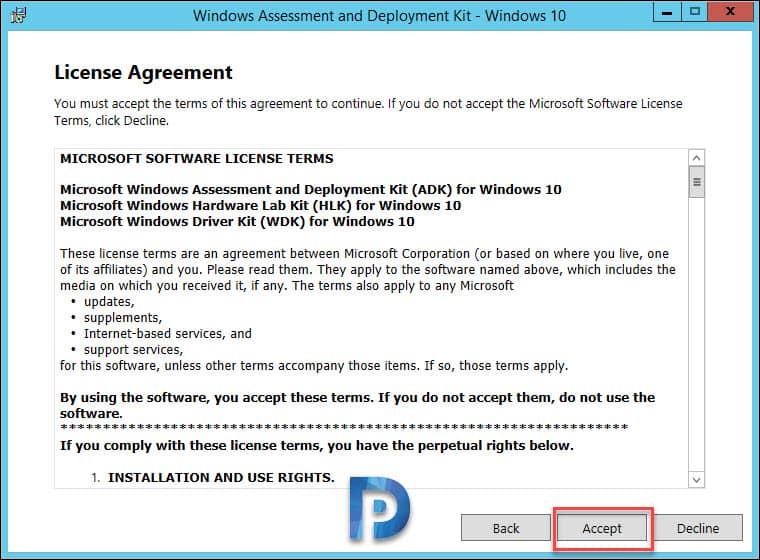
Accept the ADK license terms by clicking Accept.
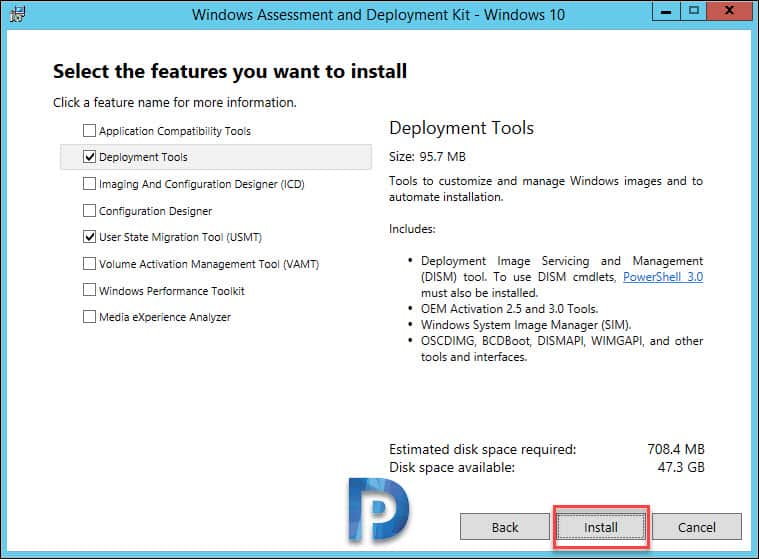
On the Feature selection page, select Deployment Tools, User State Migration Tool (USMT). Those are the only two ADK features that you require to install the SMS provider role. Click Install.
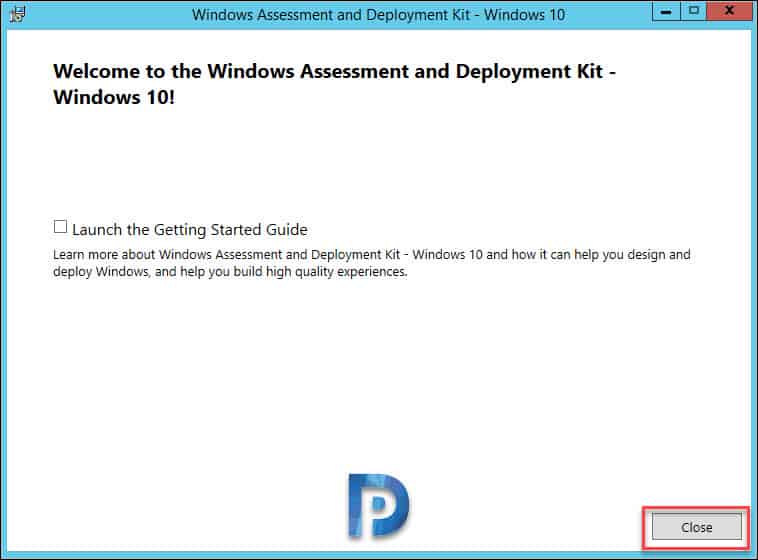
The Windows ADK installation is complete. Close the Windows Assessment and Deployment Kit setup window.
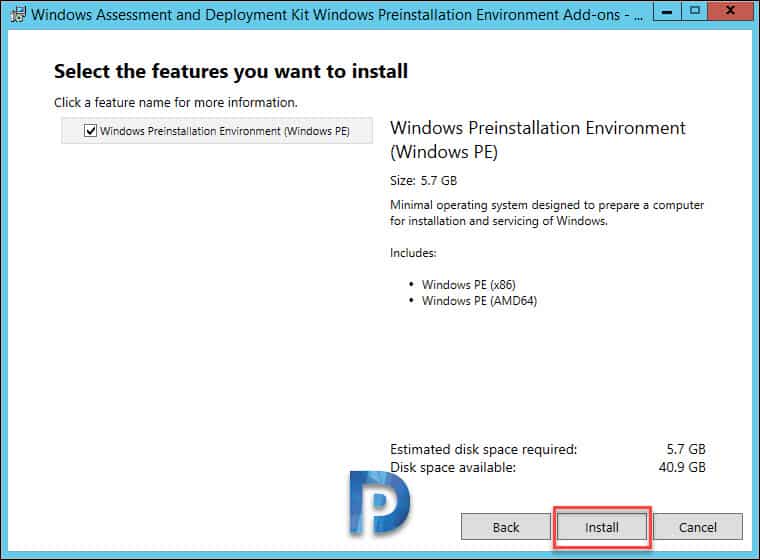
Starting with Windows ADK 10 version 1809, WinPE is now a separate install (add-on) to Windows ADK 10 and Windows ADK for Windows 11. You must install the WinPE add-on after installing the Windows ADK. Run the WinPE setup and click Install.
The Windows Preinstallation Environment (WinPE) installation is complete. Close the “Welcome to the Windows Assessment and Deployment Kit Windows Preinstallation Environment Add-ons” setup window.
Recommended Read: How to Install Windows ADK Offline
Install SCCM SMS Provider Role | Additional SMS Provider
In this section, we will install or add a new SMS provider role in the existing SCCM setup. Although you might try to install an SMS provider using the Configuration Manager console, it’s actually done differently.
On your SCCM primary site server, click Start and type “Configuration Manager Setup.” The Configuration Manager setup provides you with options to recover a site, perform site maintenance or uninstall the site. Click on the Configuration Manager setup. You can also launch the Configuration Manager setup from Programs and Features.
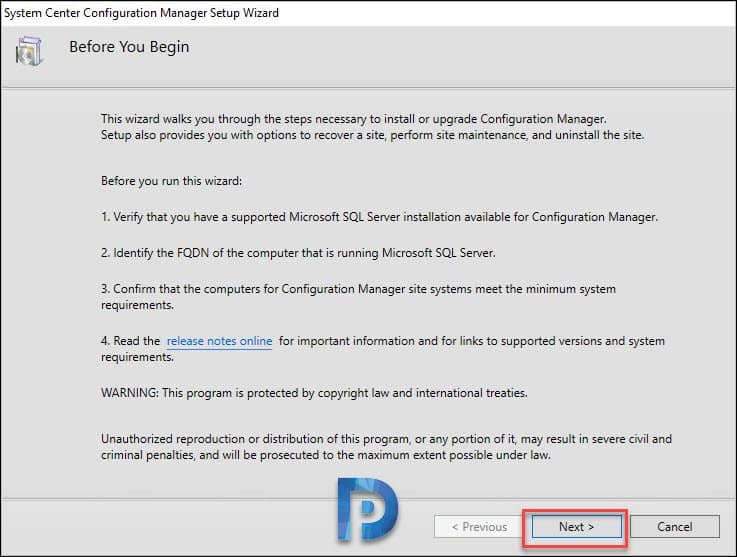
On Before You Begin page, click Next.
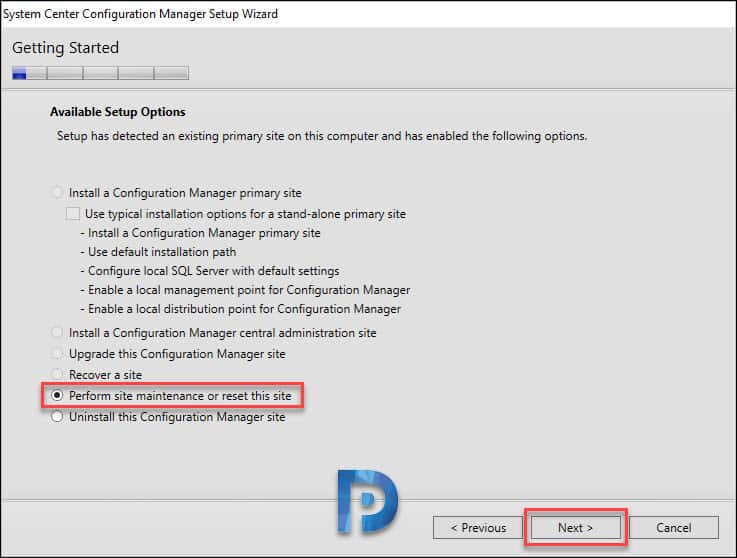
Configuration Manager setup offers several setup options. From the list of options, select Perform site maintenance or Reset this site. Click Next.
Also Read: How to Reset Configuration Manager site
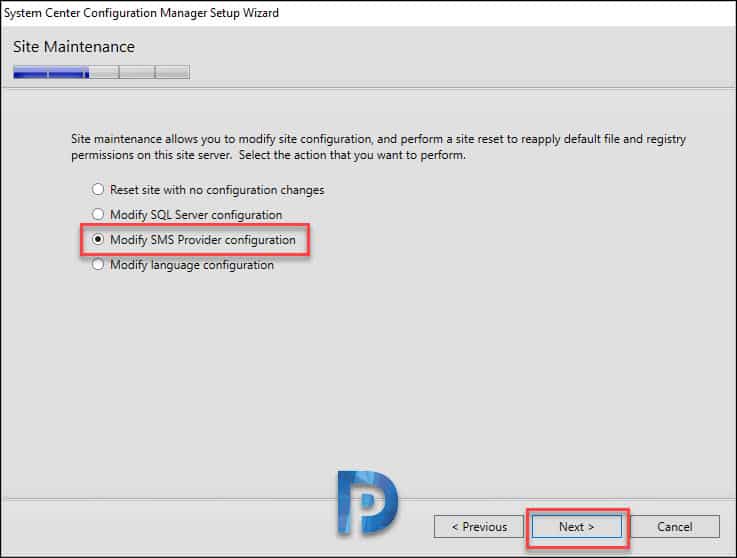
On the Site Maintenance window, select the option “Modify SMS Provider configuration“. Click Next.
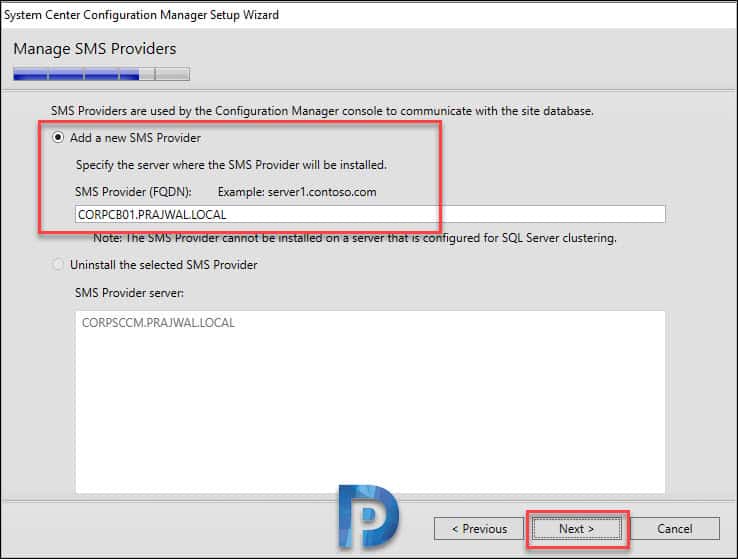
In the Manage SMS Providers window, there are two options available:
- Add a new SMS Provider
- Uninstall the selected SMS Provider
Select the option Add a new SMS Provider and enter the SMS Provider FQDN. The FQDN that you enter here is the computer on which you are installing the new SCCM SMS provider role. Click Next.
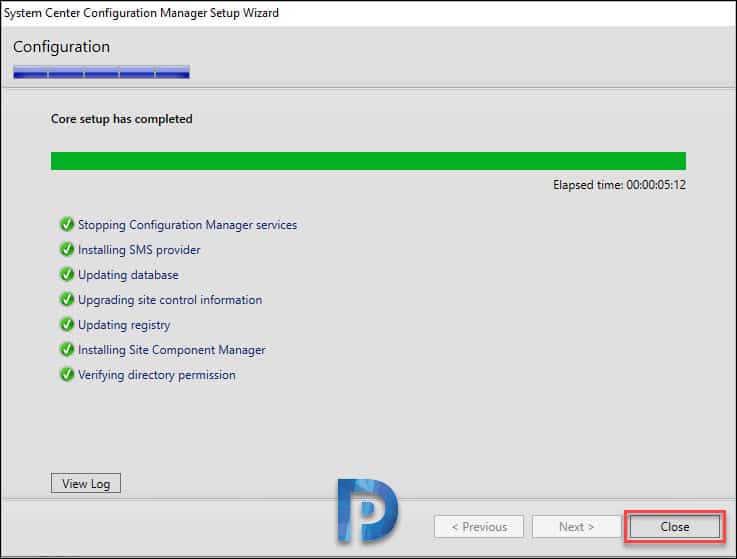
The SMS provider role installation begins now. If you see “core setup has completed,” the installation of the SMS provider role was successful. You can now close the Configuration Manager Setup Wizard. This completes the steps to install the additional SMS provider role in SCCM.
In case you encounter errors while installing the SMS provider role, review the SCCM log files to troubleshoot the issues.
Related Article: How to install Reporting Services role in SCCM
How to Find an SMS Provider Location in SCCM
When you have multiple additional SMS providers in your setup, finding the location of all the SMS providers can be challenging. There are different methods that you can use to view the locations of each SMS Provider for a SCCM site.
The SCCM console is the quickest and most straightforward way to locate an SMS provider. Use the following steps to check or find the SMS provider role inside the SCCM console:
- Launch the Configuration Manager console.
- Navigate to Administration > Overview > Site Configuration > Sites.
- Right-click on the Primary site server and select Properties.
- On Site Properties window, select the General tab and at the bottom look for SMS Provider Location. That’s where you find all the SMS Providers in your setup.




My installation has been successful and appears to be working based on SMSProv.log and AdminService.log however in Admin Console | Monitoring | System Status | Site Status, the component server status shows as critical: Site summarizer till unable to access storage object \\server\c$\sms. Moreover, other logs complain about config manager generated certificates not being healthy and that service is still unhealthy. I have already confirmed that that the primary site server computer account has the requisite rights on the new SMS Provider server, that the SMS Issuing SSL cert is in the personal cert store and bound to the IIS default site for protocol / port 443. What else might be going on here? Thanks.
i performed all the steps without any issues but the new SMS provider does not display in the admin console anywhere you would expect it to.
it finally showed up after waiting some time. thank you.
Hello, i install APK and APK WinPE, but the riadio box isn’t enable.
Can you help me please
When you add an additional SMS Provider, do you need to install the same ADK features on that server?
Deployment Tools
USMT
Windows Preinstallation Environment
1 crucial point missing from this page (probably got cut off in the copy/paste):
The IIS web server role must be installed (point 5 in the prereqs on the ms article)
For the rest, this site’s the best 🙂
That role is only required if the sccm version is 2006 or earlier
can you please give me some brief details to SMS provider
okk