Windows 10 1909 is out and if you are looking to deploy it using SCCM 1906, this post is for you. Windows 10, version 1909 includes performance improvements, enterprise features and quality enhancements.
If you are running Windows 10 version 1903, then updating to the new version 1909 will have a much faster update experience because the update will install like a monthly update. I will cover about all these cool features in a separate post. Click here to know all the new features baked in Windows 10 1909.
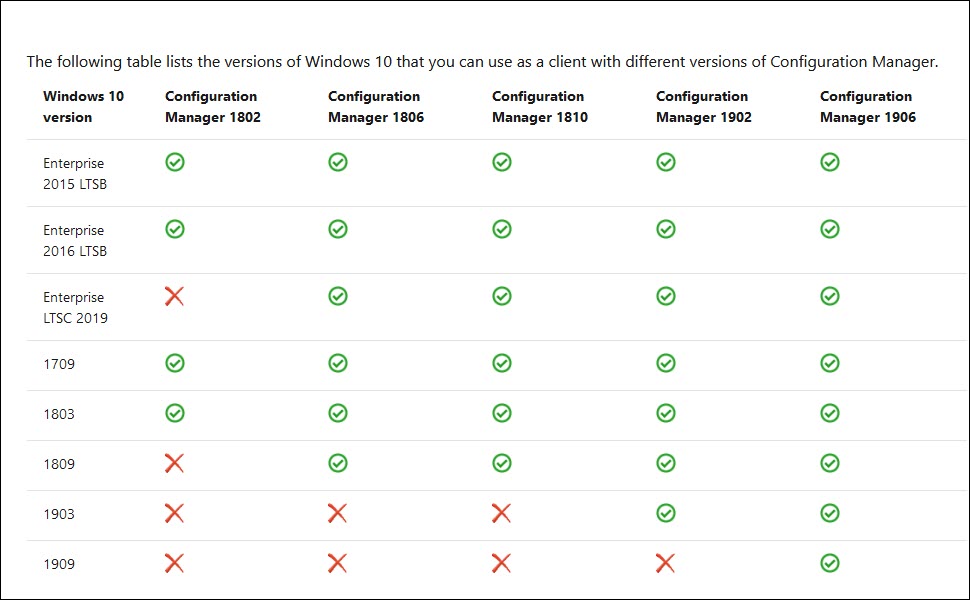
If you want to deploy Windows 10 1909 using SCCM, I would suggest use SCCM 1906 to deploy it. That’s because as per the below chart, you can use Windows 10 1909 as a client with Configuration Manager 1906.
Step 1 – Add Windows 10 1909 Operating System Image
Before you start, ensure you download the Windows 10 1909 ISO (either from VLSC or MSDN) and extract all the files to a folder.
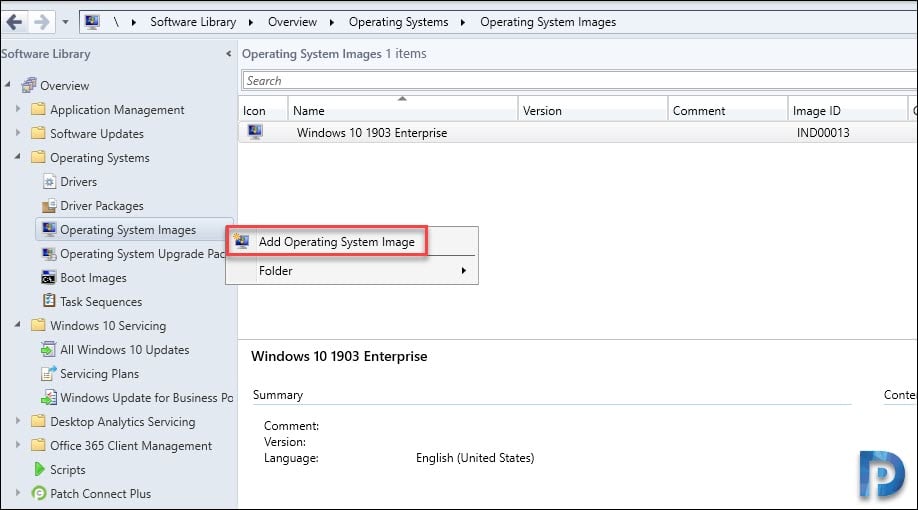
Launch the Configuration Manager console. Go to Software Library > Overview > Operating Systems. Right click Operating System Images and click Add Operating System Image.
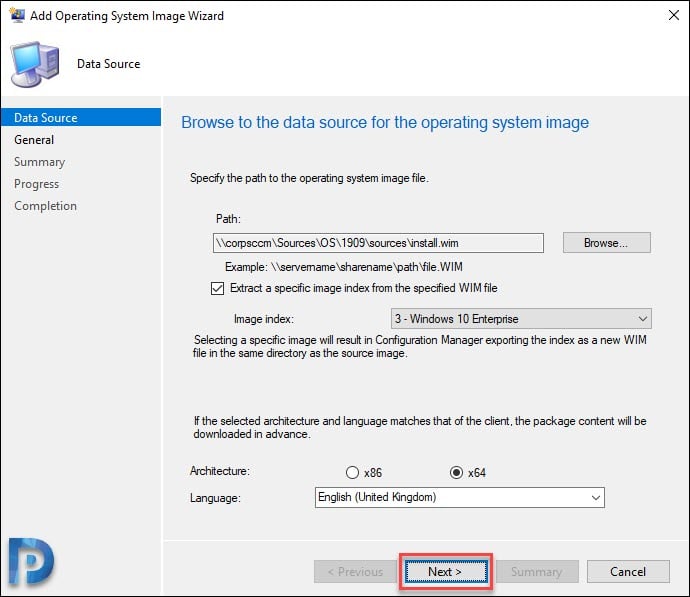
On the Data Source page, click Browse and specify the path to Windows 10 1909 install.wim. I love this option where you can extract a specific image index from the specified WIM.
Select the Image Index which is Windows 10 Enterprise in my case. Next, select the Architecture and Language. Click Next.
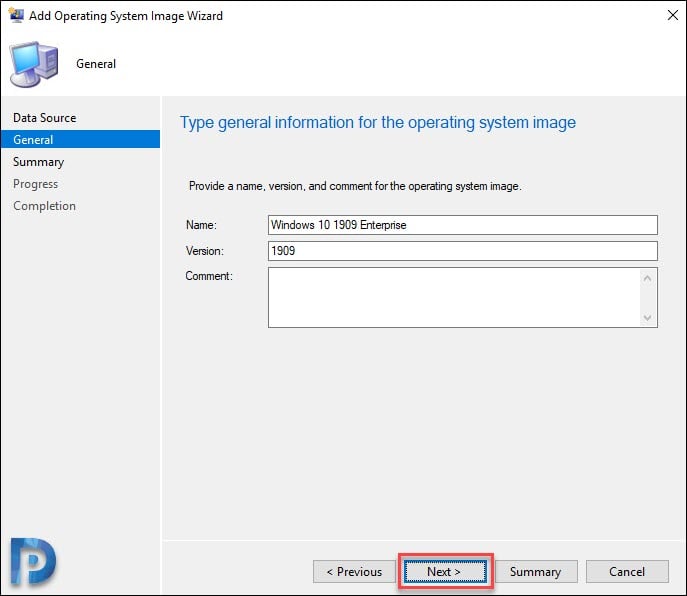
On the General page, specify the information about operating system image.
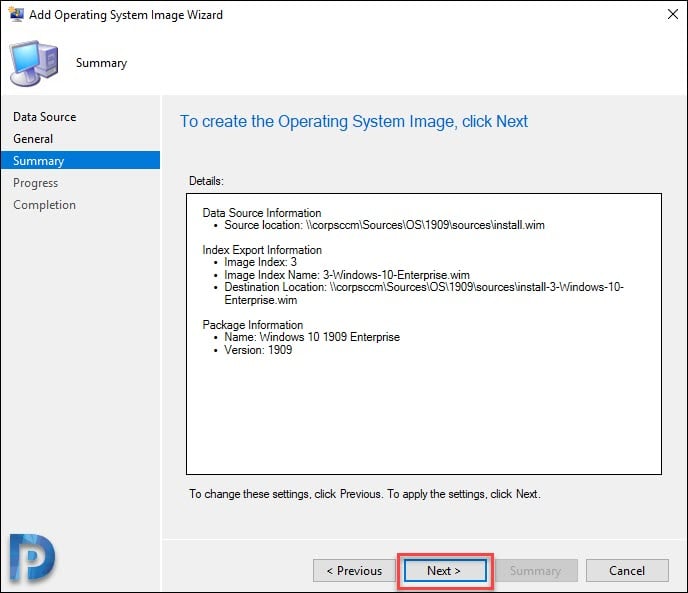
Review the settings on summary page and click Next.
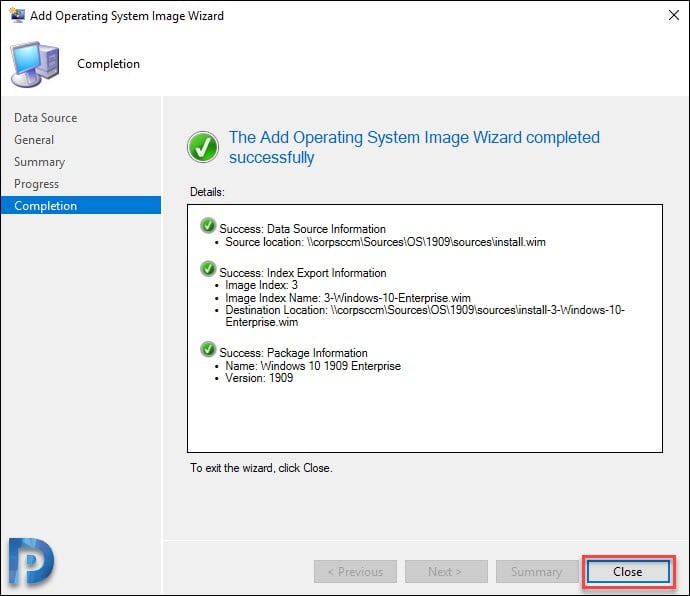
On the Completion page, click Close.
Step 2 – Distribute the Windows 10 1909 Content
The next step after you add Windows 10 1909 image is distribute the content to all the distribution points. Right click Windows 10 1909 Enterprise and click Distribute Content.
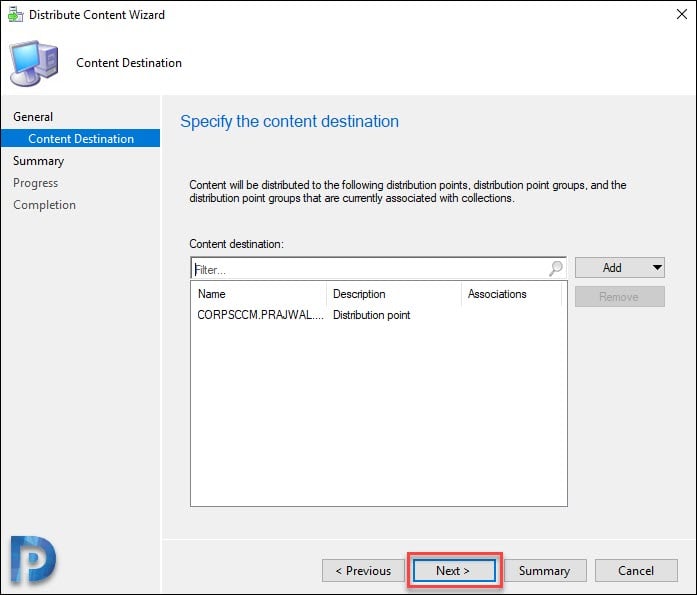
Click Next.
Click Add to specify distribution points or distribution point groups. Click Next.
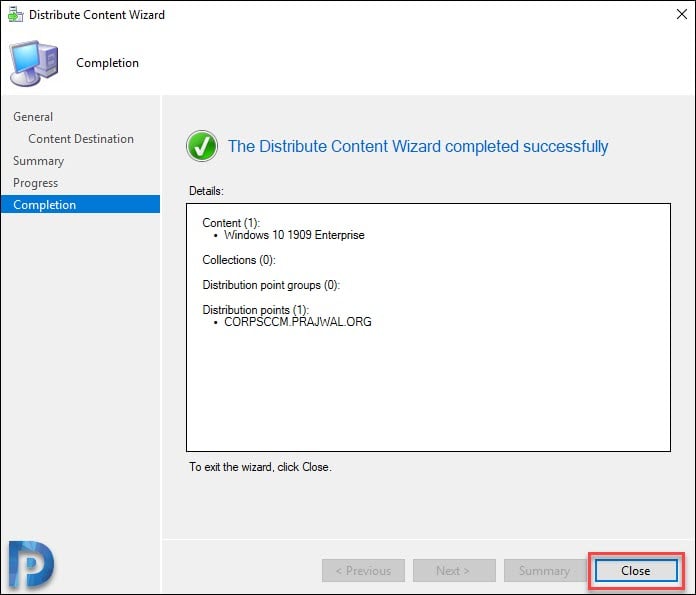
Finally on the competition page, click Close.
You must wait until the content is distributed to distribution points. You can know that when you check the content status. Green color indicates the content has been distributed to the DP.
Step 3 – Create SCCM Task Sequence to Deploy Windows 10 1909
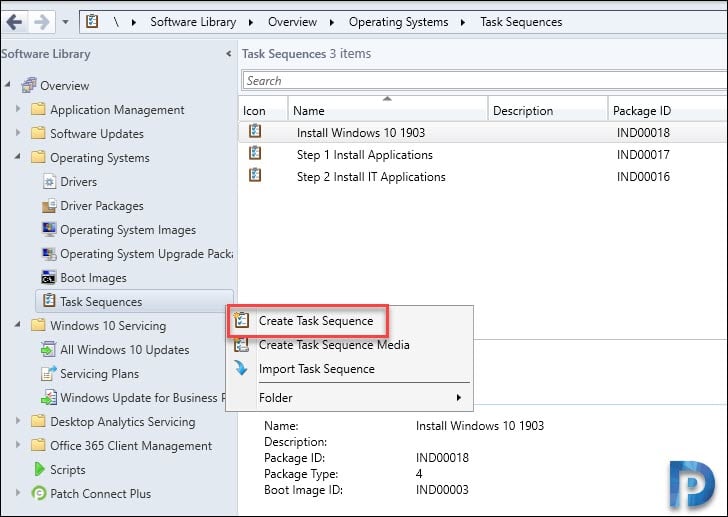
- In the SCCM console, go to Software Library > Operating Systems > Task Sequences.
- Right click Task Sequences and click Create Task Sequence.
Under Select a new task sequence to be created, click Install an existing image package. Click Next.
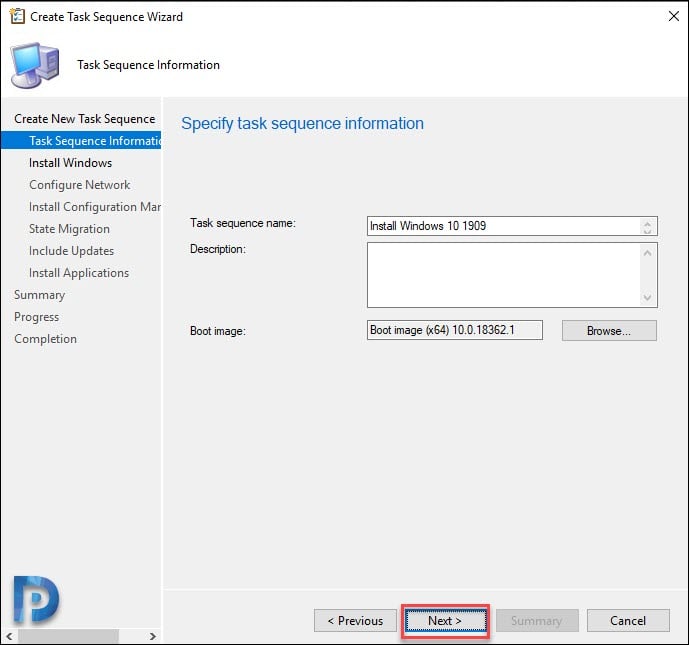
Specify the task sequence name. Click Browse and select the boot image. Click Next.
Click Browse and select Windows 10 1909 Enterprise Image Package. The Image Index should be populated automatically. To activate your copy of Windows 10, specify the product key.
You can also choose to randomly generate local admin password or you can specify an administrator password. Click Next.
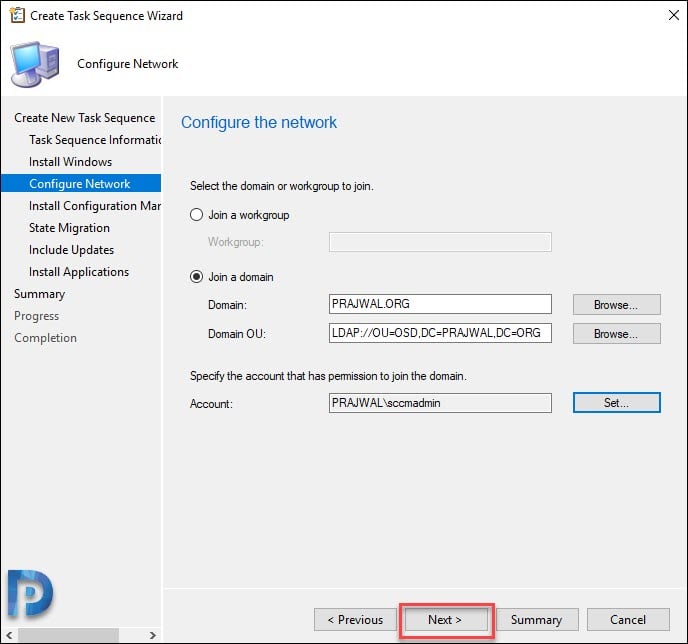
Select Join a domain, specify the domain and domain OU. Specify the account that has permissions to join the machine to the domain. Click Next.
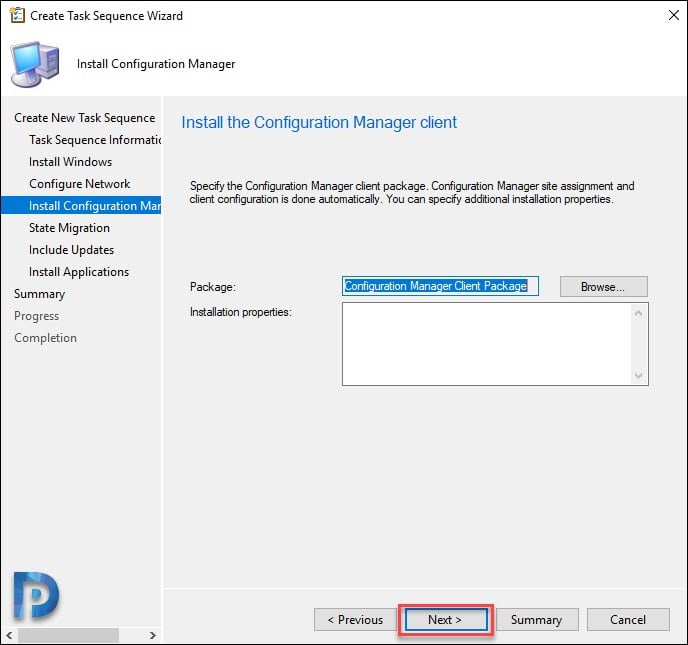
If you need to specify additional installation properties while installing SCCM client, you can specify it here.
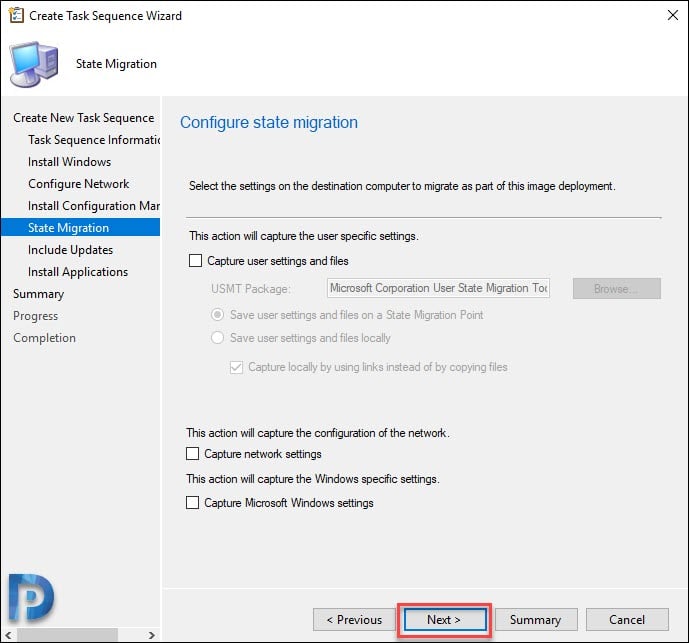
Do not select any thing under State Migration. Click Next.
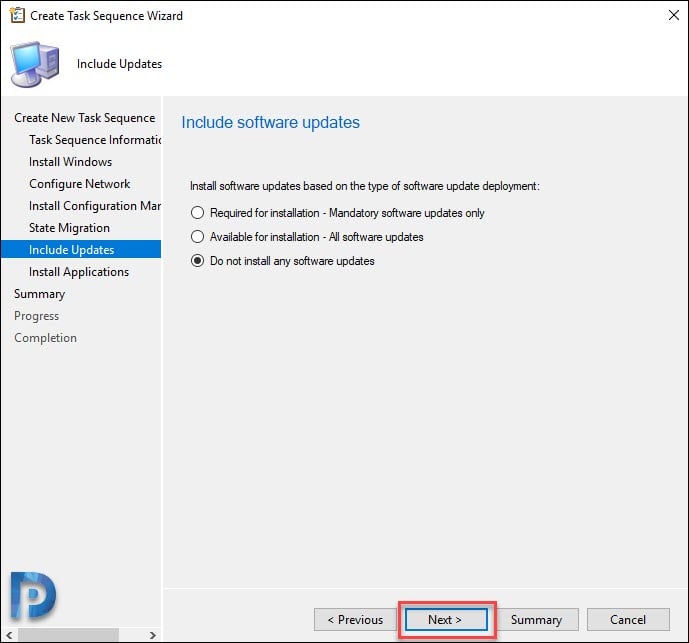
If you wish to install software updates along with Windows 10, you got some options here.
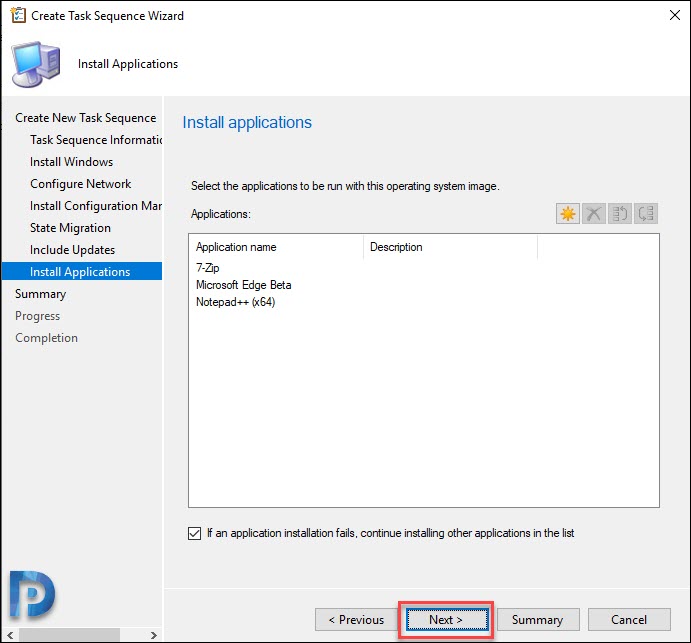
You can install applications along with Windows 10 1909.
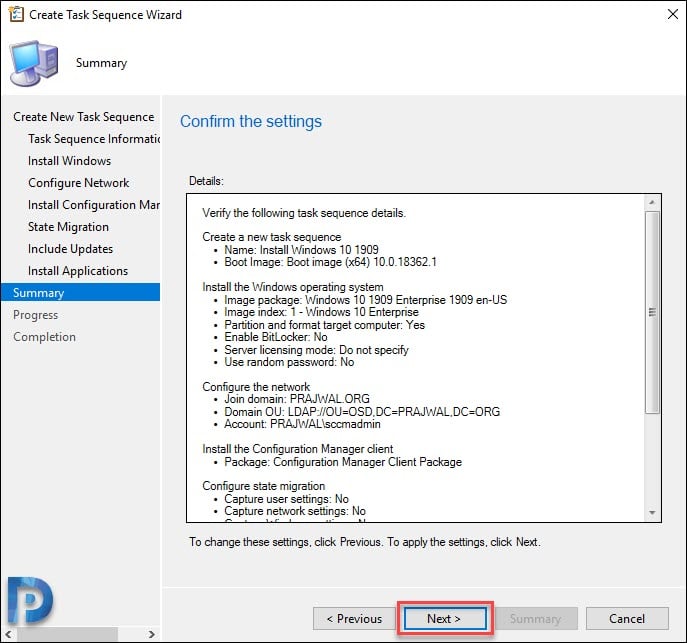
Review the settings on Summary page and click Next.
Click Close on the Completion page.
Step 4 – Deploy Windows 10 1909 using SCCM
It’s time to deploy the task sequence that we created in Step 3. Right click Install Windows 10 1909 task sequence and click Deploy.
Select the collection to which you want to deploy the Task Sequence. Click Next.
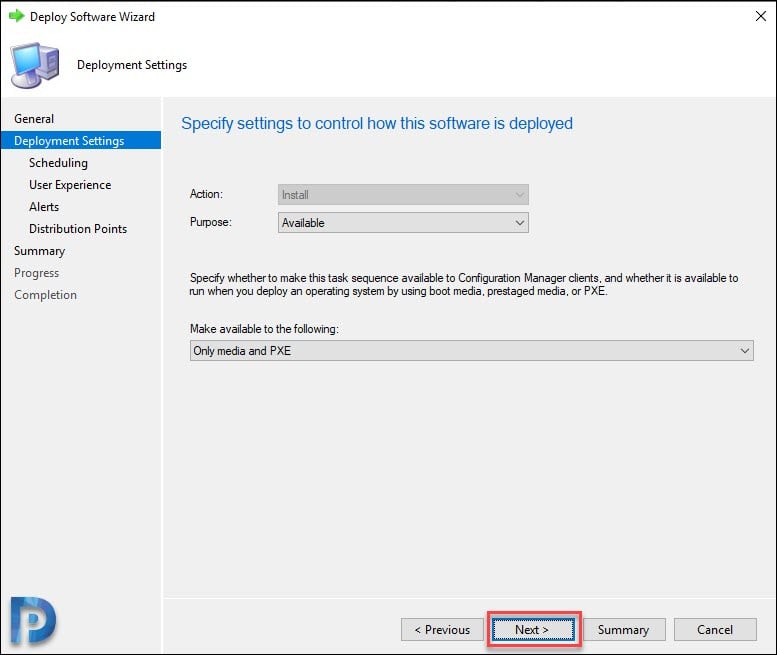
Under Deployment Settings, select the purpose as Available. Under Make available to the following, select Only media and PXE.
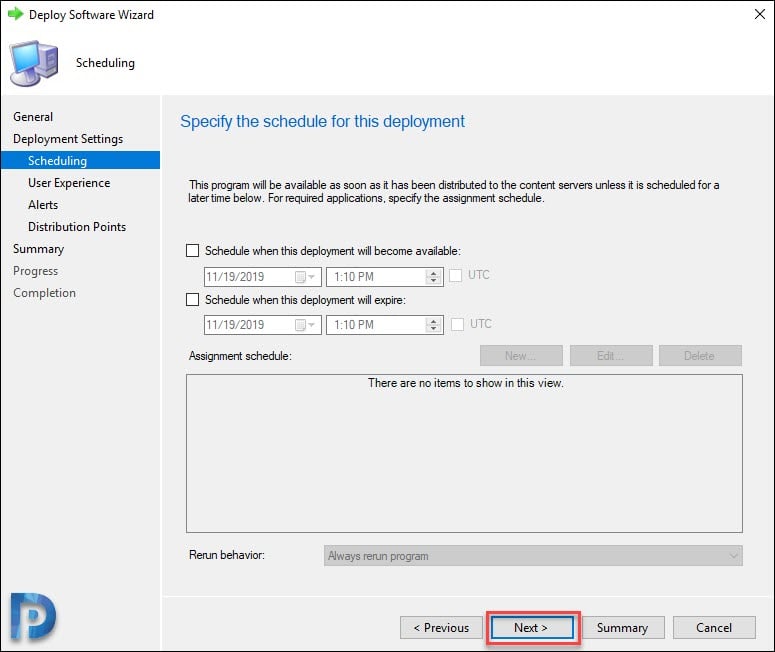
If you want to schedule the TS deployment, you can do it under Scheduling.
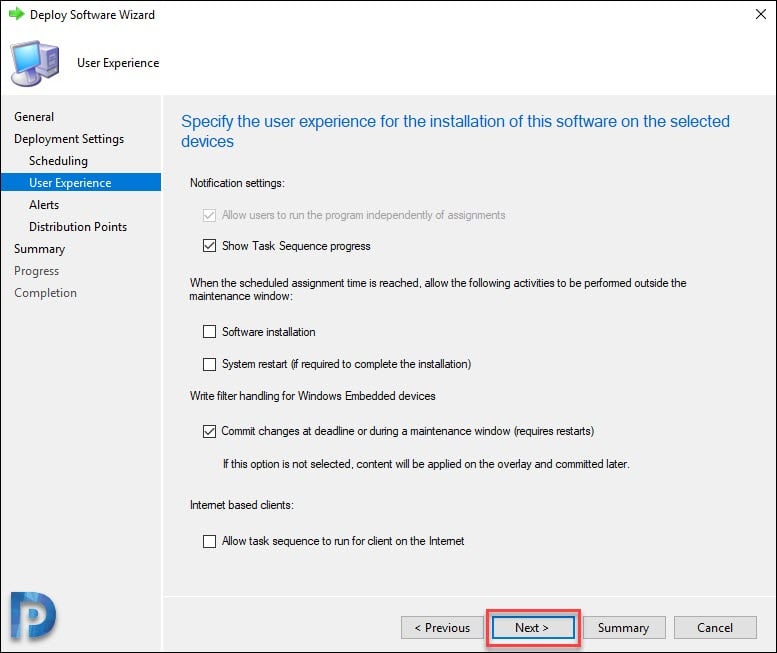
On User Experience page, click Next.
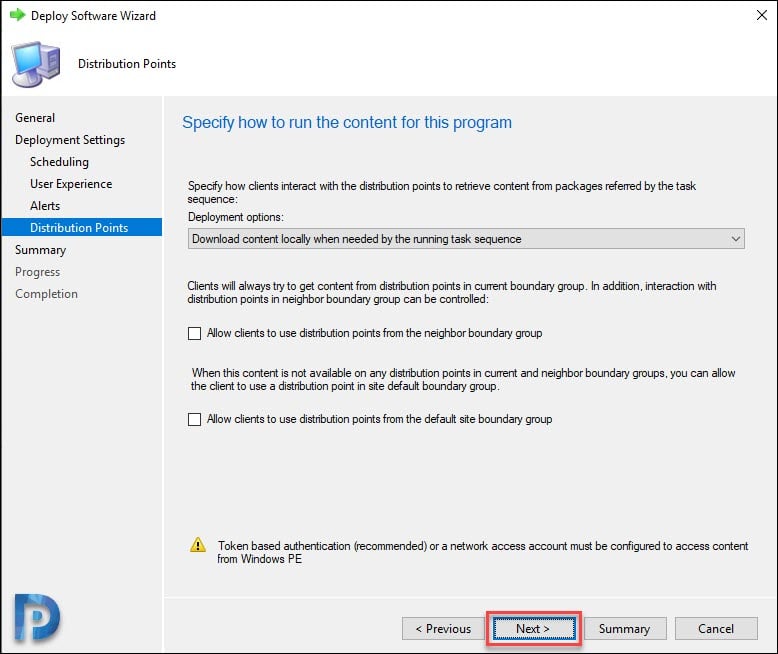
Under Deployment options, select Download content locally when needed by the running task sequence.
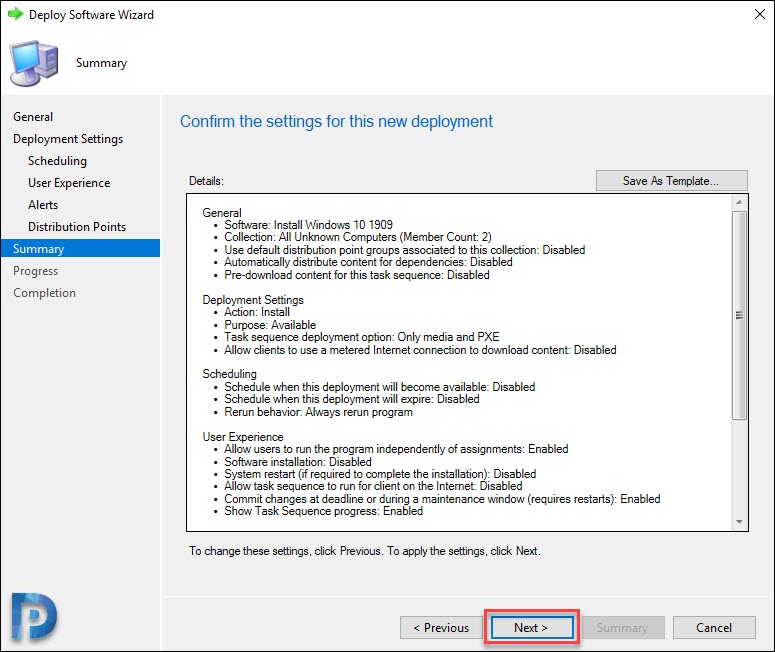
Verify the settings on Summary page and click Next.
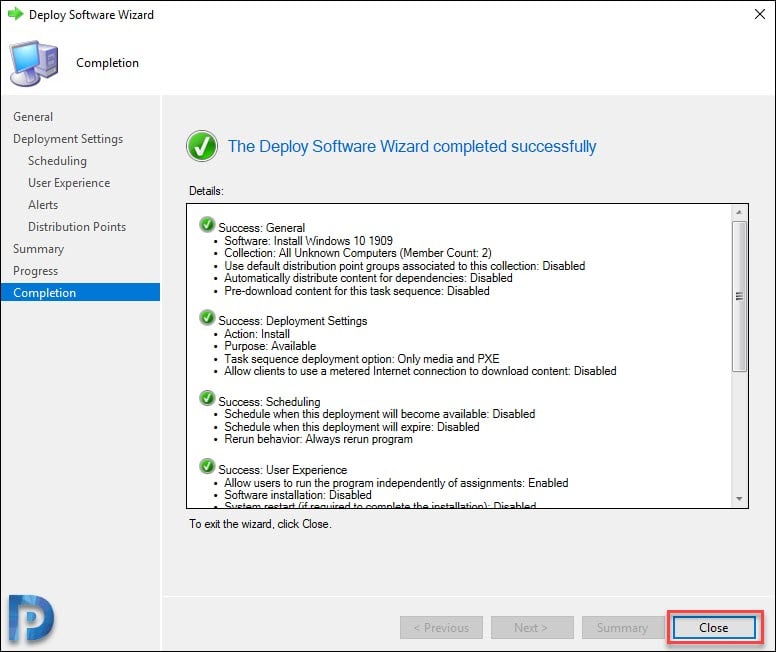
On the completion page click Close.
Step 5 – Windows 10 1909 Deployment
I assume you have enabled PXE under distribution point server properties. In addition to that ensure the boot images are distributed to distribution points. If you want to know how to do that, refer this guide – https://www.prajwaldesai.com/boot-images-distribution-point-configuration-osd-sccm-2012-r2/
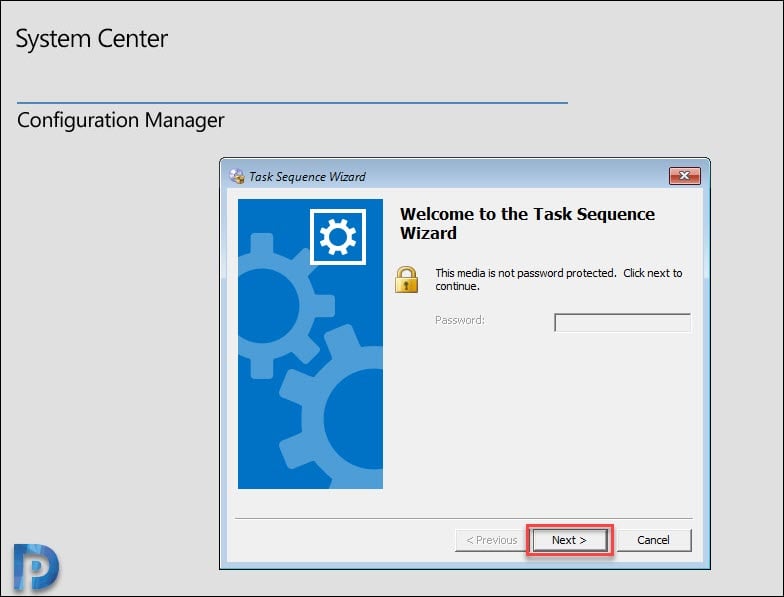
PXE boot the client computer or VM and allow it to boot from network. Wait until the boot image loads. If you have set a TS password, enter it or just click Next.
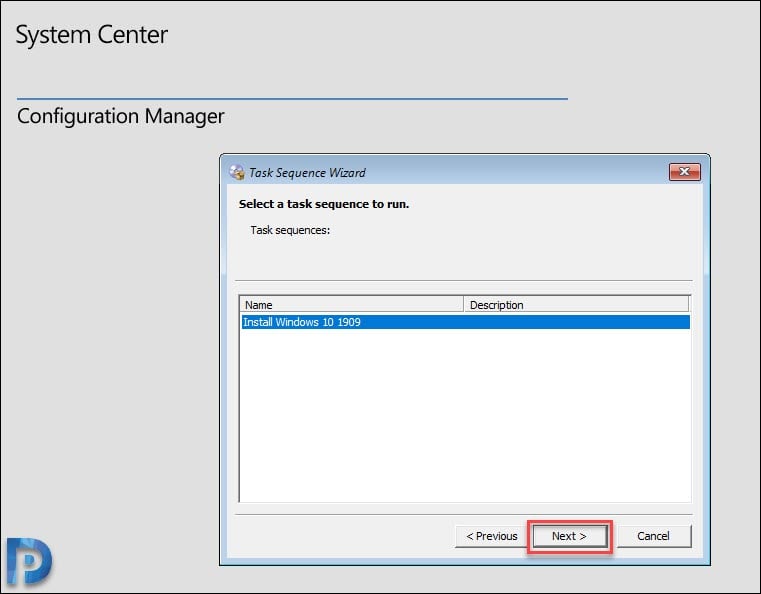
Select the Windows 10 1909 task sequence and click Next.
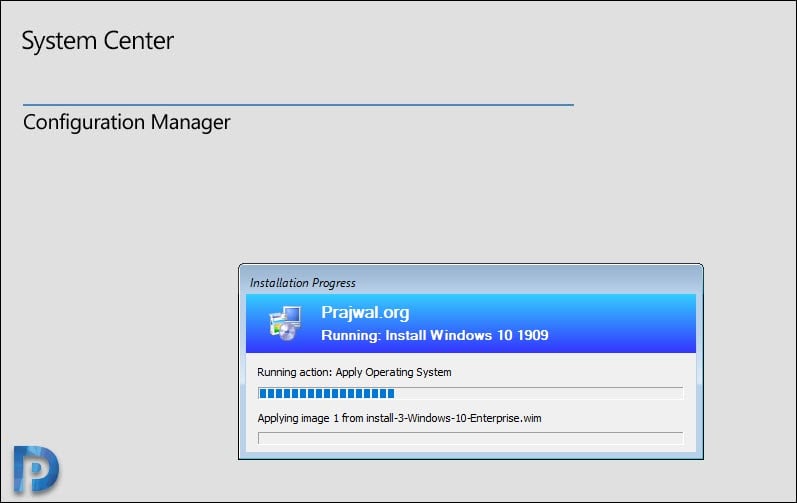
The below screenshot is taken at the step where TS applies the OS image.
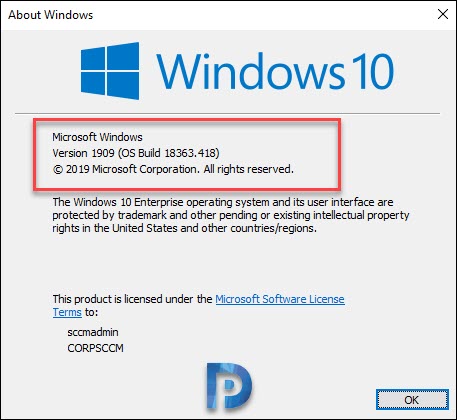
The task sequence execution is complete. Login to the Windows 10 computer and check the Windows 10 version. Go to Run and type Winver command.
We have successfully installed Windows 10 1909 OS build 18363.418.













Prajwal ,
Thanks you for the amazing helpfull content.
I know it now 2022; Is there an update for this? Is it still applicable using windows server 2022?
Thanks.
Mohammed
Hi Prajwal,
I imported Windows 10 21H2 OS and creates the OSD task sequence and everything seems to be working fine. At first, when the task sequence is completed, the machine restart but it hung at “Just a moment” then I force restart the machine. It then loads to the Windows login screen.
But I want the machine to boot to the OOBE so that a user can select language, location, connect to the internet and other preferences, etc. Do you know how can I make this happen?
Thank you for your great ideas and tips, much appreciated.
Hi Parajwal, import install.wim in SCCM in spite of selecting OS language English United kingdom it comes English (US) when I see properties then image .
Tank you
Do I need a dhcp server?
If you want to automatically assign IP address for your machines, yes you need a DHCP server.
I did the steps according to what you said
But my virtual machine does not boot via pxe
Tank you.
Do I need a dhcp server?
Hello Prajwal,
Thanks for your work in this post. Dumb question from a new to SCCM user. Is there no need to do a sysprep in this process? Or does SCCM Task Sequence have a step to generalize the image?
I am testing Windows 10v1909 in my lab and found the issue with Bitlocker enable step particularly for old models of lenovo. Error is like TPM root key is not present or incompatible ..But I was able turn on the Bitlocker manually after os completed. Can u help to resolve this issue…
I have a Hyper-V test bed, i have SCCM 2002 (released May 2020) i boot a new VM from the install media, and select the task sequence it appears to go through the process, applying the .WIM then falls over, I modified the Task sequence to “Make this the boot Disk” and now it doesn’t seem to apply the .WIM now, but falls over at the apply OS stage, when i check, with diskpart it doesn’t seem to have partitioned the disk at all 🙁
Dear Prajwal
many thanks for your instructions.
I need to set TS to Required for PXE to boot and start WinPE as my clients are in another location. Is it that possible?
Also following this instruction TS deploys successfully but my client didn’t join domain then after OS installation I have to join it manually with the same credentials. what is the problem?
Need some customization prestage of OS deployment i,e. Machine name, User affininty, Set Locale and Time zone etc via SCCM Task sequence.
thnx. I normally do the customization based on what TS offers like network setting and windows setting. about machine name and user affinity how can i do that. which steps of TS?
hello to all, after you imported the win 10 1909 OS above as operating system the OS version is 10.0.18362.418.
After the deployment the OS version build is 18363.418. any idea why this is happening ? I am trying to deploy drivers for windows 10 1909 querying the OS build version and it shows me 10.0.18362 which is identified as 1903 and not 1909.
The os build number for 1909 is starting from 18363.. any advice ?
Thank for the guide! how can we add applications and software, like 7zip, AdobeReaderDC, google chrome, Mozilla Firefox, ecc deploy it with windows 10 1909 and create an ISO for install via USB? thank a lot for answer.
Thanks for such a detailed set of instructions! I assist my department in maintaining several hundred devices and we would like to push 1909 to all of them. My question is, by using these directions will all devices get wiped or simply get upgraded? We would like data to be preserved and simply update. Thanks and keep up the great work!!
“Under Deployment Settings, select the purpose as Available” – I have to set it to Required for PXE to boot and start WinPE. Do you you have any suggestions?
I am getting errors on the Add OS Image wizard. Has anyone else experienced this issue? I select Pro or Enterprise when extracting a specific image index.
Error: Data Source Information
• Source location: \\epfile01\Software\Microsoft\Operating Systems\W10\1909\sources\install.wim
Error: Index Export Information
• Image Index: 3
• Image Index Name: Windows 10 Enterprise
• Destination Location: \\ImageLocation\Microsoft\Operating Systems\W10\1909\sources\install-3-Windows-10-Enterprise.wim
Error: Package Information
• Name: Windows 10 1909 Enterprise
• Version: 1909
Error: Errors
• The SMS Provider reported an error.
• ConfigMgr Error Object:
instance of SMS_ExtendedStatus
{
• Description = “Failed to export a single index to destination from a source WIM file”;
• ErrorCode = 1078462229;
• File = “..\\sspbootimagepackage.cpp”;
• Line = 5040;
• ObjectInfo = “DISM.EXE”;
• Operation = “ExecMethod”;
• ParameterInfo = “SMS_BootImagePackage”;
• ProviderName = “WinMgmt”;
• StatusCode = 2147749889;
};
Now if I do not choose a specific index it adds just fine. However it initially is named with W10 Education in the title and within the properties>images tab, it shows image 1 – Windows 10 Education. If I try to change it to 3, it reverts to 1 when I reopen the properties.
Hi,
I’m getting the same error. Did you find any solution ?
Thanks !
Trying to remember my steps but I believe I just added as is. In the Task Sequence I specified the version of Windows 10 and haven’t had any issues.
Recently (accidentally) ran into this myself – make sure that the share you are reaching out to for the expanded ISO has WRITE access. Part of this process creates a new install.wim file in the source folder/share in order to succeed. Hope this helps!
Thanks for the comment.
This SMSProv.log file (located: C:\Program Files\Microsoft Configuration Manager\Logs) showed the following:
ERROR> Error 5 returned to execute the command line: “C:\Program Files (x86)\Windows Kits\10\Assessment and Deployment Kit\Deployment Tools\amd64\DISM\dism.exe” /Export-Image /SourceImageFile:”\\SERVERNAME\Deployment\Win10-20H2-Wim\install.wim” /SourceIndex:3 /DestinationImageFile:”\\SERVERNAME\Deployment\Win10-20H2-Wim\install-3-Windows-10-Enterprise.wim”
I opened CMD (as admin), changed directory to “C:\Program Files (x86)\Windows Kits\10\Assessment and Deployment Kit\Deployment Tools\amd64\DISM” and ran the latter part of this error message: dism.exe /Export-Image /SourceImageFile:”\\SERVERNAME\Deployment\Win10-20H2-Wim\install.wim” /SourceIndex:3 /DestinationImageFile:”\\SERVERNAME\Deployment\Win10-20H2-Wim\install-3-Windows-10-Enterprise.wim”
The CMD window then began to extract this file and placed it in my Win10-20H2-Wim folder on my network share.
This must have been a permission issue that I could not figure out so running it manually is a workaround.
I have a basic task sequence like this.
The Install Operating System section runs but everything past Setup Windows and Configuration manager client fails. It just reboots into Windows. There is no SCCM client installed. The SMST log just stops but not with any errors.
Have you modified the setup windows and configmgr step in TS ?.
Hey Prajwal
Thanks alot for sharing thew step by step procedure.
Glad to hear that.
Thanks for the great info as always Prajwal. I do have an issue with 1903/1909 SCCM deployments if anyone has seen this and maybe resolved it. My task sequence controls many configurations by setting reg keys in HKLM during the task sequence. Since 1903 and continuing in 1909. The steps that do this are hit or miss. I’ve tried PowerShell steps using a package, Running the script from the PowerShell step and wrapping them in an application installer and none are consistent. Going through the logs. All complete fine without errors and if I change out OS for 1809, everything is stable and the keys stick.
SCCM version is 1906 and I’m using a built image with Office preinstalled on it.
Where the logs aren’t telling me anything helpful and it’s inconsistent with what keys are there, after imaging not sure where to go. Any help on this would be greatly appreciated.
Hi Prajwal! Awesome article! Thank you.
Do you maybe know how to automatic assign first free machine name from AD when adding machine into Domain OU?
I have this sorted over WDS but don’t know how to do it when deploying over SCCM.
Thank you.
Regards,
Darko
Hi Prajwal,
Do you know where i can install the windows 10 enterprise edition iso files? Thanks
VLSC or MSDN.
Amazing post with clear instruction. Thanks Prajwal.
Thank you 🙂
Awesome Doc
Thank you Rajneesh 🙂
Hi Prajwal
Using Windows 10 servicing plan we can upgrade windows version with higher version, So has Microsoft released feature updates for 1909 ?
We are having issues with adding the 1903 language pack to 1909 (and also on the newer 1903 versions). The issues are that you can’t use Windows search and in the edge browser some of the text in the header is showing as square symbols. Hope MS fix this soon.
The 1911 update fixes the issues. 🙂
You mean SCCM 1910 ?.
Isnt Fixt in 1910. I have the same Problem.
Thank you for the effort made to educate us.
All the best of luck.
Thank you Hussain 🙂
Lol, come on.. you know it’s really not that simple… driver handling? Languages? Multi domain and numerous OU’s? The list goes on… and, then, this is bare metal. Try to do a smooth feature upgrade from, say, 1709 to 1809 ..or to 1909…. Microsoft really turned feature updates into a debacle. There’re trying to fix it now, but unless you started fresh in the enterprise at 1903, get ready for a fun ride. They should have made Win10 enterprise ready from the start.
Fully agree, will be good to look at solutions for described above scenarios
Hello,
Why you write about 1903 on the beginning of the article ?
“Step 1 – Add Windows 10 1903 Operating System Image”
Regards.
Red.
I have corrected it. Thank you.
How do you deal with model specific drivers or do you let Windows Updates pull them down?
In the task sequence you are add a step to detect the laptop model number using WMI query and deploy the drivers.
Hello Prajwal,
thank you for your post. I tried a new deployment task sequence at a customer’s site and while testing the PXE deployment on a VMware VM I saw that there are two additional pages after deployment complaining about the lack of an internet connection (due to missing proxy configuration). The customer has a proxy that is configured by GPO later after deployment and this page can be skipped, but it’s not really nice.
Can these new pages be skipped during automated deployment?
Thanks in advance, best regards,
Markus